Page 190 of 416

188
308_en_Chap05_visibilite_ed01-2015
Halogen headlamps"Full LeD "
headlamps
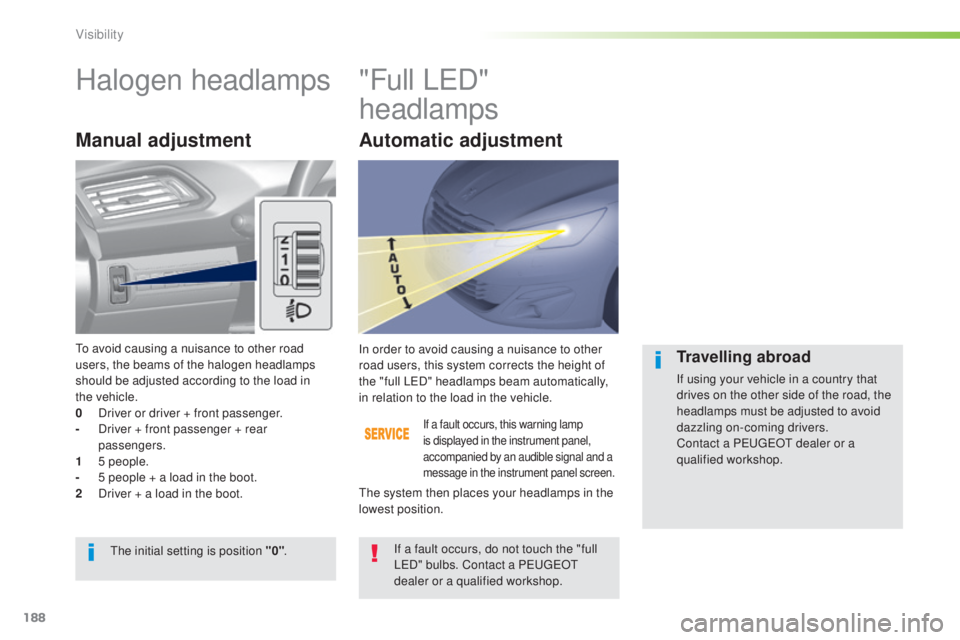
Manual adjustment
If a fault occurs, this warning lamp
is displayed in the instrument panel,
accompanied by an audible signal and a
message in the instrument panel screen.
In order to avoid causing a nuisance to other
road users, this system corrects the height of
the "full L
e
D
" headlamps beam automatically,
in relation to the load in the vehicle.
If a fault occurs, do not touch the "full
L
eD
" bulbs. Contact a P
e
uge
Ot
dealer or a qualified workshop.
th
e initial setting is position "0" .
th
e system then places your headlamps in the
lowest position.Travelling abroad
If using your vehicle in a country that
drives on the other side of the road, the
headlamps must be adjusted to avoid
dazzling on-coming drivers.
Contact a P
e
uge
Ot
dealer or a
qualified workshop.
to a
void causing a nuisance to other road
users, the beams of the halogen headlamps
should be adjusted according to the load in
the
vehicle.
0
D
river or driver + front passenger.
-
D
river + front passenger + rear
passengers.
1
5
people.
-
5 p
eople + a load in the boot.
2
D
river + a load in the boot.
Automatic adjustment
Visibility
Page 192 of 416

190
308_en_Chap05_visibilite_ed01-2015
Rear wiper
If a significant accumulation of snow or
ice is present, or when using a bicycle
carrier on the boot, deactivate the
automatic rear wiper.
Park.
Intermittent wipe.
Wash-wipe (set duration). F
P
ull the windscreen wiper stalk towards
you. t
he
screenwash then the wipers
operate for a fixed period.
th
e headlamp wash is only activated if the
dipped headlamps are on and the vehicle is
moving .
With daytime running lamps, to activate the
headlamp wash, position the lighting stalk in
the dipped beam position.
Windscreen and headlamp
wash
On vehicles fitted with digital air
conditioning, any action on the
windscreen wash control results in
temporary closing of the air intake to
avoid odours inside the passenger
compartment.
Rear wiper selection ring:
th
is function is activated by default.
F
I
n the secondary page, press "
Vehicle
settings ".
F
Sel
ect the "
Driving assistance "
menu.
Reverse gear
When reverse gear is engaged, the rear wiper
will come into operation automatically if the
windscreen wipers are operating.
Activation or deactivation of this automatic
function can be set in the touch screen.
Visibility
Page 193 of 416

191
308_en_Chap05_visibilite_ed01-2015
Screenwash/headlamp wash
level low
In the case of vehicles fitted with headlamp
washers, when the fluid reservoir low level
is reached this warning lamp comes on in
the instrument panel, accompanied by an
audible signal and a message.
Automatic rain sensitive windscreen wipers
Switching on
Briefly push the control stalk downwards.
A wiping cycle confirms that the
instruction has been accepted.
th
is warning lamp comes on in the
instrument panel and a message is
displayed.Briefly push the control stalk downwards
again, or place the control stalk in
another position (Int, 1 or 2).
th
is warning lamp goes off in the
instrument panel and a message is
displayed.
Switching off
the automatic rain sensitive windscreen
wipers must be reactivated by pushing
the control stalk downwards, if the
ignition has been off for more than
one
minute.
th
e warning lamp comes on when the ignition
is switched on, or every time the stalk is
operated, until the reservoir is refilled.
Next time you stop, refill the screenwash /
headlamp wash reservoir.
th
e windscreen wipers operate automatically, without any action on the part of the driver, if rain is
detected (sensor behind the rear view mirror), adapting their speed to the intensity of the rainfall.
5
Visibility
Page 245 of 416
243
308_en_Chap07_info-pratiques_ed01-2015
Changing a bulb
Front lamps
Model with "full LED" technology
headlamps
1. Daytime running lamps / sidelamps (light emitting diodes - LEDs).
2.
D
ipped beam headlamps (light emitting
diodes - full LEDs).
3.
M
ain beam headlamps (light emitting
diodes - full LEDs).
4.
D
irection indicators (PY21-21W).
Model with halogen headlamps
1. Dipped beam headlamps (H7-55W).
2. M ain beam headlamps (HB3).
3.
D
irection indicators (PY21-21W).
4.
D
aytime running lamps / sidelamps
(light emitting diodes - LEDs).
For H7 type bulbs with lugs... take care to
observe their correct installation so as to
ensure the best lighting performance.
Front fog lamps (H11)
Direction indicators
(GT version)
For the replacement of this type of LeD l amp,
contact a Pe ugeOt dealer or a qualified
workshop.
A replacement kit for the L
eD
s is available from
P
e
uge
Ot d
ealers.
7
Practical information
Page 246 of 416

244
308_en_Chap07_info-pratiques_ed01-2015
In some weather conditions (e.g. low
temperature or humidity), the presence
of misting on the internal sur face of the
glass of the headlamps and rear lamps
is normal; it disappears after the lamps
have been on for a few minutes.th
e headlamps are fitted with
polycarbonate glass with a protective
coating:
F
d
o not clean them using a dr y
or abrasive cloth, nor with a
detergent or solvent product,
F
u
se a sponge and soapy water or a
pH neutral product,
F
w
hen using a high pressure washer
on persistent marks, do not keep
the lance directed towards the
lamps or their edges for too long,
so as not to damage their protective
coating and seals.
Changing a bulb should only be done
after the headlamp has been switched
off for several minutes (risk of serious
burns).
F
D
o not touch the bulb directly with
your fingers, use a lint-free cloth.
It is imperative to use only anti-
ultraviolet (
uV
) type bulbs to avoid
damaging the headlamp.
Always replace a failed bulb with a
new bulb with the same type and
specification.
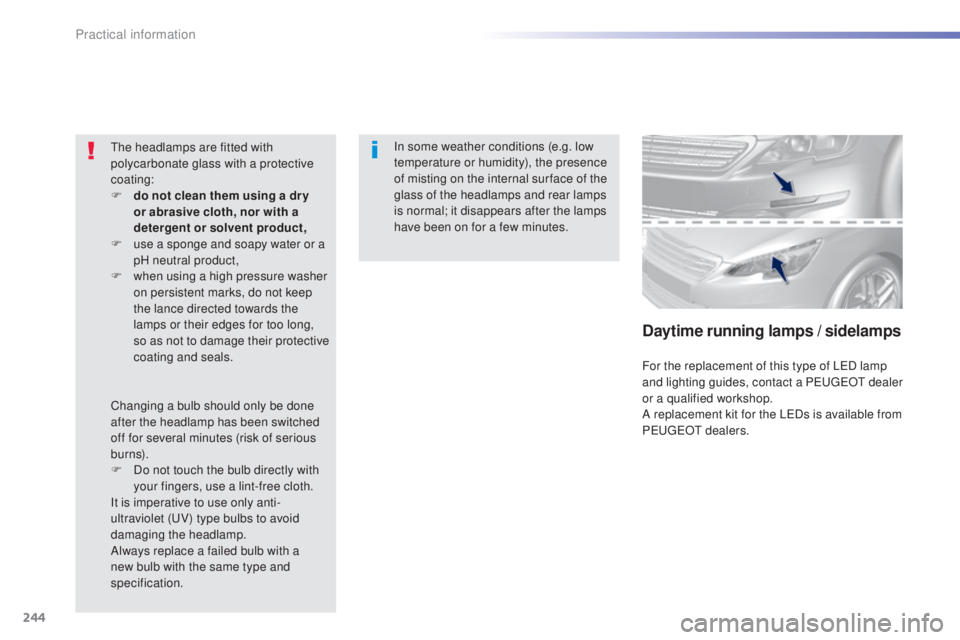
Daytime running lamps / sidelamps
For the replacement of this type of LeD l amp
and lighting guides, contact a Pe ugeOt dealer
or a qualified workshop.
A replacement kit for the L
eD
s is available from
P
e
uge
Ot d
ealers.
Practical information
Page 247 of 416

245
308_en_Chap07_info-pratiques_ed01-2015
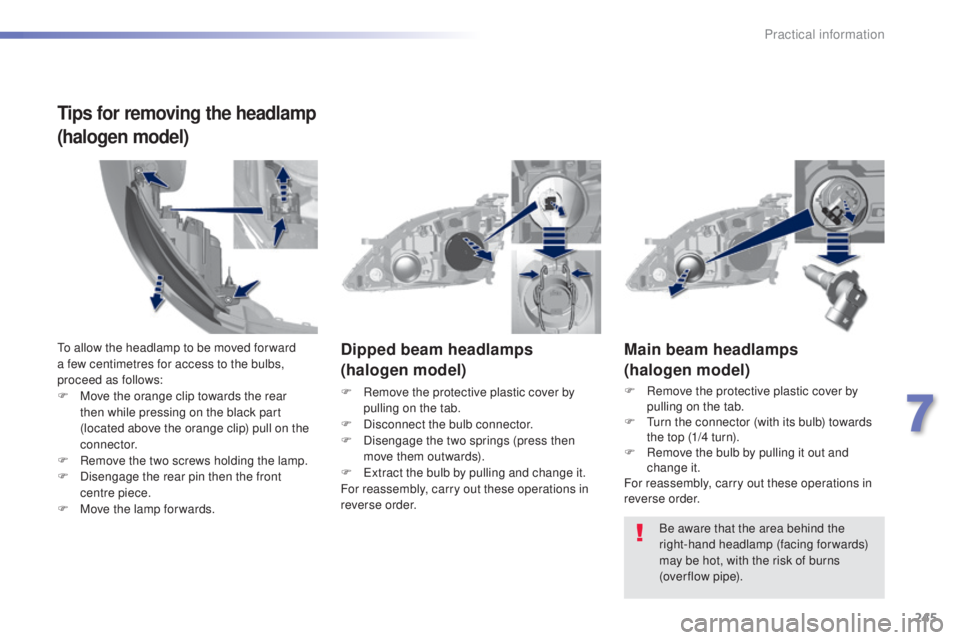
Main beam headlamps
(halogen model)
F Remove the protective plastic cover by pulling on the tab.
F
t
u
rn the connector (with its bulb) towards
the top (1/4 turn).
F
R
emove the bulb by pulling it out and
change it.
For reassembly, carry out these operations in
reverse order.
Dipped beam headlamps
(halogen model)
F Remove the protective plastic cover by
pulling on the tab.
F
D
isconnect the bulb connector.
F
D
isengage the two springs (press then
move them outwards).
F
e
x
tract the bulb by pulling and change it.
For reassembly, carry out these operations in
reverse order.
Be aware that the area behind the
right-hand headlamp (facing forwards)
may be hot, with the risk of burns
(over flow
pipe).
to a
llow the headlamp to be moved for ward
a few centimetres for access to the bulbs,
proceed as follows:
F
M
ove the orange clip towards the rear
then while pressing on the black part
(located above the orange clip) pull on the
connector.
F
R
emove the two screws holding the lamp.
F
D
isengage the rear pin then the front
centre piece.
F
M
ove the lamp for wards.
Tips for removing the headlamp
(halogen model)
7
Practical information
Page 259 of 416
257
308_en_Chap07_info-pratiques_ed01-2015
Engine compartment fuses
Access to the fuses
F unclip the cover.
F C hange the fuse (see corresponding
paragraph).
F
W
hen you have finished, close the cover
carefully to ensure correct sealing of
the
fusebox. Fuse
N° Rating
(A) Functions
F19 30Front wiper motor.
F20 15Front and rear screenwash pumps.
F21 20Headlamp wash.
F22 15Horn.
F23 15Right hand main beam headlamp.
F24 15Left hand main beam headlamp.
th
e fusebox is placed in the engine
compartment near the battery.
Version 1 (FULL)
7
Practical information
Page 260 of 416
258
308_en_Chap07_info-pratiques_ed01-2015
Version 2 (ECO)
FuseN° Rating
(A) Functions
F16 15Front foglamps.
F18 10Right hand main beam headlamp.
F19 10Left hand main beam headlamp.
F25 40Headlamp wash relay (aftermarket fitment).
F29 30Front wiper motor.
F30 80Pre-heater plugs (Diesel), additional programmable heating
(aftermarket fitment), headlamp wash pump.
Practical information