2015 PEUGEOT 108 park assist
[x] Cancel search: park assistPage 4 of 271

.
.
108_en_Chap00a_sommaire_ed01-2015
exterior lighting control stalk 93
A utomatic illumination of headlamps
9
6
Headlamp adjustment
9
8
Courtesy lamp
9
8
Boot lamp
9
8
Wiper control stalk
9
9
Visibility
Instrument panels 1 0
Display screens
1
2
Indicator and warning lamps
1
4
Indicators
25
tr
ip computer
2
6
Setting the time
2
8
MonitoringOver view
Keys
30
"Keyless e
n
try and Starting" system
3
3
Doors
37
Boo
t
38
Front electric windows
4
0
Rear quarter windows
4
0
ele
ctric fabric roof
4
1
Access
Front seats 4 5
Rear seats
4
7
Mirrors
4
9
Steering wheel adjustment
5
0
Ventilation
5
1
Heating
53
Manual air conditioning
5
4
Automatic air conditioning
5
6
Front demist - defrost
5
9
Rear screen demist - defrost
6
0
Comfort
Interior fittings 61
Rear parcel shelf
6
5
Boot fittings
6
6
Fittings
Driving recommendations 68
Starting - switching off the engine with the key 69
Starting - switching off the engine with the
Keyless
e
n
try and Starting system
7
0
Manual parking brake
7
4
5-speed manual gearbox
7
4
e
tg
el
ectronic gearbox
7
5
ge
ar shift indicator
7
9
Hill start assist
8
0
Stop & Start
8
1
Speed limiter
8
4
Reversing camera
9
0
Lane departure warning system
9
1
Driving
e
co-driving
Contents
Page 80 of 271

78
108_en_Chap05_conduite_ed01-2015
to engage reverse, the vehicle must be
stationary with your foot on the brake pedal.
F
Sel
ect position R .
Reverse
there is an audible signal on engaging reverse.
th
e vehicle can be stopped whatever the
position of the gear selector ( N, E or R ).
However, there is an audible signal on opening
the driver's door if the gear selector is not at
position N .
Switching off
When the vehicle is stopped with the
engine running, always put the gear
selector to neutral N .
th
ere is a continuous audible signal
if you turn the ignition switch to " OFF"
with the vehicle in 2
nd, 3rd, 4th or 5th g e a r.
In this case return the ignition switch
to " ON ", move the gear selector to
position
N , then to position E , M or R,
then turn the ignition switch to " OFF". On a slope, use the brakes to
immobilise the vehicle and place the
gear selector in position N
, E or R.
With the ignition on, illumination
of this warning lamp indicates a
gearbox fault.
Contact a P
e
uge
Ot
dealer or a
qualified workshop.
If N
i
s flashing in the instrument panel
accompanied by an audible signal for
a long time:
Operating faults
In all cases, it is essential that you
apply the parking brake to immobilise
the vehicle.
Before doing anything under the
bonnet, check that the gear selector is
in neutral N and the parking brake is
applied.
Limits of operation
On a gradient, or when hill start assist is
activated, never hold the vehicle using the
accelerator : you could damage the clutch.
In these situations there is an audible signal.
F
M
ove the gear selector to position N .
F
W
ait 15 minutes to allow the clutch to cool
down before setting off. -
c
heck that the ignition switch is at the "
ON"
position,
-
p
lace the gear selector at N
, then move it
to E , M or R .
If 1 is flashing in the instrument panel:
-
p
lace the gear selector at E or M
, then
move it to N .
If R is flashing in the instrument panel:
-
p
lace the gear selector at R, then move it
to N .
Driving
Page 82 of 271

80
108_en_Chap05_conduite_ed01-2015
Hill start assist
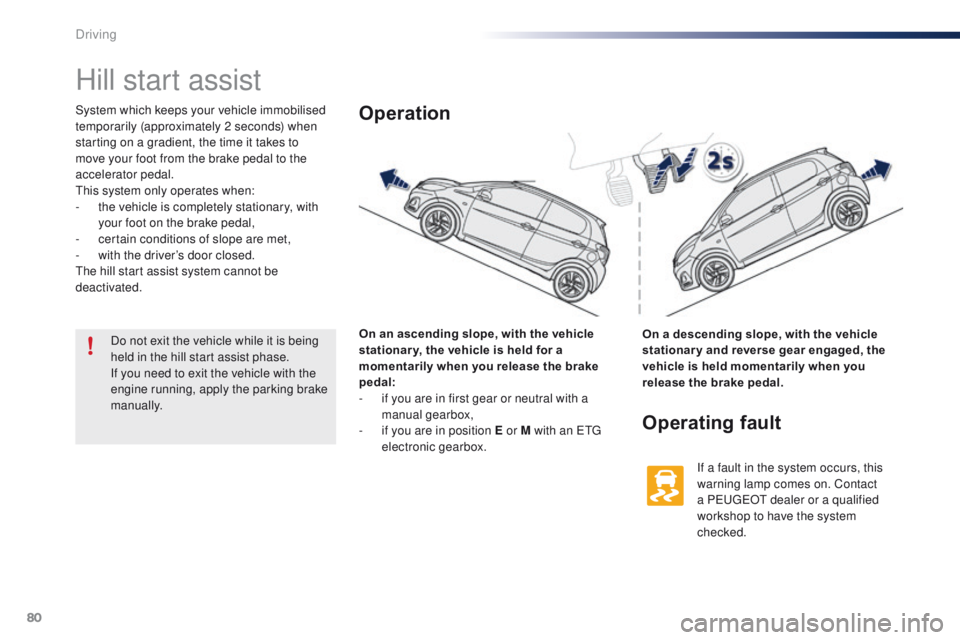
System which keeps your vehicle immobilised
temporarily (approximately 2 seconds) when
starting on a gradient, the time it takes to
move your foot from the brake pedal to the
accelerator pedal.
th
is system only operates when:
-
t
he vehicle is completely stationary, with
your foot on the brake pedal,
-
c
ertain conditions of slope are met,
-
w
ith the driver’s door closed.
th
e hill start assist system cannot be
deactivated.
On an ascending slope, with the vehicle
stationar y, the vehicle is held for a
momentarily when you release the brake
pedal:
-
i
f you are in first gear or neutral with a
manual gearbox,
-
i
f you are in position E or M with an etg
electronic gearbox.Operation
On a descending slope, with the vehicle
stationar y and reverse gear engaged, the
vehicle is held momentarily when you
release the brake pedal.
Operating fault
If a fault in the system occurs, this
warning lamp comes on. Contact
a P
e
uge
Ot
dealer or a qualified
workshop to have the system
checked.
Do not exit the vehicle while it is being
held in the hill start assist phase.
If you need to exit the vehicle with the
engine running, apply the parking brake
manually.
Driving
Page 83 of 271

81
108_en_Chap05_conduite_ed01-2015
Stop & Start (Vti 68 S&S engine)
Operation
Going into engine STOP mode
this indicator lamp comes on in the
instrument panel and the engine
goes into standby automatically:
-
w
hen stationary, in neutral, and you
release the clutch pedal.
Never refuel with the engine in S
tO
P
mode; you must switch off the ignition
with the button. For smoother operation, during
parking manoeuvres S
tO
P mode is
not available for a few seconds after
coming out of reverse gear.
S
tO
P mode does not affect the
vehicle's systems, such as for example,
braking, power steering...
Special cases: STOP mode not
available
StOP mode is not invoked principally when:
- t he driver's door is open,
-
t
he driver's seat belt is not fastened,
-
t
he engine is needed to maintain a
comfortable temperature in the passenger
compartment,
-
d
emisting is active,
-
s
ome special conditions (battery charge,
engine temperature, braking assistance,
vehicle stopped on a steep gradient, high
altitude...) where the engine is needed to
assure control of a system.
th
e Stop & Start
system puts the engine temporarily into standby - S
tO
P mode - during stops in the traffic (red lights, traffic jams, or other...). t
h
e
engine restarts automatically - S
tA
R
t
mode - as soon as you want to move off.
t
h
e restart takes place instantly, quickly and silently.
Per fect for urban use, the Stop & Start system reduces fuel consumption and exhaust emissions as well as the noise level when stationary.
Stop & Start time counters
A partial time counter counts the periods in
StO P mode during a journey.
It is displayed in the trip computer once the
Stop & Start acts.
Press one of the screen management buttons
to return to the previous display.
A global time counter counts the periods in
S
tO
P mode since the last reset.
When it is displayed, press one of the screen
management buttons to reset the counter.
5
Driving
Page 169 of 271

167
108_en_Chap09_info-pratiques_ed01-2015
towing the vehicle
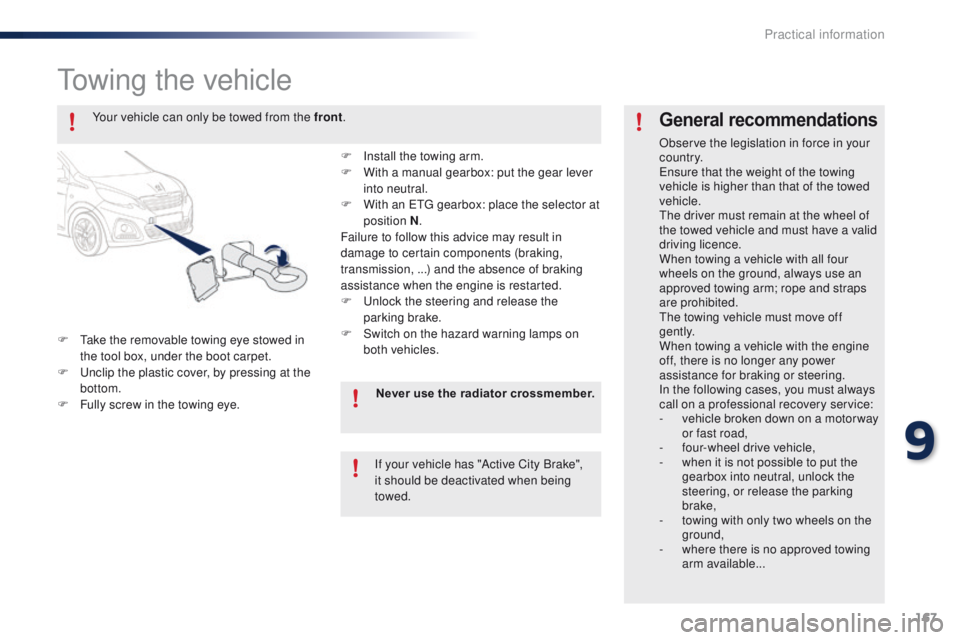
F take the removable towing eye stowed in the tool box, under the boot carpet.
F
u
n
clip the plastic cover, by pressing at the
bottom.
F
F
ully screw in the towing eye.
General recommendations
Observe the legislation in force in your
c o unt r y.
en
sure that the weight of the towing
vehicle is higher than that of the towed
vehicle.
th
e driver must remain at the wheel of
the towed vehicle and must have a valid
driving licence.
When towing a vehicle with all four
wheels on the ground, always use an
approved towing arm; rope and straps
are prohibited.
th
e towing vehicle must move off
g e nt l y.
When towing a vehicle with the engine
off, there is no longer any power
assistance for braking or steering.
In the following cases, you must always
call on a professional recovery service:
-
v
ehicle broken down on a motor way
or fast road,
-
f
our-wheel drive vehicle,
-
w
hen it is not possible to put the
gearbox into neutral, unlock the
steering, or release the parking
brake,
-
t
owing with only two wheels on the
ground,
-
w
here there is no approved towing
arm available...
Your vehicle can only be towed from the front
.
F
I
nstall the towing arm.
F
W
ith a manual gearbox: put the gear lever
into neutral.
F
W
ith an
etg
gearbox: place the selector at
position N .
Failure to follow this advice may result in
damage to certain components (braking,
transmission, ...) and the absence of braking
assistance when the engine is restarted.
F
u
n
lock the steering and release the
parking brake.
F
S
witch on the hazard warning lamps on
both vehicles.
Never use the radiator crossmember.
If your vehicle has "Active City Brake",
it should be deactivated when being
towed.
9
Practical information
Page 171 of 271

169
108_en_Chap09_info-pratiques_ed01-2015
Accessories
A wide range of accessories and genuine parts is available from the PeugeOt dealer network.th
ese accessories and parts are all suitable for your vehicle and benefit from Pe ugeOt' s recommendation and warranty.
"Transport solutions":
boot carpet, boot liner,
boot net, transverse roof bars, bicycle carrier,
ski carrier, roof boxes, boot dividers, ...
"Style":
ligne S body kit, ligne S personalised
mats, aluminium gear lever knob, alloy wheels,
exterior personalisation stickers, chrome side
mouldings, chrome mirror shells, door sill
finishers, personalised remote control shells, ... "Comfort":
air deflectors, insulated module,
sun blinds, scented air freshener, portable
ashtray, reading lamp, front and rear parking
sensors, centre armrest, cigarette lighter... "Security and safety": anti-theft alarm,
vehicle tracking system, snow chains, wheel
non-slip covers, wheel security bolts, child
seats, first aid kit, warning triangle, high
visibility vest, breathalyzer, fire extinguisher,
pet seat belt, foglamp kit, seat belt cutter/glass
hammer, ...
"Protection":
mats, mud flaps, vehicle cover,
seat covers, bumper protectors, ...
to p
revent the mat from becoming caught
under the pedals:
-
e
nsure that the mat is secured correctly,
-
n
ever fit one mat on top of another."Multimedia":
CD player, audio system,
speaker, semi-integral navigation systems,
hands-free kit, driving assistance systems,
230 V socket, rear multi-media support, DVD
players, portable satellite navigation system,
telephone/smartphone support, digital radio, ...
9
Practical information
Page 247 of 271

245
108_en_Chap13_recherche-visuelle_ed01-2015
Dashboard fuses 154-158
Instruments and controls
Opening the bonnet 1 72
Door mirrors
4
9
el
ectric windows
4
0
Courtesy lamp
9
8
Control for electric fabric roof
4
1
Rear view mirror
5
0
Sun visors
62
M
anual parking brake
7
4Heating, ventilation
5
1-53
Manual air conditioning
5
4-55
Automatic air conditioning
5
6 -58
Windscreen demist / defrost
5
9
Rear screen demist / defrost
6
0
7-inch touch screen
1
83 -222
Radio
2
23 -242
Setting the time
2
8, 29
Manual gearbox
7
4
e
tg
el
ectronic gearbox
7
5-78
ge
ar shift indicator
7
9
Stop & Start
8
1- 83
Hill start assist
8
0
12 V accessory socket
6 2uS
B port 6 3
Jack auxiliary socket
6
3
.
Visual search