2015 NISSAN VERSA NOTE display
[x] Cancel search: displayPage 4 of 24
2
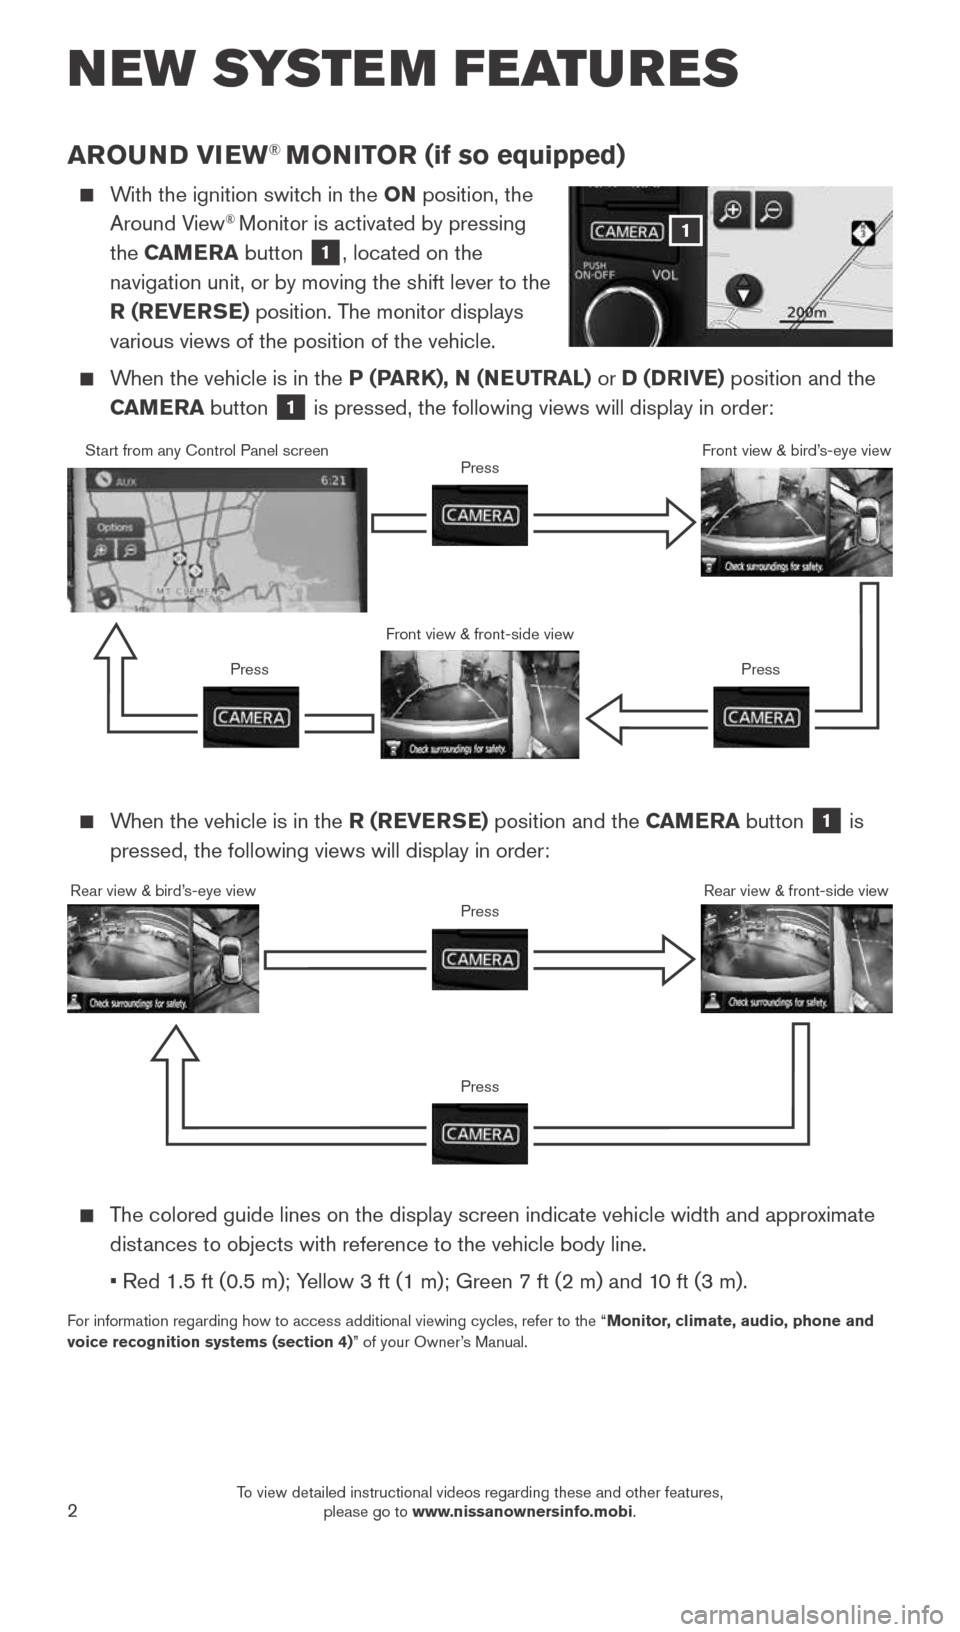
AROUND VIEW® MONITOR (if so equipped)
With the ignition switch in the ON position, the
Around View® Monitor is activated by pressing
the CAMERA button
1, located on the
navigation unit, or by moving the shift lever to the
R (REVERSE) position. The monitor displays
various views of the position of the vehicle.
When the vehicle is in the P (PARK), N (NEUTRAL) or D (DRIVE) position and the
CAMERA button
1 is pressed, the following views will display in order:
NEW SYSTEM FEATURES
When the vehicle is in the R (REVERSE) position and the CAMERA button
1 is
pressed, the following views will display in order:
The colored guide lines on the display screen indicate vehicle width and \
approximate
distances to objects with reference to the vehicle body line.
• Red 1.5 ft (0.5 m); Yellow 3 ft (1 m); Green 7 ft (2 m) and 10 ft (3 m).
For information regarding how to access additional viewing cycles, refer \
to the “ Monitor, climate, audio, phone and
voice recognition systems (section 4)” of your Owner’s Manual.
1
Start from any Control Panel screen
Front view & front-side viewPress
Press Press
Front view & bird’s-eye view
Rear view & bird’s-eye view
PressRear view & front-side viewPress
1921699_15c_Versa_Note_QRG_031615.indd 23/16/15 3:21 PM
To view detailed instructional videos regarding these and other features, please go to www.nissanownersinfo.mobi.
Page 5 of 24
3
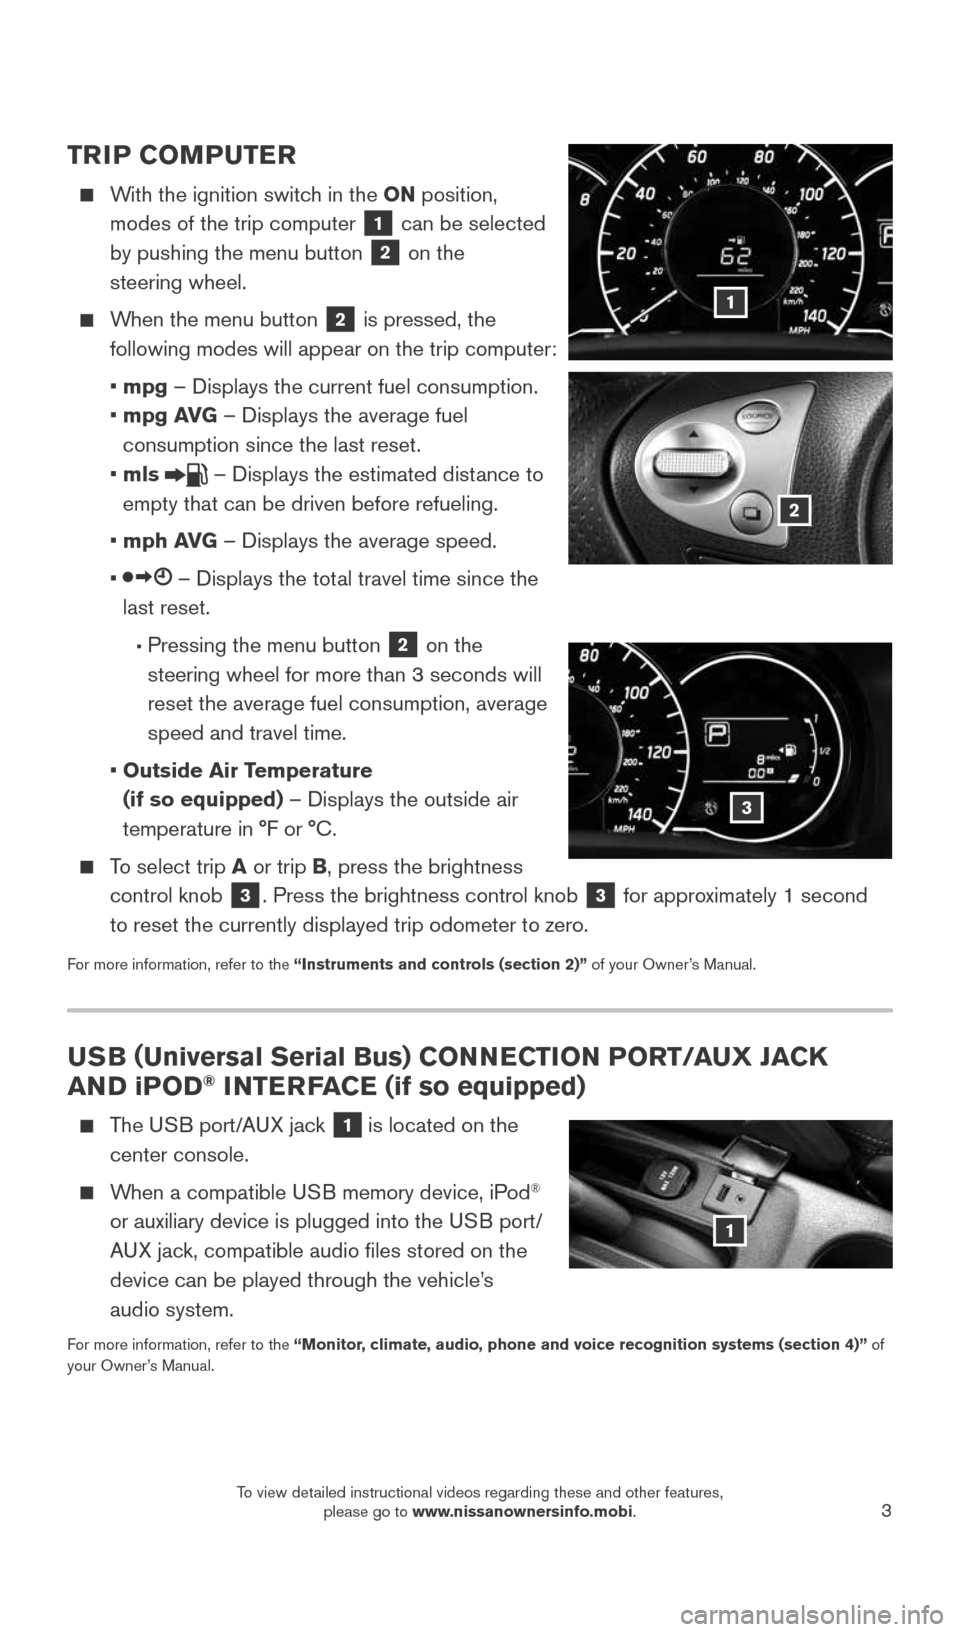
USB (Universal Serial Bus) CONNECTION PORT/AUX JACK
AND iPOD® INTERFACE (if so equipped)
The USB port/AUX jack 1 is located on the
center console.
When a compatible USB memory device, iPod®
or auxiliary device is plugged into the USB port/
AUX jack, compatible audio files stored on the
device can be played through the vehicle’s
audio system.
For more information, refer to the “Monitor, climate, audio, phone and voice recognition systems (section 4)” of
your Owner’s Manual.
1
TRIP COMPUTER
With the ignition switch in the ON position,
modes of the trip computer
1 can be selected
by pushing the menu button 2 on the
steering wheel.
When the menu button 2 is pressed, the
following modes will appear on the trip computer:
• mpg – Displays the current fuel consumption.
• mpg AVG – Displays the average fuel
consumption since the last reset.
• mls
– Displays the estimated distance to
empty that can be driven before refueling.
• mph AVG – Displays the average speed.
•
– Displays the total travel time since the
last reset.
• Pressing the menu button 2 on the
steering wheel for more than 3 seconds will
reset the average fuel consumption, average
speed and travel time.
• Outside Air Temperature
(if so equipped) – Displays the outside air
temperature in °F or °C.
To select trip A or trip B, press the brightness
control knob
3. Press the brightness control knob 3 for approximately 1 second
to reset the currently displayed trip odometer to zero.
For more information, refer to the “Instruments and controls (section 2)” of your Owner’s Manual.
1
2
3
1921699_15c_Versa_Note_QRG_031615.indd 33/16/15 3:21 PM
To view detailed instructional videos regarding these and other features, please go to www.nissanownersinfo.mobi.
Page 6 of 24
4
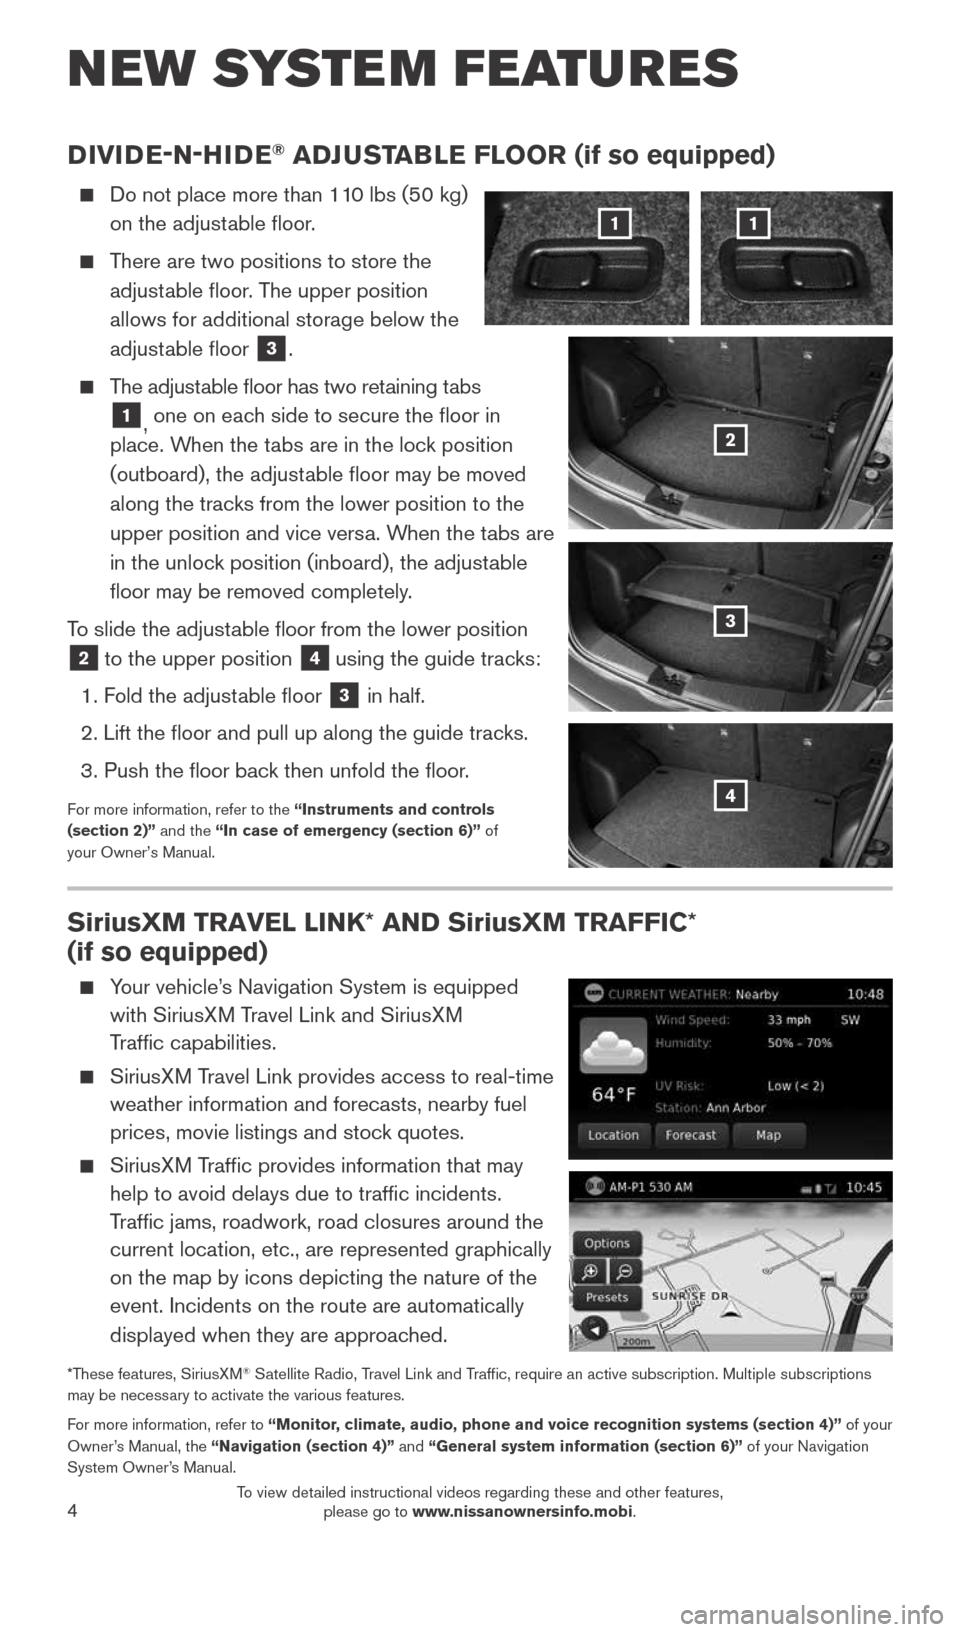
DIVIDE-N-HIDE® ADJUSTABLE FLOOR (if so equipped)
Do not place more than 110 lbs (50 kg)
on the adjustable floor.
There are two positions to store the
adjustable floor. The upper position
allows for additional storage below the
adjustable floor
3.
The adjustable floor has two retaining tabs
1, one on each side to secure the floor in
place. When the tabs are in the lock position
(outboard), the adjustable floor may be moved
along the tracks from the lower position to the
upper position and vice versa. When the tabs are
in the unlock position (inboard), the adjustable
floor may be removed completely.
To slide the adjustable floor from the lower position
2 to the upper position
4 using the guide tracks:
1. Fold the adjustable floor
3 in half.
2. Lift the floor and pull up along the guide tracks.
3. Push the floor back then unfold the floor.
For more information, refer to the “Instruments and controls
(section 2)” and the “In case of emergency (section 6)” of
your Owner’s Manual.
NEW SYSTEM FEATURES
11
2
3
4
SiriusXM TRAVEL LINK* AND SiriusXM TRAFFIC*
(if so equipped)
Your vehicle’s Navigation System is equipped
with SiriusXM Travel Link and SiriusXM
Traffic capabilities.
SiriusXM Travel Link provides access to real-time
weather information and forecasts, nearby fuel
prices, movie listings and stock quotes.
SiriusXM Traffic provides information that may
help to avoid delays due to traffic incidents.
Traffic jams, roadwork, road closures around the
current location, etc., are represented graphically
on the map by icons depicting the nature of the
event. Incidents on the route are automatically
displayed when they are approached.
*These features, SiriusXM® Satellite Radio, Travel Link and Traffic, require an active subscription. Multiple subscriptions
may be necessary to activate the various features.
For more information, refer to “Monitor, climate, audio, phone and voice recognition systems (section 4)” of your
Owner’s Manual, the “Navigation (section 4)” and “General system information (section 6)” of your Navigation
System Owner’s Manual.
1921699_15c_Versa_Note_QRG_031615.indd 43/16/15 3:21 PM
To view detailed instructional videos regarding these and other features, please go to www.nissanownersinfo.mobi.
Page 8 of 24
6
ESSE NTIAL I N FOR MATION
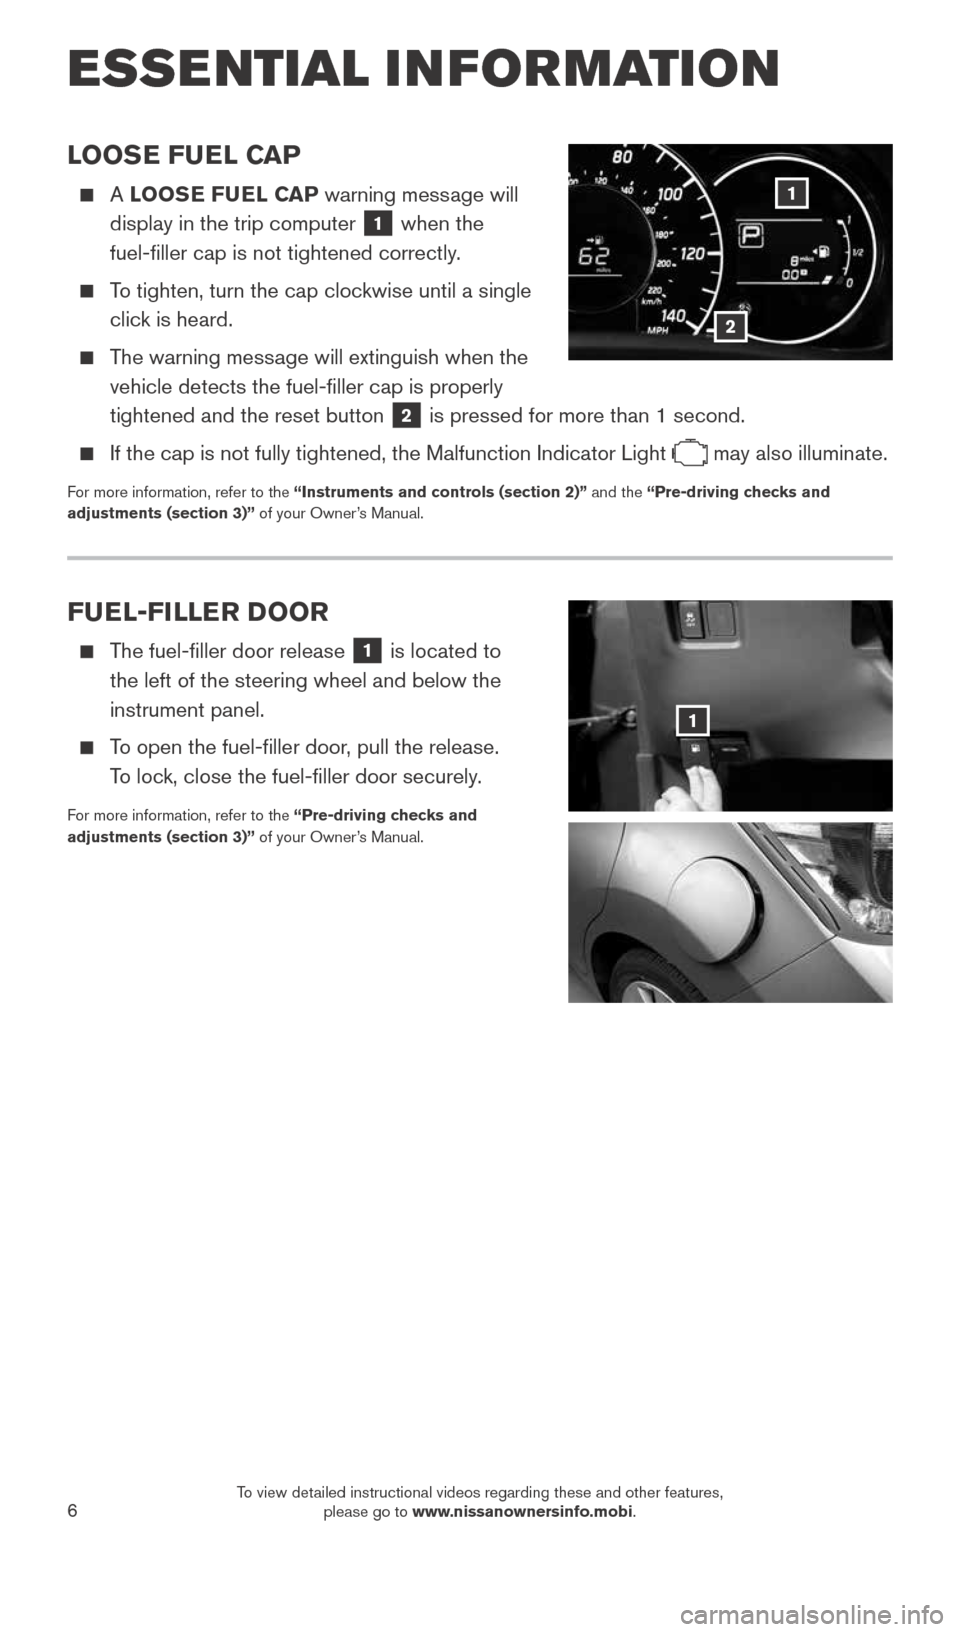
LOOSE FUEL CAP
A LOOSE FUEL CAP warning message will
display in the trip computer
1 when the
fuel-filler cap is not tightened correctly.
To tighten, turn the cap clockwise until a single
click is heard.
The warning message will extinguish when the
vehicle detects the fuel-filler cap is properly
tightened and the reset button
2 is pressed for more than 1 second.
If the cap is not fully tightened, the Malfunction Indicator Light
may also illuminate.
For more information, refer to the “Instruments and controls (section 2)” and the “Pre-driving checks and
adjustments (section 3)” of your Owner’s Manual.
FUEL-FILLER DOOR
The fuel-filler door release
1 is located to
the left of the steering wheel and below the
instrument panel.
To open the fuel-filler door, pull the release.
To lock, close the fuel-filler door securely.
For more information, refer to the “Pre-driving checks and
adjustments (section 3)” of your Owner’s Manual.
1
2
1
1921699_15c_Versa_Note_QRG_031615.indd 63/16/15 3:21 PM
To view detailed instructional videos regarding these and other features, please go to www.nissanownersinfo.mobi.
Page 9 of 24
7
CLOCK SET/ADJUSTMENT
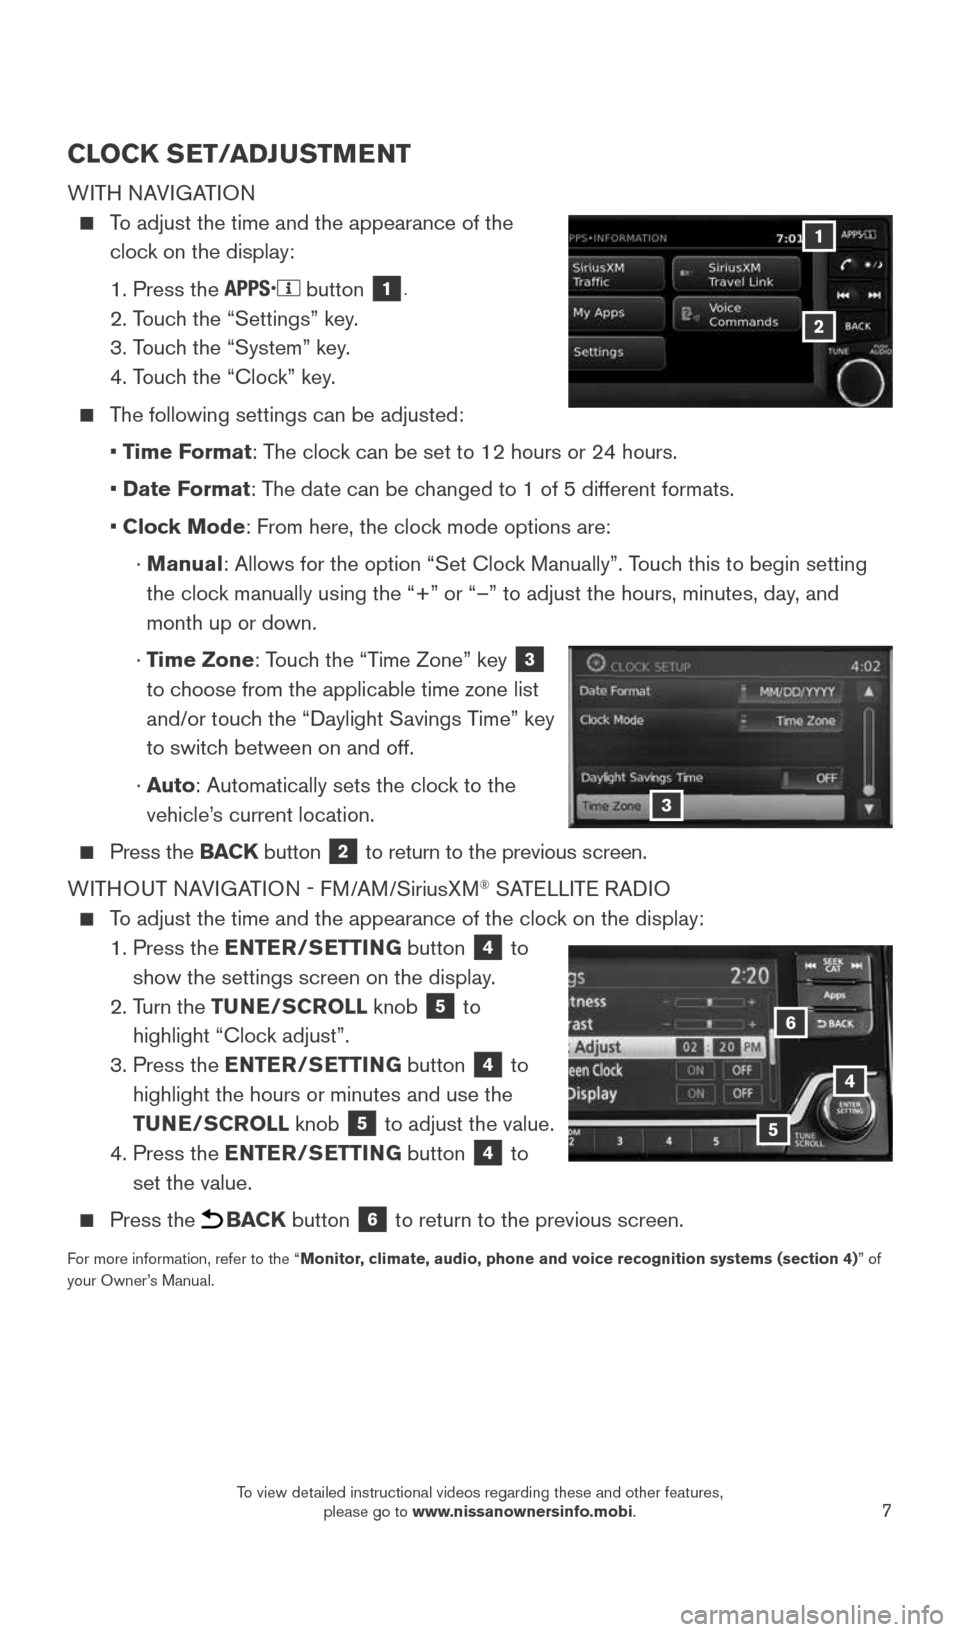
WITH NAVIGATION
To adjust the time and the appearance of the
clock on the display:
1. Press the
button 1.
2. Touch the “Settings” key.
3. Touch the “System” key.
4. Touch the “Clock” key.
The following settings can be adjusted:
• Time Format: The clock can be set to 12 hours or 24 hours.
• Date Format: The date can be changed to 1 of 5 different formats.
• Clock Mode: From here, the clock mode options are:
· Manual: Allows for the option “Set Clock Manually”. Touch this to begin setting
the clock manually using the “+” or “–” to adjust the hours, minu\
tes, day, and
month up or down.
· Time Zone: Touch the “Time Zone” key
3
to choose from the applicable time zone list
and/or touch the “Daylight Savings Time” key
to switch between on and off.
· Auto: Automatically sets the clock to the
vehicle’s current location.
Press the BACK button 2 to return to the previous screen.
WITHOUT NAVIGATION - FM/AM/S iriusXM
® SATELLITE RADIO
To adjust the time and the appearance of the clock on the display:
1. Press the ENTER/SETTING
button
4 to
show the settings screen on the display.
2. Turn the TUNE/SCROLL knob
5 to
highlight “Clock adjust”.
3. Press the ENTER/SETTING
button
4 to
highlight the hours or minutes and use the
TUNE/SCROLL knob
5 to adjust the value.
4. Press the ENTER/SETTING
button
4 to
set the value.
Press the BACK button 6 to return to the previous screen.
For more information, refer to the “Monitor, climate, audio, phone and voice recognition systems (section 4) ” of
your Owner’s Manual.
4
6
3
5
1
2
1921699_15c_Versa_Note_QRG_031615.indd 73/16/15 3:21 PM
To view detailed instructional videos regarding these and other features, please go to www.nissanownersinfo.mobi.
Page 15 of 24
13
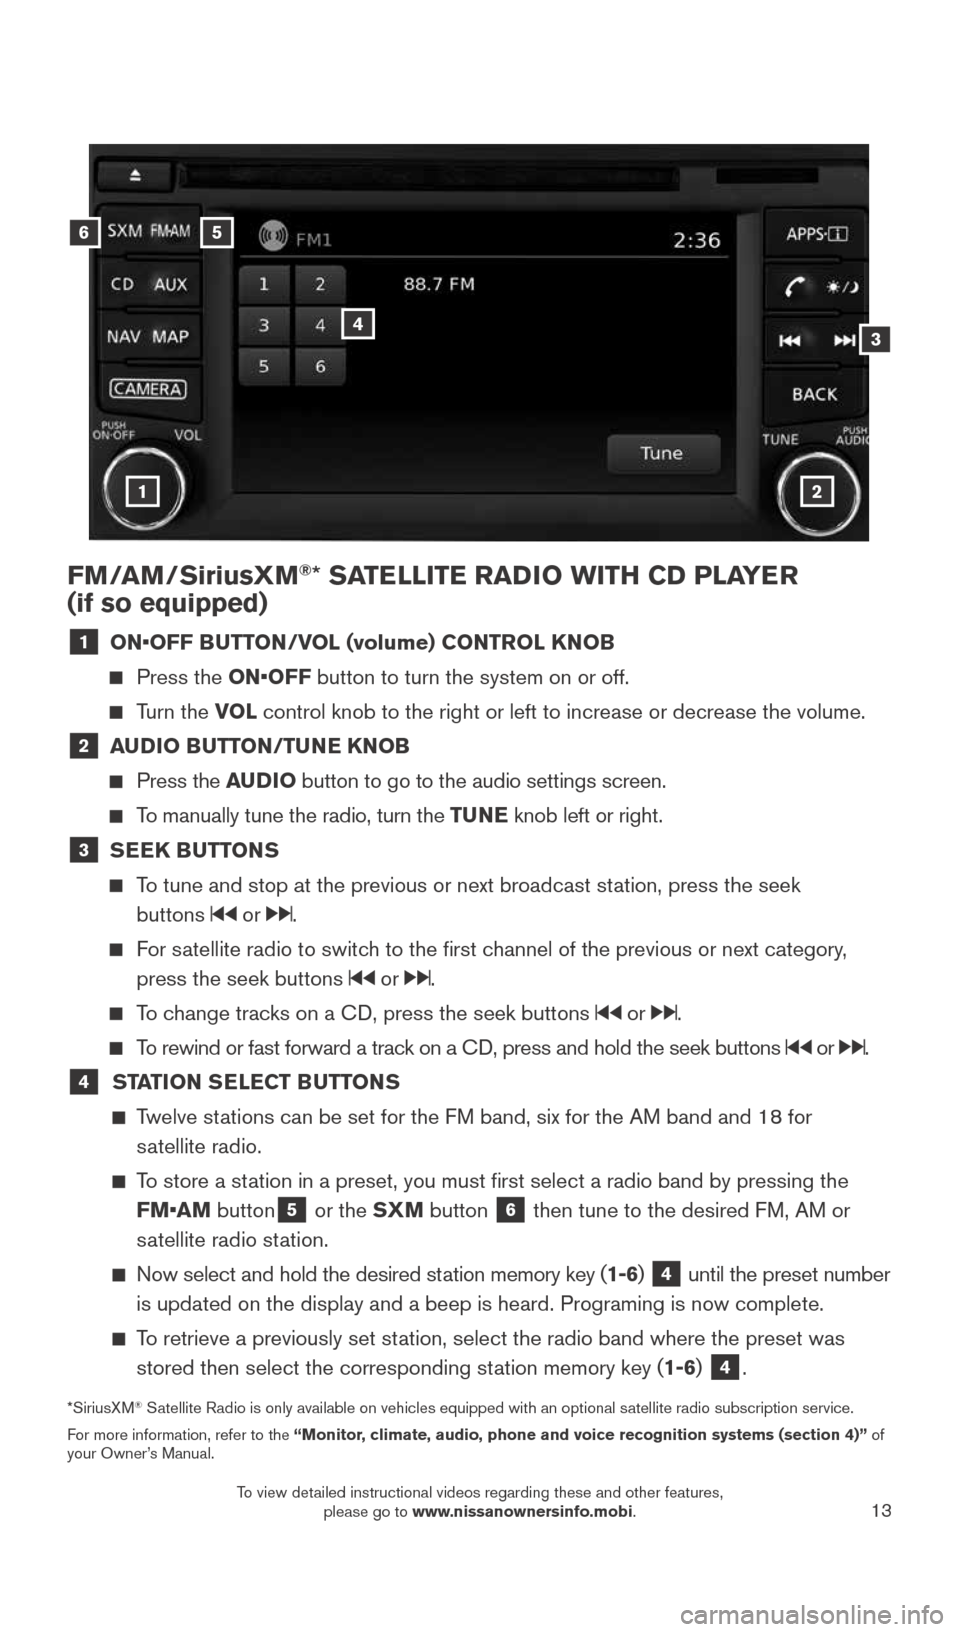
FM/AM/SiriusXM®* SATELLITE RADIO WITH CD PLAYER
(if so equipped)
1 ON•OFF BUTTON/VOL (volume) CONTROL KNOB
Press the ON•OFF button to turn the system on or off.
Turn the VOL control knob to the right or left to increase or decrease the volume.
2 AUDIO BUTTON/TUNE KNOB
Press the AUDIO button to go to the audio settings screen.
To manually tune the radio, turn the TUNE knob left or right.
3 SEEK BUTTONS
To tune and stop at the previous or next broadcast station, press the seek
buttons
or .
For satellite radio to switch to the first channel of the previous or next category,
press the seek buttons
or .
To change tracks on a CD, press the seek buttons or .
To rewind or fast forward a track on a CD, press and hold the seek buttons or .
4 STATION SELECT BUTTONS
Twelve stations can be set for the FM band, six for the AM band and 18 for
satellite radio.
To store a station in a preset, you must first select a radio band by pressing the \
FM•AM button
5 or the SXM button
6 then tune to the desired FM, AM or
satellite radio station.
Now select and hold the desired station memory key (1-6) 4 until the preset number
is updated on the display and a beep is heard. Programing is now complet\
e.
To retrieve a previously set station, select the radio band where the preset was
stored then select the corresponding station memory key (1-6)
4.
*SiriusXM® Satellite Radio is only available on vehicles equipped with an optional s\
atellite radio subscription service.
For more information, refer to the “Monitor, climate, audio, phone and voice recognition systems (section 4)” of
your Owner’s Manual.
56
3
1
4
2
1921699_15c_Versa_Note_QRG_031615.indd 133/16/15 3:22 PM
To view detailed instructional videos regarding these and other features, please go to www.nissanownersinfo.mobi.
Page 17 of 24
15
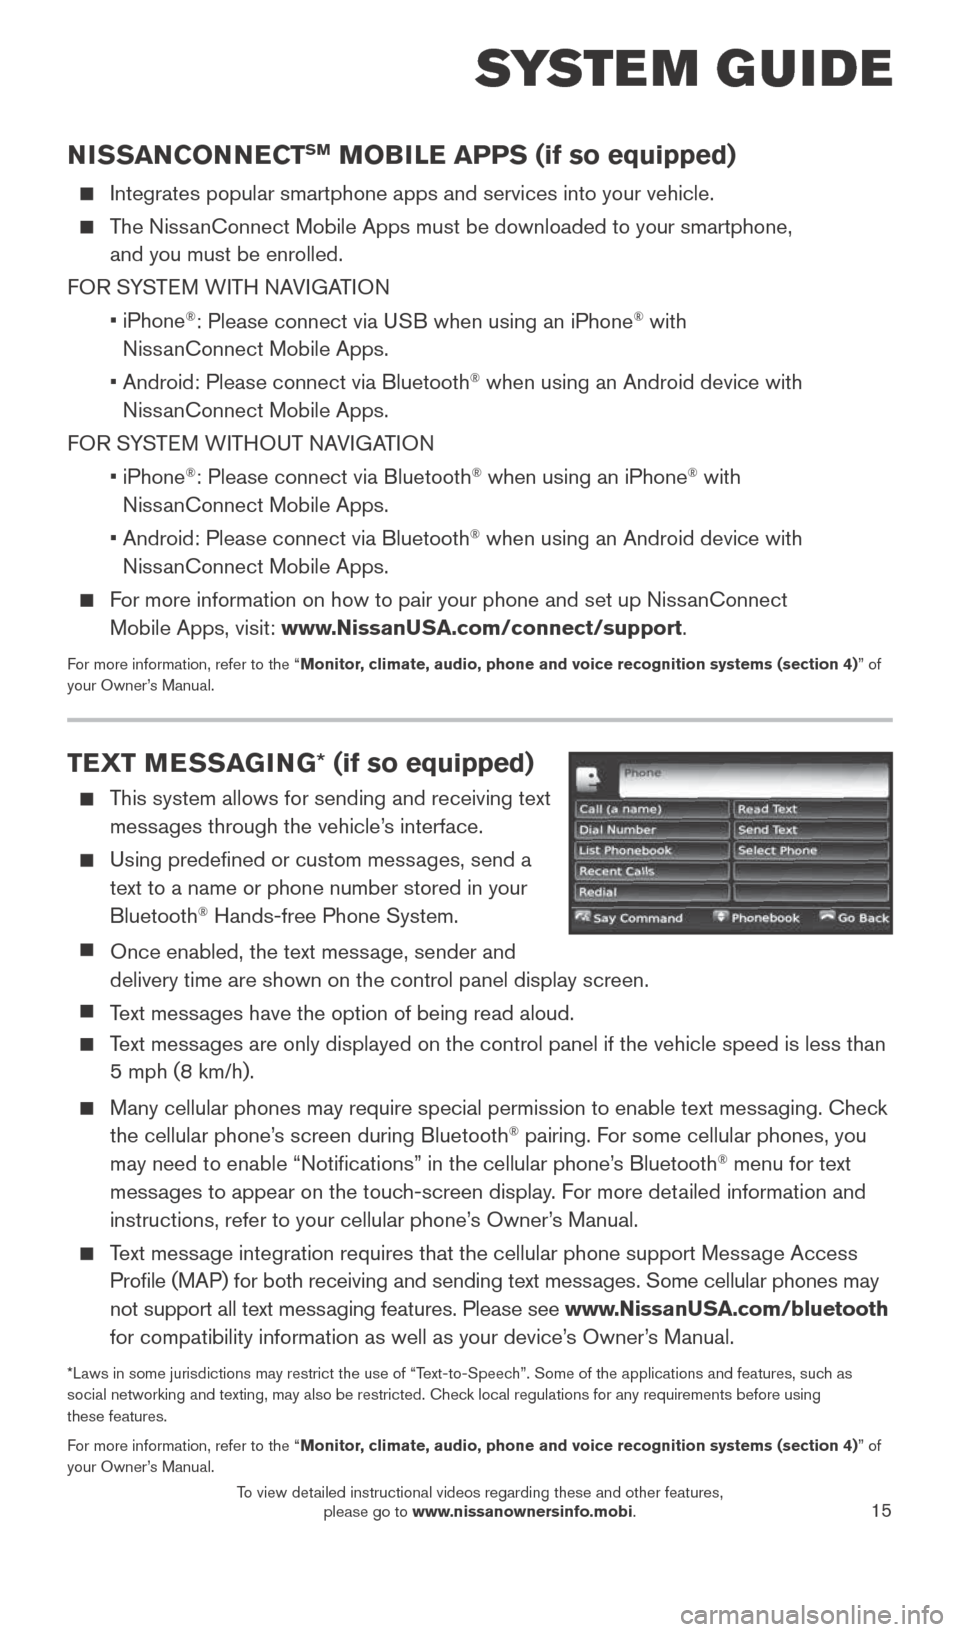
TEXT MESSAGING* (if so equipped)
This system allows for sending and receiving text
messages through the vehicle’s interface.
Using predefined or custom messages, send a
text to a name or phone number stored in your
Bluetooth
® Hands-free Phone System.
Once enabled, the text message, sender and
delivery time are shown on the control panel display screen.
Text messages have the option of being read aloud.
Text messages are only displayed on the control panel if the vehicle speed is les\
s than
5 mph (8 km/h).
Many cellular phones may require special permission to enable text messaging. Check
the cellular phone’s screen during Bluetooth® pairing. For some cellular phones, you
may need to enable “Notifications” in the cellular phone’s Bluetooth® menu for text
messages to appear on the touch-screen display. For more detailed information and
instructions, refer to your cellular phone’s Owner’s Manual.
Text message integration requires that the cellular phone support Message Access
Profile (MAP) for both receiving and sending text messages. Some cellular phones may
not support all text messaging features. Please see www.NissanUSA.com/bluetooth
for compatibility information as well as your device’s Owner’s Manual.
*Laws in some jurisdictions may restrict the use of “Text-to-Speech”. Some of the applications and features, such as
social networking and texting, may also be restricted. Check local regulations for any requirements before using
these features.
For more information, refer to the “Monitor, climate, audio, phone and voice recognition systems (section 4) ” of
your Owner’s Manual.
NISSANCONNECTSM MOBILE APPS (if so equipped)
Integrates popular smartphone apps and services into your vehicle.
The NissanConnect Mobile Apps must be downloaded to your smartphone,
and you must be enrolled.
FOR SYSTEM WITH NAVIGATION
• iPhone
®: Please connect via USB when using an iPhone® with
NissanConnect Mobile Apps.
• Android: Please connect via Bluetooth
® when using an Android device with
NissanConnect Mobile Apps.
FOR SYSTEM WITHOUT NAVIGATION
• iPhone
®: Please connect via Bluetooth® when using an iPhone® with
NissanConnect Mobile Apps.
• Android: Please connect via Bluetooth
® when using an Android device with
NissanConnect Mobile Apps.
For more information on how to pair your phone and set up NissanConnect
Mobile Apps, visit: www.NissanUSA.com/connect/support.
For more information, refer to the “Monitor, climate, audio, phone and voice recognition systems (section 4) ” of
your Owner’s Manual.
SYSTEM GUIDE
1921699_15c_Versa_Note_QRG_031615.indd 153/16/15 3:22 PM
To view detailed instructional videos regarding these and other features, please go to www.nissanownersinfo.mobi.
Page 21 of 24
19
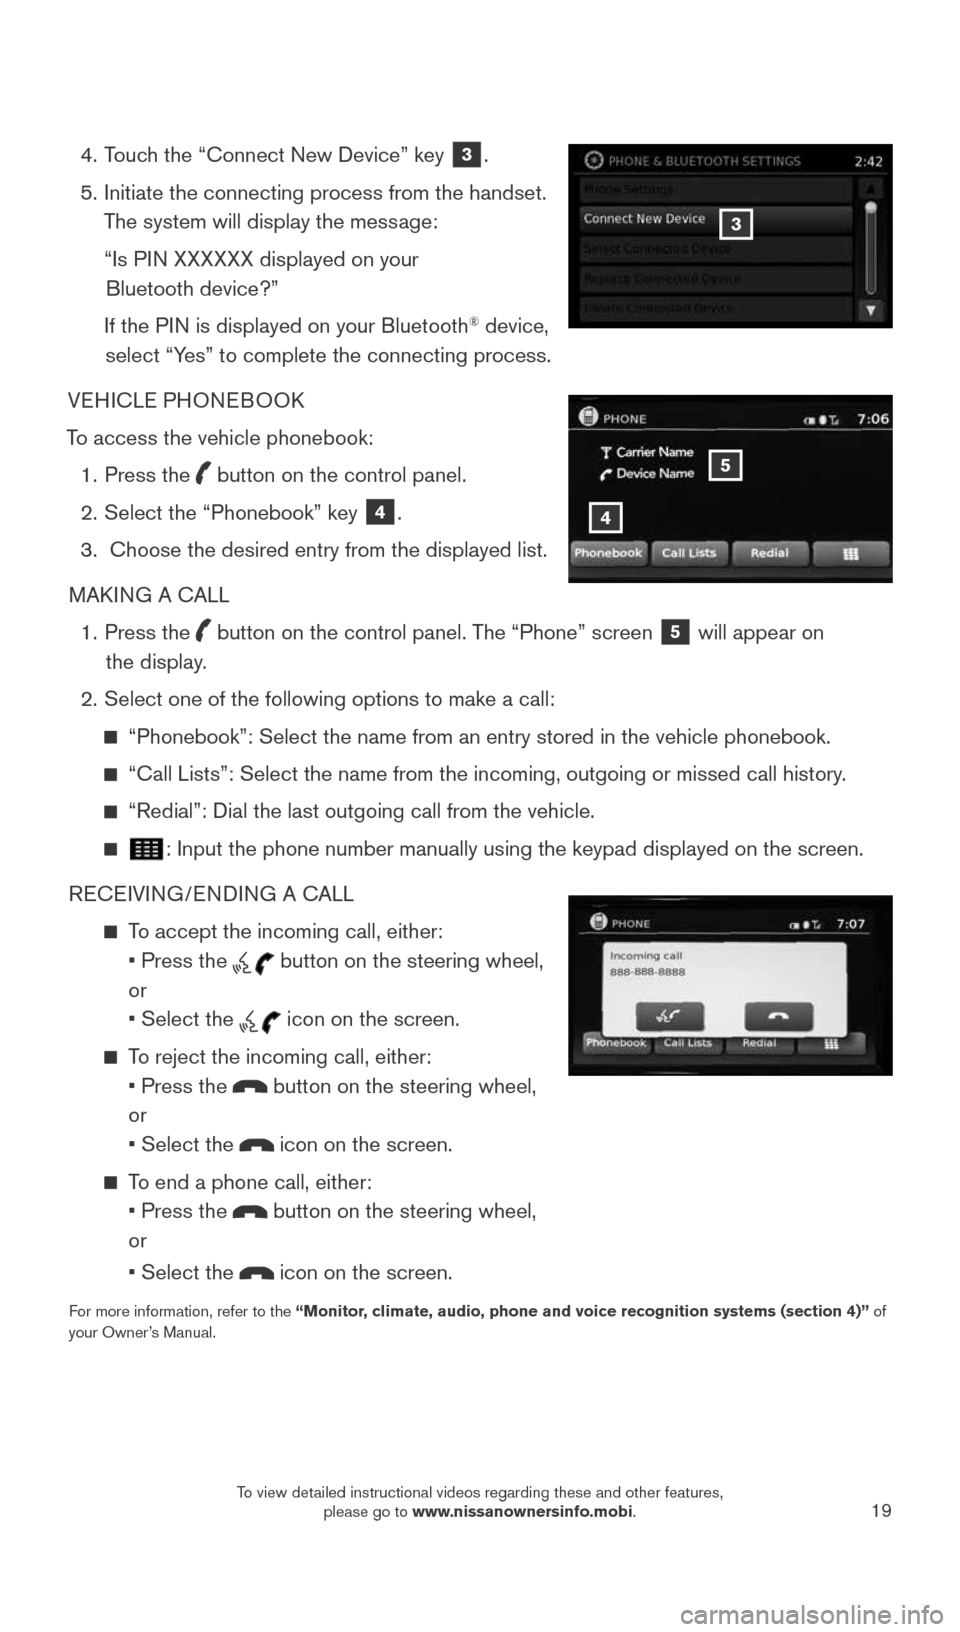
4. Touch the “Connect New Device” key
3.
5. Initiate the connecting process from the handset.
The system will display the message:
“Is PIN XXXXXX displayed on your
Bluetooth device?”
If the PIN is displayed on your Bluetooth
® device,
select “Yes” to complete the connecting process.
VEHICLE PHONEBOOK
To access the vehicle phonebook: 1. Press the
button on the control panel.
2. Select the “Phonebook” key
4.
3. Choose the desired entry from the displayed list.
MAKING A CALL
1. Press the
button on the control panel. The “Phone” screen
5 will appear on
the display.
2. Select one of the following options to make a call:
“Phonebook”: Select the name from an entry stored in the vehicle p\
honebook.
“Call Lists”: Select the name from the incoming, outgoing or misse\
d call history.
“Redial”: Dial the last outgoing call from the vehicle.
: Input the phone number manually using the keypad displayed on the scre\
en.
RECEIVING/ENDING A CALL
To accept the incoming call, either:
• Press the
button on the steering wheel,
or
• Select the
icon on the screen.
To reject the incoming call, either:
• Press the
button on the steering wheel,
or
• Select the
icon on the screen.
To end a phone call, either:
• Press the
button on the steering wheel,
or
• Select the
icon on the screen.
For more information, refer to the “Monitor, climate, audio, phone and voice recognition systems (section 4)” of
your Owner’s Manual.
3
4
5
1921699_15c_Versa_Note_QRG_031615.indd 193/16/15 3:22 PM
To view detailed instructional videos regarding these and other features, please go to www.nissanownersinfo.mobi.