Page 291 of 384
WARNING
●Make sure the parking brake is securely
applied and the manual transmission is
shifted into R (Reverse) , or the continu-
ously variable transmission into P
(Park) .
● Never change tires when the vehicle is
on a slope, ice or slippery areas. This is
hazardous.
● Never change tires if oncoming traffic is
close to your vehicle. Wait for profes-
sional road assistance.
A. Blocks
B. Flat tire
Blocking wheels
Place suitable blocks at both the front and back
of the wheel diagonally opposite the flat tire to
prevent the vehicle from moving when it is jacked
up.
WARNING
Be sure to block the wheel as the vehicle
may move and result in personal injury.
Getting the spare tire and tools
Open the rear hatch. Remove the Divide-n-Hide
floor. Refer to “Divide-n-Hide Adjustable Floor” in
the “Instruments and Controls” section of this
manual.
Lift the floorboard.
LCE2142LCE2083
6-4In case of emergency
Page 292 of 384
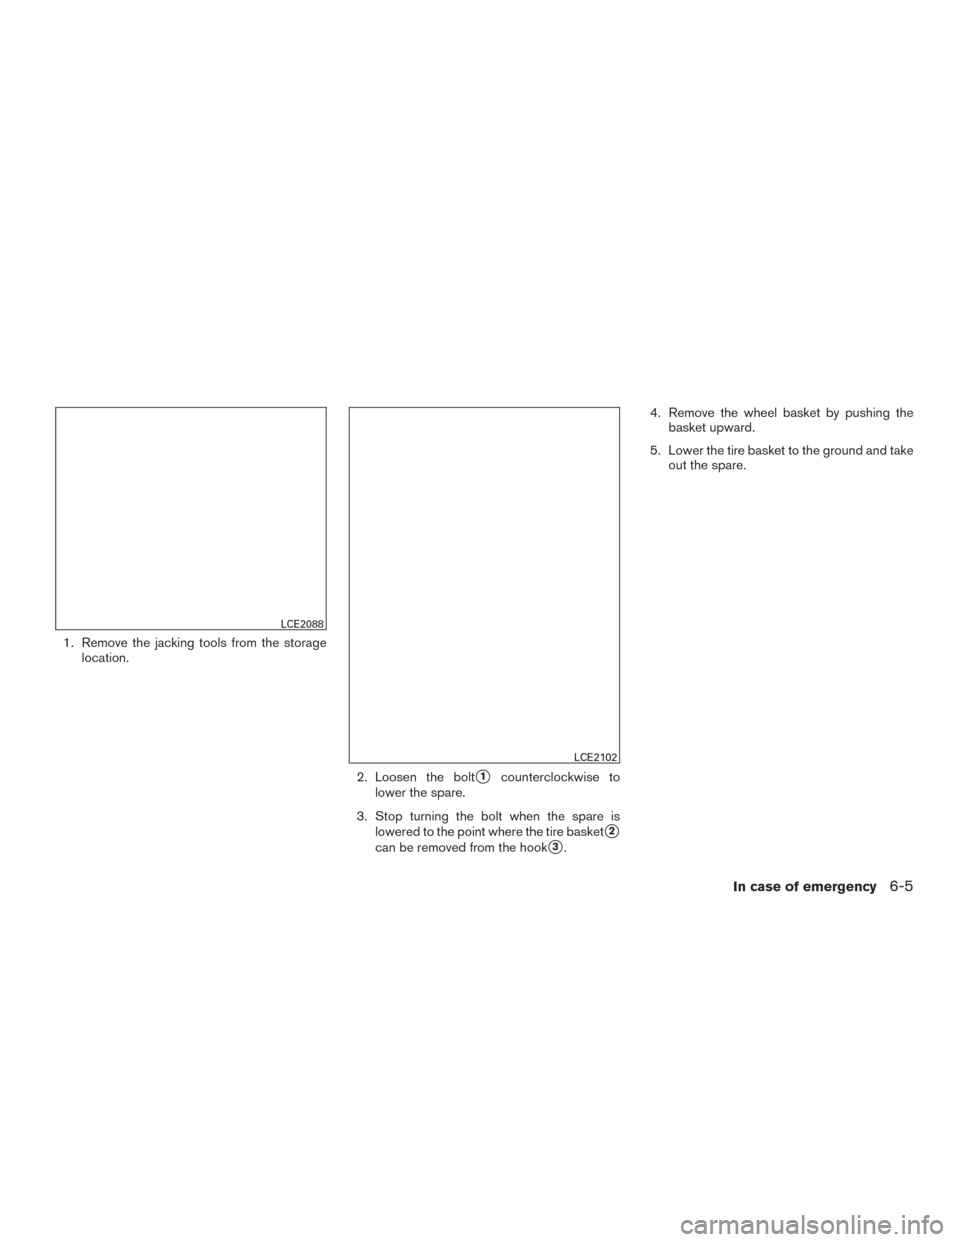
1. Remove the jacking tools from the storagelocation.
2. Loosen the bolt
�1counterclockwise to
lower the spare.
3. Stop turning the bolt when the spare is lowered to the point where the tire basket
�2
can be removed from the hook�3. 4. Remove the wheel basket by pushing the
basket upward.
5. Lower the tire basket to the ground and take out the spare.
LCE2088
LCE2102
In case of emergency6-5
Page 294 of 384

Always refer to the proper illustrations for the
correct placement and jack-up points for your
specific vehicle model and jack type.
Carefully read the caution label attached to
the jack body and the following instruc-
tions.1. Loosen each wheel nut 1 or 2 turns by turning counterclockwise with the wheel nut
wrench. Do not remove the wheel nuts
until the tire is off the ground. 2. Place the jack directly under the jack-up
point as illustrated so the top of the jack
contacts the vehicle at the jack-up point.
Align the jack head between the 2 notches in
the front or the rear as shown. Also fit the
groove of the jack head between the
notches as shown.
The jack should be used on firm and
level ground.
3. To lift the vehicle, securely hold the jack lever and rod with both hands. Carefully raise the
vehicle until the tire clears the ground. Re-
move the wheel nuts, and then remove the
tire.Installing the spare tire
The spare tire is designed for emergency
use. For additional information, refer to
“Wheels and tires” in the “Maintenance
and do-it-yourself” section of this manual.
1. Clean any mud or dirt from the surface be- tween the wheel and hub.
2. Carefully put the spare tire on and tighten the wheel nuts finger tight.
3. With the wheel nut wrench, tighten wheel nuts alternately and evenly as illustrated until
they are tight.
SCE0002WCE0048
In case of emergency6-7
Page 295 of 384
.
Lower the vehicle completely.")
4. Lower the vehicle slowly until the tiretouches the ground. Then, with the wheel
nut wrench, tighten the wheel nuts securely
in the sequence illustrated (
�A,�B,�C,�D).
Lower the vehicle completely.
WARNING
● Incorrect wheel nuts or improperly
tightened wheel nuts can cause the
wheel to become loose or come off.
This could cause an accident.
● Do not use oil or grease on the wheel
studs or nuts. This could cause the nuts
to become loose.
● Retighten the wheel nuts when the ve-
hicle has been driven for 600 miles
(1,000 km) (also in cases of a flat tire,
etc.) .
As soon as possible, tighten the wheel nuts
to the specified torque with a torque
wrench.
Wheel nut tightening torque: 83 ft-lb (113 N·m)
The wheel nuts must be kept tightened to
specification at all times. It is recom-
mended that wheel nuts be tightened to
specifications at each lubrication interval. Adjust the tire pressure to the COLD pres-
sure.
COLD pressure: After vehicle has been
parked for 3 hours or more or driven less
than 1 mile (1.6 km) .
COLD tire pressures are shown on the Tire
and Loading Information label affixed to
the driver side center pillar.
5. Securely store the flat tire and jacking equip- ment in the vehicle.
WARNING
●Always make sure that the spare tire
and jacking equipment are properly se-
cured after use. Such items can become
dangerous projectiles in an accident or
sudden stop.
● The spare tire is designed for emer-
gency use. For additional information,
refer to the specific instructions under
the heading “Wheels and tires” in the
“Maintenance and do-it-yourself” sec-
tion of this manual
Reinstalling the temporary spare tire to
its original position
After the flat tire is repaired, return the temporary
spare to its original position in the tire basket
under the rear of the vehicle.
6-8In case of emergency
Page 296 of 384
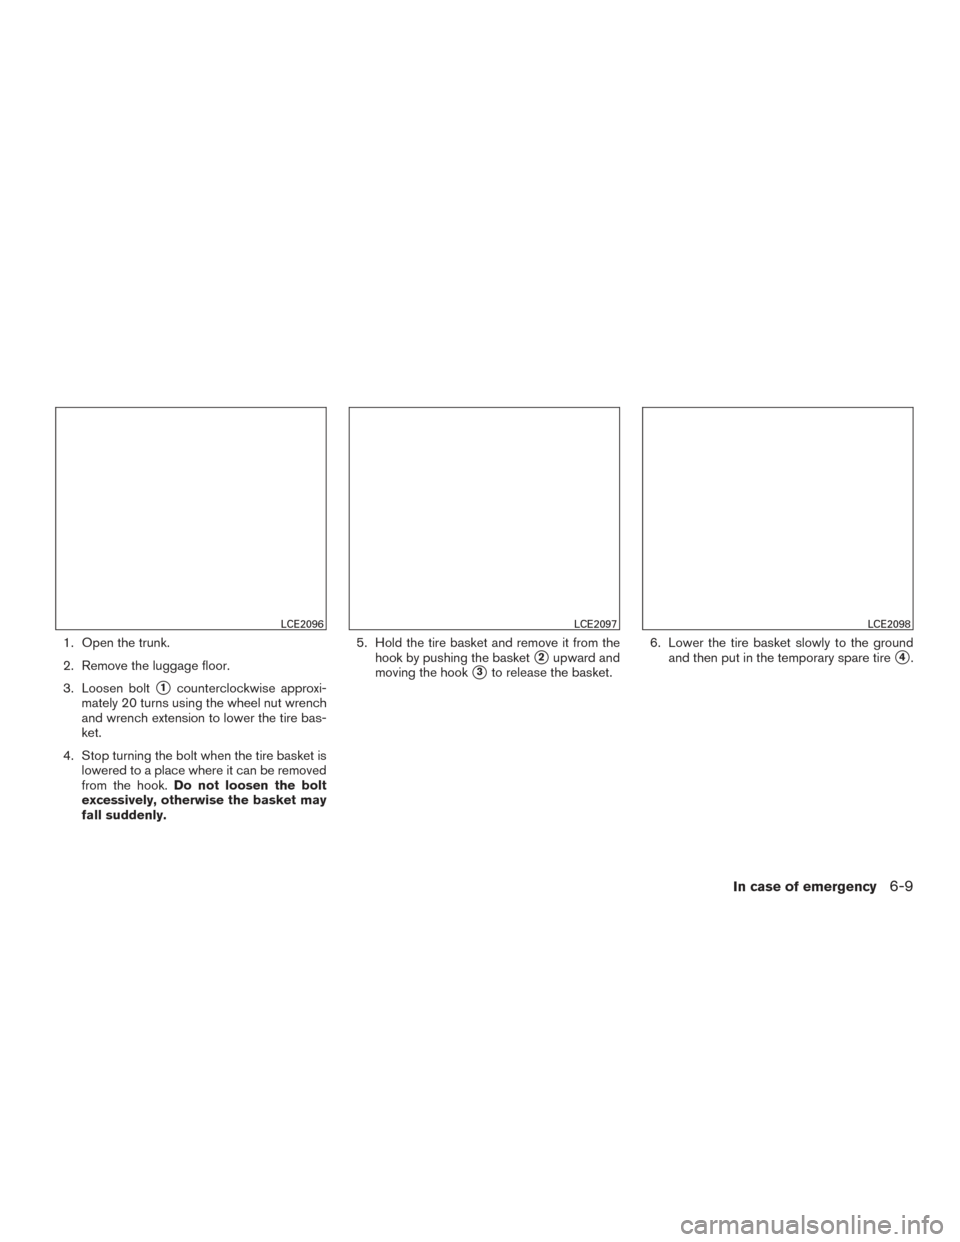
1. Open the trunk.
2. Remove the luggage floor.
3. Loosen bolt
�1counterclockwise approxi-
mately 20 turns using the wheel nut wrench
and wrench extension to lower the tire bas-
ket.
4. Stop turning the bolt when the tire basket is lowered to a place where it can be removed
from the hook. Do not loosen the bolt
excessively, otherwise the basket may
fall suddenly. 5. Hold the tire basket and remove it from the
hook by pushing the basket
�2upward and
moving the hook
�3to release the basket. 6. Lower the tire basket slowly to the ground
and then put in the temporary spare tire�4.
LCE2096LCE2097LCE2098
In case of emergency6-9
Page 297 of 384
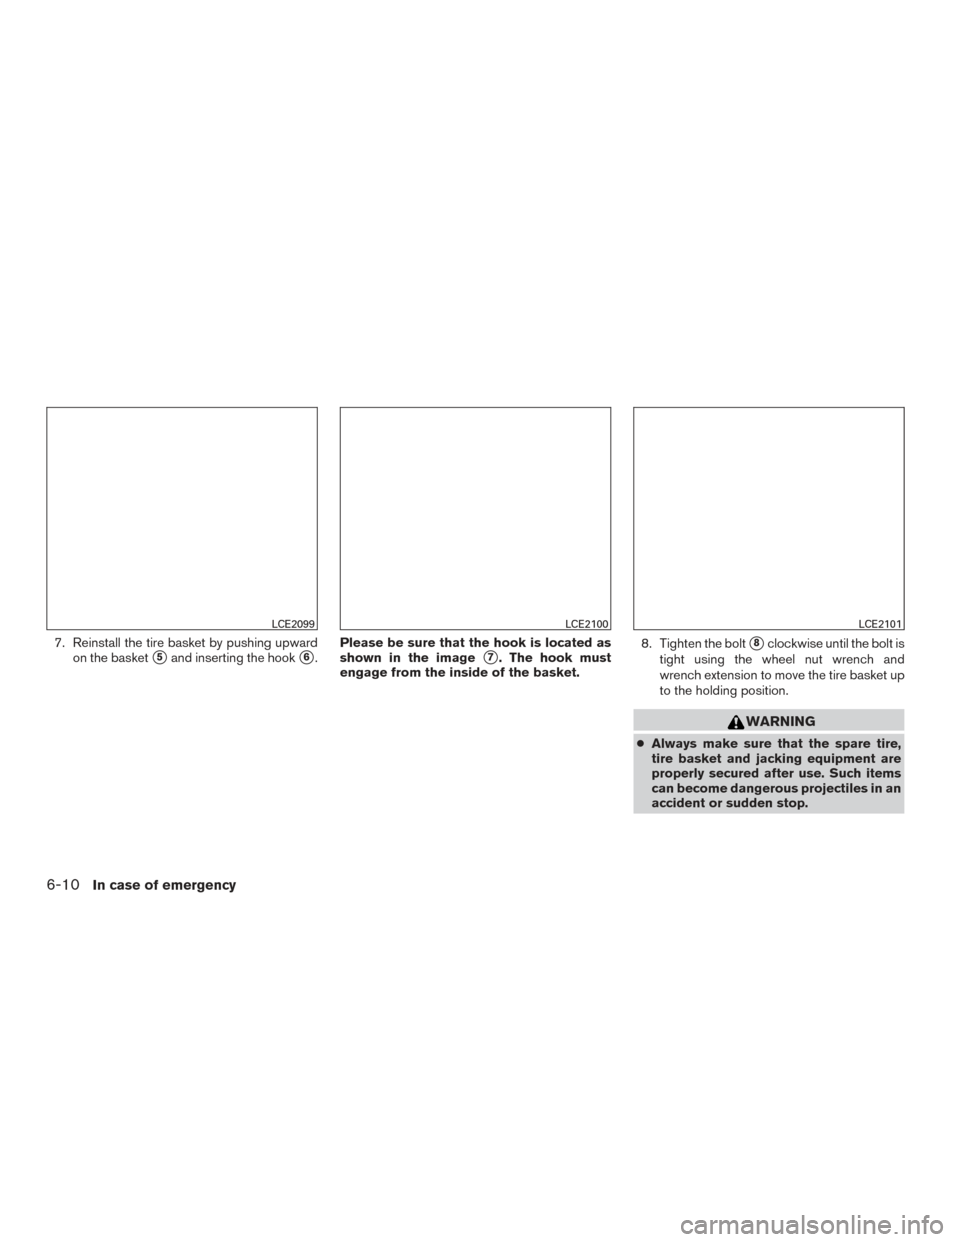
7. Reinstall the tire basket by pushing upwardon the basket
�5and inserting the hook�6. Please be sure that the hook is located as
shown in the image�7. The hook must
engage from the inside of the basket. 8. Tighten the bolt�8clockwise until the bolt is
tight using the wheel nut wrench and
wrench extension to move the tire basket up
to the holding position.
WARNING
● Always make sure that the spare tire,
tire basket and jacking equipment are
properly secured after use. Such items
can become dangerous projectiles in an
accident or sudden stop.
LCE2099LCE2100LCE2101
6-10In case of emergency
Page 298 of 384

●The spare tire is designed for emer-
gency use. For additional information,
refer to the specific instructions under
the heading “Wheels and Tires” in the
“Maintenance and do-it yourself” sec-
tion of this manual.
● When reinstalling the spare tire basket
under the vehicle after use, be sure that
the hook engages the basket from the
inside. If the spare tire basket hook is
not engaged properly, there is an in-
creased risk of the spare tire separating
from the vehicle in a crash and causing
injury.
Stowing the damaged tire
Securely store the damaged tire in the cargo area
as illustrated.
Securely store the jack and tools in the storage
area.
Return the spare tire basket back to its original
position in the reverse order of removal. For ad-
ditional information, refer to “Getting the spare
tire and tools” in this section.
Spare tire basket bolt tightening torque:
75 N•m (56 ft-lb) NOTE:
The spare tire basket cannot be used to
store the conventional tire.
WARNING
●
Always make sure that the spare tire
and jacking equipment are properly se-
cured after each use. Such items can
become dangerous projectiles in an ac-
cident or sudden stop.
● Make sure that the spare tire basket is
properly secured in its original position
after removing the spare tire.
● The spare tire and small size spare tire
are designed for emergency use. For
additional information, refer to the spe-
cific instructions under the heading
“Wheels and tires” in the “Maintenance
and do-it-yourself” section of this
manual.
LCE2103
In case of emergency6-11
Page 314 of 384

When driving in areas using road salt or other
corrosive materials, check lubrication frequently.
Lights*Clean the headlights on a regular basis.
Make sure that the headlights, stop lights, tail
lights, turn signal lights, and other lights are all
operating properly and installed securely. Also
check headlight aim.
Road wheel nuts (lug nuts)* When checking
the tires, make sure no wheel nuts are missing,
and check for any loose wheel nuts. Tighten if
necessary.
Tire rotation* Tires should be rotated every
7,500 miles (12,000 km).
TPMS Sensor ID Matching Process After
Tire Rotation (if so equipped) Each TPMS
sensor has a unique identification code. Any time
you rotate your vehicle’s tires or replace one or
more of the TPMS sensors, these identification
codes need to be matched to the new tire/wheel
position to make sure that the low tire pressure
display in the meter is correct. The identification
codes are matched to their positions using a
TPMS diagnostic tool. See your NISSAN dealer
for service.
Tires* Check the pressure with a gauge often
and always prior to long distance trips. If neces-
sary, adjust the pressure in all tires, including the spare, to the pressure specified. Check carefully
for damage, cuts or excessive wear.
Tire Pressure Monitoring System (TPMS)
transmitter components (if so equipped)
Replace the TPMS transmitter grommet seal,
valve core and cap when the tires are replaced
due to wear or age.
Wheel alignment and balance
If the vehicle
should pull to either side while driving on a
straight and level road, or if you detect uneven or
abnormal tire wear, there may be a need for wheel
alignment. If the steering wheel or seat vibrates at
normal highway speeds, wheel balancing may be
needed.
● For additional information regarding tires,
refer to “Important Tire Safety Information”
(US) or “Tire Safety Information” (Canada) in
the Warranty Information Booklet.
Windshield Clean the windshield on a regular
basis. Check the windshield at least every six
months for cracks or other damage. Have a dam-
aged windshield repaired by a qualified repair
facility.
Windshield wiper blades* Check for cracks or
wear if they do not wipe properly.Inside the vehicle
The maintenance items listed here should be
checked on a regular basis, such as when per-
forming periodic maintenance, cleaning the ve-
hicle, etc.
Additional information on the following
items with an “*” is found in this section.
Accelerator pedal Check the pedal for smooth
operation and make sure the pedal does not bind
or require uneven effort. Keep the floor mat away
from the pedal.
Brake pedal Check the pedal for smooth opera-
tion. If the brake pedal suddenly goes down fur-
ther than normal, the pedal feels spongy or the
vehicle seems to take longer to stop, see a
NISSAN dealer immediately. Keep the floor mat
away from the pedal.
Brakes Check that the brakes do not pull the
vehicle to one side when applied.
Continuously Variable Transmission (CVT)
P (Park) position mechanism (if so
equipped) On a fairly steep hill check that the
vehicle is held securely with the shift lever in the P
(Park) position without applying any brakes.
Parking brake Check the parking brake opera-
tion regularly. The vehicle should be securely held
Maintenance and do-it-yourself8-3
 , or the continu-
ously variable transmission into P
(Park) .
● Never change tires")