2015 NISSAN TITAN ESP
[x] Cancel search: ESPPage 216 of 457
Static and flutter: During signal interference from
buildings, large hills or due to antenna position
(usually in conjunction with increased distance
from the station transmitter) , static or flutter can
be heard. This can be reduced by adjusting the
treble control to reduce treble response.
Multipath reception: Because of the reflective
characteristics of FM signals, direct and reflected
signals reach the receiver at the same time. The
signals may cancel each other, resulting in mo-
mentary flutter or loss of sound.
AM RADIO RECEPTION
AM signals, because of their low frequency, can
bend around objects and skip along the ground.
In addition, the signals can be bounced off the
ionosphere and bent back to earth. Because of
these characteristics, AM signals are also sub-
ject to interference as they travel from transmitter
to receiver.
Fading: Occurs while the vehicle is passing
through freeway underpasses or in areas with
many tall buildings. It can also occur for several
seconds during ionospheric turbulence even in
areas where no obstacles exist.
Static: Caused by thunderstorms, electrical
power lines, electric signs and even traffic lights.
SATELLITE RADIO RECEPTION (if so
equipped)
When the satellite radio is used for the first time
or the battery has been replaced, the satellite
radio may not work properly. This is not a mal-
function. Wait more than 10 minutes with satellite
radio ON and the vehicle outside of any metal or
large building for satellite radio to receive all of
the necessary data.
No satellite radio reception is available and “NO
SAT” is displayed when the SAT band option is
selected unless optional satellite receiver and
antenna are installed and a SiriusXM® Satellite
Radio service subscription is active. Satellite ra-
dio is not available in Alaska, Hawaii and Guam.
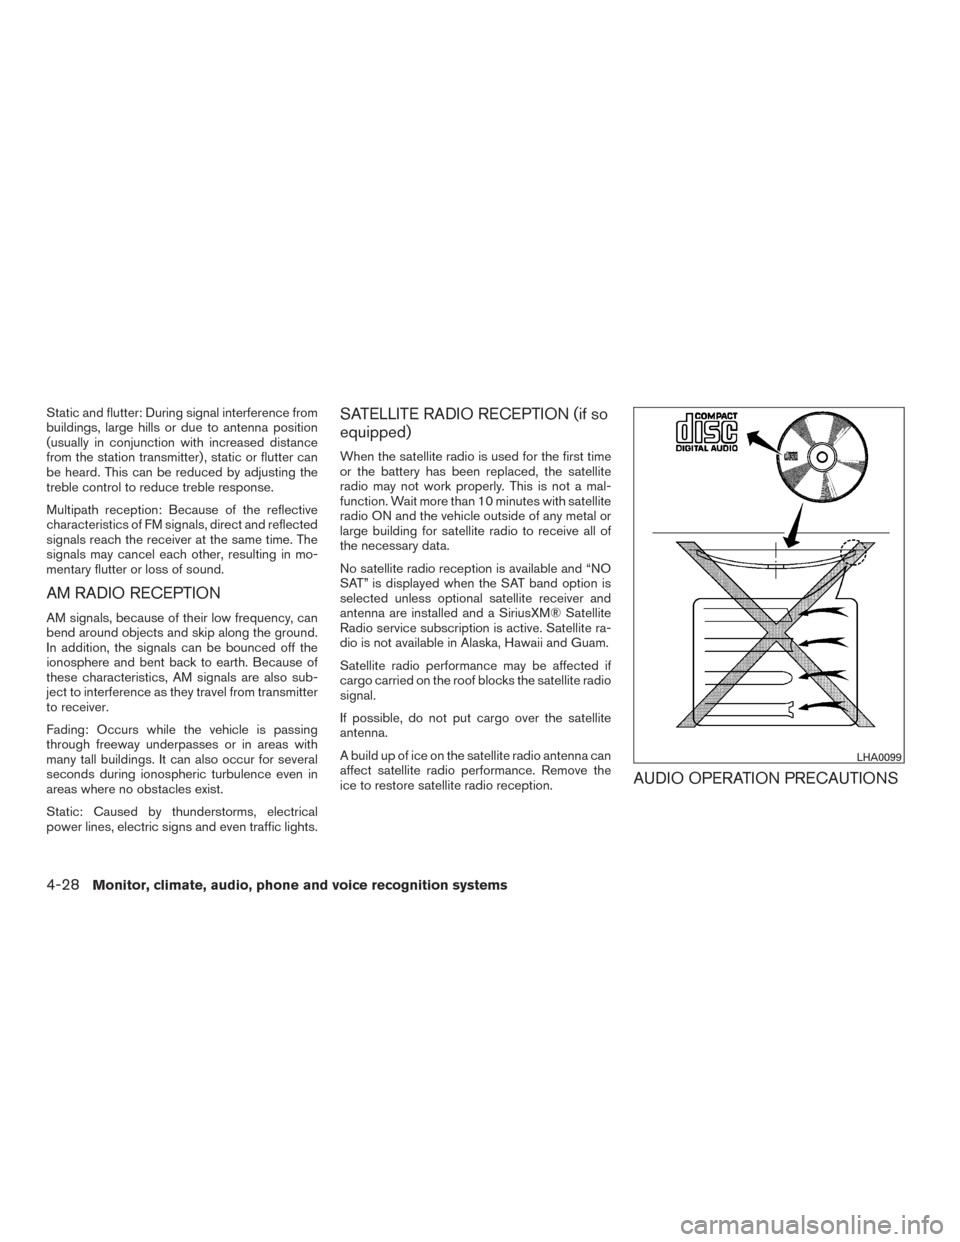
Satellite radio performance may be affected if
cargo carried on the roof blocks the satellite radio
signal.
If possible, do not put cargo over the satellite
antenna.
A build up of ice on the satellite radio antenna can
affect satellite radio performance. Remove the
ice to restore satellite radio reception.
AUDIO OPERATION PRECAUTIONS
LHA0099
4-28Monitor, climate, audio, phone and voice recognition systems
Page 221 of 457
USB (Universal Serial Bus)
Connection Port (if so equipped)
WARNING
Do not connect, disconnect, or operate the
USB device while driving. Doing so can be
a distraction. If distracted you could lose
control of your vehicle and cause an acci-
dent or serious injury.
CAUTION
●Do not force the USB device into the
USB port. Inserting the USB device
tilted or up-side-down into the port may
damage the port. Make sure that the
USB device is connected correctly into
the USB port.
● Do not grab the USB port cover (if so
equipped) when pulling the USB device
out of the port. This could damage the
port and the cover.
● Do not leave the USB cable in a place
where it can be pulled unintentionally.
Pulling the cable may damage the port. The vehicle is not equipped with a USB device.
USB devices should be purchased separately as
necessary.
This system cannot be used to format USB de-
vices. To format a USB device, use a personal
computer.
In some jurisdictions, the USB device for the front
seats plays only sound without images for regu-
latory reasons, even when the vehicle is parked.
This system supports various USB connection
port devices, USB hard drives and iPod® play-
ers. Some USB devices may not be supported by
this system.
● Partitioned USB devices may not play cor-
rectly.
● Some characters used in other languages
(Chinese, Japanese, etc.) may not appear
properly in the display. Using English lan-
guage characters with a USB device is rec-
ommended.
General notes for USB use ● Refer to your device manufacturer’s owner
information regarding the proper use and
care of the device. Notes for iPod® use
iPod® is a trademark of Apple Inc., registered in
the U.S. and other countries.
● Improperly plugging in the iPod® may cause
a checkmark to be displayed on and off
(flickering) . Always make sure that the
iPod® is connected properly.
● An iPod® nano (1st Generation) may remain
in fast forward or rewind mode if it is con-
nected during a seek operation. In this case,
please manually reset the iPod®.
● An iPod® nano (2nd Generation) will con-
tinue to fast-forward or rewind if it is discon-
nected during a seek operation.
● An incorrect song title may appear when the
Play Mode is changed while using an iPod®
nano (2nd Generation) .
● Audiobooks may not play in the same order
as they appear on an iPod®.
● Large video files cause slow responses in an
iPod®. The vehicle center display may mo-
mentarily black out, but will soon recover.
Monitor, climate, audio, phone and voice recognition systems4-33
Page 262 of 457
STOP
Press the STOP button once to stop playing the
media. The display will show
in the upper
left corner of the display for 4 seconds, and the
last disc position will be stored. When the PLAY
button is pressed again, it will resume at the
stored disc track and time position.
If the STOP button is pressed again when the
player is already in Stop mode, it will reinitialize
the pointer to the beginning of the disc. In effect,
it will ignore the last stored disc position and
upon receipt of the next play message, will begin
at the Title Menu or at “the beginning of the disc”.
EJECT
When the EJECT button is pressed with the DVD
loaded, it will be ejected.
The display will show the EJECT symbol
in
the upper left corner of the display for 4 seconds
once the EJECT button is pressed.
If the DVD is not loaded, the display will show
“NO DISC”.
If the DVD comes out and is not removed within
25 seconds, it will be pulled back into the slot to
protect it. DISPLAY
If the DISPLAY control is pressed for less than
2 seconds, the display menu will appear on the
screen.
● The display menu will remain on the screen
for 10 seconds if no subsequent control
activations occur.
● Use the NAVIGATION KEYS to navigate
within the display menu and use ENTER to
select the item.
● Holding the DISPLAY control on the face-
plate for longer than approximately 2 sec-
onds while in the display menu will reset the
display characteristics to their nominal val-
ues. (Faceplate feature only)
If the DISPLAY control button on the faceplate is
pressed for more than 2 seconds, the media
track/time information will be displayed along the
bottom of the display. Pressing the DISPLAY
control for more than 2 seconds will remove the
media track/time information from the display.
(Faceplate feature only)
NAVIGATION KEYS
If media is in PLAY mode, activation of the NAVI-
GATION KEYS (Up, Down, Left, and Right) will
perform the following functions: next
chapter/track, previous chapter/track, fast re- verse and fast forward, and the display will
show
,,andrespec-
tively in the upper left corner of the display for
4 seconds. (Faceplate feature only)
If media is in PAUSE mode, activation of the
NAVIGATION KEYS (Up, Down and Right) will
perform the following functions: next
chapter/track, previous chapter/track and slow
forward, and the display will show
,and a forward arrow symbol respectively in the
upper left corner of the display for 4 seconds.
(Faceplate feature only)
If media is in activated MENU mode, the NAVI-
GATION KEYS will be used to navigate Up,
Down, Left, and Right within the menu.
If display control menu is on, the NAVIGATION
KEYS will be used to navigate Up, Down, Left,
and Right within the menu.
ENTER
In MENU mode, press the ENTER button to se-
lect MENU items.
In the display menu, press the ENTER button to
select items for modification, as per the on-
screen instructions.
4-74Monitor, climate, audio, phone and voice recognition systems
Page 263 of 457
MENU
If the media is in PLAY mode and the MENU
button is pressed, the DVD menu will appear on
the screen. Use the Navigation Keys to navigate
within the menu and use ENTER to select the
item.
Press the MENU button again to return to PLAY
mode.
TITLE (Remote control only)
Press the TITLE button to return the DVD media
to the “title” of the DVD.
Press the TITLE button again to return to the
previous stop point and play.
BACK (Remote control only)
Press the BACK button to exit the current active
menu and return to the previous menu.
SUBTITLE (Remote control only)
Press the SUBTITLE button to call up subtitle
selection menu.
Repeatedly press the SUBTITLE button to cycle
through each available subtitle.
AUDIO (Remote control only)
Press the AUDIO button to call up the audio
menu.Repeatedly press the AUDIO button to cycle
through each available audio track.
ANGLE (Remote control only)
Press the ANGLE button to call up the camera
angle menu.
Repeatedly press the ANGLE button to cycle
through each available angle.
CLEAR (Remote control only)
Press the CLEAR button to clear all numeric
inputs, if actuated prior to expiration of the
3-second timer.
NUMERIC KEYPAD (0–9 &
≥10) (Remote
control only)
Press the NUMERIC KEYPAD to directly access
disc chapters, titles or tracks by inputting their
numeric value.
Use the “≥10” button to input numbers greater
than or equal to 10. Up to three digits can be
inputted when selecting the chapter/title/track
number.
The subsequent actuation of numeric buttons will
continuously shift the previously input number to
the “left”.
The chapter/title/track number will be automati-
cally selected (if valid, based on media content) if
3 seconds expire without any keypad inputs. The operator can cancel the input
chapter/title/track number by actuating the
CLEAR control prior to the expiration of the
3-second timer.
These functions can be used only for the DVD
discs which correspond to them.
Auxiliary input jacks
The auxiliary input jacks are located on the control
panel. Compatible devices such as video games,
camcorders and portable video players can be
connected to the auxiliary jacks.
The auxiliary jacks are color coded for identifica-
tion purposes.
● Yellow - video input
● White - left channel audio input
● Red - right channel audio input
To view the compatible device connected to the
AUX jacks, press the MODE button. For addi-
tional information, refer to “Mode select button” in
this section.
Monitor, climate, audio, phone and voice recognition systems4-75
Page 266 of 457
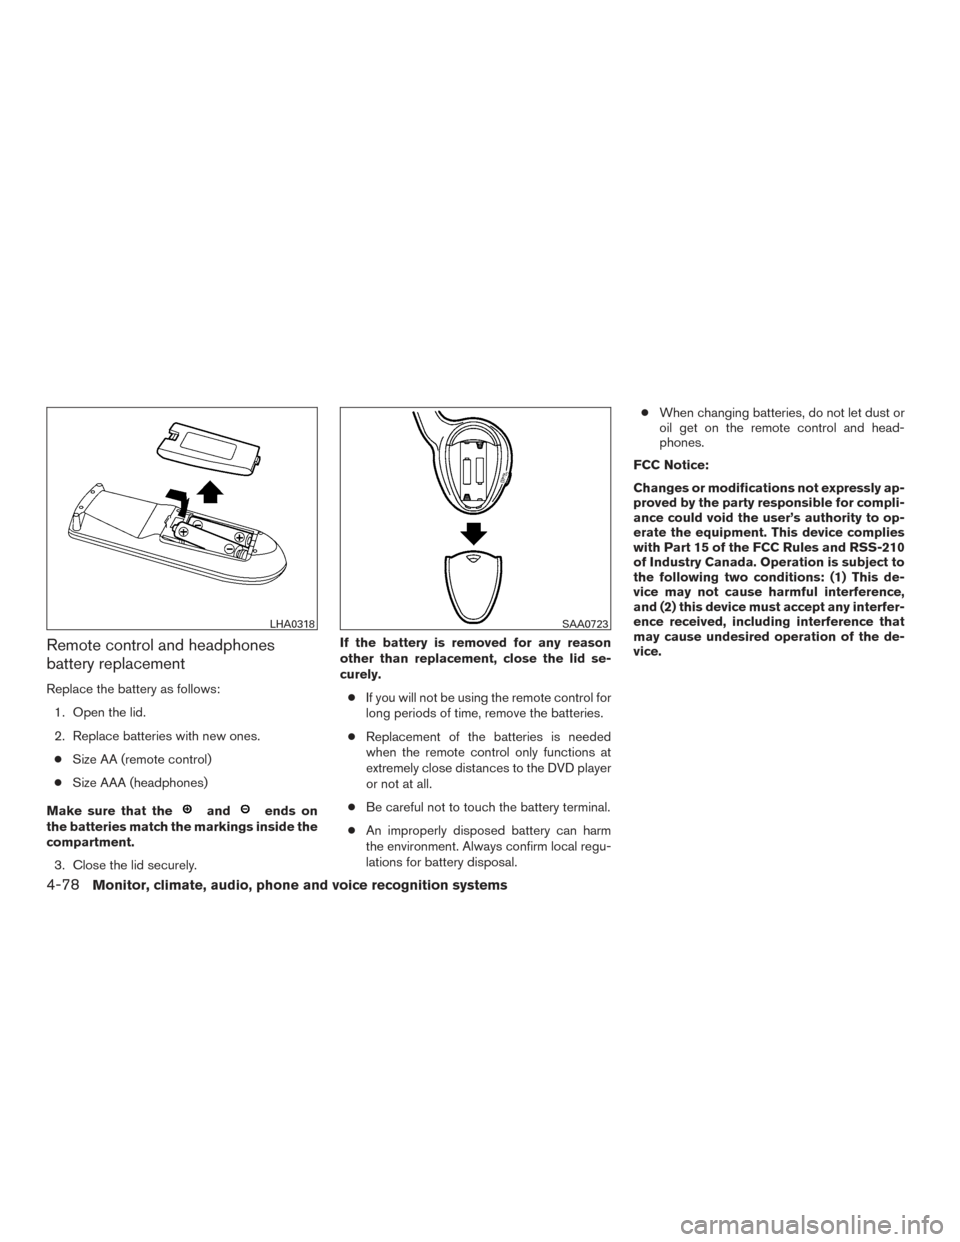
Remote control and headphones
battery replacement
Replace the battery as follows:1. Open the lid.
2. Replace batteries with new ones.● Size AA (remote control)
● Size AAA (headphones)
Make sure that the
andends on
the batteries match the markings inside the
compartment.
3. Close the lid securely. If the battery is removed for any reason
other than replacement, close the lid se-
curely.
● If you will not be using the remote control for
long periods of time, remove the batteries.
● Replacement of the batteries is needed
when the remote control only functions at
extremely close distances to the DVD player
or not at all.
● Be careful not to touch the battery terminal.
● An improperly disposed battery can harm
the environment. Always confirm local regu-
lations for battery disposal. ●
When changing batteries, do not let dust or
oil get on the remote control and head-
phones.
FCC Notice:
Changes or modifications not expressly ap-
proved by the party responsible for compli-
ance could void the user’s authority to op-
erate the equipment. This device complies
with Part 15 of the FCC Rules and RSS-210
of Industry Canada. Operation is subject to
the following two conditions: (1) This de-
vice may not cause harmful interference,
and (2) this device must accept any interfer-
ence received, including interference that
may cause undesired operation of the de-
vice.
LHA0318SAA0723
4-78Monitor, climate, audio, phone and voice recognition systems
Page 270 of 457
Initialization
When the ignition switch is placed in the ON
position, NISSAN Voice Recognition is initialized,
which takes a few seconds. If the
button is
pressed before the initialization completes, the
system will announce “Hands-free phone system
not ready” and will not react to voice commands.
Operating tips
To get the best performance out of the NISSAN
Voice Recognition (VR) system, observe the fol-
lowing:
● Keep the interior of the vehicle as quiet as
possible. Close the windows to eliminate
surrounding noises (traffic noises, vibration
sounds, etc.) , which may prevent the system
from recognizing voice commands correctly.
● Wait until the tone sounds before speaking a
command. Otherwise, the command will not
be received properly.
● Start speaking a command within 5 seconds
after the tone sounds.
● Speak in a natural voice without pausing
between words.
Giving voice commands
To operate NISSAN Voice Recognition, press
and release the
button located on the
steering wheel. After the tone sounds, speak a
command.
The command given is picked up by the micro-
phone, and voice feedback is given when the
command is accepted.
● If you need to hear the available commands
for the current menu again, say “Help” and
the system will repeat them.
● If a command is not recognized, the system
announces, “Command not recognized.
Please try again.” Make sure the command is
said exactly as prompted by the system and
repeat the command in a clear voice.
● If you want to go back to the previous com-
mand, you can say “Go back” or “Correc-
tion” any time the system is waiting for a
response. ●
You can cancel a command when the sys-
tem is waiting for a response by saying,
“Cancel” or “Quit.” The system announces
“Cancel” and ends the VR session. You can
also press and hold the
button on the
steering wheel for 5 seconds at any time to
end the VR session. Whenever the VR ses-
sion is cancelled, a double beep is played to
indicate you have exited the system.
● If you want to adjust the volume of the voice
feedback, press the volume control switches
(+ or -) on the steering wheel while being
provided with feedback. You can also use
the radio volume control knob.
Voice Prompt Interrupt
In most cases you can interrupt the voice feed-
back to speak the next command by pressing
the
button on the steering wheel. After
interrupting the system, wait for a beep before
speaking your command.
One Shot Call
To use the system faster, you may speak the
second level commands with the main menu
command on the main menu. For example, press
the
button and after the tone say, “Call
Redial”.
4-82Monitor, climate, audio, phone and voice recognition systems
Page 274 of 457
●Missed Calls
Speak this command to list the last five
missed calls to the vehicle. If the call is from
an entry in the phonebook, the name will be
displayed. Otherwise, the phone number of
the missed call will be displayed.
Say “Dial” to call the number or “Send Text”
to send a text message to that number. Say
“Next Entry” or “Previous Entry” to move
through the list of missed calls.
● Outgoing Calls
Speak this command to list the last five
outgoing calls from the vehicle. If the call
was to an entry in the phonebook, the name
will be displayed. Otherwise, the phone
number of the outgoing call will be dis-
played.
Say “Dial” to call the number or “Send Text”
to send a text message to that number. Say
“Next Entry” or “Previous Entry” to move
through the list of outgoing calls.
● Redial
Speak this command to call the last number
dialed.
● Call Back
Speak this command to call the number of
the last incoming call to the vehicle.“Messaging”
Speak this command to access text messaging
functions. For additional information on these
commands, refer to “Text messaging” in this sec-
tion.
“Show Applications”
Speak this command to display list of smart-
phone apps available.
NOTE:
Compatible smartphone and registration
necessary to access applications. For addi-
tional information, refer to “Nissan-
Connect
SMwith Mobile Apps” in this sec-
tion.
MAKING A CALL
To make a call from a phone connected to the
vehicle’s Bluetooth® Hands-Free Phone Sys-
tem:
NOTE:
Available commands different if system is
in Manual Control mode. For additional in-
formation, refer to “Manual Control” in this
section. 1. Press the
button.
2. The system will prompt you for a command. Say “Call”.
3. Select one of the available voice commands to continue:
● “(a name)” — Speak the name of a phone-
book entry to place a call to that entry. The
system will respond with the name it inter-
preted from your command and will prompt
you to confirm that the name is correct. Say
“Yes” to initiate the call or “No” to hear an-
other name from the phonebook.
● “List Names” – Speak this command to have
the system list the names in the phonebook
one by one alphabetically. Say “Next Entry”
or “Previous Entry” to move through the list
alphabetically. Say “Select” once desired
contact is heard and displayed on screen.
Say “Dial” to dial the number of the current
name or say “Record Name” to record a
name for the current phonebook entry to be
assigned.
4-86Monitor, climate, audio, phone and voice recognition systems
Page 277 of 457
The text message, sender and delivery time are
shown on the screen. Use the tuning switch on
the steering wheel to scroll through all text mes-
sages if more than one are available. Press
the
button to exit the text message screen.
Press the
button to access the following
options for replying to the text message:
● Call Back
Speak this command to call the sender of
the text message using the Bluetooth®
Hands-Free Phone System.
● Send Text
Speak this command to send a text message
response to the sender of the text message.
● Read Text
Speak this command to read the text mes-
sage again.
● Previous Text
Speak this command to move to the previ-
ous text message (if available) .
● Next Text
Speak this command to move to the next text
message (if available) .
NOTE:
Text messages are only displayed if the
vehicle speed is less than 5 mph (8 km/h).
BLUETOOTH® SETTINGS
To access and adjust the settings for the
Bluetooth® Hands-Free Phone System: 1. Press the SETTING button.
2. Use the TUNE/SCROLL knob to select “Bluetooth” and then press the ENTER but-
ton:
● Bluetooth
Select “On” or “Off” to turn the vehicle’s
Bluetooth® system on or off.
● Add Phone or Device
For additional information, refer to “Con-
necting procedure” in this section. ●
Delete Phone or Device
Select to delete a phone from the displayed
list. The system will ask to confirm before
deleting the phone.
● Replace Phone
Select to replace a phone from the displayed
list. When a selection is made, the system
will ask to confirm before proceeding. The
recorded phonebook for the phone being
deleted will be saved as long as the new
phone’s phonebook is the same as the old
phone’s phonebook.
● Select Phone or Device
Select to connect to a previously connected
phone from the displayed list.
● Show Incoming Calls
Select “Driver Only” to have incoming call
information displayed only in the vehicle in-
formation display. Select “Both” to have in-
coming call information displayed in both the
vehicle information display and the center
display screen.
● Phonebook Download
Select to turn on or off the automatic down-
load of a connected phone’s phonebook.
● Text Message
Select to turn on or off the vehicle’s text
messaging feature.
LHA2274
Monitor, climate, audio, phone and voice recognition systems4-89