Page 94 of 457

2 Instruments and controls
Instrument panel...................................2-2
Meters and gauges ................................2-3
Speedometer and odometer .....................2-4
Tachometer ....................................2-5
Engine coolant temperature gauge ...............2-5
Fuel gauge ....................................2-6
Engine oil pressure gauge (if so equipped) ........2-7
Voltmeter (if so equipped) .......................2-7
Automatic transmission fluid temperature
gauge (if so equipped) ..........................2-8
Compass display (if so equipped) ...................2-8
Compass display ...............................2-9
Warning/indicator lights and audible reminders ......2-12
Checking bulbs ............................... 2-12
Warning lights ................................ 2-13
Indicator lights ................................ 2-18
Audible reminders ............................. 2-20
Vehicle Information Display (if so equipped) .........2-20
How to use the Vehicle Information Display .......2-21
Security systems (if so equipped) ..................2-27
Vehicle security system (if so equipped) ..........2-27
NISSAN vehicle immobilizer system
(if so equipped) ............................... 2-28Windshield wiper and washer switch
...............2-30
Switch operation .............................. 2-30
Rear window and outside mirror (if so equipped)
defroster switch .................................. 2-31
Headlight and turn signal switch ....................2-32
Headlight control switch ........................ 2-33
Daytime running light system (Canada only) ......2-35
Instrument brightness control ...................2-36
Turn signal switch ............................. 2-36
Fog light switch (if so equipped) ................2-37
Horn ............................................ 2-37
Cargo lamp switch (if so equipped) .................2-38
Heated seats (if so equipped) ......................2-38
Vehicle Dynamic Control (VDC) off switch ...........2-39
Electronic locking rear differential (E-Lock) system
switch (if so equipped) ............................ 2-39
Power inverter switch (if so equipped) ..............2-40
Rear sonar system off switch (if so equipped) ........2-41
T
ow mode switch ................................. 2-42
Power outlets .................................... 2-42
12v Outlets ................................... 2-42
120v outlet (if so equipped) ....................2-44
Storage ......................................... 2-46
Page 102 of 457

This gauge indicates the temperature of the au-
tomatic transmission fluid. The automatic trans-
mission fluid temperature is in the nor")
AUTOMATIC TRANSMISSION FLUID
TEMPERATURE GAUGE (if so
equipped)
This gauge indicates the temperature of the au-
tomatic transmission fluid. The automatic trans-
mission fluid temperature is in the normal range
�1when the gauge needle points within the zone
shown in the illustration.
CAUTION
● This gauge is not designed to indicate
low automatic transmission fluid level.
Use the dipstick to check the fluid level.
(For additional information, refer to “5-
speed automatic transmission fluid” in
the “Maintenance and do-it-yourself”
section of this manual.)
● If the gauge indicates automatic trans-
mission fluid temperature over the nor-
mal range, stop the vehicle as soon as
safely possible. Have the vehicle
checked by a NISSAN dealer. Continued
operation of the vehicle may seriously
damage the transmission. This unit measures terrestrial magnetism and in-
dicates the heading direction of the vehicle.
With the ignition switch in the ON position, press
the
orbutton as described in the
charts below to activate various features of the
automatic anti-glare rearview mirror.
Type A (if so equipped)
Push and hold
the
button for about: Feature:
(Push button again for about 1 sec-
ond to change settings)
1 second Compass display toggles on/off
8 seconds Automatic anti-glare/indicator light
toggles on/off
11 seconds Compass zone can be changed to
correct false compass readings
13 seconds Compass enters calibration mode
Type B (if so equipped)
Push and hold
the
button for about: Feature:
(Push button again for about 1 sec-
ond to change settings)
1 second Compass display toggles on/off
8 seconds Compass zone can be changed to
correct false compass readings
10 seconds Compass enters calibration mode
For additional information about the automatic
anti-glare feature, refer to “Automatic anti-glare
rearview mirror” in the “Pre-driving checks and
adjustments” section of this manual.
WIC1247
COMPASS DISPLAY (if so equipped)
2-8Instruments and controls
Page 105 of 457
1. With the display turned on, press and holdthe
for about 10 seconds. The “C”
icon in the compass display will illuminate.
2. Calibrate the compass by driving the vehicle in three complete circles at a maximum
speed of 5 MPH (8 km/h).
3. After completing the circles, the display should return to normal.
CAUTION
●Do not install a ski rack, antenna, etc.,
which are attached to the vehicle by
means of a magnet. They affect the op-
eration of the compass.
● When cleaning the mirror, use a paper
towel or similar material dampened
with glass cleaner. Do not spray glass
cleaner directly on the mirror as it may
cause the liquid cleaner to enter the
mirror housing.
Instruments and controls2-11
Page 125 of 457
●Pre-mix washer fluid concentrates with
water to the manufacturer’s recom-
mended levels before pouring the fluid
into the windshield-washer fluid reser-
voir. Do not use the windshield-washer
reservoir to mix the washer fluid con-
centrate and water.
To defrost the rear window glass and outside
mirrors (if so equipped) , start the engine and
push the rear window defroster switch on. The
rear window defroster indicator light on the
switch comes on. Push the switch again to turn
the defroster off.
The rear window defroster automatically turns off
after approximately 15 minutes.
Type A (if so equipped)
LIC0488
Type B (if so equipped)
LIC1173
REAR WINDOW AND OUTSIDE
MIRROR (if so equipped)
DEFROSTER SWITCH
Instruments and controls2-31
Page 126 of 457
NOTE:
If the rear power window (if so equipped) is
lowered while the defroster switch is on,
the rear window defroster will automati-
cally shut off. The heated outside mirrors (if
so equipped) will remain on. The rear win-
dow defroster will automatically turn on
when the rear power window is fully closed
if the switch is on.
CAUTION
When cleaning the inner side of the rear
window, be careful not to scratch or dam-
age the rear window defroster.
Type C (if so equipped)
LIC1158
Type A (if so equipped)
SIC2745
HEADLIGHT AND TURN SIGNAL
SWITCH
2-32Instruments and controls
Page 151 of 457
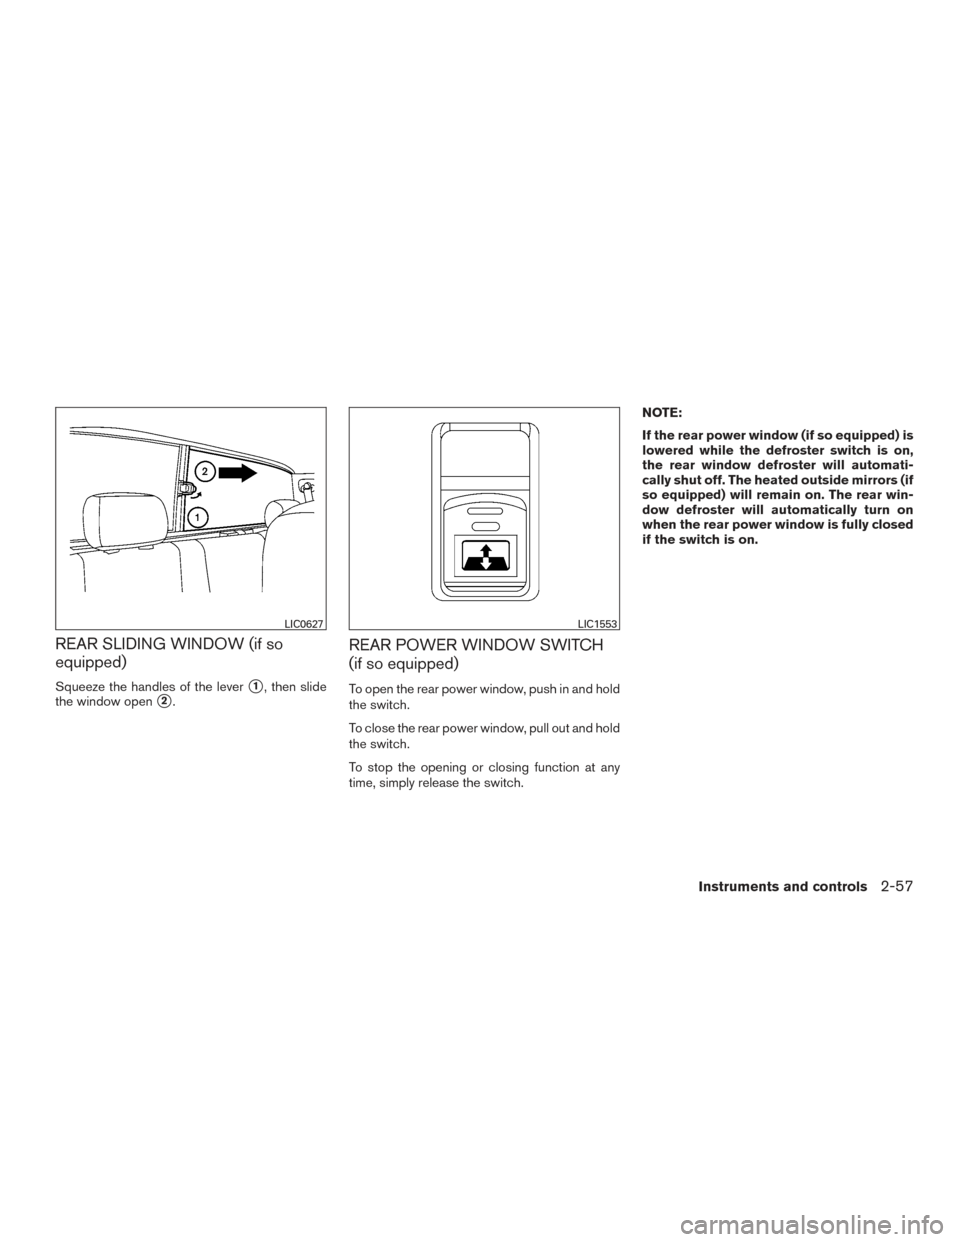
REAR SLIDING WINDOW (if so
equipped)
Squeeze the handles of the lever�1, then slide
the window open
�2.
REAR POWER WINDOW SWITCH
(if so equipped)
To open the rear power window, push in and hold
the switch.
To close the rear power window, pull out and hold
the switch.
To stop the opening or closing function at any
time, simply release the switch. NOTE:
If the rear power window (if so equipped) is
lowered while the defroster switch is on,
the rear window defroster will automati-
cally shut off. The heated outside mirrors (if
so equipped) will remain on. The rear win-
dow defroster will automatically turn on
when the rear power window is fully closed
if the switch is on.
LIC0627LIC1553
Instruments and controls2-57
Page 177 of 457
 , refer
to “Compass display” in the “Instruments and
controls” section of this manual.
Type B (if so equipp")
For additional information about the compass
and compass features
�2(if so equipped) , refer
to “Compass display” in the “Instruments and
controls” section of this manual.
Type B (if so equipped)
With the ignition switch in the ON position, press
the
button as described:
● To turn off the automatic anti-glare feature,
press the
button. The indicator light
will turn off.
● To turn on the automatic anti-glare feature,
press the
button again. The indicator
light will turn on.
The indicator light
�2will illuminate when the
automatic anti-glare feature is operating.
OUTSIDE MIRRORS
WARNING
● Objects viewed in the outside mirror on
the passenger side are closer than they
appear. Be careful when moving to the
right. Using only this mirror could cause
an accident. Use the inside mirror or
glance over your shoulder to properly
judge distances to other objects.
● Do not adjust the mirrors while driving.
You could lose control of your vehicle
and cause an accident.
Type B (if so equipped)
WPD0331
Pre-driving checks and adjustments3-17
Page 180 of 457
Power folding outside mirrors (if so
equipped)
CAUTION
Do not manually fold the power folding
mirrors. Manually folding the mirrors can
damage the mirrors.
Push the switch to open or close the mirrors. If one of the mirrors are manually operated or
bumped, the mirror body can become loose at
the pivot point. To correct electronic mirror op-
eration, cycle the mirrors by pushing the bottom
of the switch until completely closed, then push
the top of the switch until the mirrors are in the
open position.
Heated mirrors (if so equipped)
Some outside mirrors can be heated to defrost,
defog, or de-ice for improved visibility. For addi-
tional information, refer to “Rear window and
outside mirror (if so equipped) defroster switch”
in the “Instruments and controls” section of this
manual.
Type B (if so equipped)
LPD0269LPD2316
3-20Pre-driving checks and adjustments


 is
lowered while the defroster switch is on,
the rear window defroster will automati-
cally shut off. The heated outside mirrors (if
so equipped) will r")

CAUTION
Do not manually fold the power folding
mirrors. Manually folding the mirrors can
damage the mirrors.
Push the switch to open or close the mirrors")