2015 NISSAN ROGUE SELECT radio
[x] Cancel search: radioPage 166 of 322
gle between ON and OFF using the
TUNE·SCROLL control knob.
. RDS Display
When this has been set to ON, RDS (radio
data system) information will be shown on
the display. Select RDS Display and then
push the ENTER/SETTING button. You can
toggle between ON and OFF using the
TUNE·SCROLL control knob.
. iPod Menu language
The “iPod menu language” can be set to the
preferred language.
Select “iPod menu language” and then push
the ENTER/SETTING button. Use the TU-
NE·SCROLL control knob to select the
preferred language.
DISP button:
Display of the screen can be canceled by
pushing the DISP button. You can then listen
to music that is being played back. If you want to
display the screen again, either push the DISP
button once more or push the FM·AM, SiriusXM
Satellite Radio or CD·AUX button.
Switching the display:
Pushing the CD·AUX button will switch the
displays as follows:
CD ?iPod
�Š/USB ?AUX ?CD
BACK button:
When the BACK button is pushed, it returns to
the previous display.
FM-AM-SAT radio operation
radio (FM/AM) band select:
Pushing the FM·AM band select button will
change the band as follows:
AM ?FM1 ?FM2 ?AM
radio (satellite) band select:
Pushing the XM band select button will change
the band as follows:
XM1 ?XM2 ?XM3 ?XM1
When the XM band select button is pushed
while the ignition switch is in the ACC or ON
position, the radio will come on at the channel
last played.
The last channel played will also come on when
the PWR button is pushed to ON.
The satellite radio is not available in Alaska,
Hawaii and Guam.
If another audio source is playing when the radio
band select button is turned to ON, the audio
source will automatically be turned off and the
last radio channel played will come on. When the stereo broadcast signal is weak, the
radio will automatically change from stereo to
monaural reception.
TUNE (Tuning):
.
For AM and FM radio
Turn the radio TUNE·SCROLL control knob
for manual tuning.
. For SiriusXM Satellite Radio
Turn the radio TUNE·SCROLL control knob
to seek channels from all of the categories
when any category is not selected.
SEEK tuning/CAT (category):
. For AM and FM radio
Push the
orbutton to tune from low
to high or high to low frequencies and to
stop at the next broadcasting station.
. For SiriusXM Satellite Radio
Push the
orbutton to tune to the
first channel of the next or previous category.
SCAN tuning:
Push the radio SCAN tuning button to tune from
low to high frequencies and stop at each
broadcasting station/channel for 5 seconds.
Pushing the button again during this 5 seconds
period will stop SCAN tuning and the radio will
remain tuned to that station/channel.
Heater, air conditioner, audio, phone and voice recognition systems4-31
Page 167 of 322
4-32Heater, air conditioner, audio, phone and voice recognition systems
If the radio SCAN tuning button is not pushed
within 5 seconds, SCAN tuning moves to the
next station/channel.
*1to*6Station memory operations:
12 stations/channels can be set for the FM band
(6 each for FM1 and FM2) , 12 for SiriusXM
Satellite Radio (6 each for XM1 and XM2) and 6
stations can be set for the AM band.
1. Choose the radio band using the radio band select button.
2. Tune to the desired station/channel using the SEEK·CAT, SCAN button or the radio
TUNE·SCROLL control knob.
3. Push and hold the desired station preset button
*1to*6.
4. The station indicator will then come on. Memorizing is now complete.
5. Other buttons can be set in the same manner.
If the battery cable is disconnected, or if the fuse
opens, the radio memory will be erased. In that
case, reset the desired stations/channels.
Compact Disc (CD) player operation
Place the ignition switch in the ACC or ON
position and insert the Compact Disc (CD) into
the slot with the label side facing up. The CD will
be guided automatically into the slot and start
playing.
After loading the CD, the number of tracks on
the CD and the play time will appear on the
display.
If the radio is already operating, it will auto-
matically turn off and the CD will play.
If the system has been turned off while the CD
was playing, pushing the PWR button will start
the CD.
Do not use 3.1 in (8 cm) discs.
PLAY:
When the CD·AUX button is pushed with the
system off and the CD loaded, the system will
turn on and the CD will start to play.
When the CD·AUX button is pushed with the
CD loaded and the radio playing, the radio will
automatically be turned off and the CD will start
to play.
Next/Previous Track and Fast
Forward/Rewind:
When the
orbutton is pushed for more
than 1.5 seconds while the CD is being played,
the CD will play while fast forwarding or
rewinding. When the button is released, the
CD will return to normal play speed.
When the
orbutton is pushed for less
than 1.5 seconds while the CD is being played,
the next track or the beginning of the current
track on the CD will be played.
REPEAT (RPT):
When the RPT play button is pushed while the
CD is played, the play pattern can be changed
as follows:
(CD)
Normal �œ1 Track Repeat
(CD with compressed audio files)
Normal ?1 Folder Repeat ?1 Track Repeat ?
Normal
Page 173 of 322
4-38Heater, air conditioner, audio, phone and voice recognition systems
VOLUME control switch
Push up or down the VOLUME control switch to
increase or decrease the volume.
Tuning switch
Memory change (radio):
Push up or down the tuning switch for less than
1.5 seconds to change the next or previous
radio preset.
SEEK tuning (radio):
Push up or down the tuning switch for more than
1.5 seconds to seek the next or previous radio
station.
APS (Automatic Program Search) FF, APS
REW (CD):
Push up or down the tuning switch for less than
1.5 seconds to return to the beginning of the
present program or skip to the next program.
Push several times to skip back or skip through
programs.
This system searches for the blank intervals
between selections. If there is a blank interval
within one program or there is no interval
between programs, the system may not stop in
the desired or expected location.FOLDER change (CD with MP3 or WMA):
Push up or down the tuning switch for more than
1.5 seconds to change the folders (if there are
any folders) .
iPod
�Š:
. Push up or down for less than 1.5 seconds
will increase or decrease the track number.
USB:
. Push up or down for less than 1.5 seconds
will increase or decrease the track number.
. Push up or down for more than 1.5 seconds
will increase/decrease the folder number
SAA2102
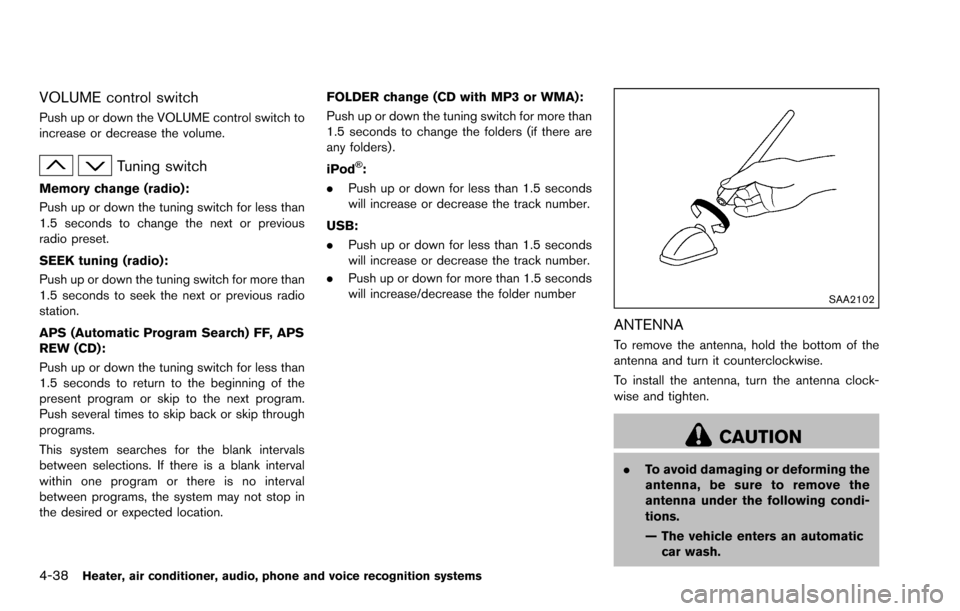
ANTENNA
To remove the antenna, hold the bottom of the
antenna and turn it counterclockwise.
To install the antenna, turn the antenna clock-
wise and tighten.
CAUTION
.To avoid damaging or deforming the
antenna, be sure to remove the
antenna under the following condi-
tions.
— The vehicle enters an automatic
car wash.
Page 174 of 322
— The vehicle enters a garage witha low ceiling.
— The vehicle is covered with a car cover.
. Always properly tighten the antenna
rod during installation. Otherwise,
the antenna rod may break during
vehicle operation. When installing a car phone or a CB radio in
your vehicle, be sure to observe the following
cautions, otherwise the new equipment may
adversely affect the electronic control modules
and electronic control system harness.
WARNING
.
A cellular phone should not be used
for any purpose while driving so full
attention may be given to vehicle
operation. Some jurisdictions prohi-
bit the use of cellular phones while
driving.
. If you must make a call while your
vehicle is in motion, the hands-free
cellular phone operational mode is
highly recommended. Exercise ex-
treme caution at all times so full
attention may be given to vehicle
operation.
. If you are unable to devote full
attention to vehicle operation while
talking on the phone, pull off the
road to a safe location and stop
your vehicle.
CAUTION
.Keep the antenna as far away as
possible from the electronic control
modules.
. Keep the antenna wire more than 8
in (20 cm) away from the electronic
control system harness. Do not
route the antenna wire next to any
harness.
. Adjust the antenna standing-wave
ratio as recommended by the man-
ufacturer.
. Connect the ground wire from the
CB radio chassis to the body.
. For details, consult a NISSAN deal-
er.
Heater, air conditioner, audio, phone and voice recognition systems4-39
CAR PHONE AND CB RADIO
Page 175 of 322
4-40Heater, air conditioner, audio, phone and voice recognition systems
WARNING
.Use a phone after stopping your
vehicle in a safe location. If you
have to use a phone while driving,
exercise extreme caution at all
times so full attention may be given
to vehicle operation.
. If you are unable to devote full
attention to vehicle operation while
talking on the phone, pull off the
road to a safe location and stop
your vehicle.
CAUTION
To avoid draining the vehicle battery,
use a phone after starting the engine.
Your NISSAN is equipped with the Bluetooth
�Š
Hands-Free Phone System. If you have a
compatible Bluetooth�Šenabled cellular phone,
you can set up the wireless connection between
your cellular phone and the in-vehicle phone
module. With Bluetooth
�Šwireless technology,
you can make or receive a hands-free telephone
call in your vehicle. Once your cellular phone is connected to the in-
vehicle phone module, no other phone connect-
ing procedure is required. Your phone is
automatically connected with the in-vehicle
phone module when the ignition switch is
placed in the ON position with the connected
cellular phone turned on and carried in the
vehicle.
You can connect up to 5 different Bluetooth
�Š
cellular phones in the in-vehicle phone module.
However, you can talk on only one cellular phone
at a time.
Before using the Bluetooth
�ŠHands-Free Phone
System, refer to the following notes.
. Wireless LAN (Wi-Fi) and the Bluetooth
�Š
functions share the same frequency band
(2.4 GHz) . Using the Bluetooth�Šand the
wireless LAN functions at the same time may
slow down or disconnect the communica-
tion and cause undesired noise. It is
recommended that you turn off the wireless
LAN (Wi-Fi) when using the Bluetooth
�Š
functions.
. Set up the wireless connection between a
compatible cellular phone and the in-vehicle
phone module before using the Bluetooth
�Š
Hands-Free Phone System.
. Some Bluetooth�Šenabled cellular phones
may not be recognized by the in-vehicle phone module. Please visit www.nissanusa.
com/bluetooth for a recommended phone
list and connecting.
. You will not be able to use a hands-free
phone under the following conditions:
— Your vehicle is outside of the telephone
service area.
— Your vehicle is in an area where it is difficult to receive radio waves; such as in
a tunnel, in an underground parking
garage, near a tall building or in a
mountainous area.
— Your cellular phone is locked to prevent it from being dialed.
. When the radio wave condition is not ideal
or ambient sound is too loud, it may be
difficult to hear the other person’s voice
during a call.
. Immediately after the ignition switch is
placed in the ON position, it may be
impossible to receive a call for a short
period of time.
. Do not place the cellular phone in an area
surrounded by metal or far away from the in-
vehicle phone module to prevent tone quality
degradation and wireless connection dis-
ruption.
. While a cellular phone is connected through
the Bluetooth�Šwireless connection, the
Bluetooth�ŠHANDS-FREE PHONE
SYSTEM (if so equipped)
Page 176 of 322
battery power of the cellular phone may
discharge quicker than usual. The Blue-
tooth
�ŠHands-Free Phone System cannot
charge cellular phones.
. If the Bluetooth
�ŠHands-Free Phone System
seems to be malfunctioning, see “Trouble-
shooting guide” later in this section. You can
also visit www.nissanusa.com/bluetooth for
troubleshooting help.
. Some cellular phones or other devices may
cause interference or a buzzing noise to
come from the audio system speakers.
Storing the device in a different location
may reduce or eliminate the noise.
. Refer to the cellular phone Owner’s Manual
regarding battery charging, cellular phone
antenna, etc.
. This wireless hands free car kit is based on
Bluetooth
�Štechnology,
— Frequency: 2402 MHz - 2480 MHz
— Output Power: 7,94 dBm E.I.R.P
— Modulation: FHSS GFSK 8DPSK, p/
4DQPSK
— Number of Channel: 79
— This wireless equipment can’t be used for any services related to safety because
there is the possibility of radio interfer-
ence.
REGULATORY INFORMATION
FCC Regulatory information
. CAUTION: To maintain compliance with
FCC’s RF exposure guidelines, use only
the supplied antenna. Unauthorized antenna,
modification, or attachments could damage
the transmitter and may violate FCC regula-
tions.
. Operation is subject to the following two
conditions:
1) this device may not cause interference
and
2) this device must accept any interference, including interference that may cause
undesired operation of the device
Bluetooth�Štrademark
Bluetooth�Šis a trademark owned
by Bluetooth SIG, Inc., and
licensed to Visteon Corporation.
SAA3436
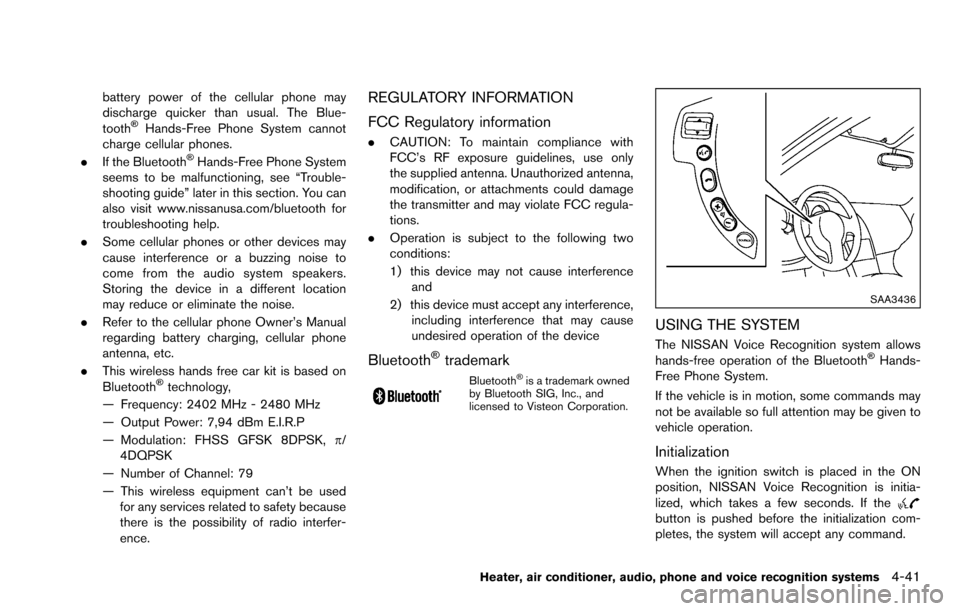
USING THE SYSTEM
The NISSAN Voice Recognition system allows
hands-free operation of the Bluetooth�ŠHands-
Free Phone System.
If the vehicle is in motion, some commands may
not be available so full attention may be given to
vehicle operation.
Initialization
When the ignition switch is placed in the ON
position, NISSAN Voice Recognition is initia-
lized, which takes a few seconds. If the
button is pushed before the initialization com-
pletes, the system will accept any command.
Heater, air conditioner, audio, phone and voice recognition systems4-41
Page 177 of 322
4-42Heater, air conditioner, audio, phone and voice recognition systems
Operating tips
To get the best performance out of the NISSAN
Voice Recognition system, observe the follow-
ing:
.Keep the interior of the vehicle as quiet as
possible. Close the windows to eliminate
surrounding noises (traffic noises, vibration
sounds, etc.) , which may prevent the system
from recognizing voice commands correctly.
. Wait until the tone sounds before speaking a
command. Otherwise, the command will not
be received properly.
. Start speaking a command within 5 seconds
after the tone sounds.
. Speak in a natural voice without pausing
between words.
Giving voice command
To operate NISSAN Voice Recognition, push
and release thebutton located on the
steering wheel. After the tone sounds, speak a
command.
The command given is picked up by the
microphone, and voice feedback is given when
the command is accepted.
. If you need to hear the available commands
for the current menu again, say “Help” and
the system will repeat them. .
If a command is not recognized, the system
announces, “Command not recognized.
Please say again.” Repeat the command in
a clear voice.
. If you want to go back to the previous
command, you can say “Go back” or
“Correction” anytime the system is waiting
for a response.
. You can cancel a command when the
system is waiting for a response by saying,
“Cancel” or “Quit.” The system announces
“Cancel” and ends the Voice Recognition
(VR) session. You can also push and hold
the
button for 5 seconds on the
steering wheel at any time to cancel the
VR session. Whenever the VR session is
cancelled, a double beep is played to
indicate you have exited the system.
. If you want to adjust the volume of the voice
feedback, push the volume control switch (+
or�í) on the steering wheel while being
provided with feedback. You can also use
the radio volume control knob.
Voice prompt interrupt:
In most cases you can interrupt the voice
feedback to speak the next command by
pushing the
button on the steering wheel.
After interrupting the system, wait for a beep
before speaking your command. One shot call:
To use the system faster, you may speak the
second level commands with the main menu
command on the main menu. For example, push
the
button and after the tone say, “Call
Redial”.
How to say numbers
NISSAN Voice Recognition requires a certain
way to speak numbers in voice commands.
Refer to the rules and examples below.
. Either “zero” or “oh” can be used for “0”.
Example: 1-800-662-6200
— “One eight oh oh six six two six two oh
oh”, or
— “One eight zero zero six six two six two oh oh”
. Words can be used for the first 4 digits
places only.
Example: 1-800-662-6200
— “One eight hundred six six two six two oh
oh”,
— NOT “One eight hundred six six two sixty two hundred, and
— NOT “One eight oh oh six six two sixty two hundred.
. Numbers can be spoken in small groups.
The system will prompt you to continuing
entering digits, if desired.
Page 192 of 322
function and the low tire pressure
warning light will flash for approxi-
mately 1 minute. The light will
remain on after 1 minute. Contact
your NISSAN dealer as soon as
possible for tire replacement and/
or system resetting.
. Replacing tires with those not ori-
ginally specified by NISSAN could
affect the proper operation of the
TPMS.
. Do not inject any tire liquid or
aerosol tire sealant into the tires,
as this may cause a malfunction of
the tire pressure sensors.
CAUTION
.The TPMS may not function properly
when the wheels are equipped with
tire chains or the wheels are buried
in snow.
. Do not place metalized film or any
metal parts (antenna, etc.) on the
windows. This may cause poor re-
ception of the signals from the tire
pressure sensors, and the TPMS will not function properly.
Some devices and transmitters may temporarily
interfere with the operation of the TPMS and
cause the low tire pressure warning light to
illuminate. Some examples are:
. Facilities or electric devices using similar
radio frequencies are near the vehicle.
. If a transmitter set to similar frequencies is
being used in or near the vehicle.
. If a computer (or similar equipment) or a DC/
AC converter is being used in or near the
vehicle.
FCC Notice:
This device complies with Part 15 of the
FCC Rules. Operation is subject to the
following two conditions: (1) This device
may not cause harmful interference, and
(2) this device must accept any interfer-
ence received, including interference that
may cause undesired operation.
Note: Changes or modifications not ex-
pressly approved by the party responsible
for compliance could void the user’s
authority to operate the equipment.
AVOIDING COLLISION AND ROLL-
OVER
WARNING
Failure to operate this vehicle in a safe
and prudent manner may result in loss
of control or an accident.
Be alert and drive defensively at all times. Obey
all traffic regulations. Avoid excessive speed,
high speed cornering, or sudden steering
maneuvers, because these driving practices
could cause you to lose control of your vehicle.
As with any vehicle, a loss of control could
result in a collision with other vehicles or
objects, or cause the vehicle to rollover,
particularly if the loss of control causes the
vehicle to slide sideways. Be attentive at all
times, and avoid driving when tired. Never drive
when under the influence of alcohol or drugs
(including prescription or over-the-counter
drugs which may cause drowsiness) . Always
wear your seat belt as outlined in the “Seat
belts” (P.1-9) of this manual, and also instruct
your passengers to do so.
Seat belts help reduce the risk of injury in
collisions and rollovers. In a rollover crash, an
unbelted or improperly belted person is
Starting and driving5-5