2015 NISSAN ROGUE SELECT change wheel
[x] Cancel search: change wheelPage 209 of 322
5-22Starting and driving
ning.
. Engine idling speed is high while
warming up the engine. Be espe-
cially careful when starting or driv-
ing on slippery surfaces.
. When turning the vehicle in LOCK
mode on paved roads, you may feel
a braking effect. This is a normal
condition of the AWD model.
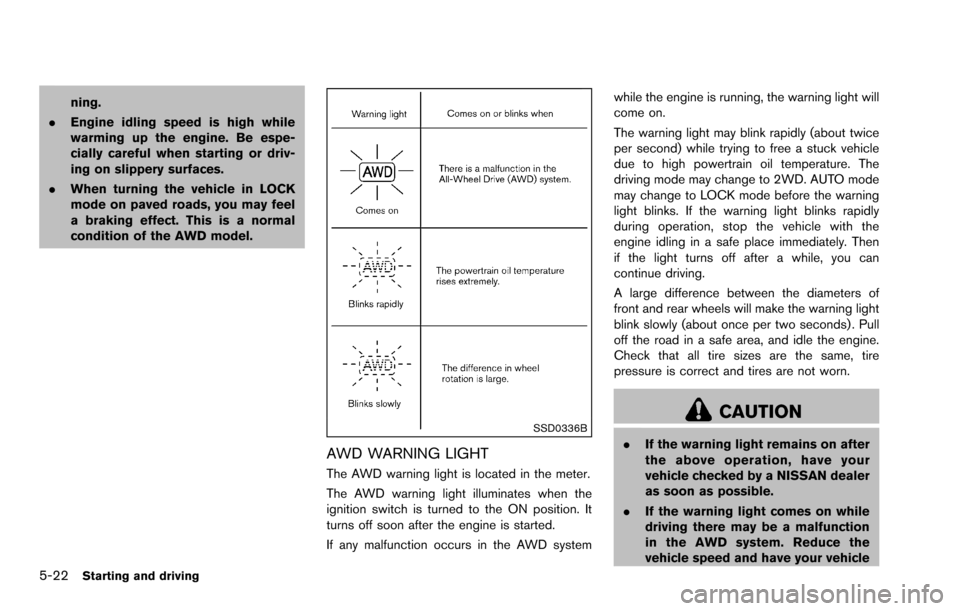
SSD0336B
AWD WARNING LIGHT
The AWD warning light is located in the meter.
The AWD warning light illuminates when the
ignition switch is turned to the ON position. It
turns off soon after the engine is started.
If any malfunction occurs in the AWD system while the engine is running, the warning light will
come on.
The warning light may blink rapidly (about twice
per second) while trying to free a stuck vehicle
due to high powertrain oil temperature. The
driving mode may change to 2WD. AUTO mode
may change to LOCK mode before the warning
light blinks. If the warning light blinks rapidly
during operation, stop the vehicle with the
engine idling in a safe place immediately. Then
if the light turns off after a while, you can
continue driving.
A large difference between the diameters of
front and rear wheels will make the warning light
blink slowly (about once per two seconds) . Pull
off the road in a safe area, and idle the engine.
Check that all tire sizes are the same, tire
pressure is correct and tires are not worn.
CAUTION
.
If the warning light remains on after
the above operation, have your
vehicle checked by a NISSAN dealer
as soon as possible.
. If the warning light comes on while
driving there may be a malfunction
in the AWD system. Reduce the
vehicle speed and have your vehicle
Page 220 of 322
failure. Serious vehicle damage
could occur and may lead to an
accident and could result in serious
personal injury. Check the tire pres-
sure for all four tires. Adjust the tire
pressure to the recommended COLD
tire pressure shown on the Tire and
Loading Information label to turn
the low tire pressure warning light
OFF. If you have a flat tire, replace it
with a spare tire as soon as possi-
ble.
. When a spare tire is mounted or a
wheel is replaced, the TPMS will not
function and the low tire pressure
warning light will flash for approxi-
mately 1 minute. The light will
remain on after 1 minute. Contact
your NISSAN dealer as soon as
possible for tire replacement and/
or system resetting.
. Replacing tires with those not ori-
ginally specified by NISSAN could
affect the proper operation of the
TPMS.
. Do not inject any tire liquid or
aerosol tire sealant into the tires,
as this may cause a malfunction of the tire pressure sensors.
CHANGING A FLAT TIRE
If you have a flat tire, follow the instructions
below.
Stopping the vehicle
1. Safely move the vehicle off the road and
away from traffic.
2. Turn on the hazard warning flashers.
3. Park on a level surface and apply the parking brake. Move the shift lever to the P (Park)
position.
4. Turn off the engine.
5. Raise the hood to warn other traffic, and to signal professional road assistance person-
nel that you need assistance.
6. Have all passengers get out of the vehicle and stand in a safe place, away from traffic
and clear of the vehicle.
WARNING
.Make sure the parking brake is
securely applied and the transmis-
sion is shifted into the P (Park)
position. .
Never change tires when the vehicle
is on a slope, ice or slippery areas.
This is hazardous.
. Never change tires if oncoming
traffic is close to your vehicle. Wait
for professional road assistance.
In case of emergency6-3
Page 223 of 322
6-6In case of emergency
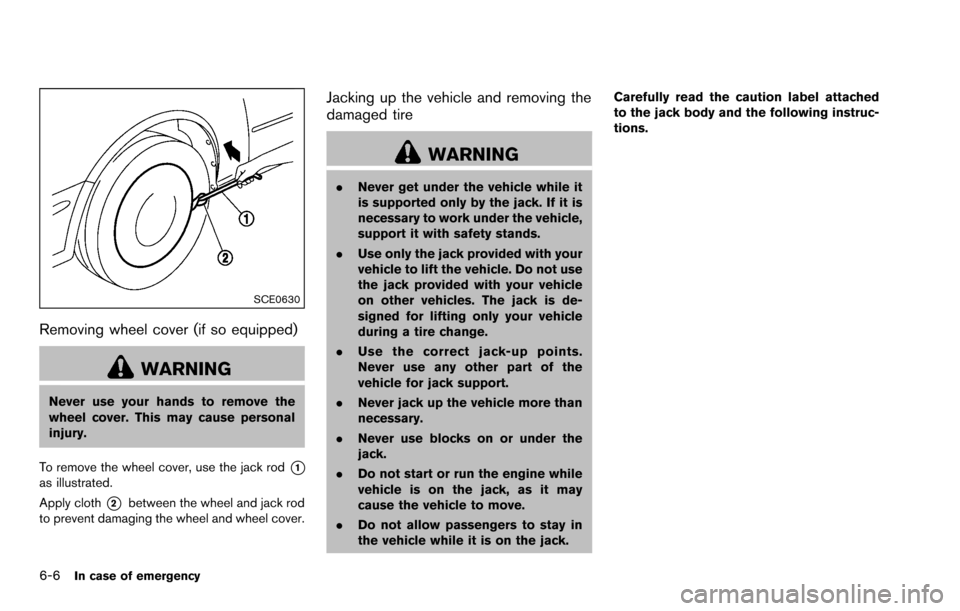
SCE0630
Removing wheel cover (if so equipped)
WARNING
Never use your hands to remove the
wheel cover. This may cause personal
injury.
To remove the wheel cover, use the jack rod
*1as illustrated.
Apply cloth
*2between the wheel and jack rod
to prevent damaging the wheel and wheel cover.
Jacking up the vehicle and removing the
damaged tire
WARNING
. Never get under the vehicle while it
is supported only by the jack. If it is
necessary to work under the vehicle,
support it with safety stands.
. Use only the jack provided with your
vehicle to lift the vehicle. Do not use
the jack provided with your vehicle
on other vehicles. The jack is de-
signed for lifting only your vehicle
during a tire change.
. Use the correct jack-up points.
Never use any other part of the
vehicle for jack support.
. Never jack up the vehicle more than
necessary.
. Never use blocks on or under the
jack.
. Do not start or run the engine while
vehicle is on the jack, as it may
cause the vehicle to move.
. Do not allow passengers to stay in
the vehicle while it is on the jack. Carefully read the caution label attached
to the jack body and the following instruc-
tions.
Page 236 of 322
finish or leave swirl marks.
REMOVING SPOTS
Remove tar and oil spots, industrial dust,
insects, and tree sap as quickly as possible
from the paint surface to avoid lasting damage
or staining. Special cleaning products are
available at a NISSAN dealer or any automotive
accessory stores.
UNDERBODY
In areas where road salt is used in winter, the
underbody must be cleaned regularly. This will
prevent dirt and salt from building up and
causing the acceleration of corrosion on the
underbody and suspension. Before the winter
period and again in the spring, the underseal
must be checked and, if necessary, re-treated.
GLASS
Use glass cleaner to remove smoke and dust
film from the glass surfaces. It is normal for glass
to become coated with a film after the vehicle is
parked in the hot sun. Glass cleaner and a soft
cloth will easily remove this film.
CAUTION
When cleaning the inside of the win-
dows, do not use sharp-edged tools,
abrasive cleaners or chlorine-baseddisinfectant cleaners. They could da-
mage the electrical conductors, radio
antenna elements or rear window
defroster elements.
WHEELS
Wash the wheels when washing the vehicle to
maintain their appearance.
.
Clean the inner side of the wheels when the
wheel is changed or the underside of the
vehicle is washed.
. Inspect wheel rims regularly for dents or
corrosion. Such damage may cause loss of
pressure or poor seal at the tire bead.
. NISSAN recommends that the road wheels
be waxed to protect against road salt in
areas where it is used during winter.
CAUTION
Do not use abrasive cleaners when
washing the wheels.
Aluminum alloy wheels
Wash regularly with a sponge dampened in a
mild soap solution, especially during winter
months in areas where road salt is used. Salt
could discolor the wheels if not removed.
CAUTION
Follow the directions below to avoid
staining or discoloring the wheels:
.Do not use a cleaner that uses
strong acid or alkali contents to
clean the wheels.
. Do not apply wheel cleaners to the
wheels when they are hot. The
wheel temperature should be the
same as ambient temperature.
. Rinse the wheel to completely re-
move the cleaner within 15 minutes
after the cleaner is applied.
CHROME PARTS
Clean chrome parts regularly with a non-
abrasive chrome polish to maintain the finish.
Appearance and care7-3
Page 244 of 322
Lights*:Clean the headlights on a regular basis.
Make sure that the headlights, stop lights, tail
lights, turn signal lights, and other lights are all
operating properly and installed securely. Also
check headlight aim.
Road wheel nuts (lug nuts)*: When checking
the tires, make sure no wheel nuts are missing,
and check for any loose wheel nuts. Tighten if
necessary.
Tire rotation*: Tires should be rotated every
5,000 miles (8,000 km) .
Tires*: Check the pressure with a gauge often
and always prior to long distance trips. If
necessary, adjust the pressure in all tires,
including the spare, to the pressure specified.
Check carefully for damage, cuts or excessive
wear.
Tire Pressure Monitoring System (TPMS)
transmitter components: Replace the TPMS
transmitter grommet seal, valve core and cap
when the tires are replaced due to wear or age.
Wheel alignment and balance: If the vehicle
should pull to either side while driving on a
straight and level road, or if you detect uneven or
abnormal tire wear, there may be a need for
wheel alignment.
If the steering wheel or seat vibrates at normal
highway speeds, wheel balancing may be
needed. For additional information regarding tires, refer
to “Important Tire Safety Information” in the
Warranty Information Booklet.
Windshield:
Clean the windshield on a regular
basis. Check the windshield at least every six
months for cracks or other damage. Have a
damaged windshield repaired by a qualified
repair facility.
Windshield wiper blades*: Check for cracks
or wear if they do not wipe properly.
Inside the vehicle
The maintenance items listed here should be
checked on a regular basis, such as when
performing scheduled maintenance, cleaning
the vehicle, etc.
Accelerator pedal: Check the pedal for
smooth operation and make sure the pedal
does not catch or require uneven effort. Keep
the floor mat away from the pedal.
Brake pedal: Check the pedal for smooth
operation. If the brake pedal suddenly goes
down further than normal, the pedal feels
spongy or the vehicle seems to take longer to
stop, see a NISSAN dealer immediately. Keep
the floor mat away from the pedal.
Brakes: Check that the brakes do not pull the
vehicle to one side when applied. Continuously Variable Transmission (CVT)
P (Park) position mechanism:
On a fairly
steep hill, check that the vehicle is held securely
with the shift lever in the P (Park) position
without applying any brakes.
Parking brake: Check the parking brake
operation regularly. The vehicle should be
securely held on a fairly steep hill with only the
parking brake applied. If the parking brake needs
adjusted, see a NISSAN dealer.
Seat belts: Check that all parts of the seat belt
system (for example, buckles, anchors, adjusters
and retractors) operate properly and smoothly,
and are installed securely. Check the belt
webbing for cuts, fraying, wear or damage.
Seats: Check seat position controls such as
seat adjusters, seatback recliner, etc. to ensure
they operate smoothly and that all latches lock
securely in every position. Check that the head
restraints/headrests move up and down
smoothly and that the locks (if so equipped)
hold securely in all latched positions.
Steering wheel: Check for changes in the
steering conditions, such as excessive free play,
hard steering or strange noises.
Warning lights and chimes: Make sure that
all warning lights and chimes are operating
properly.
Maintenance and do-it-yourself8-3
Page 278 of 322
Replacing wheels and tires
When replacing a tire, use the same size, tread
design, speed rating and load carrying capacity
as originally equipped. (See “Specifications”
(P.9-7) for recommended types and sizes of
tires and wheels.)
WARNING
.The use of tires other than those
recommended or the mixed use of
tires of different brands, construc-
tion (bias, bias-belted or radial) , or
tread patterns can adversely affect
the ride, braking, handling, ground
clearance, body-to-tire clearance,
tire chain clearance, speedometer
calibration, headlight aim and bum-
per height. Some of these effects
may lead to accidents and could
result in serious personal injury.
. For 2WD models, if your vehicle was
originally equipped with 4 tires that
were the same size and you are only
replacing 2 of the 4 tires, install the
new tires on the rear axle. Placing
new tires on the front axle may
cause loss of vehicle control in
some driving conditions and cause an accident and personal injury.
. If the wheels are changed for any
reason, always replace with wheels
which have the same off-set dimen-
sion. Wheels of a different off-set
could cause premature tire wear,
degrade vehicle handling character-
istics and/or interference with the
brake discs/drums. Such interfer-
ence can lead to decreased braking
efficiency and/or early brake pad/
shoe wear. See “Wheels and tires”
(P.9-7) of this manual for wheel off-
set dimensions.
. When a spare tire is mounted or a
wheel is replaced, the TPMS will not
function and the low tire pressure
warning light will flash for approxi-
mately 1 minute. The light will
remain on after 1 minute. Contact
your NISSAN dealer as soon as
possible for tire replacement and/
or system resetting.
. Replacing tires with those not ori-
ginally specified by NISSAN could
affect the proper operation of the
TPMS.
. Do not install a damaged or de-
formed wheel or tire even if it has been repaired. Such wheels or tires
could have structural damage and
could fail without warning.
. The use of retread tire is not re-
commended.
. For additional information regard-
ing tires, refer to “Important Tire
Safety Information” in the Warranty
Information Booklet.
CAUTION
Always use tires of the same type, size,
brand, construction (bias, bias-belted
or radial) , and tread pattern on all four
wheels. Failure to do so may result in a
circumference difference between tires
on the front and rear axles which will
cause excessive tire wear and may
damage the transmission, transfer case
and differential gears (AWD models) .
Maintenance and do-it-yourself8-37
Page 296 of 322
securing cargo.
WARNING
.Properly secure all cargo with ropes
or straps to help prevent it from
sliding or shifting. Do not place
cargo higher than the seatbacks. In
a sudden stop or collision, unse-
cured cargo could cause personal
injury.
. The child restraint top tether strap
may be damaged by contact with
items in the cargo area. Secure any
items in the cargo area. Your child
could be seriously injured or killed
in a collision if the top tether strap is
damaged.
. Do not load your vehicle any heavier
than the GVWR or the maximum
front and rear GAWRs. If you do,
parts of your vehicle can break, tire
damage could occur, or it can
change the way your vehicle han-
dles. This could result in loss of
control and cause personal injury.
LOADING TIPS
.The GVW must not exceed GVWR or
GAWR as specified on the F.M.V.S.S.
certification label.
. Do not load the front and rear axle to
the GAWR. Doing so will exceed the
GVWR.
WARNING
.Properly secure all cargo with
ropes or straps to help prevent it
from sliding or shifting. Do not
place cargo higher than the
seatbacks. In a sudden stop or
collision, unsecured cargo could
cause personal injury.
. Do not load your vehicle any
heavier than the GVWR or the
maximum front and rear
GAWRs. If you do, parts of your
vehicle can break, tire damage
could occur, or it can change the
way your vehicle handles. This
could result in loss of control
and cause personal injury. .
Overloading not only can short-
en the life of your vehicle and
the tire, but can cause unsafe
vehicle handling and longer
braking distances. This may
cause a premature tire failure,
which could result in a serious
accident and personal injury.
Failures caused by overloading
are not covered by the vehicle’s
warranty.
MEASUREMENT OF WEIGHTS
Secure loose items to prevent weight shifts
that could affect the balance of your
vehicle. When the vehicle is loaded, drive
to a scale and weigh the front and the rear
wheels separately to determine axle loads.
Individual axle loads should not exceed
either of the Gross Axle Weight Ratings
(GAWR) . The total of the axle loads should
not exceed the Gross Vehicle Weight
Rating (GVWR) . These ratings are given
on the vehicle certification label. If weight
ratings are exceeded, move or remove
items to bring all weights below the ratings.
Technical and consumer information9-15
Page 303 of 322
9-22Technical and consumer information
Trailer brakes
If your trailer is equipped with a braking system,
make sure it conforms to federal and/or local
regulations and that it is properly installed.
WARNING
Never connect a trailer brake system
directly to the vehicle brake system.
Pre-towing tips
.Be certain your vehicle maintains a level
position when a loaded or unloaded trailer is
hitched. Do not drive the vehicle if it has an
abnormal nose-up or nose-down condition;
check for improper tongue load, overload,
worn suspension or other possible causes
of either condition.
. Always secure items in the trailer to prevent
load shift while driving.
. Keep the cargo load as low as possible in
the trailer to keep the trailer center of gravity
low.
. Load the trailer so approximately 60% of the
trailer load is in the front half and 40% is in
the back half. Also make sure the load is
balanced side to side. .
Check your hitch, trailer tire pressure,
vehicle tire pressure, trailer light operation,
and trailer wheel lug nuts every time you
attach a trailer to the vehicle.
. Be certain your rearview mirrors conform to
all federal, state or local regulations. If not,
install any mirrors required for towing before
driving the vehicle.
. Determine the overall height of the vehicle
and trailer so the required clearance is
known.Trailer towing tips
In order to gain skill and an understanding of the
vehicle’s behavior, you should practice turning,
stopping and backing up in an area which is free
from traffic. Steering stability, and braking
performance will be somewhat different than
under normal driving conditions.
.Always secure items in the trailer to prevent
load shift while driving.
. Lock the trailer hitch coupler with a pin or
lock to prevent the coupler from inadver-
tently becoming unlatched.
. Avoid abrupt starts, acceleration or stops.
. Avoid sharp turns or lane changes.
. Always drive your vehicle at a moderate
speed. Some states or provinces have
specific speed limits for vehicles that are towing trailers. Obey the local speed limits.
. When backing up, hold the bottom of the
steering wheel with one hand. Move your
hand in the direction in which you want the
trailer to go. Make small corrections and
back up slowly. If possible, have someone
guide you when you are backing up.
Always block the wheels on both vehicle and
trailer when parking. Parking on a slope is not
recommended; however, if you must do so:
CAUTION
If you move the shift lever to the P
(Park) position before blocking the
wheels and applying the parking brake,
transmission damage could occur.
1. Apply and hold the brake pedal.
2. Have someone place blocks on the downhill side of the vehicle and trailer wheels.
3. After the wheel blocks are in place, slowly release the brake pedal until the blocks
absorb the vehicle load.
4. Apply the parking brake.
5. Shift the transmission into P (Park) .