2015 NISSAN ROGUE display
[x] Cancel search: displayPage 10 of 32
8
LOOSE FUEL CAP
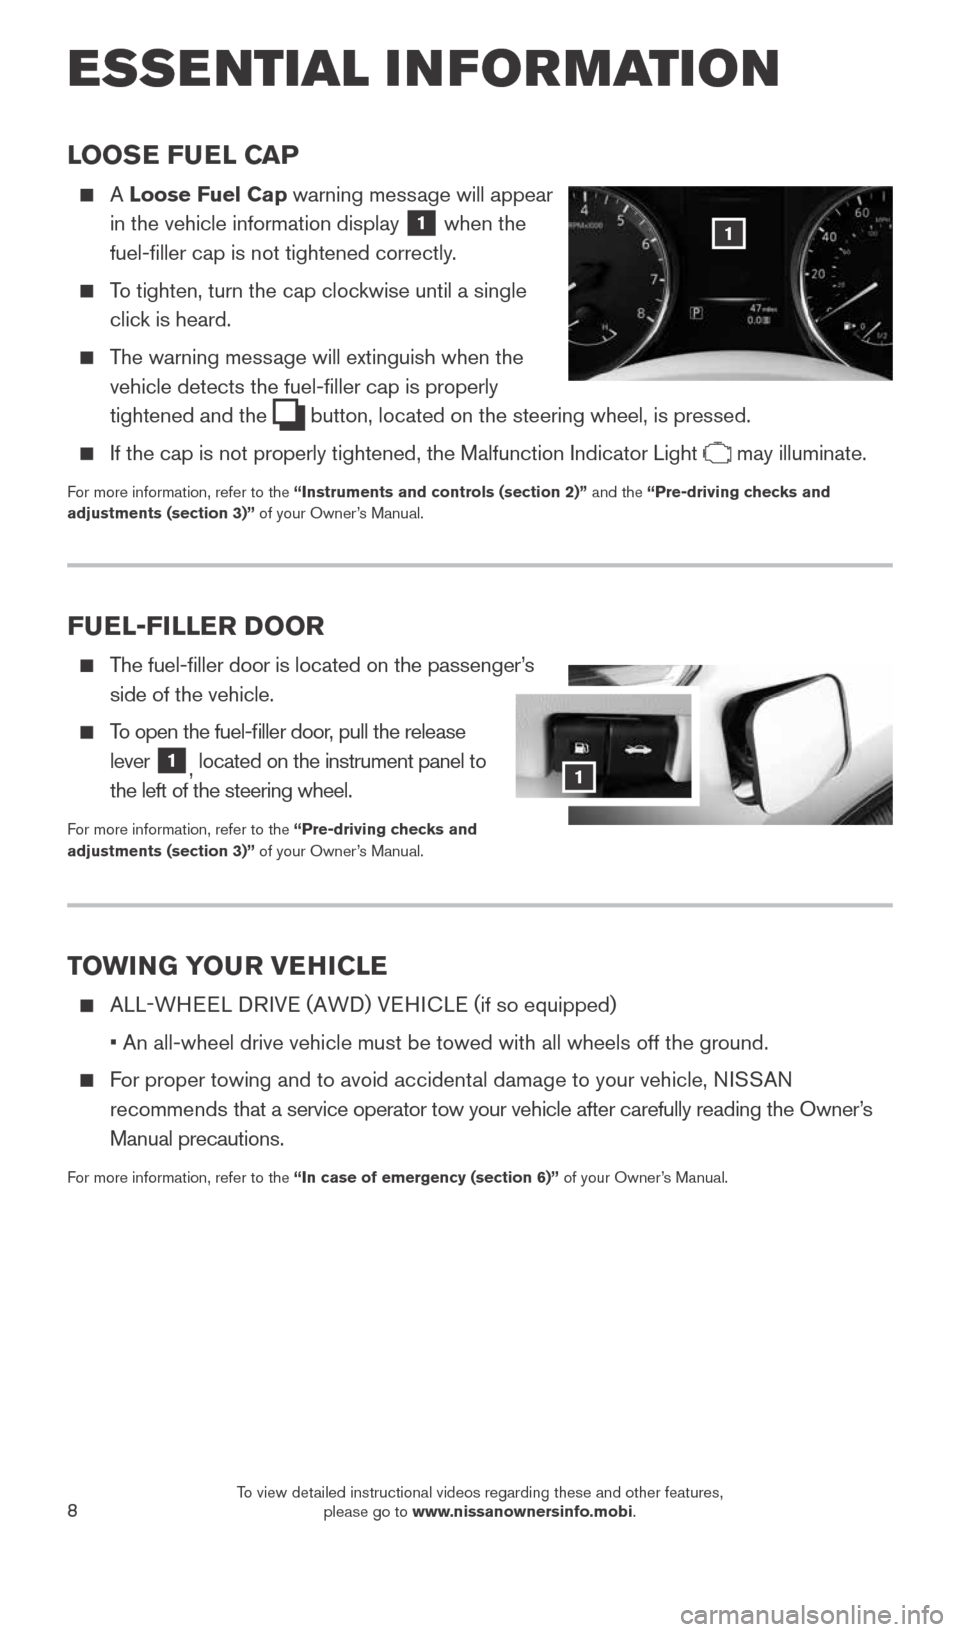
A Loose Fuel Cap warning message will appear
in the vehicle information display
1 when the
fuel-filler cap is not tightened correctly.
To tighten, turn the cap clockwise until a single
click is heard.
The warning message will extinguish when the
vehicle detects the fuel-filler cap is properly
tightened and the
button, located on the steering wheel, is pressed.
If the cap is not properly tightened, the Malfunction Indicator Light may illuminate.
For more information, refer to the “Instruments and controls (section 2)” and the “Pre-driving checks and
adjustments (section 3)” of your Owner’s Manual.
1
TOWING YOUR VEHICLE
ALL-WHEEL DRIVE (AWD) VEHICLE ( if so equipped)
• An all-wheel drive vehicle must be towed with all wheels off the gr\
ound.
For proper towing and to avoid accidental damage to your vehicle, NISSAN
recommends that a service operator tow your vehicle after carefully reading the Own\
er’s
Manual precautions.
For more information, refer to the “In case of emergency (section 6)” of your Owner’s Manual.
FUEL-FILLER DOOR
The fuel-filler door is located on the passenger’s
side of the vehicle.
To open the fuel-filler door, pull the release
lever
1, located on the instrument panel to
the left of the steering wheel.
For more information, refer to the “Pre-driving checks and
adjustments (section 3)” of your Owner’s Manual.
1
ESSE NTIAL I N FOR MATION
1904704_15d_Rogue_QRG_031915.indd 83/19/15 1:22 PM
To view detailed instructional videos regarding these and other features, please go to www.nissanownersinfo.mobi.
Page 11 of 32
9
OUTSIDE TEMPERATURE DISPLAY
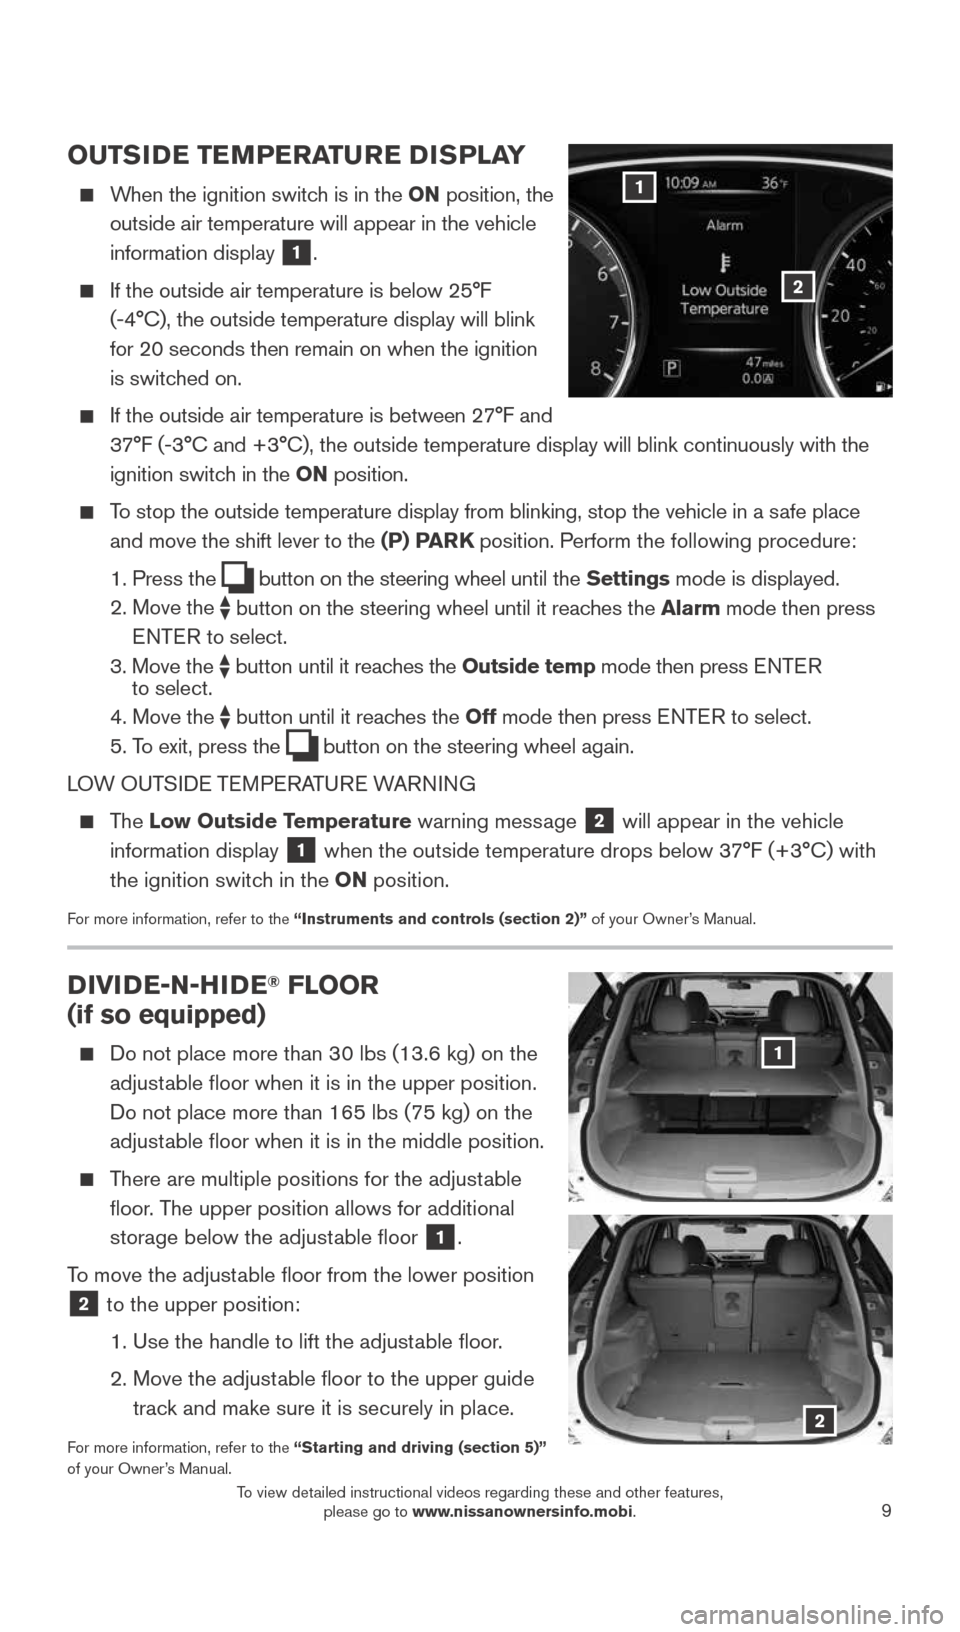
When the ignition switch is in the ON position, the
outside air temperature will appear in the vehicle
information display
1.
If the outside air temperature is below 25°F
(-4°C), the outside temperature display will blink
for 20 seconds then remain on when the ignition
is switched on.
If the outside air temperature is between 27°F and
37°F (-3°C and +3°C), the outside temperature display will bli\
nk continuously with the
ignition switch in the ON position.
To stop the outside temperature display from blinking, stop the vehicle i\
n a safe place
and move the shift lever to the (P) PARK position. Perform the following procedure:
1. Press the
button on the steering wheel until the Settings mode is displayed.
2. Move the
button on the steering wheel until it reaches the Alarm mode then press
E NTE R to select.
3. Move the
button until it reaches the Outside temp mode then press E NTE R
to select.
4. Move the
button until it reaches the Off mode then press E NTE R to select.
5. To exit, press the button on the steering wheel again.
LOW OUTSIDE TEMPERATURE WARNING
The Low Outside Temperature warning message 2 will appear in the vehicle
information display
1 when the outside temperature drops below 37°F (+3°C) with
the ignition switch in the ON position.
For more information, refer to the “Instruments and controls (section 2)” of your Owner’s Manual.
1
2
DIVIDE-N-HIDE® FLOOR
(if so equipped)
Do not place more than 30 lbs (13.6 kg) on the
adjustable floor when it is in the upper position.
Do not place more than 165 lbs (75 kg) on the
adjustable floor when it is in the middle position.
There are multiple positions for the adjustable
floor. The upper position allows for additional
storage below the adjustable floor
1.
To move the adjustable floor from the lower position
2 to the upper position:
1. Use the handle to lift the adjustable floor.
2. Move the adjustable floor to the upper guide
track and make sure it is securely in place.
For more information, refer to the “Starting and driving (section 5)”
of your Owner’s Manual.
1
2
1904704_15d_Rogue_QRG_031915.indd 93/19/15 1:22 PM
To view detailed instructional videos regarding these and other features, please go to www.nissanownersinfo.mobi.
Page 12 of 32
10
CLOCK SET/ADJUSTMENT
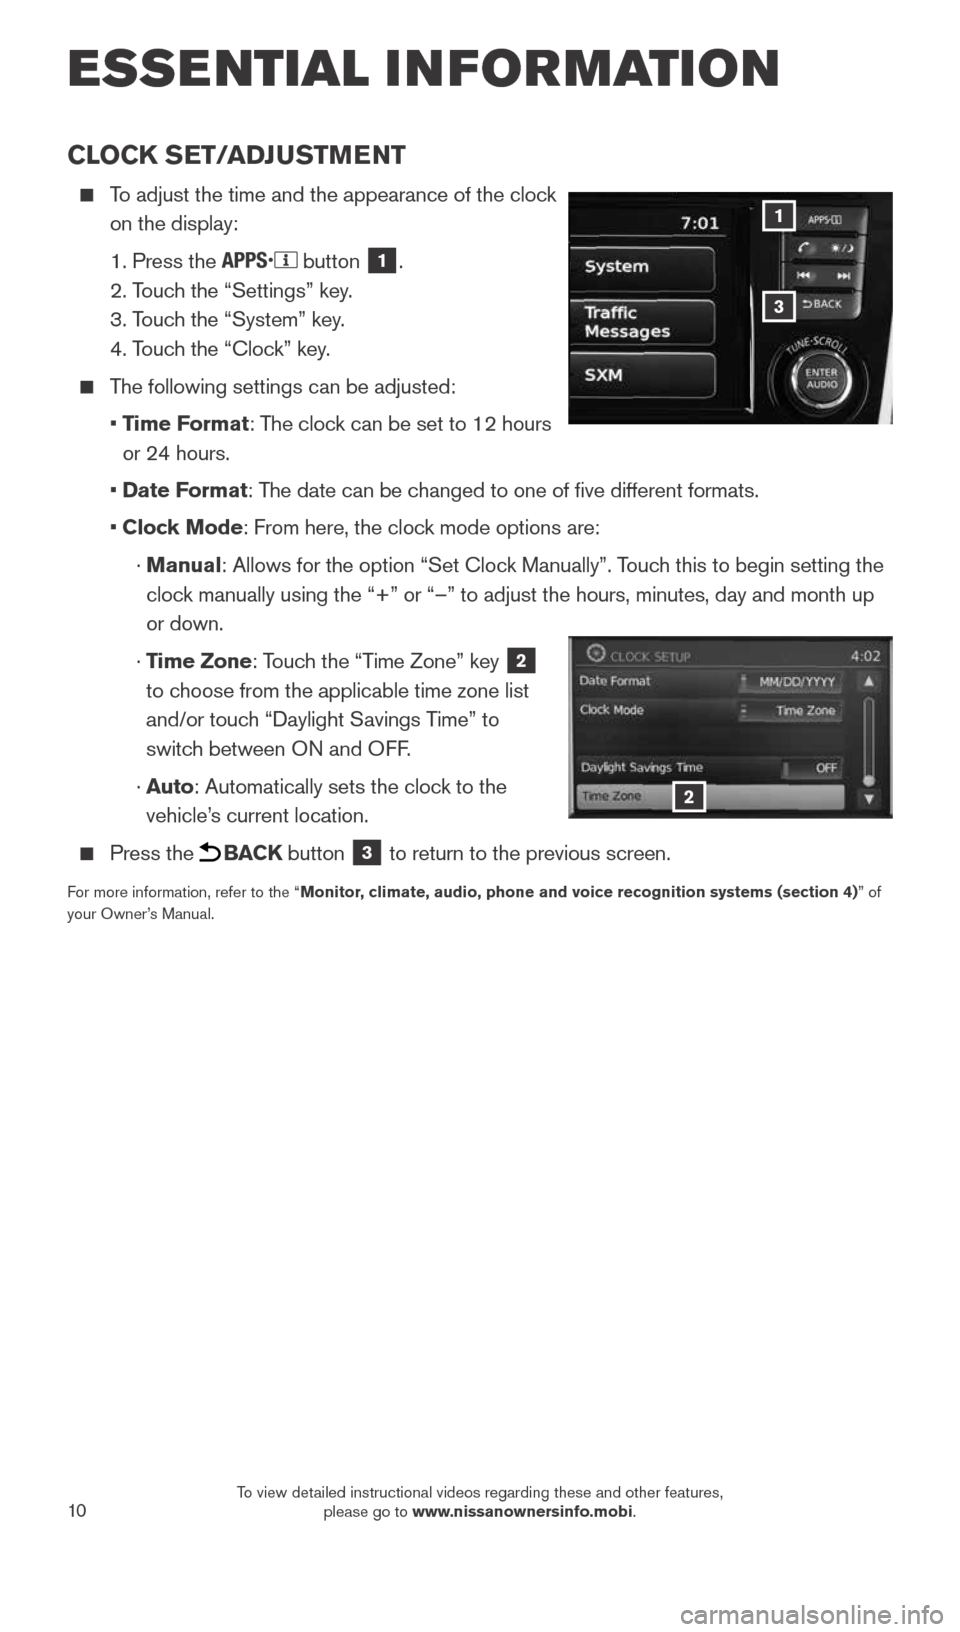
To adjust the time and the appearance of the clock
on the display:
1. Press the
button 1.
2. Touch the “Settings” key.
3. Touch the “System” key.
4. Touch the “Clock” key.
The following settings can be adjusted:
• Time Format: The clock can be set to 12 hours
or 24 hours.
• Date Format: The date can be changed to one of five different formats.
• Clock Mode: From here, the clock mode options are:
· Manual: Allows for the option “Set Clock Manually”. Touch this to begin setting the
clock manually using the “+” or “–” to adjust the hours, minu\
tes, day and month up
or down.
· Time Zone: Touch the “Time Zone” key
2
to choose from the applicable time zone list
and/or touch “Daylight Savings Time” to
switch between ON and OFF.
· Auto: Automatically sets the clock to the
vehicle’s current location.
Press the BACK button 3 to return to the previous screen.
For more information, refer to the “Monitor, climate, audio, phone and voice recognition systems (section 4) ” of
your Owner’s Manual.
3
1
2
ESSE NTIAL I N FOR MATION
1904704_15d_Rogue_QRG_031915.indd 103/19/15 1:22 PM
To view detailed instructional videos regarding these and other features, please go to www.nissanownersinfo.mobi.
Page 20 of 32
18
CRUISE CONTROL
The cruise control system enables you to set a
constant cruising speed once the vehicle has
reached 25 mph (40 km/h). The system will
automatically maintain the set speed until you tap
the brake pedal, accelerate, cancel or turn the
system off.
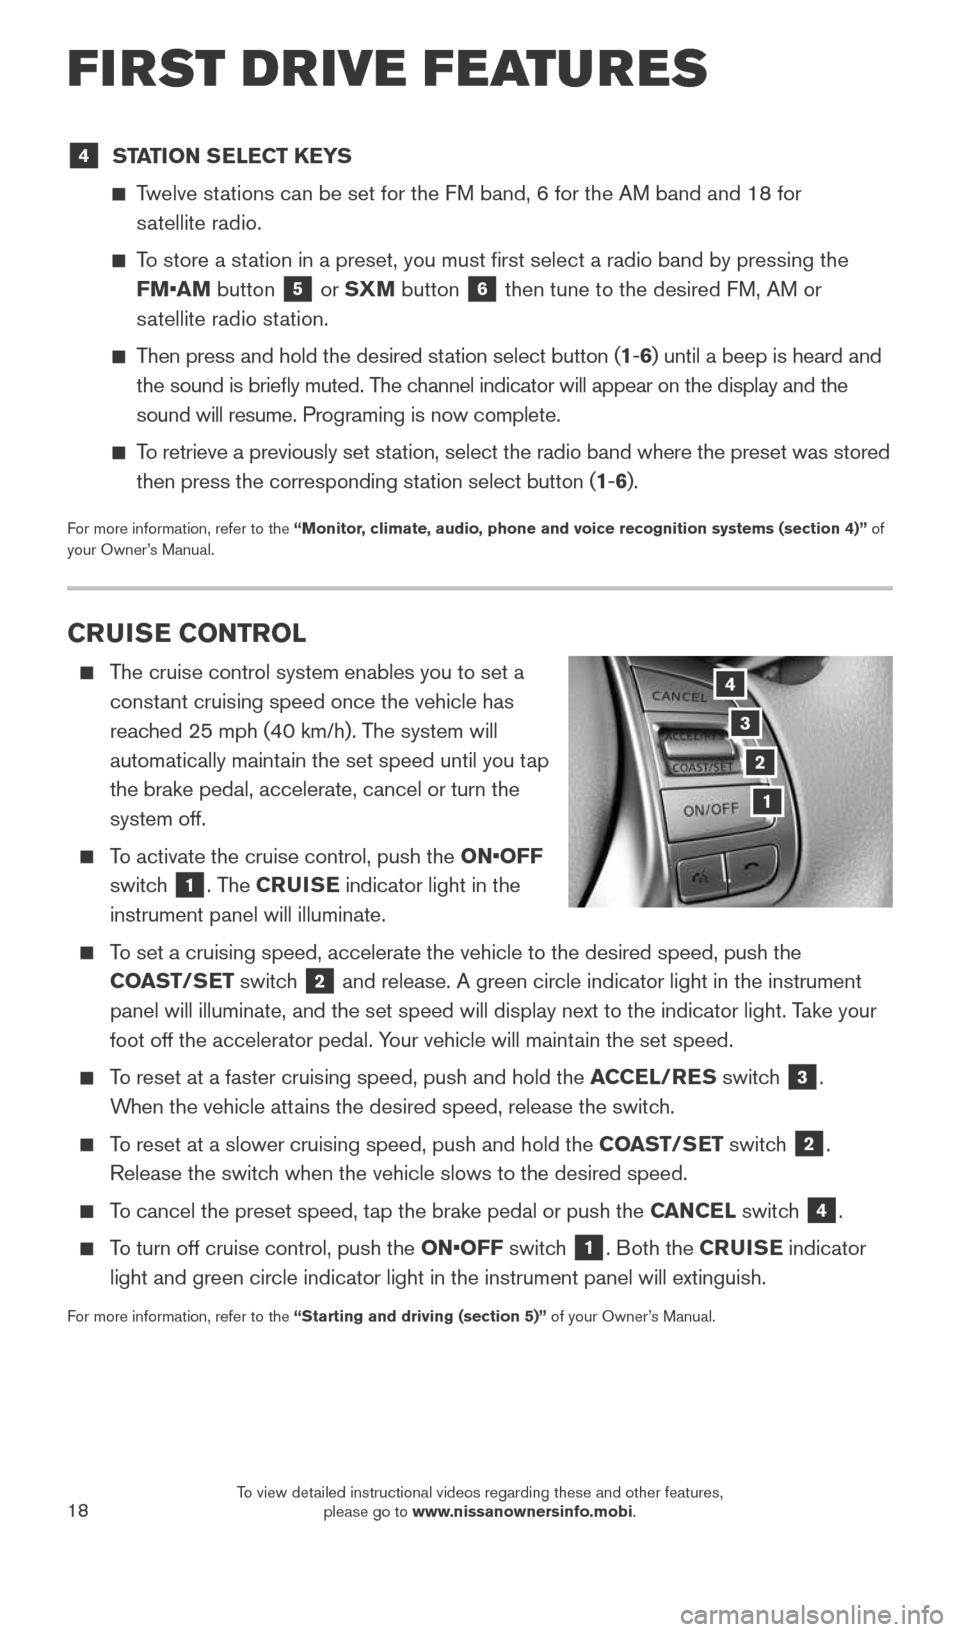
To activate the cruise control, push the ON•OFF
switch
1. The CRUISE indicator light in the
instrument panel will illuminate.
To set a cruising speed, accelerate the vehicle to the desired speed, pus\
h the
COAST/SET switch
2 and release. A green circle indicator light in the instrument
panel will illuminate, and the set speed will display next to the indica\
tor light. Take your
foot off the accelerator pedal. Your vehicle will maintain the set speed.
To reset at a faster cruising speed, push and hold the ACCEL/RES switch 3.
When the vehicle attains the desired speed, release the switch.
To reset at a slower cruising speed, push and hold the COAST/SET switch 2.
Release the switch when the vehicle slows to the desired speed.
To cancel the preset speed, tap the brake pedal or push the CANCEL switch 4.
To turn off cruise control, push the ON•OFF switch 1. Both the CRUISE indicator
light and green circle indicator light in the instrument panel will exti\
nguish.
For more information, refer to the “Starting and driving (section 5)” of your Owner’s Manual.
3
2
1
4
4 STATION SELECT KEYS
Twelve stations can be set for the FM band, 6 for the AM band and 18 for
satellite radio.
To store a station in a preset, you must first select a radio band by pressing the \
FM•AM button
5 or SXM button 6 then tune to the desired FM, AM or
satellite radio station.
Then press and hold the desired station select button (1 -6 ) until a beep is heard and
the sound is briefly muted. The channel indicator will appear on the display and the
sound will resume. Programing is now complete.
To retrieve a previously set station, select the radio band where the preset was stored
then press the corresponding station select button (1 -6 ).
For more information, refer to the “Monitor, climate, audio, phone and voice recognition systems (section 4)” of
your Owner’s Manual.
FIRST DRIVE FEATURES
1904704_15d_Rogue_QRG_031915.indd 183/19/15 1:23 PM
To view detailed instructional videos regarding these and other features, please go to www.nissanownersinfo.mobi.
Page 22 of 32
20
SYSTEM GUIDE
VEHICLE INFORMATION DISPLAY
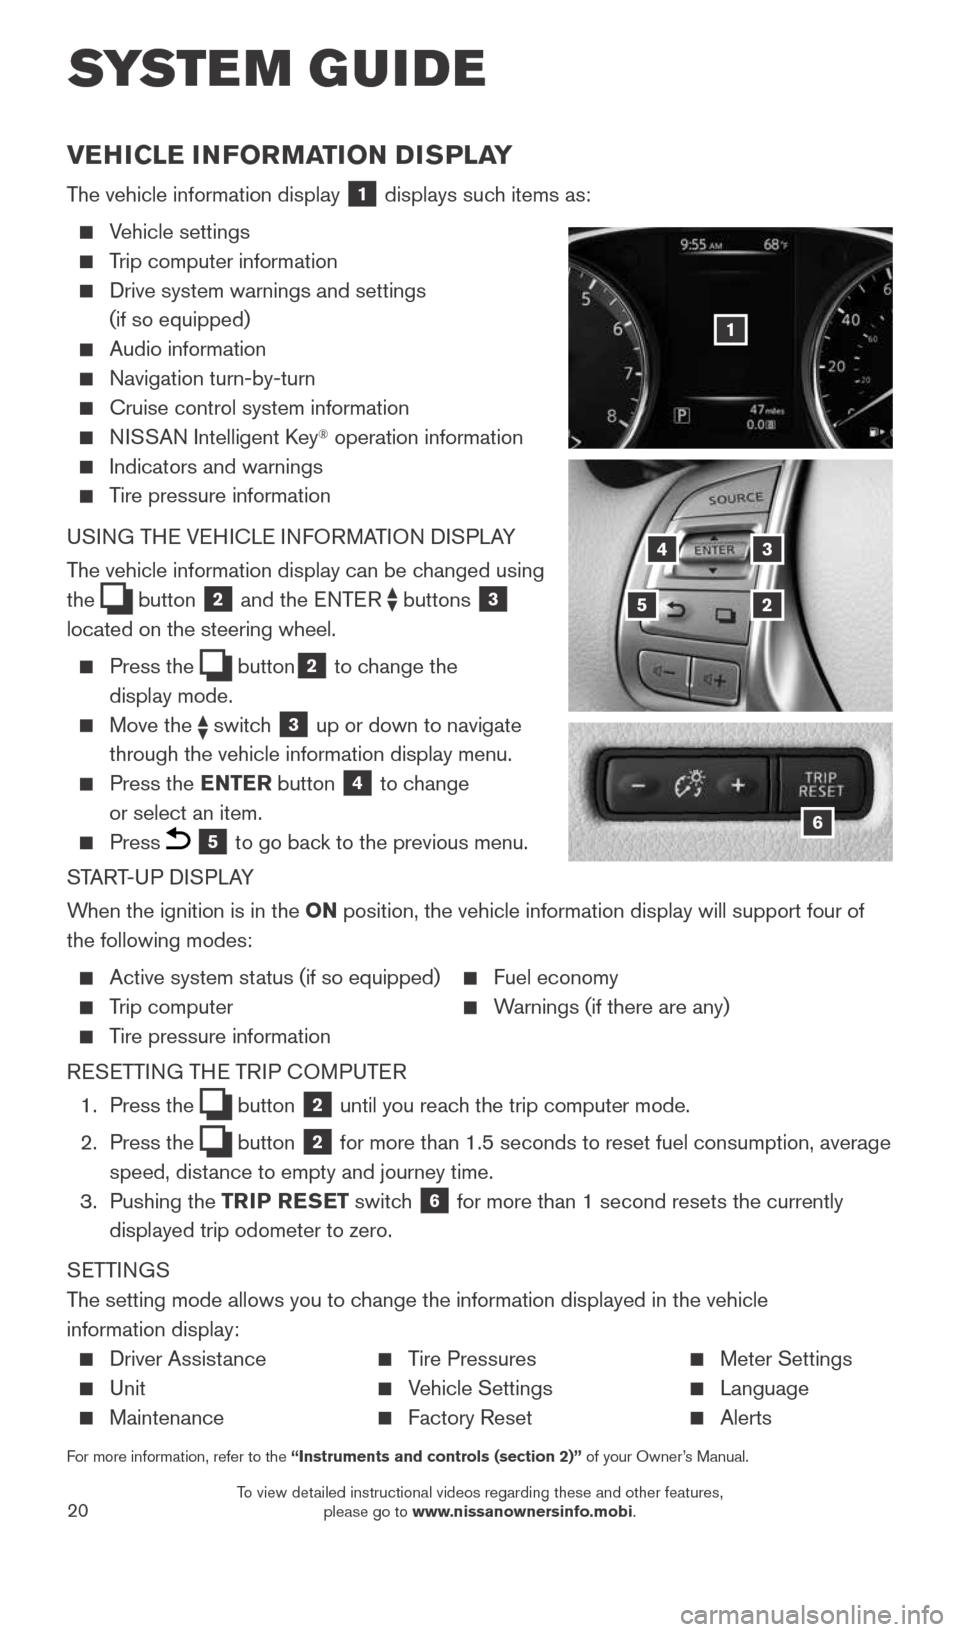
The vehicle information display 1 displays such items as:
Vehicle settings
Trip computer information
Drive system warnings and settings
(if so equipped)
Audio information
Navigation turn-by-turn
Cruise control system information
NISSAN Intelligent Key® operation information
Indicators and warnings
Tire pressure information
USING THE VEHICLE INFORMATION DISPLAY
The vehicle information display can be changed using
the
button 2 and the ENTER buttons 3
located on the steering wheel.
Press the button2 to change the
display mode.
Move the switch 3 up or down to navigate
through the vehicle information display menu.
Press the ENTER button 4 to change
or select an item.
Press 5 to go back to the previous menu.
START-UP DISPLAY
When the ignition is in the ON position, the vehicle information display will support four of
the following modes:
Active system status (if so equipped) Fuel economy
Trip computer Warnings (if there are any)
Tire pressure information
RESETTING THE TRIP COMPUTER
1. Press the
button 2 until you reach the trip computer mode.
2. Press the
button 2 for more than 1.5 seconds to reset fuel consumption, average
speed, distance to empty and journey time.
3. Pushing the TRIP RESET switch
6 for more than 1 second resets the currently
displayed trip odometer to zero.
SETTINGS
The setting mode allows you to change the information displayed in the vehicle
information display:
Driver Assistance Tire Pressures Meter Settings
Unit Vehicle Settings Language
Maintenance Factory Reset Alerts
For more information, refer to the “Instruments and controls (section 2)” of your Owner’s Manual.
5
3
2
4
6
1
1904704_15d_Rogue_QRG_031915.indd 203/19/15 1:23 PM
To view detailed instructional videos regarding these and other features, please go to www.nissanownersinfo.mobi.
Page 23 of 32
21
NISSANCONNECTSM MOBILE APPS
Integrates popular smartphone apps and services into your vehicle.
The NissanConnect Mobile Apps companion app must be downloaded to your smartphone, and you must be enrolled.
FOR SYSTEM WITH NAVIGATION
• iPhone
®: Please connect over USB when using an iPhone® with NissanConnect
M obile Apps.
• Android: Please connect over Bluetooth
® when using an Android device with
NissanConnect Mobile Apps.
FOR SYSTEM WITHOUT NAVIGATION
• iPhone
®: Please connect over Bluetooth® when using an iPhone® with NissanConnect
Mobile Apps.
• Android: Please connect over Bluetooth
® when using an Android device with
NissanConnect M obile Apps.
For more information on how to pair your phone and set up NissanConnect Mobile
Apps, visit: www.nissanusa.com/connect/support.
For more information, refer to the “Monitor, climate, audio, phone and voice recognition systems (section 4) ” of
your Owner’s Manual.
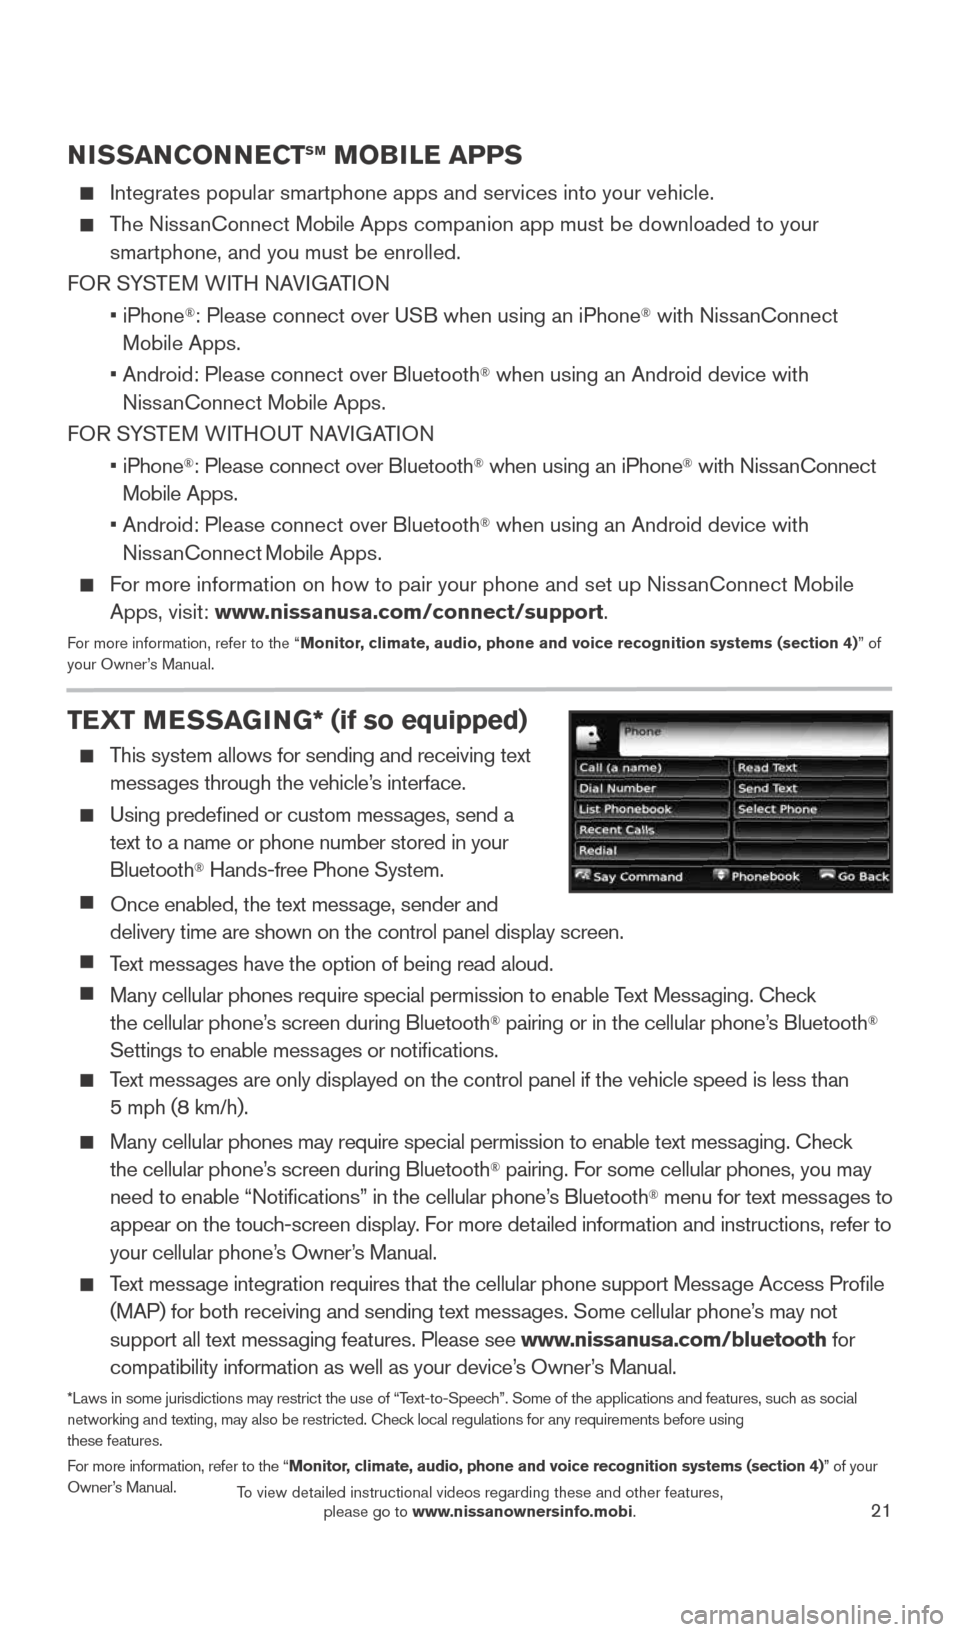
TEXT MESSAGING* (if so equipped)
This system allows for sending and receiving text
messages through the vehicle’s interface.
Using predefined or custom messages, send a
text to a name or phone number stored in your
Bluetooth
® Hands-free Phone System.
Once enabled, the text message, sender and
delivery time are shown on the control panel display screen.
Text messages have the option of being read aloud.
Many cellular phones require special permission to enable Text Messaging. Check
the cellular phone’s screen during Bluetooth® pairing or in the cellular phone’s Bluetooth®
Settings to enable messages or notifications.
Text messages are only displayed on the control panel if the vehicle speed is les\
s than
5 mph (8 km/h).
Many cellular phones may require special permission to enable text messaging. Check
the cellular phone’s screen during Bluetooth® pairing. For some cellular phones, you may
need to enable “Notifications” in the cellular phone’s Bluetooth® menu for text messages to
appear on the touch-screen display. For more detailed information and instructions, refer to
your cellular phone’s Owner’s Manual.
Text message integration requires that the cellular phone support Message Access Profile
(MAP) for both receiving and sending text messages. Some cellular phone’s may not
support all text messaging features. Please see www.nissanusa.com/bluetooth for
compatibility information as well as your device’s Owner’s Manual.
*Laws in some jurisdictions may restrict the use of “Text-to-Speech”. Some of the applications and features, such as social
networking and texting, may also be restricted. Check local regulations for any requirements before using
these features.
For more information, refer to the “Monitor, climate, audio, phone and voice recognition systems (section 4)” of your
Owner’s Manual.
1904704_15d_Rogue_QRG_031915.indd 213/19/15 1:23 PM
To view detailed instructional videos regarding these and other features, please go to www.nissanownersinfo.mobi.
Page 25 of 32
23
3. Initiate pairing from the cellular phone.
• The connecting procedure varies according to each cellular phone model.
For detailed connecting instructions and a list of compatible cellular phones,
please visit www.nissanusa.com/bluetooth.
• When prompted, compare the PIN on the display with the PIN code shown on the
handset. If your device does not support Secure Simple Pairing and reque\
sts you to
input a PIN, enter “1234” from the handset.
4. Say a name for the cellular phone when the system asks you to provide one\
. You can
give the cellular phone a name of your choice.
PHONEBOOK REGISTRATION
When the cellular phone is connected to the in-vehicle module, the data stored in the
cellular phone, such as phonebook, outgoing call logs, incoming call logs and missed
call logs, is automatically transferred and registered to the system.
The availability of this function depends on each cellular phone. The copying procedure
also varies according to each cellular phone. See your cellular phone’s Owner’s Manual
for more information.
Up to 1,000 phone entries per registered cellular phone can be stored in\
the phonebook.
MAKING A CALL
1. Push the
button on the steering wheel. A tone will sound.
2. Say: “Call”. The system acknowledges the command and announces the next set of
available commands.
3. Say: “the registered person’s name”. The system acknowledges the command and
announces the next set of available commands.
4. Say: “Yes”. The system acknowledges the command and makes the call.
RECEIVING/ENDING A CALL
To accept the call, press the
button on the steering wheel.
To reject the call, press the button on the steering wheel.
To hang-up, press the button on the steering wheel.
BLUETOOTH® SYSTEM WITH NAVIGATION (if so equipped)
Send predefined or custom text messages* through your vehicle’s Bluetooth® system.
Receive texts through your vehicle’s Bluetooth® system that can be read to you.
Bluetooth® Streaming Audio allows you to use a compatible Bluetooth® device to play
audio files. Once your compatible device is connected to the vehicle’\
s audio system, the
audio files will play through the vehicle’s speakers.
*Laws in some jurisdictions may restrict the use of “Text-to-Speech”. Some of the applications and features, such as
social networking and texting, may also be restricted. Check local regulations for any requirements before using
these features.
1904704_15d_Rogue_QRG_031915.indd 233/19/15 1:23 PM
To view detailed instructional videos regarding these and other features, please go to www.nissanownersinfo.mobi.
Page 26 of 32
24
SYSTEM GUIDE
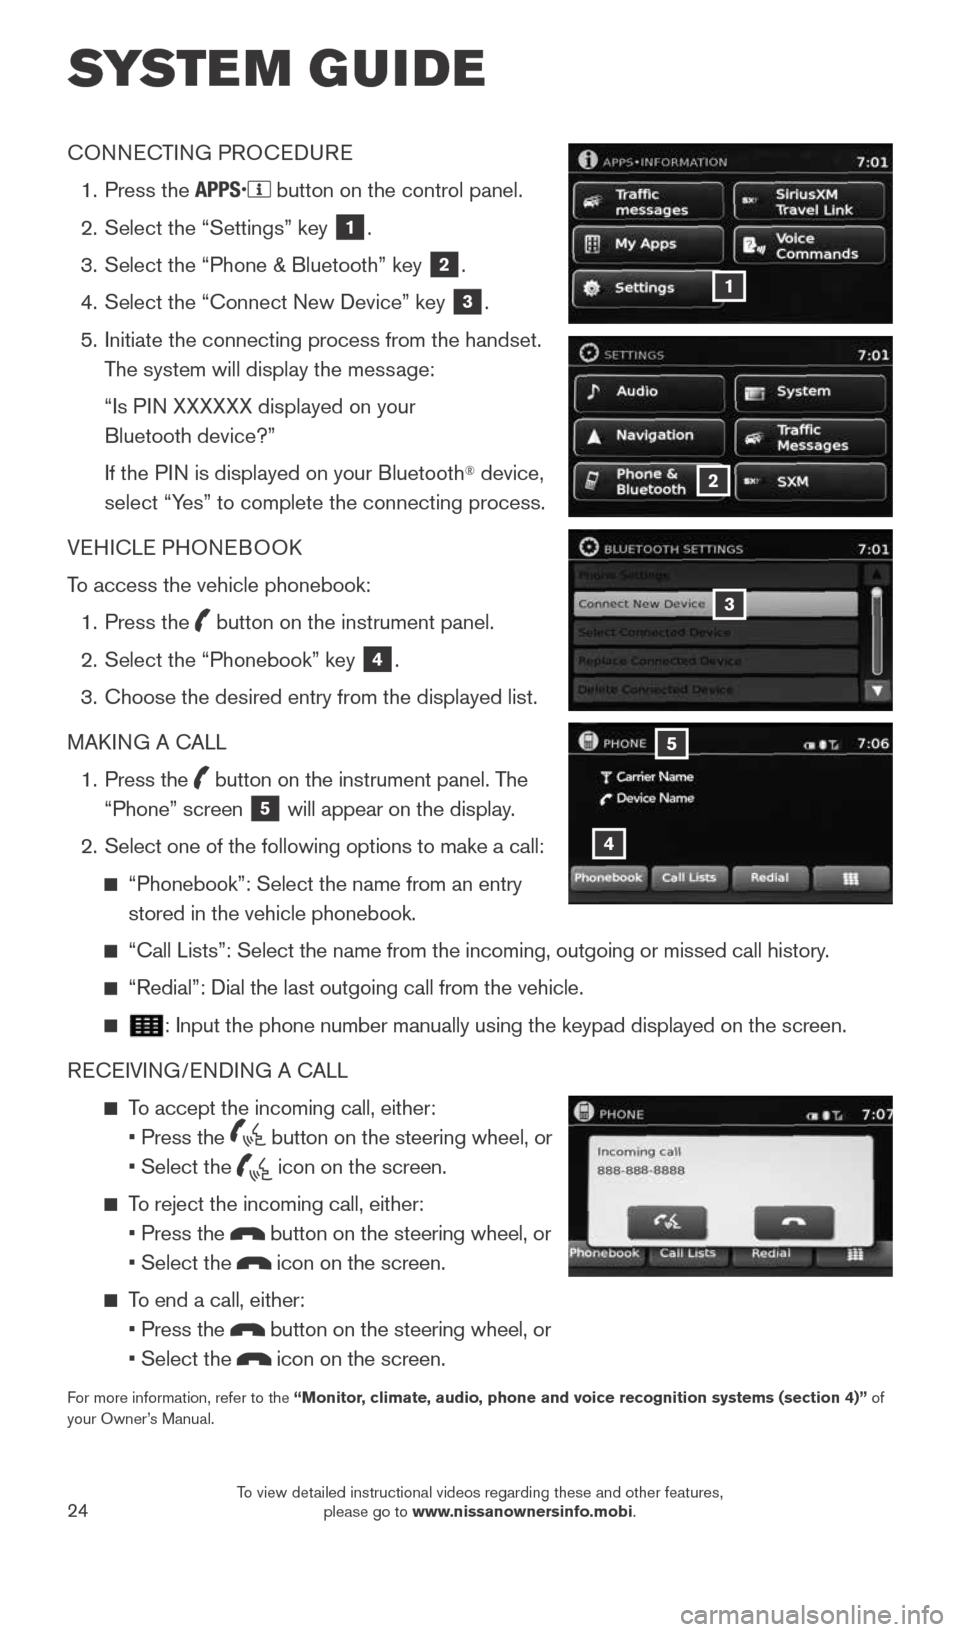
CONNECTING PROCEDURE
1. Press the
button on the control panel.
2. Select the “Settings” key
1.
3. Select the “Phone & Bluetooth” key
2.
4. Select the “Connect New Device” key
3.
5. Initiate the connecting process from the handset.
The system will display the message:
“Is PIN XXXXXX displayed on your
Bluetooth device?”
If the PIN is displayed on your Bluetooth
® device,
select “Yes” to complete the connecting process.
VEHICLE PHONEBOOK
To access the vehicle phonebook:
1. Press the
button on the instrument panel.
2. Select the “Phonebook” key
4.
3. Choose the desired entry from the displayed list.
MAKING A CALL
1. Press the
button on the instrument panel. The
“Phone” screen 5 will appear on the display.
2. Select one of the following options to make a call:
“Phonebook”: Select the name from an entry
stored in the vehicle phonebook.
“Call Lists”: Select the name from the incoming, outgoing or misse\
d call history.
“Redial”: Dial the last outgoing call from the vehicle.
: Input the phone number manually using the keypad displayed on the scree\
n.
RECEIVING/ENDING A CALL
To accept the incoming call, either:
• Press the
button on the steering wheel, or
• Select the
icon on the screen.
To reject the incoming call, either:
• Press the
button on the steering wheel, or
• Select the
icon on the screen.
To end a call, either:
• Press the
button on the steering wheel, or
• Select the
icon on the screen.
For more information, refer to the “Monitor, climate, audio, phone and voice recognition systems (section 4)” of
your Owner’s Manual.
4
5
3
2
1
1904704_15d_Rogue_QRG_031915.indd 243/19/15 1:23 PM
To view detailed instructional videos regarding these and other features, please go to www.nissanownersinfo.mobi.