2015 NISSAN ROGUE ignition
[x] Cancel search: ignitionPage 242 of 440
CAUTION
●To avoid damage and loss of function
when using a USB device, note the fol-
lowing precautions.
● Do not force the USB device into the
USB port. Inserting the USB device
tilted or up-side-down into the port may
damage the port. Make sure that the
USB device is connected correctly into
the USB port.
● Do not grab the USB port cover (if so
equipped) when pulling the USB device
out of the port. This could damage the
port and the cover.
● Do not leave the USB cable in a place
where it can be pulled unintentionally.
Pulling the cable may damage the port.
Refer to your device manufacturer’s owner infor-
mation regarding the proper use and care of the
device.
The USB connection port is located on the center
console beneath the heater and air conditioner
controls. Insert the USB device into the connec-
tion port. When a compatible storage device is plugged
into the connection port, compatible audio files
on the storage device can be played through the
vehicle’s audio system.
Audio file operation
AUX button
Place the ignition switch in the ON or ACC
position and press the AUX button to switch to
the USB input mode. If another audio source is
playing and a USB memory device is inserted,
press the AUX button until the center display
changes to the USB memory mode.
If the system has been turned off while the USB
memory was playing, press the POWER button
to restart the USB memory.
Play information
Information about the audio files being played is
shown on the display screen of the vehicle’s
audio system. Touch “Browse” to display the list
of folders and files on the USB device. Touch the
name of a song on the screen to begin playing
that song.
LHA2923
Monitor, climate, audio, phone and voice recognition systems4-63
Page 244 of 440
CAUTION
●Do not force the USB device into the
USB port. Inserting the USB device
tilted or up-side-down into the port may
damage the port. Make sure that the
USB device is connected correctly into
the USB port.
● Do not grab the USB port cover (if so
equipped) when pulling the USB device
out of the port. This could damage the
port and the cover.
● Do not leave the USB cable in a place
where it can be pulled unintentionally.
Pulling the cable may damage the port.
Refer to your device manufacturer’s owner infor-
mation regarding the proper use and care of the
device.
To connect an iPod® to the vehicle so that the
iPod® can be controlled with the audio system
controls and display screen, use the USB con-
nection port located on the center console below
the heater and air conditioner controls. Connect
the iPod®-specific end of the cable to the iPod®
and the USB end of the cable to the USB con-
nection port on the vehicle. If your iPod® sup-
ports charging via a USB connection, its battery will be charged while connected to the vehicle
with the ignition switch in the ACC or ON posi-
tion.
While connected to the vehicle, the iPod® can
only be operated by the vehicle audio controls.
To disconnect the iPod® from the vehicle, re-
move the USB end of the cable from the USB
connection port on the vehicle, then remove the
cable from the iPod®.
* iPod® is a trademark of Apple Inc., registered in
the U.S. and other countries.
Compatibility
The following models are compatible:
● iPod® Classic - 5th Generation (firmware
version 1.3.0 or later)
● iPod® Classic - 6th Generation (firmware
version 2.0.1 or later)
● iPod® Classic - 7th Generation (firmware
version 2.0.4 or later)
● iPod® nano - 1st generation (firmware ver-
sion 1.3.1 or later)
● iPod® nano - 2nd generation (firmware ver-
sion 1.1.3 or later)
● iPod® nano - 3rd generation (firmware ver-
sion 1.1.3 or later) ●
iPod® nano - 4th generation (firmware ver-
sion 1.0.4 or later)
● iPod® nano - 5th generation (firmware ver-
sion 1.0.2 or later)
● iPod® nano - 6th generation (firmware ver-
sion 1.1 or later)
● iPod® Touch - 2nd generation (firmware
version 4.2.1 or later)
● iPod® Touch - 3rd generation (firmware ver-
sion 5.1 or later) (minimum iOS 5.0 required
for smartphone integration)
● iPod® Touch - 4th generation (firmware ver-
sion 5.1 or later) (minimum iOS 5.0 required
for smartphone integration)
● iPhone® 3G (firmware version 4.2.1 or later)
● iPhone® 3GS (firmware version 5.1 or later)
(minimum iOS 5.0 required for smartphone
integration)
● iPhone® 4 (firmware version 5.1 or later)
(minimum iOS 5.0 required for smartphone
integration)
● iPhone® 4S (firmware version 5.1 or later)
(minimum iOS 5.0 required for smartphone
integration)
Make sure that your iPod® firmware is updated to
the version indicated above.
Monitor, climate, audio, phone and voice recognition systems4-65
Page 245 of 440
Audio main operation
Place the ignition switch in the ACC or ON
position. Press the MEDIA button repeatedly to
switch to the iPod® mode.
If the system has been turned off while the iPod®
was playing, pressing the VOL/
control
knob will start the iPod®.
iPod® MENU button (if so equipped)
Press the iPod® MENU button while the iPod®
is connected to show the iPod® operation menu
on the audio display. Scroll through the menu list
using the TUNE/FOLDER control dial. Press
ENTER/SETTING button to select a menu item.
Items in the iPod® menu appear on the display in
the following order:
● Now playing
● Playlists
● Artists
● Albums
● Songs
● Podcasts
● Genres
● Composers
● Audiobooks ●
Shuffle songs
For additional information, refer to the iPod®
Owner’s Manual regarding each item.
SEEK/CAT and TRACK buttons
When theSEEK/CAT button orTRACK button is pressed for less than 1.5 sec-
onds while the iPod® is playing, the next track or
the beginning of the current track on the iPod®
will be played.
When the
SEEK/CAT button orTRACK button is pressed for more than 1.5 sec-
onds while the iPod® is playing, the iPod® will
play while fast forwarding or rewinding. When the
button is released, the iPod® will return to the
normal play speed.
REPEAT (RPT)
When the RPT button is pressed while a track is
being played, the play pattern can be changed as
follows:
Repeat Off →1 Track Repeat →All Repeat →
Repeat Off
1 Track Repeat: the current track will be re-
peated.
All Repeat: all songs in the current list are re-
peated.
Repeat Off: no repeat play pattern is applied. RANDOM (RDM)
When the RDM button is pressed while a track is
being played, the play pattern can be changed as
follows:
Shuffle Off
→Track Shuffle →Album Shuffle →
Shuffle Off
Track Shuffle: the tracks in the current list will be
played randomly.
Album Shuffle: the albums in the current list will
be played randomly.
Shuffle Off: no random play pattern is applied.BACK button
When the
BACK button is pressed, it re-
turns to the previous menu.
4-66Monitor, climate, audio, phone and voice recognition systems
Page 246 of 440
iPod®* PLAYER OPERATION WITH
NAVIGATION SYSTEM (if so
equipped)
Connecting iPod®
WARNING
Do not connect, disconnect, or operate the
USB device while driving. Doing so can be
a distraction. If distracted you could lose
control of your vehicle and cause an acci-
dent or serious injury.
CAUTION
●Do not force the USB device into the
USB port. Inserting the USB device
tilted or up-side-down into the port may
damage the port. Make sure that the
USB device is connected correctly into
the USB port.
● Do not grab the USB port cover (if so
equipped) when pulling the USB device
out of the port. This could damage the
port and the cover.
● Do not leave the USB cable in a place
where it can be pulled unintentionally.
Pulling the cable may damage the port.
Refer to your device manufacturer’s owner infor-
mation regarding the proper use and care of the
device.
To connect an iPod® to the vehicle so that the
iPod® can be controlled with the audio system
controls and display screen, use the USB connec-
tion port located on the center console below the
heater and air conditioner controls. Connect the
iPod®-specific end of the cable to the iPod® and
the USB end of the cable to the USB connection
port on the vehicle. If your iPod® supports charg-
ing via a USB connection, its battery will be
charged while connected to the vehicle with the
ignition switch in the ACC or ON position.
While connected to the vehicle, the iPod® can
only be operated by the vehicle audio controls.
To disconnect the iPod® from the vehicle, re-
move the USB end of the cable from the USB
connection port on the vehicle, then remove the
cable from the iPod®.
* iPod® is a trademark of Apple Inc., registered in
the U.S. and other countries.
Compatibility
The following models are compatible: ● iPod® Classic 5th generation (firmware ver-
sion 1.3.0 or later)
● iPod® Classic 6th generation (firmware ver-
sion 2.0.1 or later)
● iPod® Classic 7th generation (firmware ver-
sion 2.0.4 or later)
● iPod® Touch 2nd generation (firmware ver-
sion 4.2.1 or later)*
● iPod® Touch 3rd generation (firmware ver-
sion 5.1 or later)
● iPod® Touch 4th generation (firmware ver-
sion 5.1 or later)
● iPod® nano - 1st generation (firmware ver-
sion 1.3.1 or later)
LHA2929
Monitor, climate, audio, phone and voice recognition systems4-67
Page 252 of 440
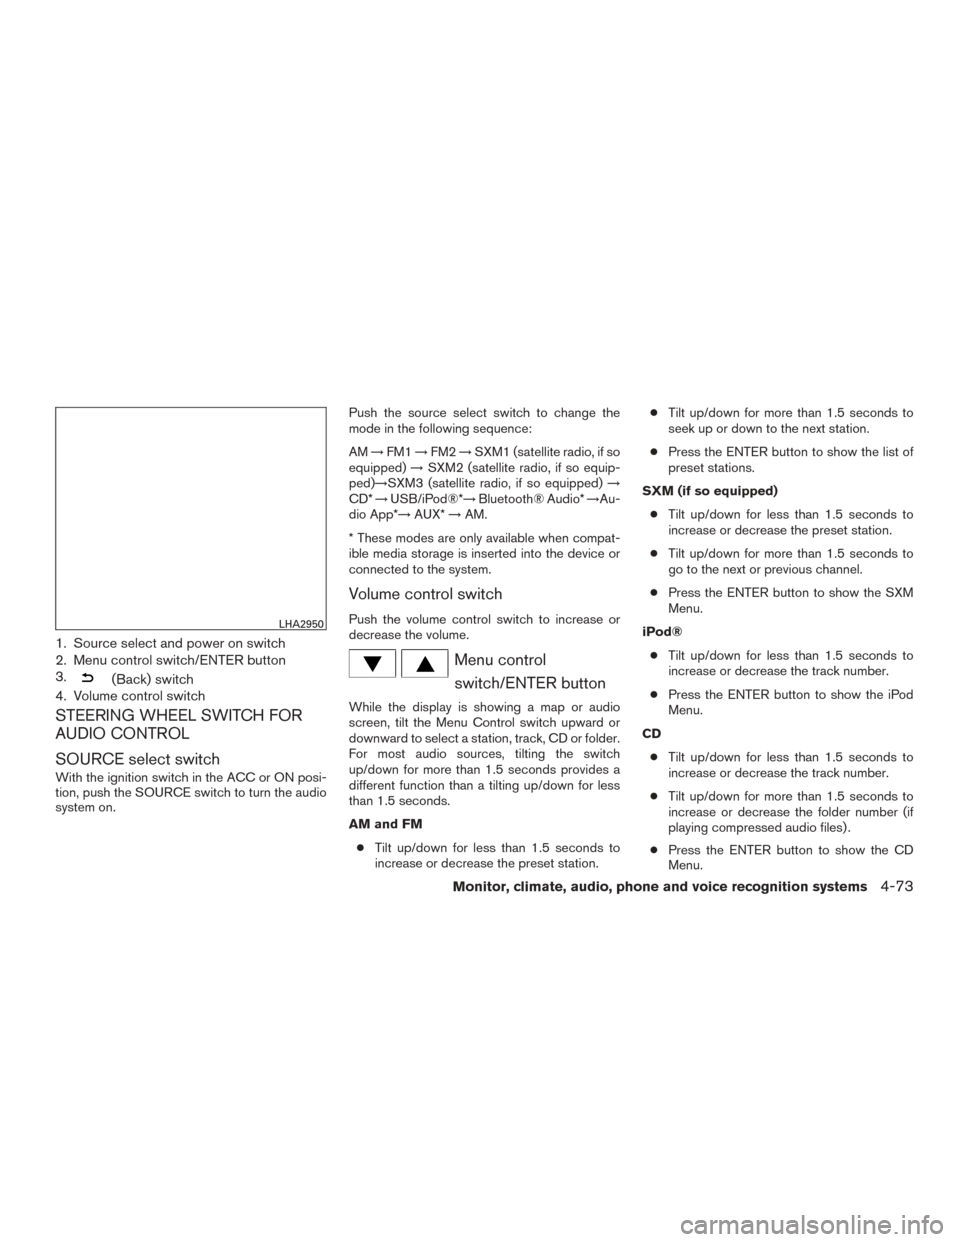
1. Source select and power on switch
2. Menu control switch/ENTER button
3.
(Back) switch
4. Volume control switch
STEERING WHEEL SWITCH FOR
AUDIO CONTROL
SOURCE select switch
With the ignition switch in the ACC or ON posi-
tion, push the SOURCE switch to turn the audio
system on. Push the source select switch to change the
mode in the following sequence:
AM
→FM1 →FM2 →SXM1 (satellite radio, if so
equipped) →SXM2 (satellite radio, if so equip-
ped)→SXM3 (satellite radio, if so equipped) →
CD* →USB/iPod®*→ Bluetooth® Audio* →Au-
dio App*→ AUX*→AM.
* These modes are only available when compat-
ible media storage is inserted into the device or
connected to the system.
Volume control switch
Push the volume control switch to increase or
decrease the volume.
Menu control switch/ENTER button
While the display is showing a map or audio
screen, tilt the Menu Control switch upward or
downward to select a station, track, CD or folder.
For most audio sources, tilting the switch
up/down for more than 1.5 seconds provides a
different function than a tilting up/down for less
than 1.5 seconds.
AM and FM
● Tilt up/down for less than 1.5 seconds to
increase or decrease the preset station. ●
Tilt up/down for more than 1.5 seconds to
seek up or down to the next station.
● Press the ENTER button to show the list of
preset stations.
SXM (if so equipped) ● Tilt up/down for less than 1.5 seconds to
increase or decrease the preset station.
● Tilt up/down for more than 1.5 seconds to
go to the next or previous channel.
● Press the ENTER button to show the SXM
Menu.
iPod® ● Tilt up/down for less than 1.5 seconds to
increase or decrease the track number.
● Press the ENTER button to show the iPod
Menu.
CD ● Tilt up/down for less than 1.5 seconds to
increase or decrease the track number.
● Tilt up/down for more than 1.5 seconds to
increase or decrease the folder number (if
playing compressed audio files) .
● Press the ENTER button to show the CD
Menu.
LHA2950
Monitor, climate, audio, phone and voice recognition systems4-73
Page 256 of 440
Your NISSAN is equipped with the Bluetooth®
Hands-Free Phone System. If you have a com-
patible Bluetooth® enabled cellular phone, you
can set up the wireless connection between your
cellular phone and the in-vehicle phone module.
With Bluetooth® wireless technology, you canmake or receive a hands-free telephone call with
your cellular phone in the vehicle.
Once your cellular phone is connected to the
in-vehicle phone module, no other phone con-
necting procedure is required. Your phone is
automatically connected with the in-vehiclephone module when the ignition switch is placed
in the ON position with the previously connected
cellular phone turned on and carried in the ve-
hicle.
NOTE:
Some devices require the user to accept
connections to other Bluetooth® devices. If
your phone does not connect automatic
ally to the system, consult the phone’s
Owner’s Manual for details on device op-
eration.
You can connect up to five different Bluetooth®
cellular phones to the in-vehicle phone module.
However, you can talk on only one cellular phone
at a time.
Before using the Bluetooth® Hands-Free Phone
System, refer to the following notes.
● Set up the wireless connection between a
compatible cellular phone and the in-vehicle
phone module before using the hands-free
phone system.
● Some Bluetooth® enabled cellular phones
may not be recognized or work properly.
Please visit www.nissanusa.com/bluetooth
or www.nissan.ca/bluetooth for a recom-
mended phone list and connecting instruc-
tions.
LHA3127
Monitor, climate, audio, phone and voice recognition systems4-77
Page 257 of 440
●You will not be able to use a hands-free
phone under the following conditions:
– Your vehicle is outside of the cellular ser- vice area.
– Your vehicle is in an area where it is difficult to receive a cellular signal; such
as in a tunnel, in an underground parking
garage, near a tall building or in a moun-
tainous area.
– Your cellular phone is locked to prevent it from being dialed.
● When the radio wave condition is not ideal
or ambient sound is too loud, it may be
difficult to hear the other person’s voice dur-
ing a call.
● Do not place the cellular phone in an area
surrounded by metal or far away from the
in-vehicle phone module to prevent tone
quality degradation and wireless connection
disruption.
● While a cellular phone is connected through
the Bluetooth® wireless connection, the
battery power of the cellular phone may dis-
charge quicker than usual. The Bluetooth®
Hands-Free Phone System cannot charge
cellular phones. ●
Some cellular phones or other devices may
cause interference or a buzzing noise to
come from the audio system speakers. Stor-
ing the device in a different location may
reduce or eliminate the noise.
● Refer to the cellular phone Owner’s Manual
regarding the telephone charges, cellular
phone antenna and body, etc.
● For additional information, refer to “Trouble-
shooting guide” in this section. You can also
visit www.nissanusa.com/bluetooth for
troubleshooting help if the hands-free phone
system seems to be malfunctioning.
REGULATORY INFORMATION
FCC Regulatory information
– CAUTION: To maintain compliance with FCC’s RF exposure guidelines, use only the
supplied antenna. Unauthorized antenna,
modification, or attachments could damage
the transmitter and may violate FCC regula-
tions.
– Operation is subject to the following two con- ditions:
1. This device may not cause interference and
2. this device must accept any interference, including interference that may cause unde-
sired operation of the device. IC Regulatory information
– Operation is subject to the following two con-
ditions: (1) this device may not cause interfer-
ence, and (2) this device must accept any
interference, including interference that may
cause undesired operation of the device.
– This Class B digital apparatus meets all re- quirements of the Canadian Interference-
Causing Equipment Regulations.
BLUETOOTH® is a
trademark owned by
Bluetooth SIG, Inc.
and licensed to
Visteon.
USING THE SYSTEM
The NISSAN Voice Recognition system allows
hands-free operation of the Bluetooth® Hands-
Free Phone System.
If the vehicle is in motion, some commands may
not be available so full attention may be given to
vehicle operation.
Initialization
When the ignition switch is placed in the ON
position, NISSAN Voice Recognition is initialized,
which takes a few seconds. If the
button is
4-78Monitor, climate, audio, phone and voice recognition systems
Page 268 of 440
Your NISSAN is equipped with the Bluetooth®
Hands-Free Phone System. If you have a com-
patible Bluetooth® enabled cellular phone, you
can set up the wireless connection between your
cellular phone and the in-vehicle phone module.
With Bluetooth® wireless technology, you canmake or receive a hands-free telephone call with
your cellular phone in the vehicle.
Once your cellular phone is connected to the
in-vehicle phone module, no other phone con-
necting procedure is required. Your phone is
automatically reconnected with the in-vehiclephone module when the ignition switch is placed
in the ON position with the connected cellular
phone turned on and carried in the vehicle.
You can register up to five different Bluetooth®
cellular phones to the in-vehicle phone module.
However, you can talk on only one cellular phone
at a time.
NISSAN Voice Recognition system supports the
phone commands, so dialing a phone number
using your voice is possible. For additional infor-
mation, refer to “NISSAN Voice Recognition Sys-
tem” in this section.
Before using the Bluetooth® Hands-Free Phone
System, refer to the following notes.
● Set up the wireless connection between a
cellular phone and the in-vehicle phone
module before using the hands-free phone
system.
● Some Bluetooth® enabled cellular phones
may not be recognized by the in-vehicle
phone module. Please visit
www.nissanusa.com/bluetooth or
www.nissan.ca/bluetooth for a recom-
mended phone list and connecting.
LHA3128
Monitor, climate, audio, phone and voice recognition systems4-89