Page 438 of 558

●The system is designed as an aid to the
driver in detecting large stationary ob-
jects to help avoid damaging the ve-
hicle. The system will not detect small
objects below the bumper, and may not
detect objects close to the bumper or
on the ground.
● If your vehicle sustains damage to the
rear bumper fascia, leaving it mis-
aligned or bent, the sensing zone may
be altered causing inaccurate measure-
ment of obstacles or false alarms.
The RSS sounds a tone to warn the driver of
obstacles near the rear bumper when the shift
lever is in R (Reverse) . The system may not
detect objects at speeds above 3 mph (5 km/h)
and may not detect certain angular or moving
objects.
The RSS detects obstacles up to 5.9 ft (1.8 m)
from the rear bumper with a decreased coverage
area at the outer corners of the bumper (refer to
the illustration for approximate zone coverage
areas) . As you move closer to the obstacle, the
rate of the tone increases. When the obstacle is
less than 10 in (25.0 cm) away, the tone will
sound continuously. If the RSS detects a station-
ary or receding object further than 10 in.
(25.0 cm) from the side of the vehicle, the tone will sound for only 3 seconds. Once the system
detects an object approaching, the tone will
sound again.
The RSS automatically turns on when the shift
lever is placed in R (Reverse) and the ignition
switch is placed in the ON position. The RSS can
be turned off in the vehicle information display.
For additional information, refer to “Vehicle infor-
mation display” in the “Instruments and controls”
section of this manual. To turn the RSS off, the
ignition switch must be placed in the ON posi-
tion.
Keep the RSS sensors (located on the rear bum-
per fascia) free from snow, ice and large accumu-
lations of dirt (do not clean the sensors with sharp
objects) . If the sensors are covered, it will affect
the accuracy of the RSS.FREEING A FROZEN DOOR LOCK
To prevent a door lock from freezing, apply de-
icer through the key hole. If the lock becomes
frozen, heat the key before inserting it into the key
hole, or use the NISSAN Intelligent Key®.
ANTIFREEZE
In the winter when it is anticipated that the tem-
perature will drop below 32°F (0°C) , check the
antifreeze to assure proper winter protection. For
additional information, refer to “Engine cooling
system” in the “Do-it-yourself” section of this
manual.
BATTERY
If the battery is not fully charged during extremely
cold weather conditions, the battery fluid may
freeze and damage the battery. To maintain maxi-
mum efficiency, the battery should be checked
regularly. For additional information, refer to “Bat-
tery” in the “Do-it-yourself” section of this manual.
DRAINING OF COOLANT WATER
If the vehicle is to be left outside without anti-
freeze, drain the cooling system, including the
engine block. Refill before operating the vehicle.
For additional information, refer to “Changing
engine coolant” in the “Do-it-yourself” section of
this manual.
COLD WEATHER DRIVING
5-74Starting and driving
Page 452 of 558
6. After the engine cools down, check the cool-ant level in the engine coolant reservoir tank
with the engine running. Add coolant to the
engine coolant reservoir tank if necessary.
Have your vehicle repaired. It is recom-
mended that you visit a NISSAN dealer for
this service. When towing your vehicle, all jurisdictional and
local regulations for towing must be followed.
Incorrect towing equipment could damage your
vehicle. Towing instructions are available from a
NISSAN dealer. Local service operators are gen-
erally familiar with the applicable laws and proce-
dures for towing. To assure proper towing and to
prevent accidental damage to your vehicle,
NISSAN recommends having a service operator
tow your vehicle. It is advisable to have the ser-
vice operator carefully read the following precau-
tions:
Page 469 of 558

CHECKING ENGINE COOLANT
LEVEL
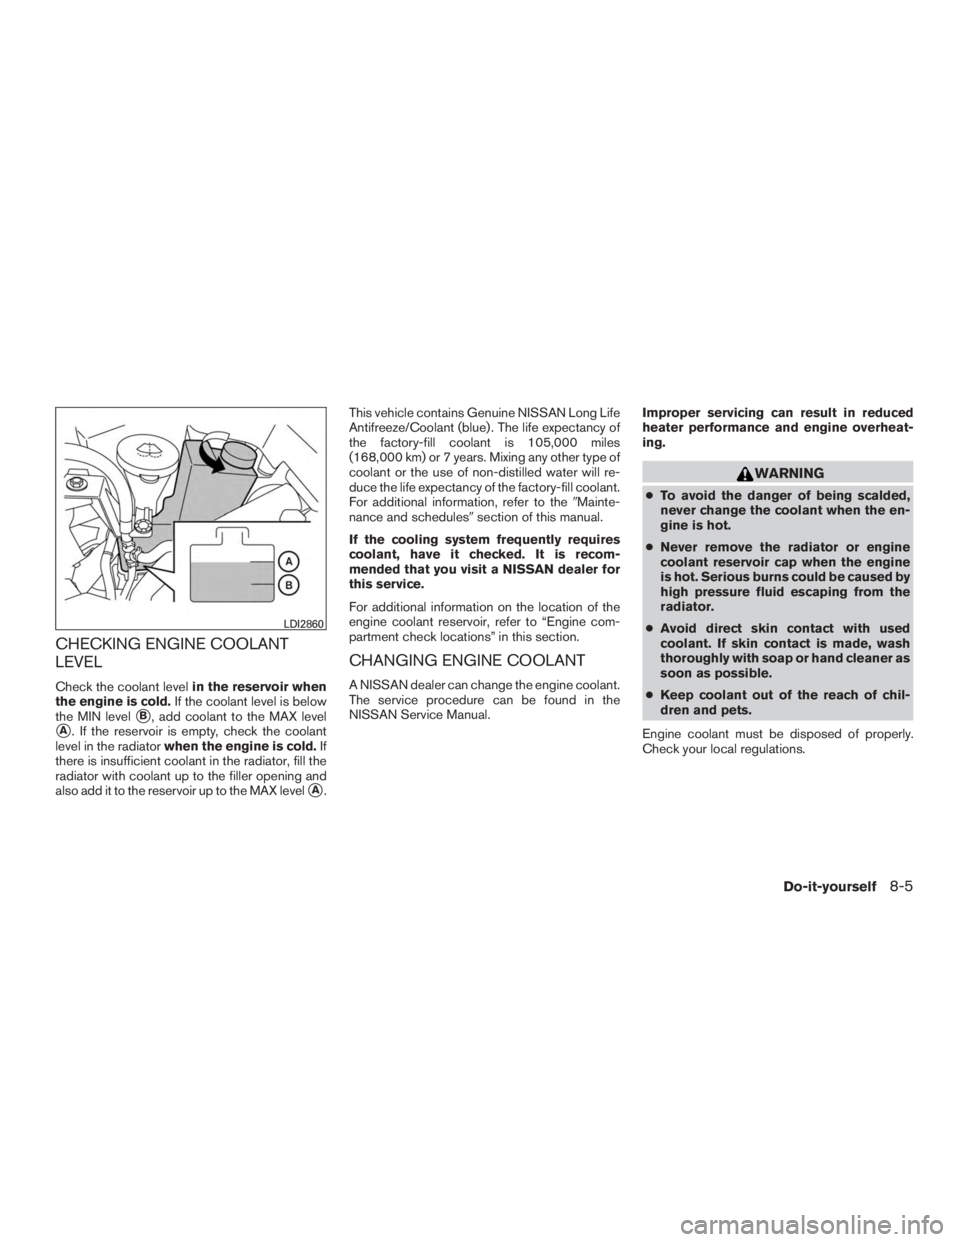
Check the coolant levelin the reservoir when
the engine is cold. If the coolant level is below
the MIN level
�B, add coolant to the MAX level
�A. If the reservoir is empty, check the coolant
level in the radiator when the engine is cold. If
there is insufficient coolant in the radiator, fill the
radiator with coolant up to the filler opening and
also add it to the reservoir up to the MAX level
�A. This vehicle contains Genuine NISSAN Long Life
Antifreeze/Coolant (blue) . The life expectancy of
the factory-fill coolant is 105,000 miles
(168,000 km) or 7 years. Mixing any other type of
coolant or the use of non-distilled water will re-
duce the life expectancy of the factory-fill coolant.
For additional information, refer to the
�Mainte-
nance and schedules� section of this manual.
If the cooling system frequently requires
coolant, have it checked. It is recom-
mended that you visit a NISSAN dealer for
this service.
For additional information on the location of the
engine coolant reservoir, refer to “Engine com-
partment check locations” in this section.
CHANGING ENGINE COOLANT
A NISSAN dealer can change the engine coolant.
The service procedure can be found in the
NISSAN Service Manual. Improper servicing can result in reduced
heater performance and engine overheat-
ing.
Page 470 of 558
CHECKING ENGINE OIL LEVEL
1. Park the vehicle on a level surface and applythe parking brake.
2. Start the engine and let it idle until it reaches operating temperature.
3. Turn off the engine. Wait more than
10 minutes for the oil to drain back into
the oil pan.
4. Remove the dipstick and wipe it clean. Re- insert it all the way. 5. Remove the dipstick again and check the oil
level. It should be between the H (High) and
L (Low) marks�B. This is the normal oper-
ating oil level range. If the oil level is below
the L (Low) mark
�A, remove the oil filler cap
and pour recommended oil through the
opening. Do not fill oil level above H
(High) mark
�C.
6. Recheck the oil level with the dipstick.
It is normal to add some oil between oil
maintenance intervals or during the
break-in period, depending on the severity
of operating conditions.
Page 471 of 558
CHANGING ENGINE OIL
1. Park the vehicle on a level surface and applythe parking brake.
2. Start the engine and let it idle until it reaches operating temperature, then turn it off. 3. Remove the oil filler cap
�Aby turning it
counterclockwise.
4. Place a large drain pan under the drain plug
�B.
5. Remove the drain plug
�Bwith a wrench by
turning it counterclockwise and completely
drain the oil.
If the oil filter is to be changed, remove and
replace it at this time. For additional informa-
tion, refer to “Changing engine oil filter” in
this section.
● Waste oil must be disposed of prop-
erly.
● Check your local regulations.
Page 472 of 558
8. Start the engine. Check for leakage aroundthe drain plug and oil filter. Correct as re-
quired.
9. Turn the engine off and wait more than 10 minutes. Check the oil level with the
dipstick. Add engine oil if necessary.
CHANGING ENGINE OIL FILTER
1. Park the vehicle on a level surface and apply
the parking brake.
2. Turn the engine off.
3. Place a large drain pan under the oil filter
�B. 4. Remove pins
�Afrom the right engine pro-
tector located inside right wheel well, re-
move protector. Remove oil filter
�Bwith an
oil filter wrench by turning it counterclock-
wise. Then remove the oil filter by turning it
by hand.
Page 473 of 558
8. Start the engine and check for leakagearound the oil filter. Correct as required.
9. Turn the engine off and wait more than 10 minutes. Check the oil level. Add engine
oil if necessary.
Page 477 of 558
2. Check the fluid level in each cell. If it isnecessary to add fluid, add only distilled
water to bring the level up to the bottom of
the filler opening. Do not overfill.Reinstall
the vent caps. Vehicles operated in high temperatures or under
severe conditions require frequent checks of the
battery fluid level.
JUMP STARTING
If jump starting is necessary, refer to “Jump start-
ing” in the “In case of emergency” section of this
manual. If the engine does not start by jump
starting, the battery may have to be replaced. It is
recommended that you visit a NISSAN dealer for
this service.
1. Crankshaft pulley
2. Drive belt automatic tensioner pulley
3. Generator pulley
4. Air conditioner compressor pulley