Page 456 of 524
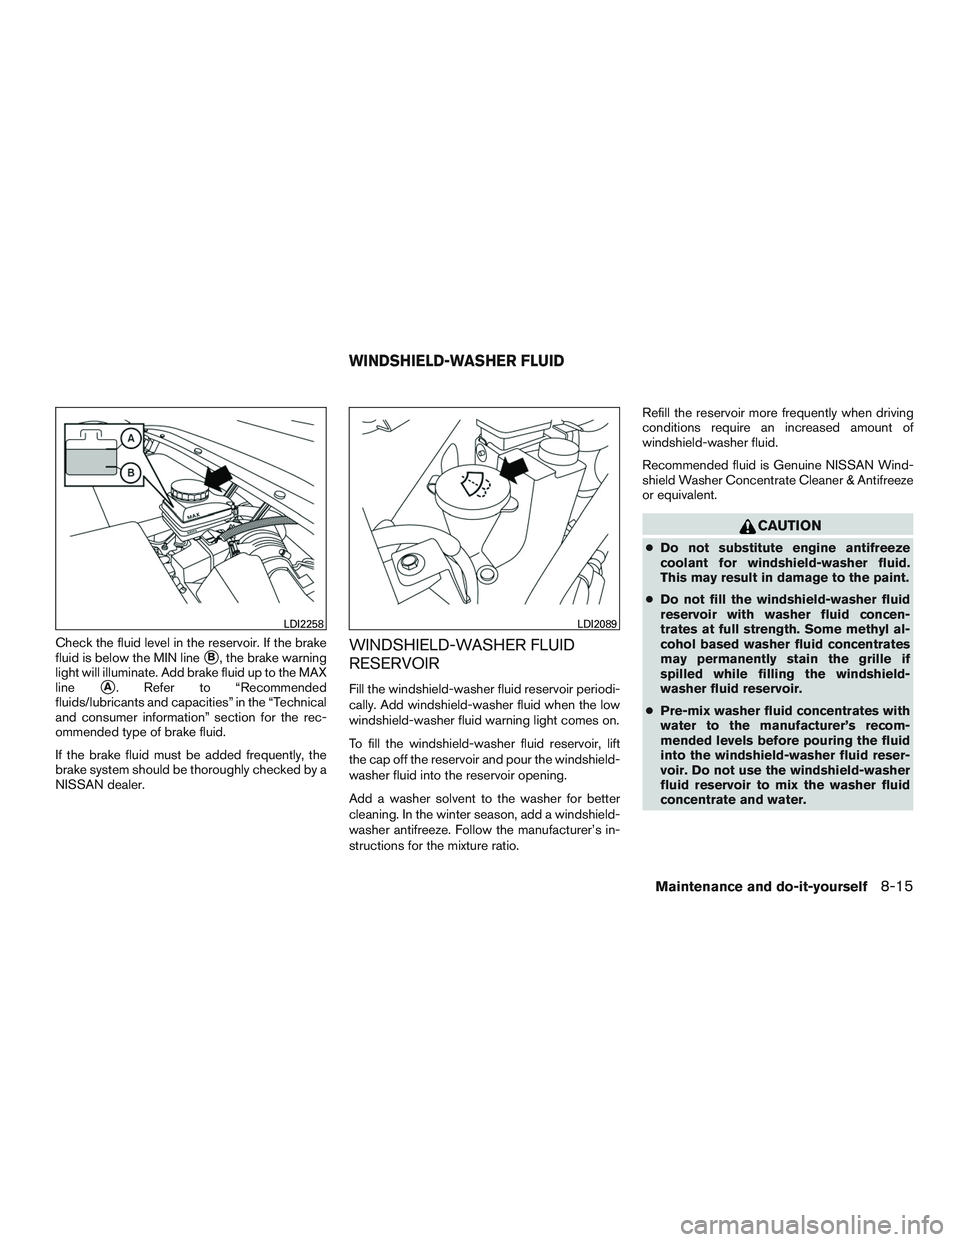
Check the fluid level in the reservoir. If the brake
fluid is below the MIN line
�B, the brake warning
light will illuminate. Add brake fluid up to the MAX
line
�A. Refer to “Recommended
fluids/lubricants and capacities” in the “Technical
and consumer information” section for the rec-
ommended type of brake fluid.
If the brake fluid must be added frequently, the
brake system should be thoroughly checked by a
NISSAN dealer.
WINDSHIELD-WASHER FLUID
RESERVOIR
Fill the windshield-washer fluid reservoir periodi-
cally. Add windshield-washer fluid when the low
windshield-washer fluid warning light comes on.
To fill the windshield-washer fluid reservoir, lift
the cap off the reservoir and pour the windshield-
washer fluid into the reservoir opening.
Add a washer solvent to the washer for better
cleaning. In the winter season, add a windshield-
washer antifreeze. Follow the manufacturer’s in-
structions for the mixture ratio.Refill the reservoir more frequently when driving
conditions require an increased amount of
windshield-washer fluid.
Recommended fluid is Genuine NISSAN Wind-
shield Washer Concentrate Cleaner & Antifreeze
or equivalent.
CAUTION
●Do not substitute engine antifreeze
coolant for windshield-washer fluid.
This may result in damage to the paint.
●Do not fill the windshield-washer fluid
reservoir with washer fluid concen-
trates at full strength. Some methyl al-
cohol based washer fluid concentrates
may permanently stain the grille if
spilled while filling the windshield-
washer fluid reservoir.
●Pre-mix washer fluid concentrates with
water to the manufacturer’s recom-
mended levels before pouring the fluid
into the windshield-washer fluid reser-
voir. Do not use the windshield-washer
fluid reservoir to mix the washer fluid
concentrate and water.
LDI2258LDI2089
WINDSHIELD-WASHER FLUID
Maintenance and do-it-yourself8-15
Page 462 of 524
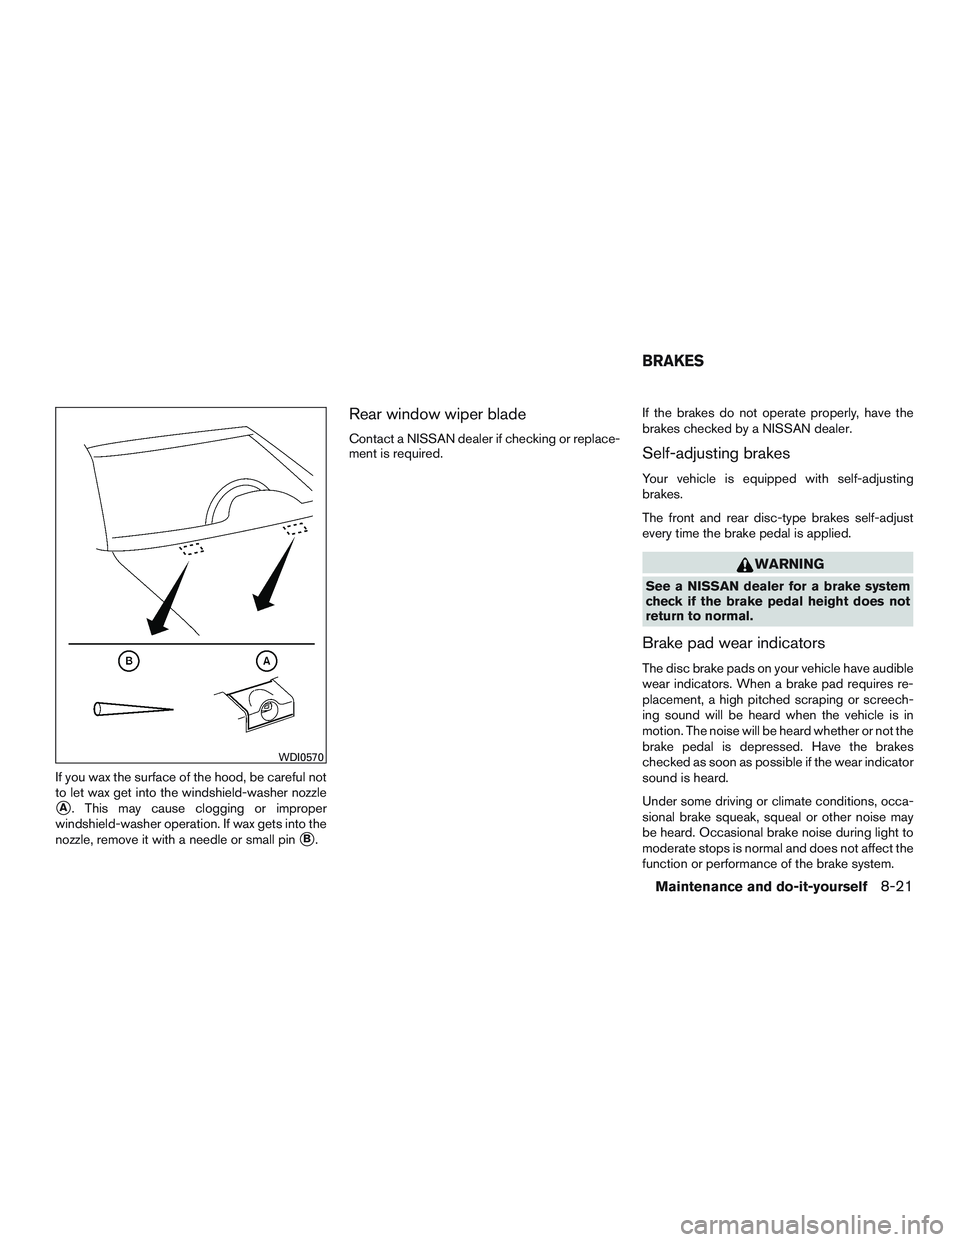
If you wax the surface of the hood, be careful not
to let wax get into the windshield-washer nozzle
�A. This may cause clogging or improper
windshield-washer operation. If wax gets into the
nozzle, remove it with a needle or small pin
�B.
Rear window wiper blade
Contact a NISSAN dealer if checking or replace-
ment is required.If the brakes do not operate properly, have the
brakes checked by a NISSAN dealer.Self-adjusting brakes
Your vehicle is equipped with self-adjusting
brakes.
The front and rear disc-type brakes self-adjust
every time the brake pedal is applied.
WARNING
See a NISSAN dealer for a brake system
check if the brake pedal height does not
return to normal.
Brake pad wear indicators
The disc brake pads on your vehicle have audible
wear indicators. When a brake pad requires re-
placement, a high pitched scraping or screech-
ing sound will be heard when the vehicle is in
motion. The noise will be heard whether or not the
brake pedal is depressed. Have the brakes
checked as soon as possible if the wear indicator
sound is heard.
Under some driving or climate conditions, occa-
sional brake squeak, squeal or other noise may
be heard. Occasional brake noise during light to
moderate stops is normal and does not affect the
function or performance of the brake system.
WDI0570
BRAKES
Maintenance and do-it-yourself8-21
Page 463 of 524
Proper brake inspection intervals should
be followed.For additional information regard-
ing brake inspections, refer to the appropriate
maintenance schedule information in the
“NISSAN Service and Maintenance Guide”.
ENGINE COMPARTMENT
CAUTION
Never use a fuse of a higher or lower
amperage rating than specified on the
fuse box cover. This could damage the
electrical system or cause a fire.
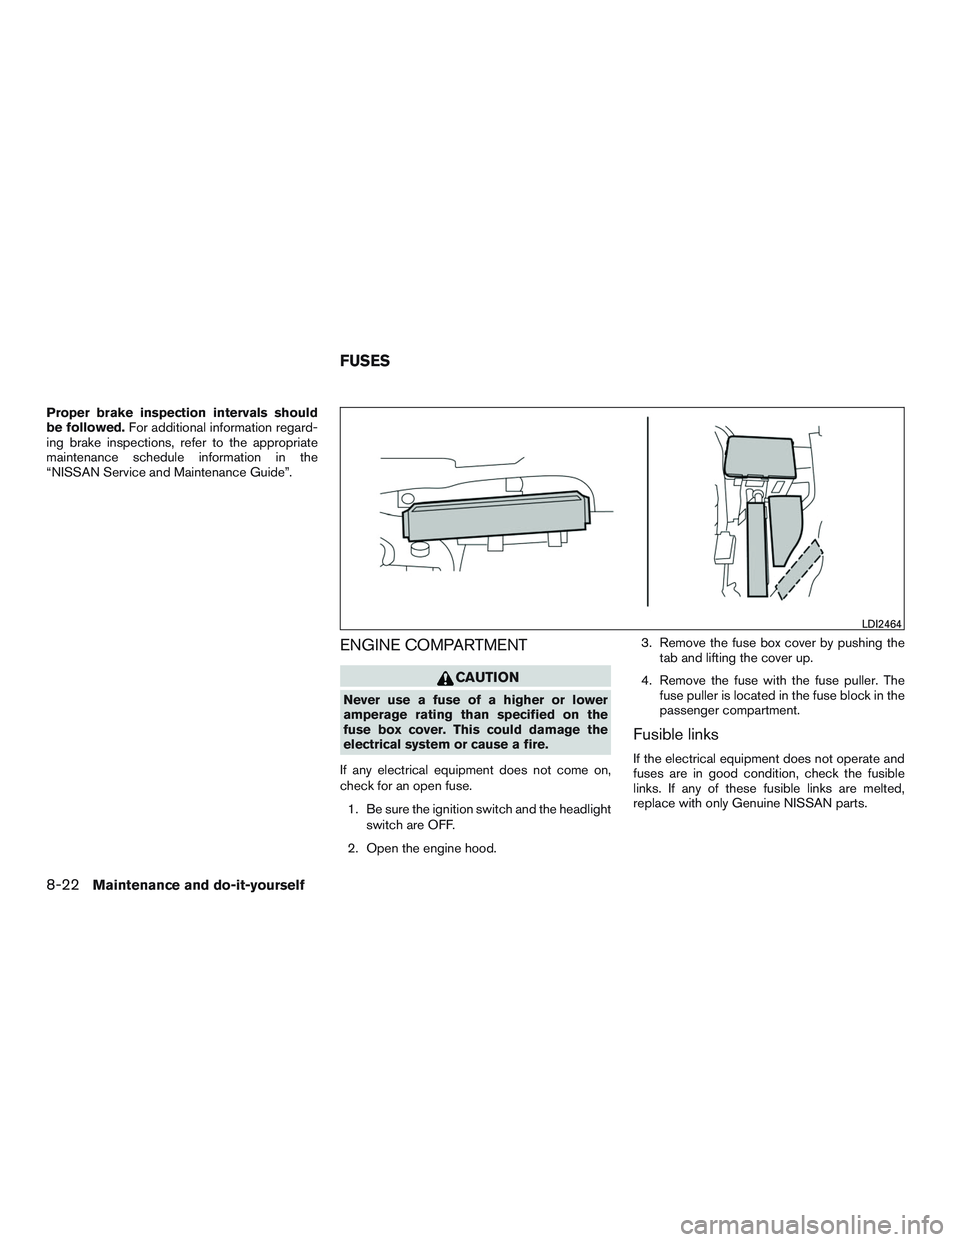
If any electrical equipment does not come on,
check for an open fuse.
1. Be sure the ignition switch and the headlight
switch are OFF.
2. Open the engine hood.3. Remove the fuse box cover by pushing the
tab and lifting the cover up.
4. Remove the fuse with the fuse puller. The
fuse puller is located in the fuse block in the
passenger compartment.
Fusible links
If the electrical equipment does not operate and
fuses are in good condition, check the fusible
links. If any of these fusible links are melted,
replace with only Genuine NISSAN parts.
LDI2464
FUSES
8-22Maintenance and do-it-yourself
Page 464 of 524
PASSENGER COMPARTMENT
CAUTION
Never use a fuse of a higher or lower
amperage rating than specified on the
fuse box cover. This could damage the
electrical system or cause a fire.
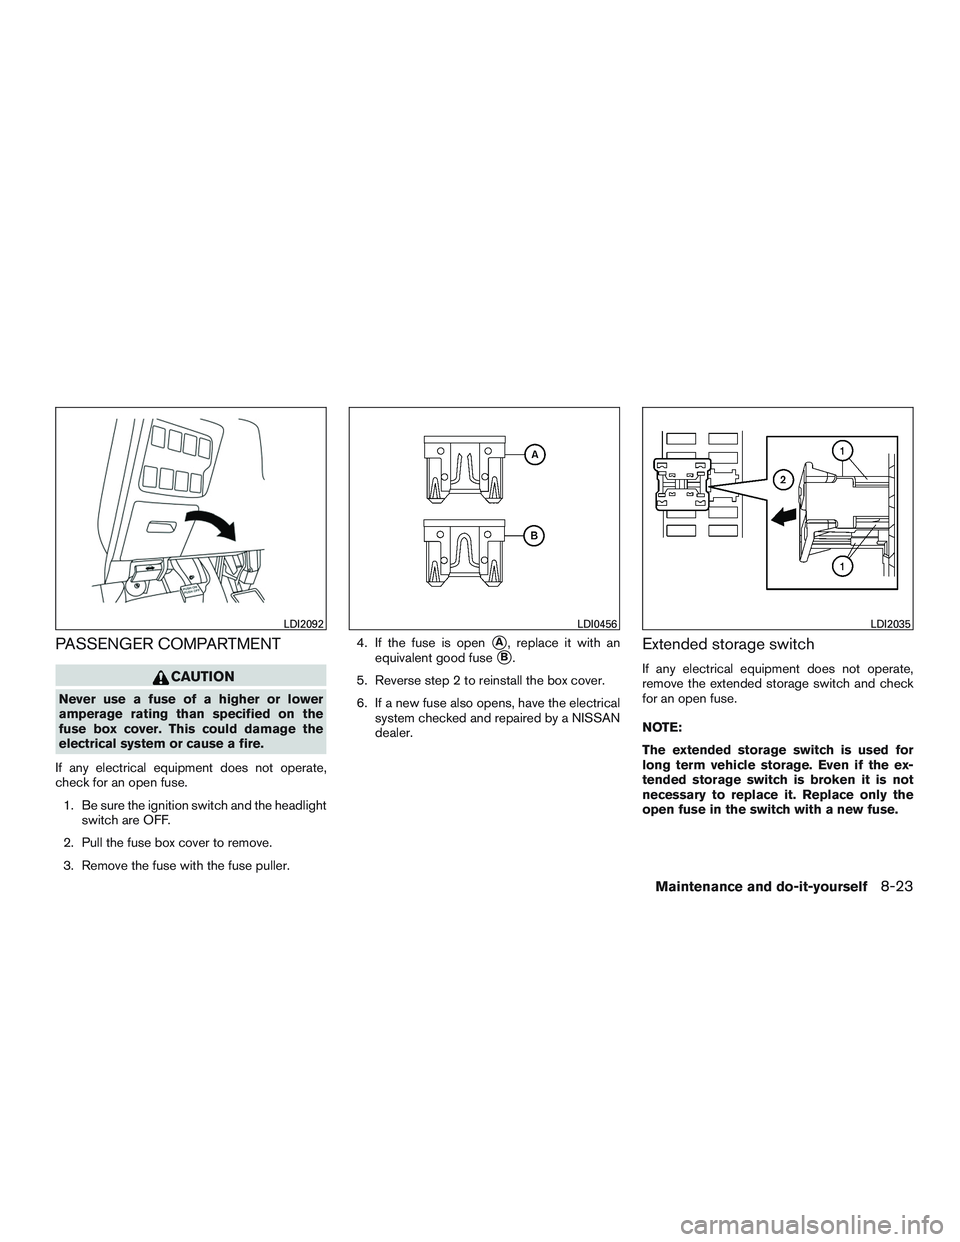
If any electrical equipment does not operate,
check for an open fuse.
1. Be sure the ignition switch and the headlight
switch are OFF.
2. Pull the fuse box cover to remove.
3. Remove the fuse with the fuse puller.4. If the fuse is open
�A, replace it with an
equivalent good fuse
�B.
5. Reverse step 2 to reinstall the box cover.
6. If a new fuse also opens, have the electrical
system checked and repaired by a NISSAN
dealer.Extended storage switch
If any electrical equipment does not operate,
remove the extended storage switch and check
for an open fuse.
NOTE:
The extended storage switch is used for
long term vehicle storage. Even if the ex-
tended storage switch is broken it is not
necessary to replace it. Replace only the
open fuse in the switch with a new fuse.
LDI2092LDI0456LDI2035
Maintenance and do-it-yourself8-23
Page 465 of 524
How to remove the extended storage
switch:
1. To remove the extended storage switch, be
sure the ignition switch is in the OFF or
LOCK position.
2. Be sure the headlight switch is in the OFF
position.
3. Remove the fuse box cover.
4. Pinch the locking tabs
�1found on each
side of the storage switch.
5. Pull the storage switch straight out from the
fuse box
�2.
CAUTION
Be careful not to allow children to swallow
the battery or removed parts.
SDI1867
BATTERY REPLACEMENT
8-24Maintenance and do-it-yourself
Page 467 of 524
HEADLIGHTS
Replacing the halogen headlight bulb
If bulb replacement is required, see your NISSAN
dealer.
CAUTION
●Aiming is not necessary after replacing
the bulb. When aiming adjustment is
necessary, contact a NISSAN dealer.
●Do not leave the headlight assembly
open without a bulb installed for a long
period of time. Dust, moisture, smoke,
etc. entering the headlight body may
affect bulb performance. Remove the
bulb from the headlight assembly just
before a replacement bulb is installed.
●Only touch the base when handling the
bulb. Never touch the glass envelope.
Touching the glass could significantly
affect bulb life and/or headlight
performance.
●High pressure halogen gas is sealed
inside the halogen bulb. The bulb may
break if the glass envelope is scratched
or the bulb is dropped.
●Use the same number and wattage as
shown in the chart.Fog may temporarily form inside the lenses of the
exterior lights in the rain or in a car wash. A
temperature difference between the inside and
the outside of the lens causes the fog. This is not
a malfunction. If large drops of water collect
inside the lens, contact a NISSAN dealer.FOG LIGHTS
Replacing the fog light bulb
If bulb replacement is required, see your NISSAN
dealer.
CAUTION
●High pressure halogen gas is sealed
inside the halogen bulb. The bulb may
break if the glass envelope is scratched
or the bulb is dropped.
●When handling the bulb, do not touch
the glass envelope.
●Use the same number and wattage as
originally installed as shown in the
chart.
●Do not leave the bulb out of the fog light
for a long period of time as dust, mois-
ture and smoke may enter the fog light
body and affect the performance of the
fog light.
LIGHTS
8-26Maintenance and do-it-yourself
Page 468 of 524
EXTERIOR AND INTERIOR LIGHTS
Item Wattage (W) Bulb No.
Headlight assembly*
High 60 HB3
Low 55 H11
Park — —
Turn 21 WY21W
Sidemarker 5 WY5W
Daytime running lights (if so equipped) 55 H11
Front fog lights 55 H11
Map light* — —
Footwell light (if so equipped) 3.4 158
Personal lights — P1Y
Glove box light* — 158
Step light (if so equipped) 3.4 194
Courtesy light* — —
Vanity mirror light 2 —
Cargo light — AL1X
High-mounted stop light* — —
Rear combination light
Tail/Stop* 5/21 7443
Turn 21 WY21W
Backup (reversing)* 21 W16W
License plate light* 5 W5W
Always check with the Parts Department at a NISSAN dealer for the latest parts information.
* See a NISSAN dealer for replacement.
Maintenance and do-it-yourself8-27
Page 469 of 524
1. Headlight assembly
2 Map light
3. Personal light
4. Fog light
5. Cargo light
6. High-mounted stop light
7. Rear combination light
8. License plate light
Replacement procedures
All other lights are either type A, B, C or D. When
replacing a bulb, first remove the lens, lamp
and/or cover.
Indicates bulb removal
Indicates bulb installationLDI2160
WDI0263
8-28Maintenance and do-it-yourself