Page 32 of 370

WARNING
∙ Always route the shoulder belt overyour shoulder and across your chest.
Never put the belt behind your back,
under your arm or across your neck.
The belt should be away from your
face and neck, but not falling off your
shoulder.
∙ Position the lap belt as low and snug as possible AROUND THE HIPS, NOT
THE WAIST. A lap belt worn too high
could increase the risk of internal inju-
ries in an accident. ∙ Be sure the seat belt tongue is se-
curely fastened to the proper buckle.
∙ Do not wear the seat belt inside out or twisted. Doing so may reduce its
effectiveness.
∙ Do not allow more than one person to use the same seat belt.
∙ Never carry more people in the vehicle than there are seat belts.
∙ If the seat belt warning light glows continuously while the ignition is
turned ON with all doors closed and all
seat belts fastened, it may indicate a
malfunction in the system. Have the
system checked. It is recommended
that you visit a NISSAN dealer for this
service.
∙ No changes should be made to the seat belt system. For example, do not
modif y the seat belt, add material, or
install devices that may change the
seat belt routing or tension. Doing so
may affect the operation of the seat
belt system. Modif ying or tampering
with the seat belt system may result
in serious personal injury. ∙ Once seat belt pretensioner(s) have
activated, they cannot be reused and
must be replaced together with the
retractor. It is recommended that you
visit a NISSAN dealer for this service.
∙ All seat belt assemblies, including re- tractors and attaching hardware,
should be inspected af ter any colli-
sion. It is recommended that you visit
a NISSAN dealer for this service.
NISSAN recommends that all seat belt
assemblies in use during a collision be
replaced unless the collision was mi-
nor and the belts show no damage
and continue to operate properly.
Seat belt assemblies not in use during
a collision should also be inspected
and replaced if either damage or im-
proper operation is noted.
∙ All child restraints and attaching hardware should be inspected af ter
any collision. Always follow the re-
straint manufacturer’s inspection in-
structions and replacement recom-
mendations. The child restraints
should be replaced if they are
damaged.
Page 66 of 370

are similar to those of a higher severity
impact. They are designed to inflate on the
side where the vehicle is impacted. They
may not inflate in certain side collisions.
Vehicle damage (or lack of it) is not always
an indication of proper side air bag and
curtain air bag operation.
When the side air bags and curtain air bags
inflate, a fairly loud noise may be heard,
followed by release of smoke. This smoke is
not harmful and does not indicate a fire.
Care should be taken not to inhale it, as it
may cause irritation and choking. Those
with a history of a breathing condition
should get fresh air promptly.
Side air bags, along with the use of seat
belts, help to cushion the impact force on
the chest and pelvic area of the front occu-
pants. Curtain air bags help to cushion the
impact force to the head of occupants in
the front seating positions. They can help
save lives and reduce serious injuries. How-
ever, an inflating side air bag and curtain air
bag may cause abrasions or other injuries.
Side air bags and curtain air bags do not
provide restraint to the lower body.The seat belts should be correctly worn
and the driver and passenger seated up-
right as far as practical away from the side
air bag. The side air bags and curtain air
bags inflate quickly in order to help protect
the occupants. Because of this, the force of
the side air bag and curtain air bag inflating
can increase the risk of injury if the occu-
pant is too close to, or is against, these air
bag modules during inflation. The side air
bag will deflate quickly af ter the collision is
over.
The curtain air bag will remain inflated for a
short time.
The side air bags and curtain air bags
operate only when the ignition switch is
placed in the ON position.
Af ter placing the ignition switch in the
ON position, the supplemental air bag
warning light illuminates. The supple-
mental air bag warning light will turn off
af ter about 7 seconds if the system is
operational.
Page 77 of 370
The low tire pressure warning light remains
illuminated until the tires are inflated to the
recommended COLD tire pressure. The
CHECK TIRE PRES (pressure) warning mes-
sage is displayed each time the ignition
switch is placed in the ON position as long
as the low tire pressure warning light re-
mains illuminated.
For additional information, refer to “Low tire
pressure warning light” in this section, “Tire
Pressure Monitoring System (TPMS)” in the
“Starting and driving” section, and “Wheels
and tires” in the “Do-it-yourself ” section of
this manual.
TACHOMETER
The tachometer indicates engine speed in
revolutions per minute (rpm). Do not rev
engine into the red zone
�1.
Page 83 of 370

Low tire pressure warninglight
Your vehicle is equipped with a TPMS that
monitors the tire pressure of all tires except
the spare.
The low tire pressure warning light warns
of low tire pressure or indicates that the
TPMS is not functioning properly.
Af ter the ignition switch is placed in the ON
position, this light illuminates for about
1 second and turns off.
Low tire pressure warning
If the vehicle is being driven with low tire
pressure, the warning light will illumi-
nate.
A CHECK TIRE PRES (pressure) warning
message is also displayed in the odom-
eter.
When the low tire pressure warning light
illuminates, you should stop and adjust
the tire pressure of all four tires to the
recommended COLD tire pressure shown
on the Tire and Loading Information la-
bel located in the driver’s door opening.
The low tire pressure warning light does
not automatically turn off when the tire
pressure is adjusted. Af ter the tire is in- flated to the recommended pressure,
the vehicle must be driven at speeds
above 16 mph (25 km/h) to activate the
TPMS and turn off the low tire pressure
warning light. Use a tire pressure gauge
to check the tire pressure.
The low tire pressure warning light remains
illuminated until the tires are inflated to the
recommended COLD tire pressure. The
CHECK TIRE PRES warning message is dis-
played each time the ignition switch is
placed in the ON position as long as the low
tire pressure warning light remains illumi-
nated.
For additional information, refer to "Check
tire pressure warning message" in this sec-
tion and “Tire Pressure Monitoring System
(TPMS)” in the “Starting and driving” section
and in the “In case of emergency” section of
this manual.
TPMS malfunction
If the TPMS is not functioning properly, the
low tire pressure warning light will flash for
approximately 1 minute when the ignition
switch is placed in the ON position. The
light will remain on af ter 1 minute. Have the
system checked. It is recommended that
you visit a NISSAN dealer for this service.
The "CHECK TIRE PRES" warning does notappear if the low tire pressure warning light
illuminates to indicate a TPMS malfunction.
For additional information, refer to “Tire
Pressure Monitoring System (TPMS)” in the
“Starting and driving” section and “Tire
pressure” in the “Do-it-yourself ” section of
this manual.
Page 85 of 370
When the ignition switch is placed in the ON
position, the power steering warning light
illuminates. Af ter starting the engine, the
power steering warning light turns off. This
indicates the power steering is operational.
If the power steering warning light illumi-
nates while the engine is running, it may
indicate the power steering is not function-
ing properly and may need servicing. Have
the power steering checked. It is recom-
mended that you visit a NISSAN dealer for
this service.
When the power steering warning light illu-
minates with the engine running, there will
be no power assist for the steering, but you
will still have control of the vehicle. At this
time, greater steering effort is required to
operate the steering wheel, especially in
sharp turns and at low speeds.
For additional information, refer to “Power
steering” in the “Starting and driving” sec-
tion of this manual.
Page 104 of 370
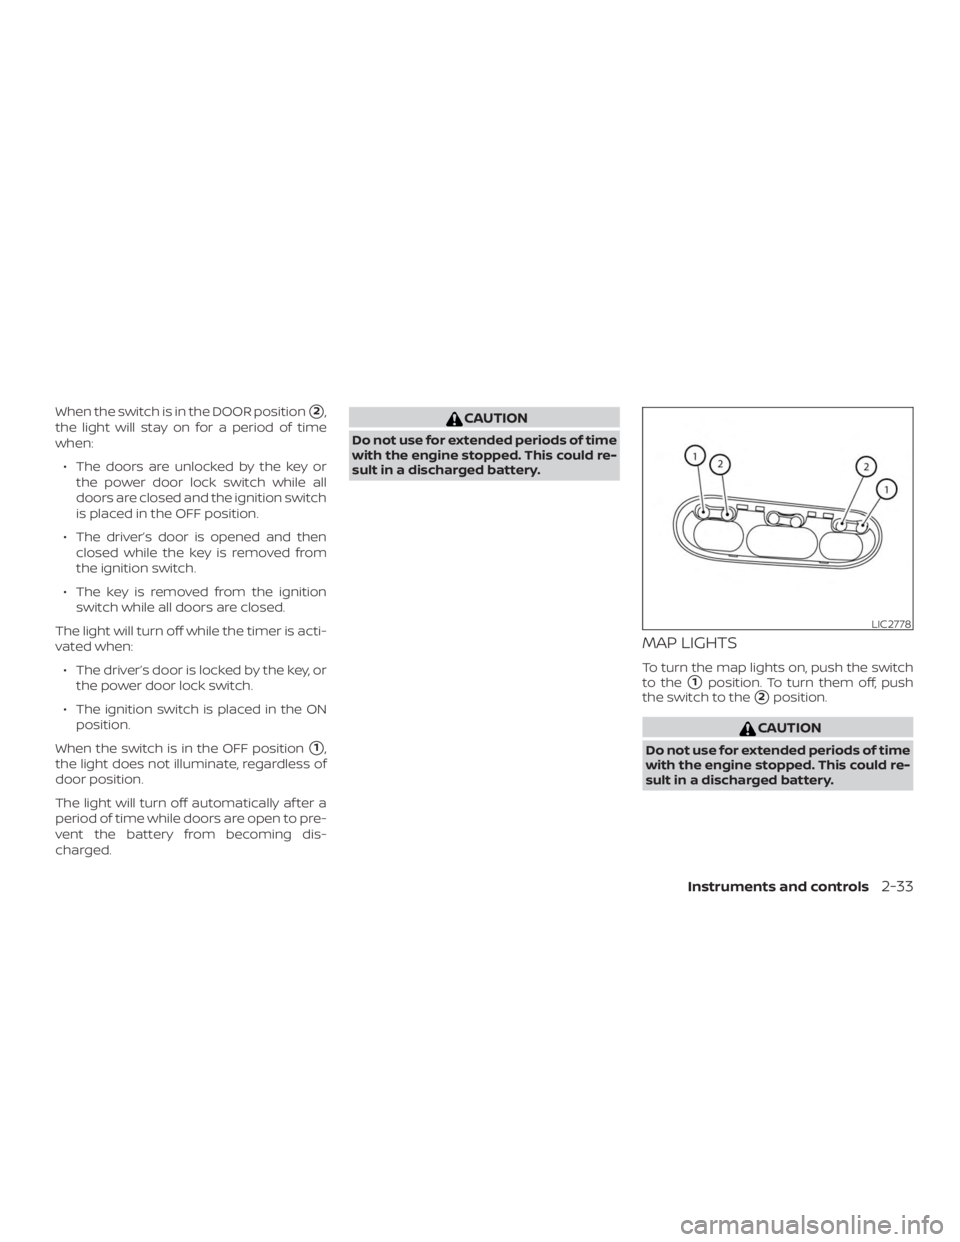
When the switch is in the DOOR position�2,
the light will stay on for a period of time
when:
∙ The doors are unlocked by the key or the power door lock switch while all
doors are closed and the ignition switch
is placed in the OFF position.
∙ The driver’s door is opened and then closed while the key is removed from
the ignition switch.
∙ The key is removed from the ignition switch while all doors are closed.
The light will turn off while the timer is acti-
vated when: ∙ The driver’s door is locked by the key, or the power door lock switch.
∙ The ignition switch is placed in the ON position.
When the switch is in the OFF position
�1,
the light does not illuminate, regardless of
door position.
The light will turn off automatically af ter a
period of time while doors are open to pre-
vent the battery from becoming dis-
charged.
Page 105 of 370
CARGO LIGHT
The cargo light has a two-position switch
and operates regardless of ignition switch
position.
When the switch is in the ON position, the
cargo light illuminates, regardless of door
position. The light will go off af ter a period
of time unless the ignition switch is placed
in the ACC or ON position.
When the switch is in the OFF position, the
cargo light will not illuminate, regardless of
door position.
Page 112 of 370
Lockout protection
When the power door lock switch (driver’s
or front passenger’s side) is moved to the
lock position with the key in the ignition
switch while any door is open, all doors will
lock and then unlock automatically. This
helps to prevent the keys from being acci-
dently locked inside the vehicle.
OPERATING THE SLIDING DOORS
 warning mes-
sage is displayed each time the")


 is moved to the
lock position with the key in the ignition
switch while any door is open, all doors will
loc")