2015 NISSAN MURANO key
[x] Cancel search: keyPage 3 of 36
Please see your Owner’s Manual for important safety information and system operation limitations.• A cellular telephone should not be used for any purpose while driving so full attention may be given to vehicle operation.• Always wear your seat belt.• Supplemental air bags do not replace proper seat belt usage. • Children 12 and under should always ride in the rear seat properly secur\
ed in child restraints or seat belts according to their age and weight. • Do not drink and drive.For more information, refer to the “Safety — Seats, seat belts and supplemental restraint system (sectio\
n 1)”, the “Display screen, heater, air conditioner, audio and phone systems (section 4)” and the “Starting and driving (section 5)” of your Owner’s Manual.
Additional information about your vehicle is also available in your Owne\
r’s Manual, Navigation System Owner’s Manual and at www.NissanUSA.com.
NEW SYSTEM FEATURESHow to Use Your Murano’s Touch-screen Display ........................................................................\
.........2Heated Steering Wheel (if so equipped) ........................................................................\
.........................3Around View® Monitor (AVM) with Moving Object Detection (MOD) (if so equipped) .................3Blind Spot Warning (BSW) System (if so equipped) ........................................................................\
...5Predictive Forward Collision Warning (PFCW) System (if so equipped) ........................................5Vehicle Dynamic Control (VDC) ........................................................................\
.........................................5Hill Start Assist (HSA) System ........................................................................\
...........................................5Forward Emergency Braking (FEB) System (if so equipped) .............................................................6SiriusXM Travel Link and SiriusXM Traffic (if so equipped) .................................................................6
ESSENTIAL INFORMATIONTire Pressure Monitoring System (TPMS) with Easy Fill Tire Alert ....................................................7Loose Fuel Cap ........................................................................\
......................................................................8Fuel-filler Door ........................................................................\
........................................................................8Towing Your Vehicle (if so equipped) ........................................................................\
................................8 Clock Set/Adjustment ........................................................................\
...........................................................9
FIRST DRIVE FEATURESNISSAN Intelligent Key® System ........................................................................\
.....................................10Power Liftgate Release (if so equipped) ........................................................................\
........................12Front Seat Adjustments ........................................................................\
......................................................12Automatic Drive Positioner (if so equipped) ........................................................................\
..................13Rear Seat Adjustments ........................................................................\
.......................................................13Outside Mirror Control Switch ........................................................................\
..........................................14Starting/Stopping the Engine ........................................................................\
...........................................14Headlight Control Switch ........................................................................\
.................................................15Windshield Wiper and Washer Switch ........................................................................\
...........................16Automatic Climate Controls (if so equipped) ........................................................................\
................16FM/AM/SiriusXM® Satellite Radio with CD Player and Navigation .................................................18USB (Universal Serial Bus) Connection Port/iPod® Interface and AUX Jack (if so equipped) .....19Front Arm Rest/Center Console Storage Box ........................................................................\
..............20Cruise Control (if so equipped) ........................................................................\
........................................20Intelligent Cruise Control (ICC) (if so equipped) ........................................................................\
.........21
SYSTEM GUIDETrip Computer ........................................................................\
.......................................................................22Text Messaging (if so equipped) ........................................................................\
......................................23NissanConnectsm mobile Apps (if so equipped) ........................................................................\
...........23Bluetooth
Page 4 of 36
2
NEW SYSTEM FEATURES
HOW TO USE YOUR MURANO’S
TOUCH-SCREEN DISPLAY
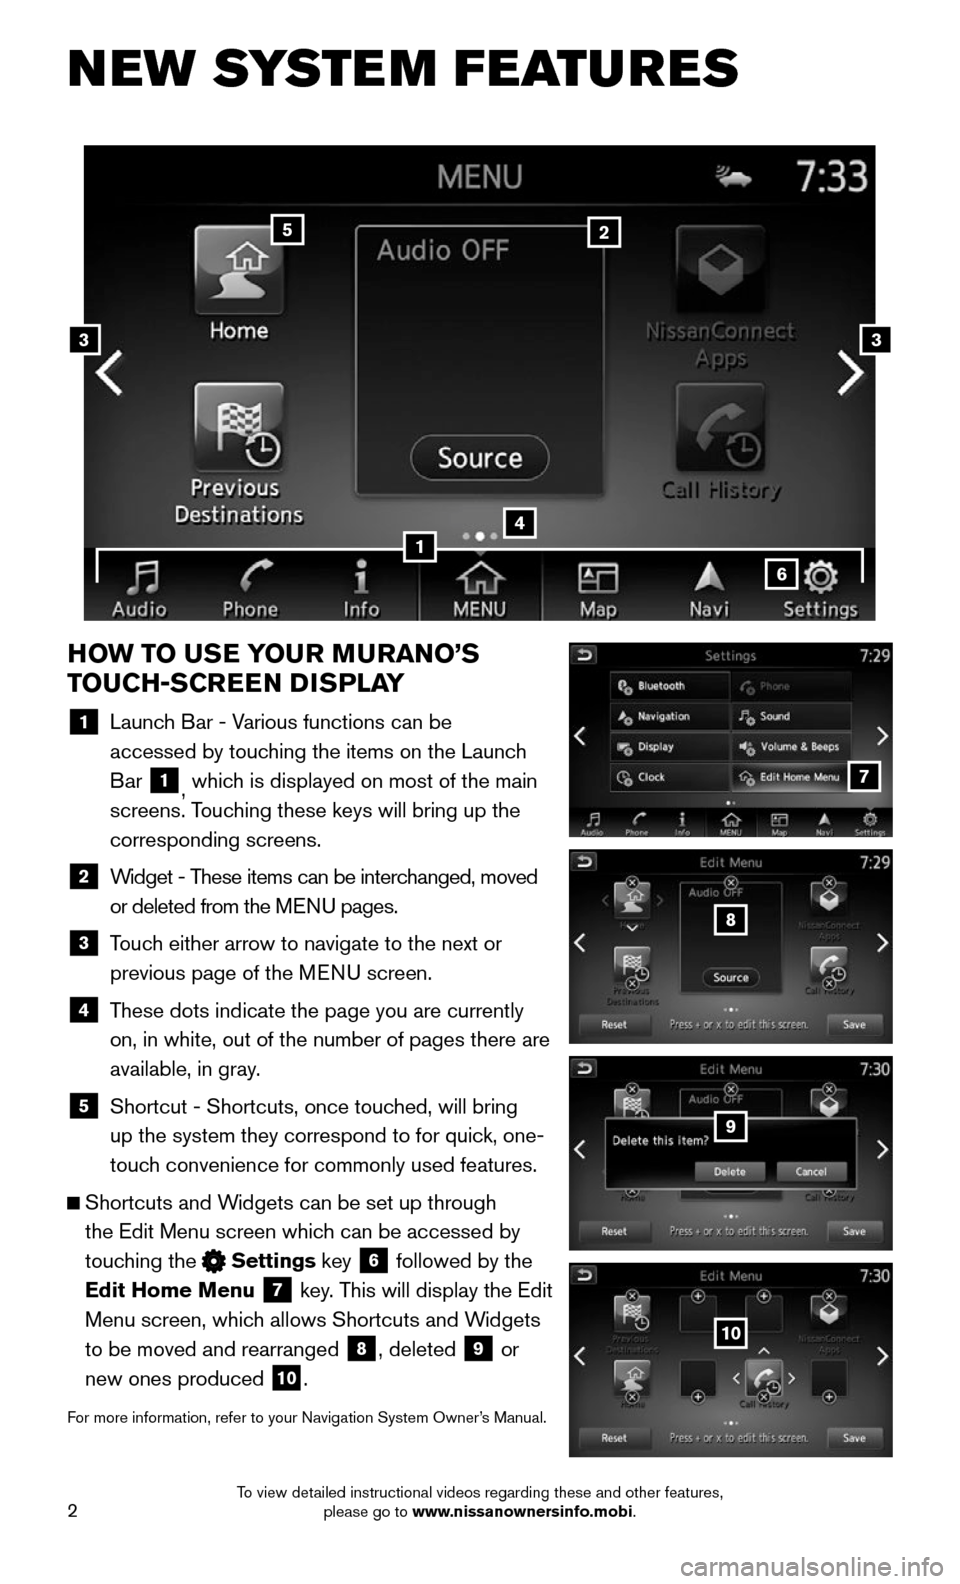
1 Launch Bar - Various functions can be
accessed by touching the items on the Launch
Bar 1, which is displayed on most of the main
screens. Touching these keys will bring up the
corresponding screens.
2 Widget - These items can be interchanged, moved
or deleted from the MENU pages.
3 Touch either arrow to navigate to the next or
previous page of the MENU screen.
4 These dots indicate the page you are currently
on, in white, out of the number of pages there are
available, in gray.
5 Shortcut - Shortcuts, once touched, will bring
up the system they correspond to for quick, one-
touch convenience for commonly used features.
Shortcuts and Widgets can be set up through
the Edit Menu screen which can be accessed by
touching the Settings key 6 followed by the
Edit Home Menu 7 key. This will display the Edit
Menu screen, which allows Shortcuts and Widgets
to be moved and rearranged 8, deleted 9 or
new ones produced 10.
For more information, refer to your Navigation System Owner’s Manual.
4
2
33
5
7
8
9
10
1
6
To view detailed instructional videos regarding these and other features, please go to www.nissanownersinfo.mobi.
Page 11 of 36
9
CLOCK SET/ADJUSTMENT
SYSTEM WITH NAVIGATION
To adjust the time and the appearance of the clock on the display:
1. Press the MENU button on the control panel.
2. Touch the Settings key on the Launch Bar.
3. Touch the Clock key.
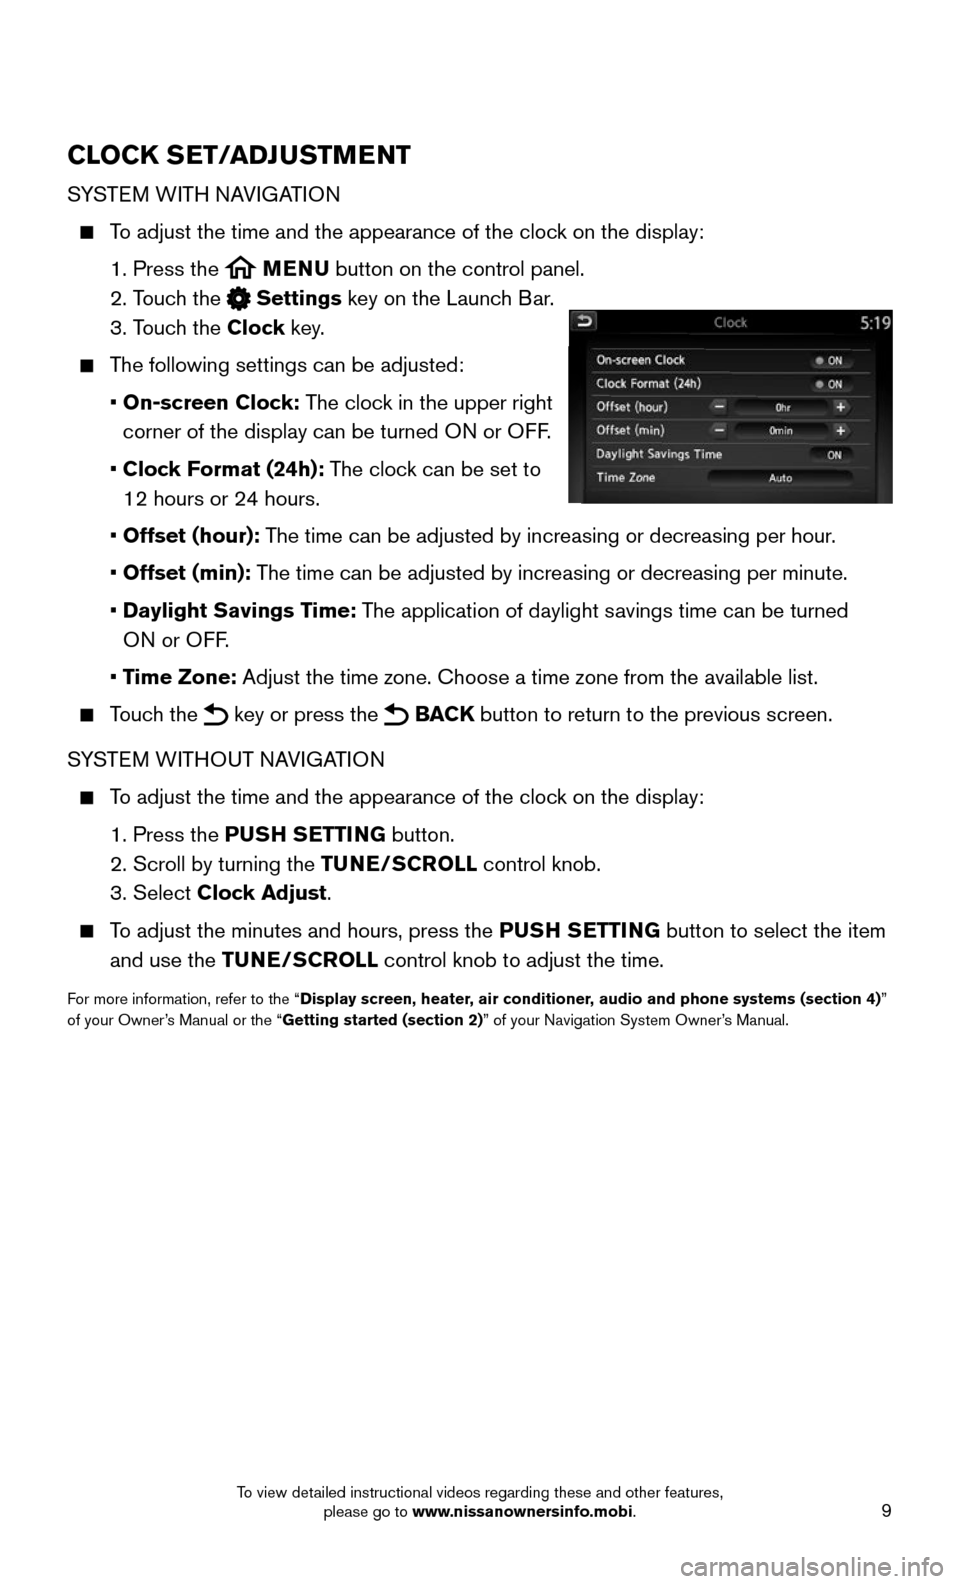
The following settings can be adjusted:
• On-screen Clock: The clock in the upper right
corner of the display can be turned ON or OFF.
• Clock Format (24h): The clock can be set to
12 hours or 24 hours.
• Offset (hour): The time can be adjusted by increasing or decreasing per hour.
• Offset (min): The time can be adjusted by increasing or decreasing per minute.
• Daylight Savings Time: The application of daylight savings time can be turned
ON or OFF.
• Time Zone: Adjust the time zone. Choose a time zone from the available list.
Touch the key or press the BACK button to return to the previous screen.
SYSTEM WITHOUT NAVIGATION
To adjust the time and the appearance of the clock on the display:
1. Press the PUSH SETTING button.
2. Scroll by turning the TUNE/SCROLL control knob.
3. Select Clock Adjust.
To adjust the minutes and hours, press the PUSH SETTING button to select the item
and use the TUNE/SCROLL control knob to adjust the time.
For more information, refer to the “Display screen, heater, air conditioner, audio and phone systems (section 4)” of your Owner’s Manual or the “Getting started (section 2)” of your Navigation System Owner’s Manual.
To view detailed instructional videos regarding these and other features, please go to www.nissanownersinfo.mobi.
Page 12 of 36
10
FIRST DRIVE FEATURES
NISSAN INTELLIGENT KEY® SYSTE M
The NISSAN Intelligent Key® system allows you to lock or unlock your vehicle, open your
liftgate (if so equipped) and start the engine (if so equipped). It is important to make sure
the Intelligent Key (I-Key) is with you (that is, in your pocket or purse).
KEY-LINKED SYSTEM (if so equipped)
The vehicle information display has added features, allowing the Key-Linked System to
remember some of the vehicle information display settings.
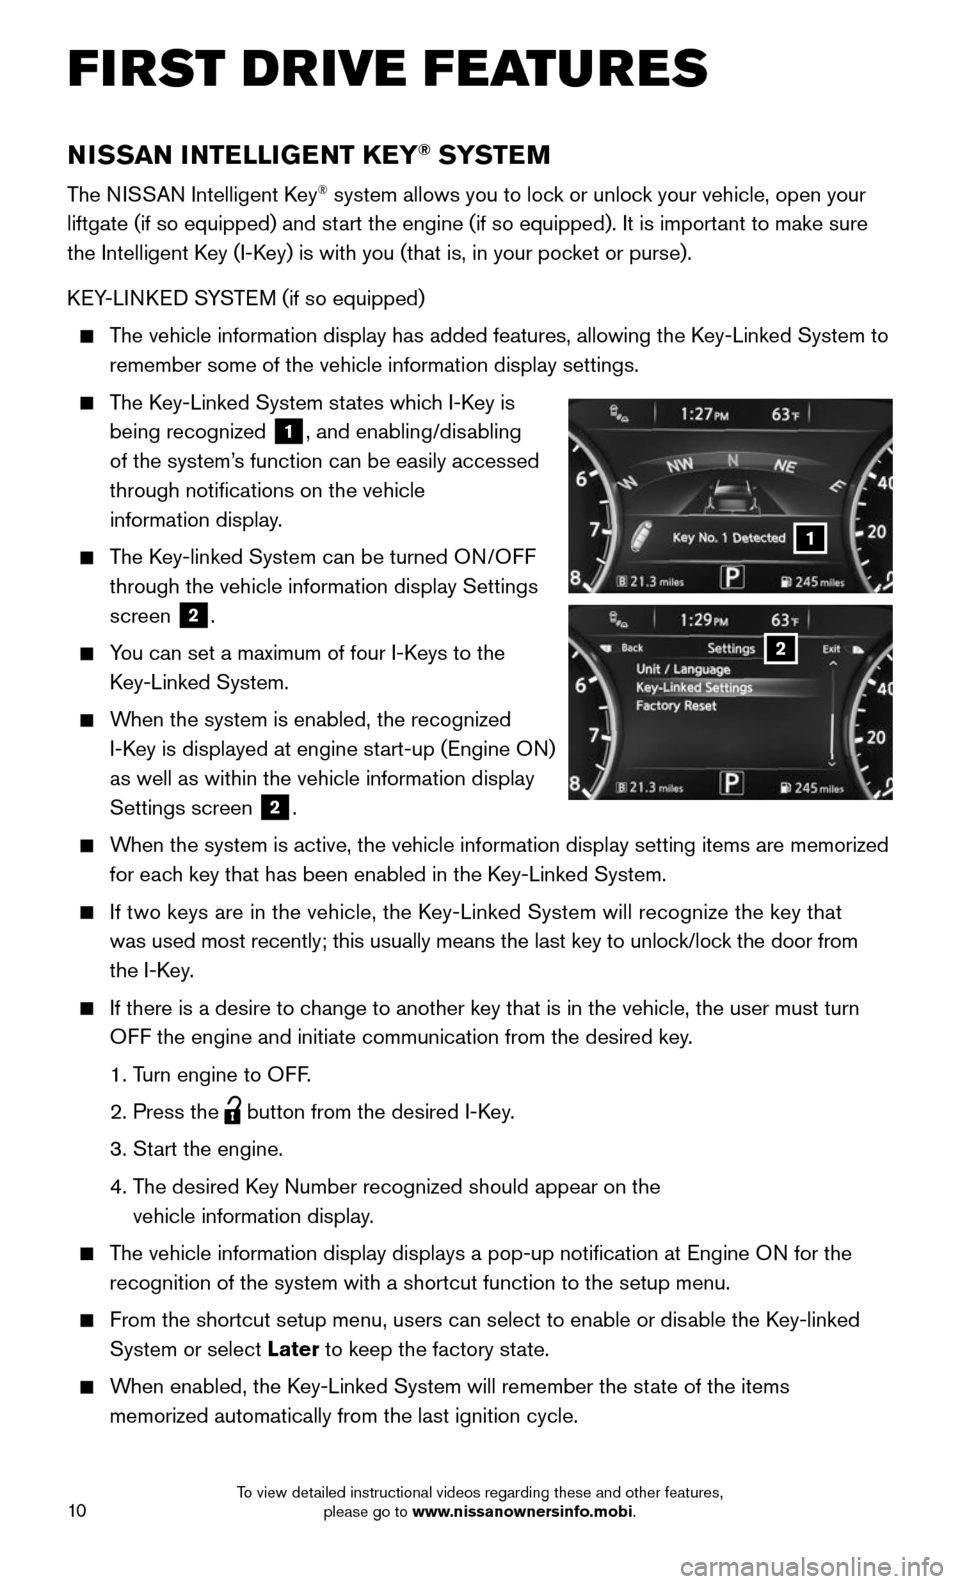
The Key-Linked System states which I-Key is
being recognized 1, and enabling/disabling
of the system’s function can be easily accessed
through notifications on the vehicle
information display.
The Key-linked System can be turned ON/OFF
through the vehicle information display Settings
screen 2.
You can set a maximum of four I-Keys to the
Key-Linked System.
When the system is enabled, the recognized
I-Key is displayed at engine start-up (Engine ON)
as well as within the vehicle information display
Settings screen 2.
When the system is active, the vehicle information display setting items \
are memorized
for each key that has been enabled in the Key-Linked System.
If two keys are in the vehicle, the Key-Linked System will recognize the key that
was used most recently; this usually means the last key to unlock/lock the door from
the I-Key.
If there is a desire to change to another key that is in the vehicle, the user must turn
OFF the engine and initiate communication from the desired key.
1. Turn engine to OFF.
2. Press the button from the desired I-Key.
3. Start the engine.
4. The desired Key Number recognized should appear on the
vehicle information display.
The vehicle information display displays a pop-up notification at Engin\
e ON for the
recognition of the system with a shortcut function to the setup menu.
From the shortcut setup menu, users can select to enable or disable the Key-linked
System or select Later to keep the factory state.
When enabled, the Key-Linked System will remember the state of the items
memorized automatically from the last ignition cycle.
2
1
To view detailed instructional videos regarding these and other features, please go to www.nissanownersinfo.mobi.
Page 13 of 36
11
REMOTE ENGINE START* (if so equipped)
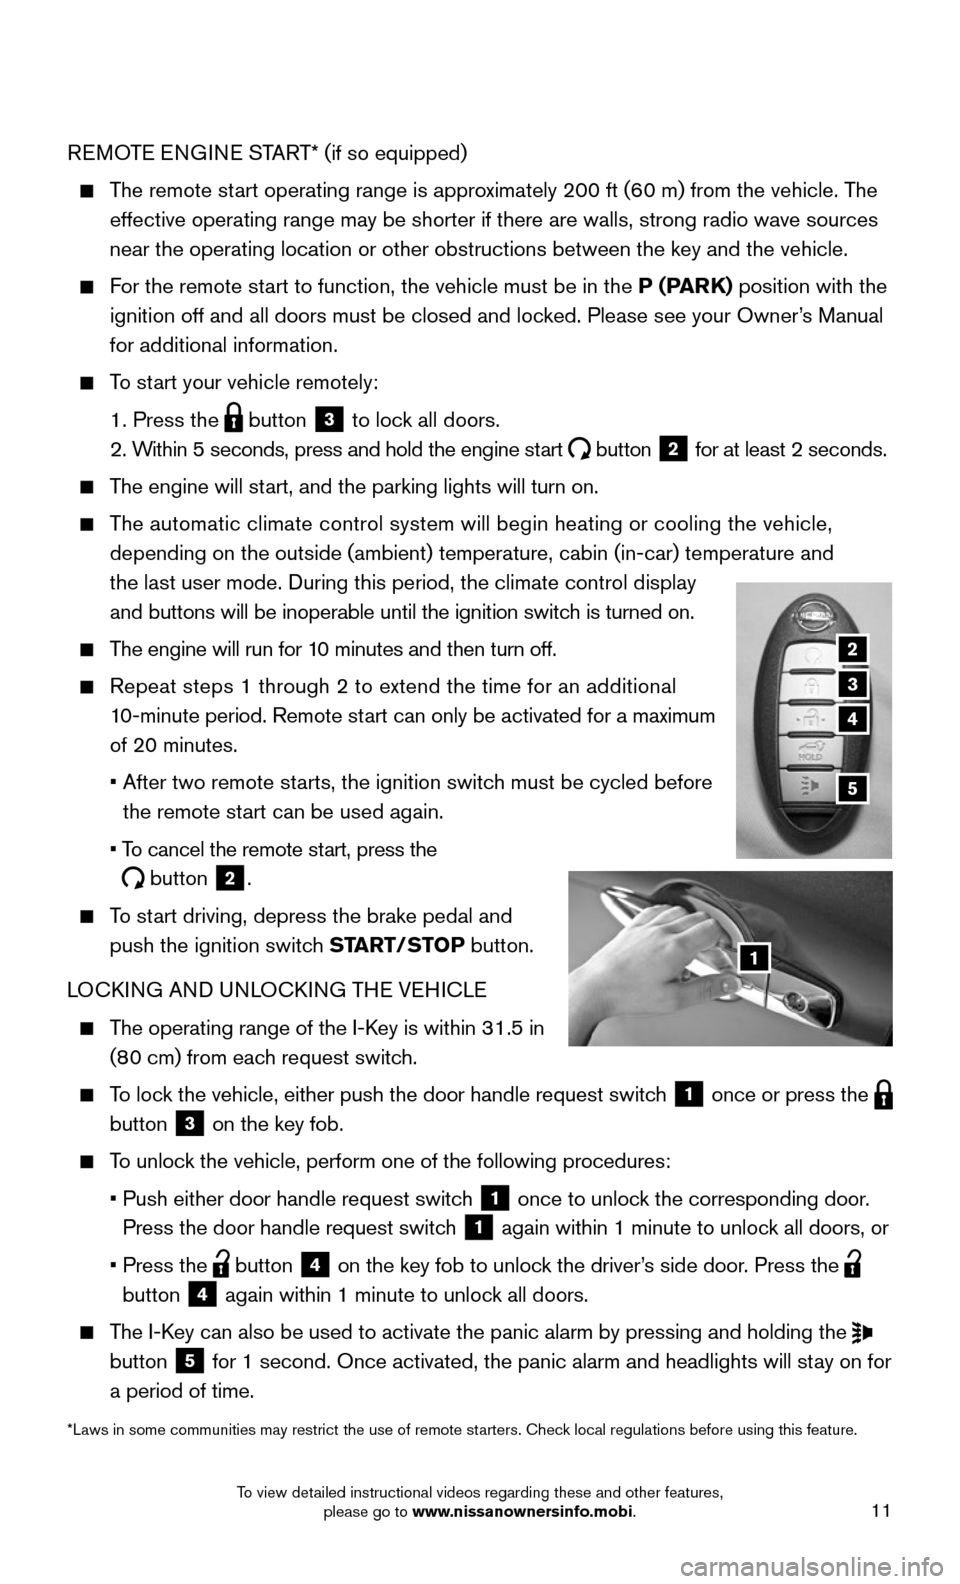
The remote start operating range is approximately 200 ft (60 m) from the vehicle. The
effective operating range may be shorter if there are walls, strong radi\
o wave sources
near the operating location or other obstructions between the key and th\
e vehicle.
For the remote start to function, the vehicle must be in the P (PARK) position with the
ignition off and all doors must be closed and locked. Please see your Owner’s Manual
for additional information.
To start your vehicle remotely:
1. Press the button 3 to lock all doors.
2. Within 5 seconds, press and hold the engine start button 2 for at least 2 seconds.
The engine will start, and the parking lights will turn on.
The automatic climate control system will begin heating or cooling the ve\
hicle,
depending on the outside (ambient) temperature, cabin (in-car) tempe\
rature and
the last user mode. During this period, the climate control display
and buttons will be inoperable until the ignition switch is turned on.
The engine will run for 10 minutes and then turn off.
Repeat steps 1 through 2 to extend the time for an additional
10-minute period. Remote start can only be activated for a maximum
of 20 minutes.
• After two remote starts, the ignition switch must be cycled before
the remote start can be used again.
• To cancel the remote start, press the
button 2.
To start driving, depress the brake pedal and
push the ignition switch START/STOP button.
LOCKING AND UNLOCKING THE VEHICLE
The operating range of the I-Key is within 31.5 in
(80 cm) from each request switch.
To lock the vehicle, either push the door handle request switch 1 once or press the button 3 on the key fob.
To unlock the vehicle, perform one of the following procedures:
• Push either door handle request switch 1 once to unlock the corresponding door.
Press the door handle request switch 1 again within 1 minute to unlock all doors, or
• Press the button 4 on the key fob to unlock the driver’s side door. Press the button 4 again within 1 minute to unlock all doors.
The I-Key can also be used to activate the panic alarm by pressing and holding \
the button 5 for 1 second. Once activated, the panic alarm and headlights will stay on for
a period of time.
*Laws in some communities may restrict the use of remote starters. Check local regulations before using this feature.
2
3
5
1
4
To view detailed instructional videos regarding these and other features, please go to www.nissanownersinfo.mobi.
Page 14 of 36
12
FIRST DRIVE FEATURES
NISSAN INTELLIGENT KEY® BATTERY DISCHARGE
If the battery of the I-Key is discharged or
environmental conditions interfere with the I-Key
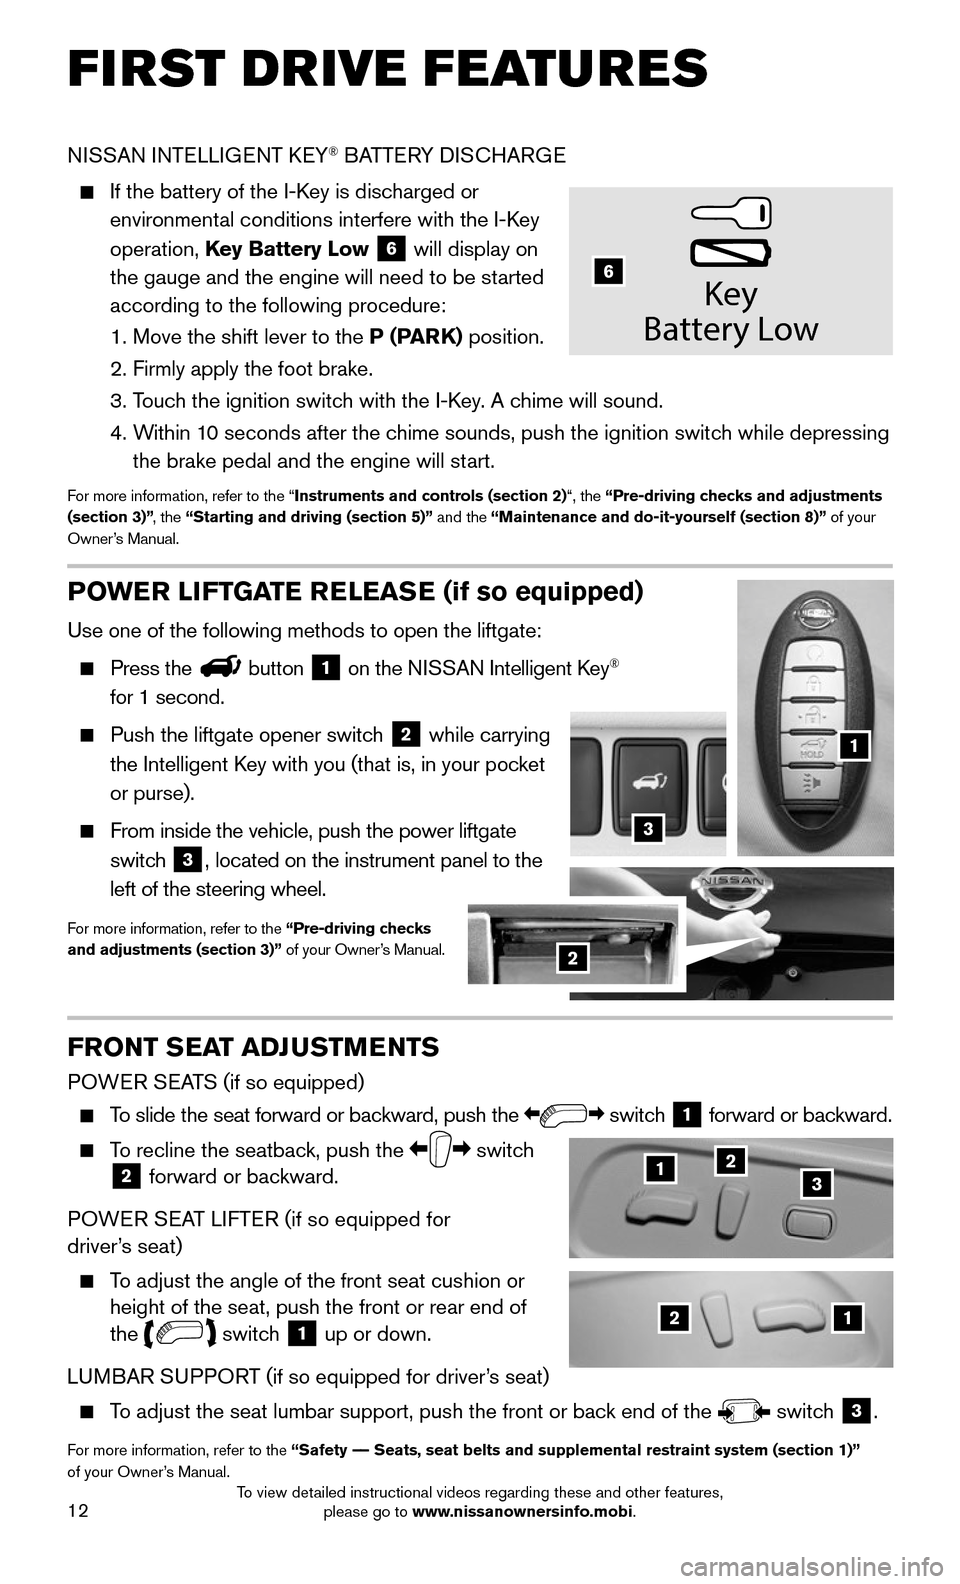
operation, Key Battery Low 6 will display on
the gauge and the engine will need to be started
according to the following procedure:
1. Move the shift lever to the P (PARK) position.
2. Firmly apply the foot brake.
3. Touch the ignition switch with the I-Key. A chime will sound.
4. Within 10 seconds after the chime sounds, push the ignition switch while depressing
the brake pedal and the engine will start.
For more information, refer to the “Instruments and controls (section 2)“, the “Pre-driving checks and adjustments (section 3)”, the “Starting and driving (section 5)” and the “Maintenance and do-it-yourself (section 8)” of your Owner’s Manual.
Key
Batter y Low
6
21
123
POWER LIFTGATE RELEASE (if so equipped)
Use one of the following methods to open the liftgate:
Press thebutton 1 on the NISSAN Intelligent Key®
for 1 second.
Push the liftgate opener switch 2 while carrying
the Intelligent Key with you (that is, in your pocket
or purse).
From inside the vehicle, push the power liftgate
switch 3, located on the instrument panel to the
left of the steering wheel.
For more information, refer to the “Pre-driving checks and adjustments (section 3)” of your Owner’s Manual.
1
2
3
FRONT SEAT ADJUSTMENTS
POWER SEATS (if so equipped)
To slide the seat forward or backward, push the switch 1 forward or backward.
To recline the seatback, push the switch 2 forward or backward.
POWER SEAT LIFTER (if so equipped for driver’s seat)
To adjust the angle of the front seat cushion or height of the seat, push the front or rear end of the switch 1 up or down.
LUMBAR SUPPORT (if so equipped for driver’s seat)
To adjust the seat lumbar support, push the front or back end of the switch 3.
For more information, refer to the “Safety –– Seats, seat belts and supplemental restraint system (section 1)”\
of your Owner’s Manual.
To view detailed instructional videos regarding these and other features, please go to www.nissanownersinfo.mobi.
Page 15 of 36
13
AUTOMATIC DRIVE POSITIONER (if so equipped)
Two positions for the driver’s seat, steering column
(if so equipped) and outside mirrors can be stored
in the automatic drive positioner memory.
Follow this procedure to set the memory positions:
• Push the ignition switch to the ON or ACC
position. (The vehicle should be stopped while setting the memory.)
• Adjust the driver’s seat, steering column (if so equipped) and outside mirrors to the
desired positions using the adjusting switches for each feature.
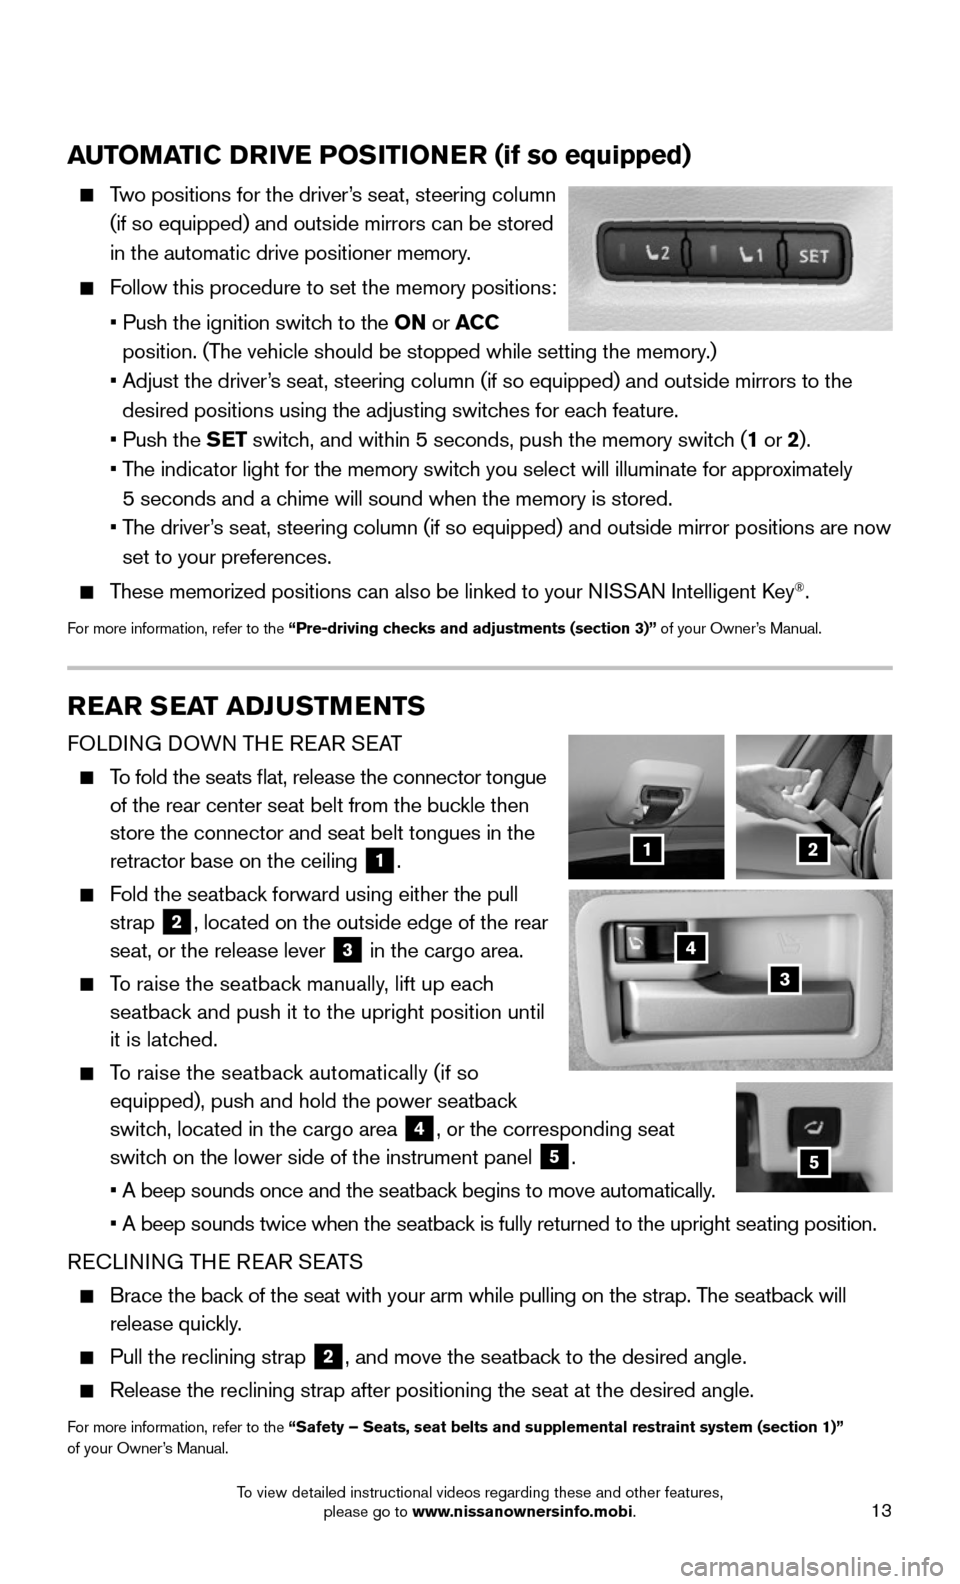
• Push the SET switch, and within 5 seconds, push the memory switch (1 or 2).
• The indicator light for the memory switch you select will illuminate for approximately
5 seconds and a chime will sound when the memory is stored.
• The driver’s seat, steering column (if so equipped) and outside mirror positions \
are now
set to your preferences.
These memorized positions can also be linked to your NISSAN Intelligent Key®.
For more information, refer to the “Pre-driving checks and adjustments (section 3)” of your Owner’s Manual.
REAR SEAT ADJUSTMENTS
FOLDING DOWN THE REAR SEAT
To fold the seats flat, release the connector tongue
of the rear center seat belt from the buckle then
store the connector and seat belt tongues in the
retractor base on the ceiling 1.
Fold the seatback forward using either the pull
strap 2, located on the outside edge of the rear
seat, or the release lever 3 in the cargo area.
To raise the seatback manually, lift up each
seatback and push it to the upright position until
it is latched.
To raise the seatback automatically (if so
equipped), push and hold the power seatback
switch, located in the cargo area 4, or the corresponding seat
switch on the lower side of the instrument panel 5.
• A beep sounds once and the seatback begins to move automatically.
• A beep sounds twice when the seatback is fully returned to the upright seating position.
RECLINING THE REAR SEATS
Brace the back of the seat with your arm while pulling on the strap. The seatback will
release quickly.
Pull the reclining strap 2, and move the seatback to the desired angle.
Release the reclining strap after positioning the seat at the desired an\
gle.
For more information, refer to the “Safety – Seats, seat belts and supplemental restraint system (se\
ction 1)” of your Owner’s Manual.
4
21
3
5
To view detailed instructional videos regarding these and other features, please go to www.nissanownersinfo.mobi.
Page 16 of 36
14
FIRST DRIVE FEATURES
OUTSIDE MIRROR CONTROL SWITCH
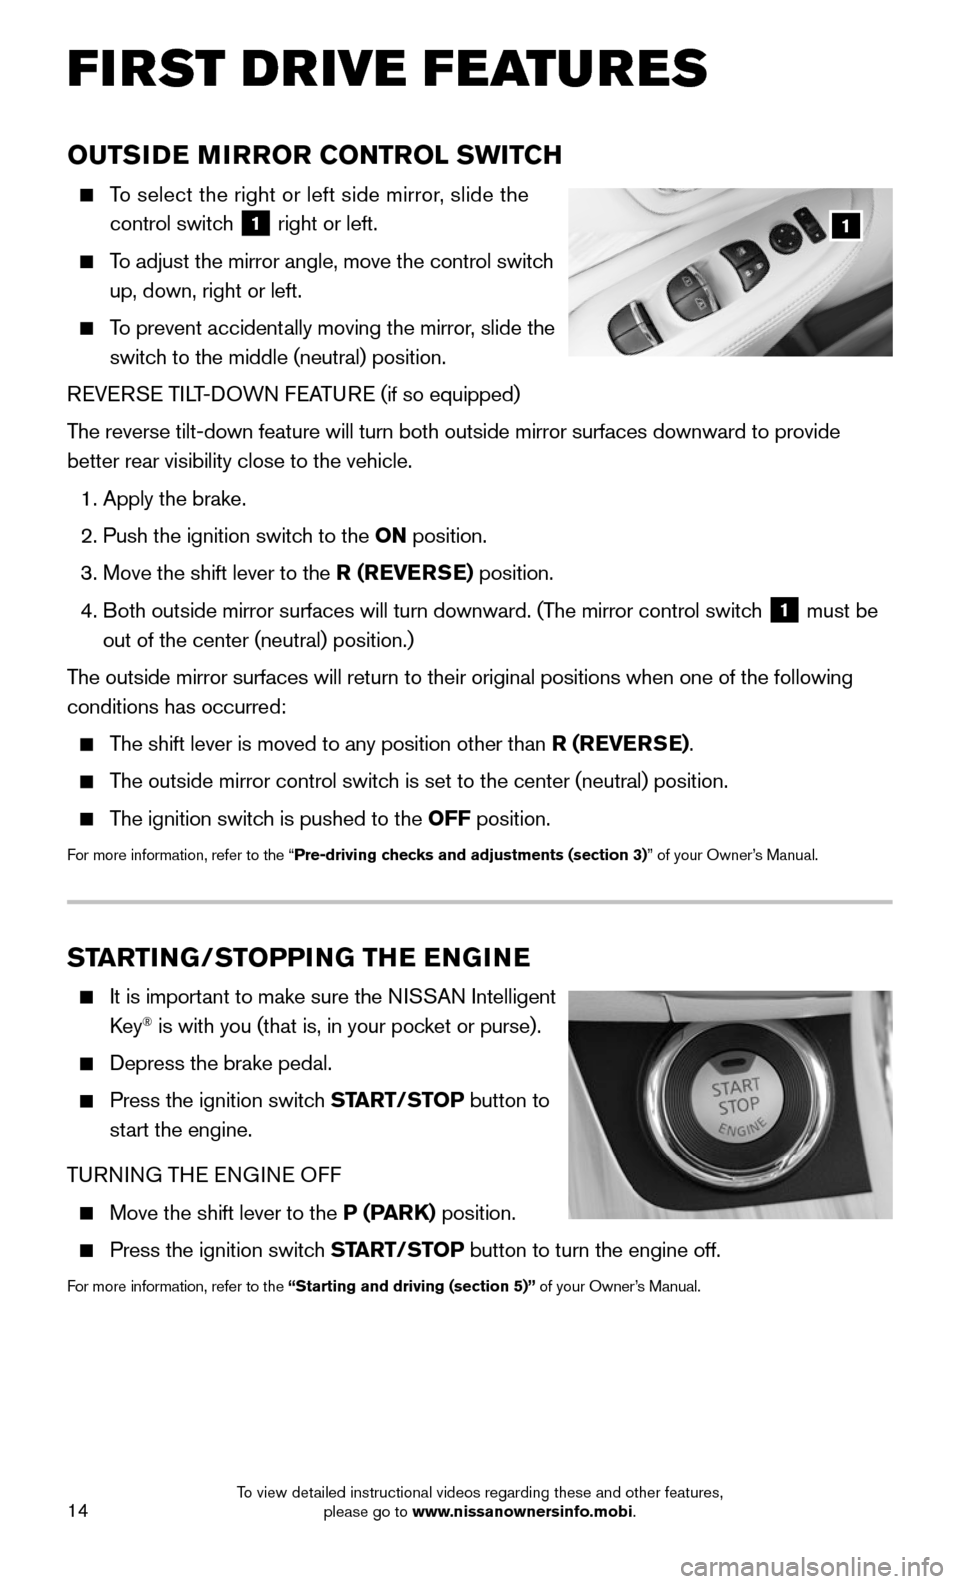
To select the right or left side mirror, slide the
control switch 1 right or left.
To adjust the mirror angle, move the control switch
up, down, right or left.
To prevent accidentally moving the mirror, slide the
switch to the middle (neutral) position.
REVERSE TILT-DOWN FEATURE (if so equipped)
The reverse tilt-down feature will turn both outside mirror surfaces down\
ward to provide
better rear visibility close to the vehicle.
1. Apply the brake.
2. Push the ignition switch to the ON position.
3. Move the shift lever to the R (REVERSE) position.
4. Both outside mirror surfaces will turn downward. (The mirror control switch 1 must be
out of the center (neutral) position.)
The outside mirror surfaces will return to their original positions when \
one of the following
conditions has occurred:
The shift lever is moved to any position other than R (REVERSE).
The outside mirror control switch is set to the center (neutral) position.
The ignition switch is pushed to the OFF position.
For more information, refer to the “Pre-driving checks and adjustments (section 3)” of your Owner’s Manual.
1
STARTING/STOPPING THE ENGINE
It is important to make sure the NISSAN Intelligent
Key® is with you (that is, in your pocket or purse).
Depress the brake pedal.
Press the ignition switch START/STOP button to
start the engine.
TURNING THE ENGINE OFF
Move the shift lever to the P (PARK) position.
Press the ignition switch START/STOP button to turn the engine off.
For more information, refer to the “Starting and driving (section 5)” of your Owner’s Manual.
To view detailed instructional videos regarding these and other features, please go to www.nissanownersinfo.mobi.