Page 142 of 424
Push the button to turn the map lights on. To turn
them off, press the button again.
Page 143 of 424

WARNING
●Do not use the HomeLink® Universal
Transceiver with any garage door
opener that lacks safety stop and re-
verse features as required by federal
safety standards. (These standards be-
came effective for opener models
manufactured after April 1, 1982) . A ga-
rage door opener which cannot detect
an object in the path of a closing garage
door and then automatically stop and
reverse, does not meet current federal
safety standards. Using a garage door
opener without these features in-
creases the risk of serious injury or
death.
● During the programming procedure
your garage door or security gate will
open and close (if the transmitter is
within range) . Make sure that people or
objects are clear of the garage door,
gate, etc. that you are programming.
● Your vehicle’s engine should be turned
off while programming the HomeLink®
Universal Transceiver.
PROGRAMMING HOMELINK®
If you have any questions or are having difficulty
programming your HomeLink® buttons, refer to
the HomeLink® web site at: www.homelink.com
or call 1-800-355-3515.
NOTE:
Place the ignition switch in the ACC posi-
tion (if so equipped) when programming
HomeLink®. It is also recommended that a
new battery be placed in the hand-held
transmitter of the device being pro-
grammed to HomeLink® for quicker pro-
gramming and accurate transmission of
the radio-frequency.
1. Position the end of your hand-held transmit- ter 1–3 in (2–8 cm) away from the
HomeLink® surface, keeping the
HomeLink® indicator light
�1in view. 2. Using both hands, simultaneously press and
hold the desired HomeLink® button and
hand-held transmitter button. DO NOT re-
lease until the HomeLink® indicator light
�1
flashes slowly and then rapidly. When the
indicator light flashes rapidly, both buttons
may be released. (The rapid flashing indi-
cates successful programming.)
NOTE:
Some devices may require you to replace
Step 2 with the cycling procedure noted in
“Programming HomeLink® for Canadian
customers and gate openers” in this sec-
tion.
Page 157 of 424
 position,place the ignition switch in the LOCK posi-
tion and make sure you carry the Intelligent
Key with you.
2. Close all doors.
3. Push any do")
Locking doors
1. Move the shift lever to the P (Park) position,place the ignition switch in the LOCK posi-
tion and make sure you carry the Intelligent
Key with you.
2. Close all doors.
3. Push any door handle request switch while carrying the Intelligent Key with you.
4. All doors and the rear liftgate will lock.
5. The hazard warning lights flash twice, the outside buzzer sounds twice, and the front
and tail lights will turn on for 10 seconds. NOTE:
● Request switches for all doors and lift-
gate can be deactivated when the Intel-
ligent Key Door Lock setting is
switched to OFF in the Vehicle Settings
of the vehicle information display. For
additional information, refer to “Ve-
hicle information display” in the “In-
struments and controls” section of this
manual.
● Doors lock with the door handle request
switch while the ignition switch is not in the
LOCK position. ●
Doors do not lock by pushing the door
handle request switch while any door is
open. However, doors lock with the me-
chanical key even if any door is open.
● Doors do not lock with the door handle
request switch with the Intelligent Key inside
the vehicle and a beep sounds to warn you.
However, when an Intelligent Key is inside
the vehicle, doors can be locked with an-
other Intelligent Key.
Page 159 of 424

NOTE:
Request switches for all doors and liftgate
can be deactivated when the Intelligent Key
Door Lock setting is switched to OFF in the
Vehicle Settings of the vehicle information
display. For additional information, refer to
“Vehicle information display” in the “In-
struments and controls” section of this
manual.
If a door handle is pulled while unlocking the
doors, that door may not be unlocked. Returning
the door handle to its original position will unlock
the door. If the door does not unlock after return-
ing the door handle, push the door handle re-
quest switch to unlock the door.
All doors will be locked automatically unless one
of the following operations is performed within
one minute after pushing the request switch.● Opening any door.
● Pushing the ignition switch.
The interior light timer illuminates for a period of
time when a door is unlocked and the room light
switch is in the DOOR position.
The interior light can be turned off without waiting
by performing one of the following operations: ● Placing the ignition switch in the ON posi-
tion. ●
Locking the doors with the remote control.
● Switching the room light switch to the OFF
position.
● Switching the Auto Room Lamp to the OFF
position in Vehicle Settings of the vehicle
information display. For additional informa-
tion, refer to “Vehicle information display” in
the “Instruments and controls” section.
HOW TO USE THE REMOTE
KEYLESS ENTRY FUNCTION
The remote keyless entry function can operate all
door locks using the remote keyless function of
the Intelligent Key. The remote keyless function
can operate at a distance of 33 ft (10 m) away
from the vehicle. The operating distance de-
pends upon the conditions around the vehicle.
The remote keyless entry function will not func-
tion under the following conditions:
● When the Intelligent Key is not within the
operational range.
● When the Intelligent Key battery is dis-
charged.
Page 169 of 424
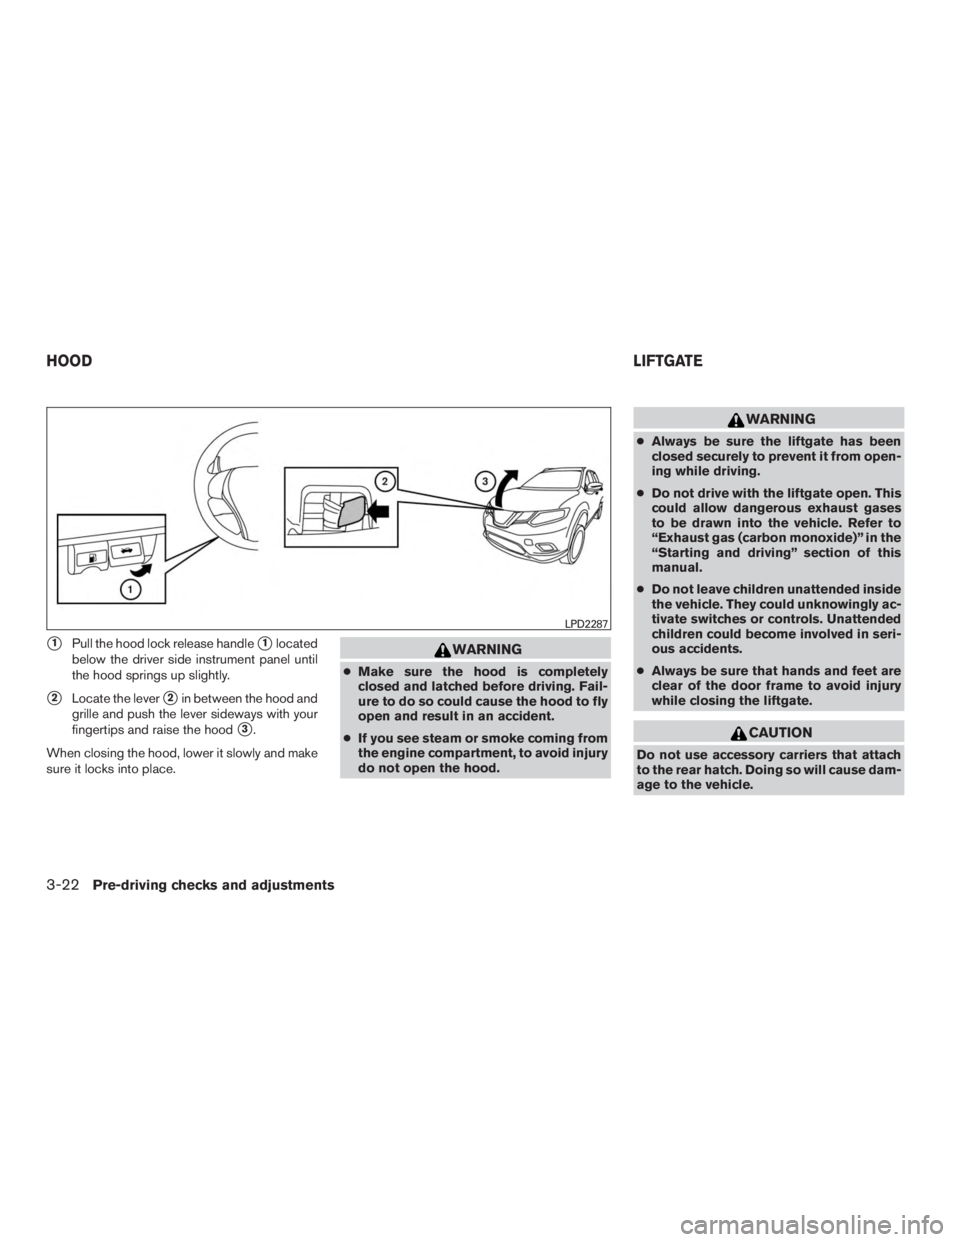
�1Pull the hood lock release handle�1located
below the driver side instrument panel until
the hood springs up slightly.
�2Locate the lever�2in between the hood and
grille and push the lever sideways with your
fingertips and raise the hood
�3.
When closing the hood, lower it slowly and make
sure it locks into place.
Page 179 of 424
VANITY MIRRORS
To access the vanity mirror, pull the sun visor
down and flip open the mirror cover. The vanity
mirror will illuminate when the mirror cover is
open.
CARD HOLDER
Do not view information while operating the ve-
hicle.
REARVIEW MIRROR (if so equipped)
Use the night position�1to reduce glare from
the headlights of vehicles behind you at night.
Use the day position
�2when driving in daylight
hours.
Page 180 of 424
AUTOMATIC ANTI-GLARE
REARVIEW MIRROR (if so equipped)
The inside mirror is designed so that it automati-
cally dims during night time conditions and ac-
cording to the intensity of the headlights of the
vehicle following you. The automatic anti-glare
feature is activated when the ignition switch is in
the ON position.NOTE:
Do not hang any objects over the sensors
�1or apply glass cleaner to the sensors.
Doing so will reduce the sensitivity of the
sensors, resulting in improper operation.
The indicator light
�2will illuminate when the
automatic anti-glare feature is operating.
● To turn off the anti-glare feature, press
the
Page 201 of 424

Bird’s-eye view
The bird’s-eye view shows the overhead view of
the vehicle, which helps confirm the vehicle po-
sition and the predicted course to a parking
space.
The vehicle icon
�1shows the position of the
vehicle. Note that the distance between objects
viewed in the bird’s-eye view may differ some-
what from the actual vehicle.
The areas that the cameras cannot cover
�2are
indicated in black.
The non-viewable area
�2is highlighted in yellow
for several seconds after the bird’s-eye view is displayed. It will be shown only the first time after
the ignition switch is placed in the ON position.
The driver can check the direction and angle of
the tire on the display by the tire icon
�3when
driving the vehicle forward or backward.
Predictive course lines (
�4and�5) indicate the
predictive course when operating the vehicle.
The predictive course lines will be displayed on
the monitor when the steering wheel is turned.
The predictive course lines will move depending
on how much the steering wheel is turned and
will not be displayed while the steering wheel is in
the neutral position.
When the monitor displays the front view and the
steering wheel turns about 90 degrees or less
from the neutral position, the two green predic-
tive course lines
�4are shown in front of the
vehicle.
When the steering wheel turns about 90 degrees
or more, one green predictive course line is
shown in front of the vehicle and the other green
predictive course line
�5is shown at the side of
the vehicle.
When the monitor displays the rear view, the
predictive course lines are shown at the back of
the vehicle.


The inside mirror is designed so that it automati-
cally dims during night time conditions and ac-
cording to the intensity of the headlights of t")