2015 NISSAN LEAF seats
[x] Cancel search: seatsPage 158 of 412
must be taken to your nearest NISSAN certified
LEAF dealer.
• The supplemental air bag warning light remainson after approximately 7 seconds.
• The supplemental air bag warning light flashes intermittently.
• The supplemental air bag warning light does not illuminate at all.
Unless checked and repaired, the Supplemental
Restraint Systems and/or the pretensioners may
not function properly.
For additional information, see “Supplemental re-
straint system” in the “Safety — Seats seat belts
and supplemental restraint system” section.
WARNING
If the supplemental air bag warning light
is on, it could mean that the front air bag,
side air bag, curtain air bag and/or pre-
tensioner systems will not operate in an
accident. To help avoid injury to yourself
or others, have your vehicle checked by a
NISSAN certified LEAF dealer as soon as
possible.
Vehicle Dynamic Control
(VDC) warning light
The light will blink when the Vehicle Dynamic
Control (VDC) system is operating, thus alerting
the driver that the vehicle is nearing its traction
limits. The road surface may be slippery.
When the VDC warning light illuminates with
VDC system turned on, this light alerts the driver
to the fact that the VDC system’s fail-safe mode
is operating, for example the VDC system may
not be functioning properly. Have the system
checked by a NISSAN certified LEAF dealer. If a
malfunction occurs in the system, the VDC sys-
tem function will be canceled but the vehicle is
still driveable. For additional information, see “Ve-
hicle Dynamic Control (VDC) system” in the
“Starting and driving” section of this manual.
INDICATOR LIGHTS
Exterior light indicator
This indicator illuminates when the headlight
switch is turned to the AUTO (if so equipped) ,
orposition and the front parking
lights, side maker lights, tail and license plate
lights are on. The indicator turns off when these
lights are turned off.
Front fog light indicator
light (if so equipped)
The front fog light indicator light illuminates when
the front fog lights are on. See “Fog light switch”
in this section.
Front passenger air bag status
light
The front passenger air bag status light (located
on the center of the instrument panel) will be lit
and the passenger front air bag will be turned
OFF depending on how the front passenger seat
is being used.
For front passenger air bag status light operation,
see “NISSAN Advanced Air Bag System (front
seats)” in the “Safety — Seats seat belts and
supplemental restraint system” section of this
manual.
High beam indicator light
(blue)
This light illuminates when the headlight high
beam is on and goes out when the low beam is
selected.
Instruments and controls2-19
Page 186 of 412
The front seats and the rear outboard seats can
be warmed by built-in heaters. The switches lo-
cated on the center console and at the side of the
front passenger seatback can be operated inde-
pendently of each other.
1. Place the power switch in the ON position.
2. Push the LO or HI position of the switch, asdesired, depending on the temperature. The
indicator light in the switch will illuminate.
3. To turn off the heater, return the switch to the level position. Make sure the indicator light
goes off. The heater is controlled by a thermostat, auto-
matically turning the heater on and off. The indi-
cator light will remain on as long as the switch is
on.
When the vehicle’s interior is warmed, or before
you leave the vehicle, be sure to turn the switch
off.
NOTE:
The heated seats consumes less power
than the heater and can be used to either
help extend vehicle range by reducing
heater use or to maximize comfort by
supplementing the heater.
WARNING
Do not use or allow occupants to use the
seat heater if you or the occupants can-
not monitor elevated seat temperatures
or have an inability to feel pain in those
body parts in contact with the seat. Use of
the seat heater by such people could re-
sult in serious injury.
CAUTION
• Do not use the seat heater for ex- tended periods or when no one is us-
ing the seat.
• Do not put anything on the seat which insulates heat, such as a blanket,
cushion, seat cover, etc. Otherwise, the
seat may become overheated.
• Do not place anything hard or heavy on the seat or pierce it with a pin or similar
object. This may result in damage to
the heater.
• Any liquid spilled on the heated seat should be removed immediately with a
dry cloth.
• When cleaning the seat, never use gasoline, thinner, or any similar mate-
rials.
• If any abnormalities are found or the heated seat does not operate, turn the
switch off and have the system
checked by a NISSAN certified LEAF
dealer.
Rear
Instruments and controls2-47
Page 262 of 412
USB (Universal Serial Bus) connection
port
WARNING
Do not connect, disconnect or operate
the USB device while driving. Doing so
can be a distraction. If distracted you
could lose control of your vehicle and
cause an accident or serious injury.
CAUTION
• Do not force the USB device into the USB port. Inserting the USB device
tilted or up-side-down into the port
may damage the port. Make sure that
the USB device is connected correctly
into the USB port.
• Do not grab the USB port cover (if so equipped) when pulling the USB de-
vice out of the port. This could damage
the port and the cover.
• Do not leave the USB cable in a place where it can be pulled unintentionally.
Pulling the cable may damage the port.
The vehicle is not equipped with a USB device.
USB devices should be purchased separately as
necessary. This system cannot be used to format USB devices. To format a USB device, use a
personal computer. In some states/area, the USB
device for the front seats plays only sound with-
out images for regulatory reasons, even when the
vehicle is parked.
This system supports various USB memory de-
vices, USB hard drives and iPod® players. Some
USB devices may not be supported by this sys-
tem.
Partitioned USB devices may not play correctly.
Some characters used in other languages (Chi-
nese, Japanese, etc.) may not appear properly in
the display. Using English language characters
with a USB device is recommended.
General notes for USB use:
Refer to your device manufacturer’s owner infor-
mation regarding the proper use and care of the
device.
Notes for iPod® use:
iPod® is a trademark of Apple Inc., registered in
the U.S. and other countries.
• Improperly plugging in the iPod may cause a
checkmark to be displayed on and off (flicker-
ing) . Always make sure that the iPod is con-
nected properly. • An iPod® nano (1st Generation) may remain in
fast forward or rewind mode if it is connected
during a seek operation. In this case, please
manually reset the iPod.
• An iPod® nano (2nd Generation) will continue to fast-forward or rewind if it is disconnected
during a seek operation.
• An incorrect song title may appear when the Play Mode is changed while using an iPod®
nano (2nd Generation) .
• Audiobooks may not play in the same order as they appear on an iPod®.
• Large video files cause slow responses in an iPod®. The vehicle center display may momen-
tarily black out, but will soon recover.
• If an iPod® automatically selects large video files while in the shuffle mode, the vehicle center
display may momentarily black out, but will soon
recover.
Bluetooth® streaming audio
• Some Bluetooth® audio devices may not berecognized by the in-vehicle audio system.
• It is necessary to set up the wireless connection between a compatible Bluetooth® audio device
and the in-vehicle Bluetooth® module before
using the Bluetooth® audio.
Display screen, heater, air conditioner, audio and phone systems4-35
Page 292 of 412
– There is a malfunction in the horn or hazardindicators.
– If the Easy Fill Tire Alert does not operate due to TPMS interference, move the vehicle
about 3 ft (1 m) backward or forward and try
again.
If the Easy Fill Tire Alert is not working, use a tire
pressure gauge.
AVOIDING COLLISION AND
ROLLOVER
WARNING
Failure to operate this vehicle in a safe
and prudent manner may result in loss of
control or an accident.
Be alert and drive defensively at all times. Obey
all traffic regulations. Avoid excessive speed,
high speed cornering, or sudden steering ma-
neuvers, because these driving practices could
cause you to lose control of your vehicle. As with
any vehicle, a loss of control could result in
a collision with other vehicles or objects, or
cause the vehicle to rollover, particularly if
the loss of control causes the vehicle to
slide sideways. Be attentive at all times, and avoid driving when tired. Never drive when under
the influence of alcohol or drugs (including pre-
scription or over-the-counter drugs which may
cause drowsiness) . Always wear your seat belt
as outlined in the “Seat belts” in the “Safety —
Seats seat belts and supplemental restraint sys-
tem” section of this manual, and also instruct your
passengers to do so.
Seat belts help reduce the risk of injury in colli-
sions and rollovers.
In a rollover crash, an
unbelted or improperly belted person is
significantly more likely to be injured or
killed than a person properly wearing a
seat belt.
OFF-ROAD RECOVERY
While driving, the right side or left side wheels
may unintentionally leave the road surface. If this
occurs, maintain control of the vehicle by follow-
ing the procedure below. Please note that this
procedure is only a general guide. The vehicle
must be driven as appropriate based on the con-
ditions of the vehicle, road and traffic.
1. Remain calm and do not overreact.
2. Do not apply the brakes.
3. Maintain a firm grip on the steering wheel with both hands and try to hold a straight course. 4. When appropriate, slowly release the accel-
erator pedal to gradually slow the vehicle.
5. If there is nothing in the way, steer the vehicle to follow the road while the vehicle speed is
reduced. Do not attempt to drive the vehicle
back onto the road surface until vehicle speed
is reduced.
6. When it is safe to do so, gradually turn the steering wheel until both tires return to the
road surface. When all tires are on the road
surface, steer the vehicle to stay in the appro-
priate driving lane.
• If you decide that it is not safe to return the vehicle to the road surface based on vehicle,
road or traffic conditions, gradually slow the
vehicle to a stop in a safe place off the road.RAPID AIR PRESSURE LOSS
Rapid air pressure loss or a “blow-out” can occur
if the tire is punctured or is damaged due to
hitting a curb or pothole. Rapid air pressure loss
can also be caused by driving on under-inflated
tires.
Rapid air pressure loss can affect the handling
and stability of the vehicle, especially at highway
speeds.
Starting and driving5-5
Page 335 of 412
CHROME PARTS
Clean chrome parts regularly with a non- abrasive
chrome polish to maintain the finish.
TIRE DRESSING
NISSAN does not recommend the use of tire
dressings. Tire manufacturers apply a coating to
the tires to help reduce discoloration of the rub-
ber. If a tire dressing is applied to the tires, it may
react with the coating and form a compound. This
compound may come off the tire while driving and
stain the vehicle paint.
If you choose to use a tire dressing, take the
following precautions:
• Use a water-based tire dressing. The coating onthe tire dissolves more easily with an oil-based
tire dressing.
• Apply a light coat of tire dressing to help prevent it from entering the tire tread/grooves (where it
would be difficult to remove) .
• Wipe off excess tire dressing using a dry towel. Make sure the tire dressing is completely re-
moved from the tire tread/grooves.
• Allow the tire dressing to dry as recommended by the tire dressing manufacturer. Occasionally remove loose dust from the interior
trim, plastic parts and seats using a vacuum
cleaner or soft bristled brush. Wipe the vinyl and
leather surfaces with a clean, soft cloth damp-
ened in mild soap solution, then wipe clean with a
dry soft cloth.
Regular care and cleaning is required in order to
maintain the appearance of the leather.
Before using any fabric protector, read the manu-
facturer’s recommendations. Some fabric pro-
tectors contain chemicals that may stain or
bleach the seat material.
Use a cloth dampened only with water to clean
the meter and gauge lens.
WARNING
Do not use water or acidic cleaners (hot
steam cleaners) on the seat. This can
damage the seat or occupant classifica-
tion sensor. This can also affect the op-
eration of the air bag system and result in
serious personal injury.
CAUTION
• Never use benzine, thinner, or any similar material. • Small dirt particles can be abrasive
and damaging to the leather surfaces
and should be removed promptly. Do
not use saddle soap, car waxes, pol-
ishes, oils, cleaning fluids, solvents,
detergents or ammonia-based clean-
ers as they may damage the leather’s
natural finish.
• Never use fabric protectors unless rec- ommended by the manufacturer.
• Do not use glass or plastic cleaner on meter or gauge lens covers. It may
damage the lens cover.
AIR FRESHENERS
Most air fresheners use a solvent that could affect
the vehicle interior. If you use an air freshener,
take the following precautions:
• Hanging-type air fresheners can cause perma-
nent discoloration when they contact vehicle
interior surfaces. Place the air freshener in a
location that allows it to hang free and not
contact an interior surface.
• Liquid-type air fresheners typically clip on the vents. These products can cause immediate
damage and discoloration when spilled on inte-
rior surfaces.
CLEANING INTERIOR
7-4Appearance and care
Page 336 of 412
Carefully read and follow the manufacturer’s in-
structions before using air fresheners.
FLOOR MATS
WARNING
To avoid potential pedal interference that
may result in a collision or injury:
• NEVER place a floor mat on top of another floor mat in the driver front
position.
• Use only genuine NISSAN floor mats specifically designed for use in your
vehicle model. See your NISSAN certi-
fied LEAF dealer for more information.
• Properly position the mats in the floor- well using the floor mat positioning
aid. See “Floor mat positioning aid
(driver’s side only)” in this section.
The use of genuine NISSAN floor mats can ex-
tend the life of your vehicle carpet and make it
easier to clean the interior. Mats should be main-
tained with regular cleaning and replaced if they
become excessively worn.
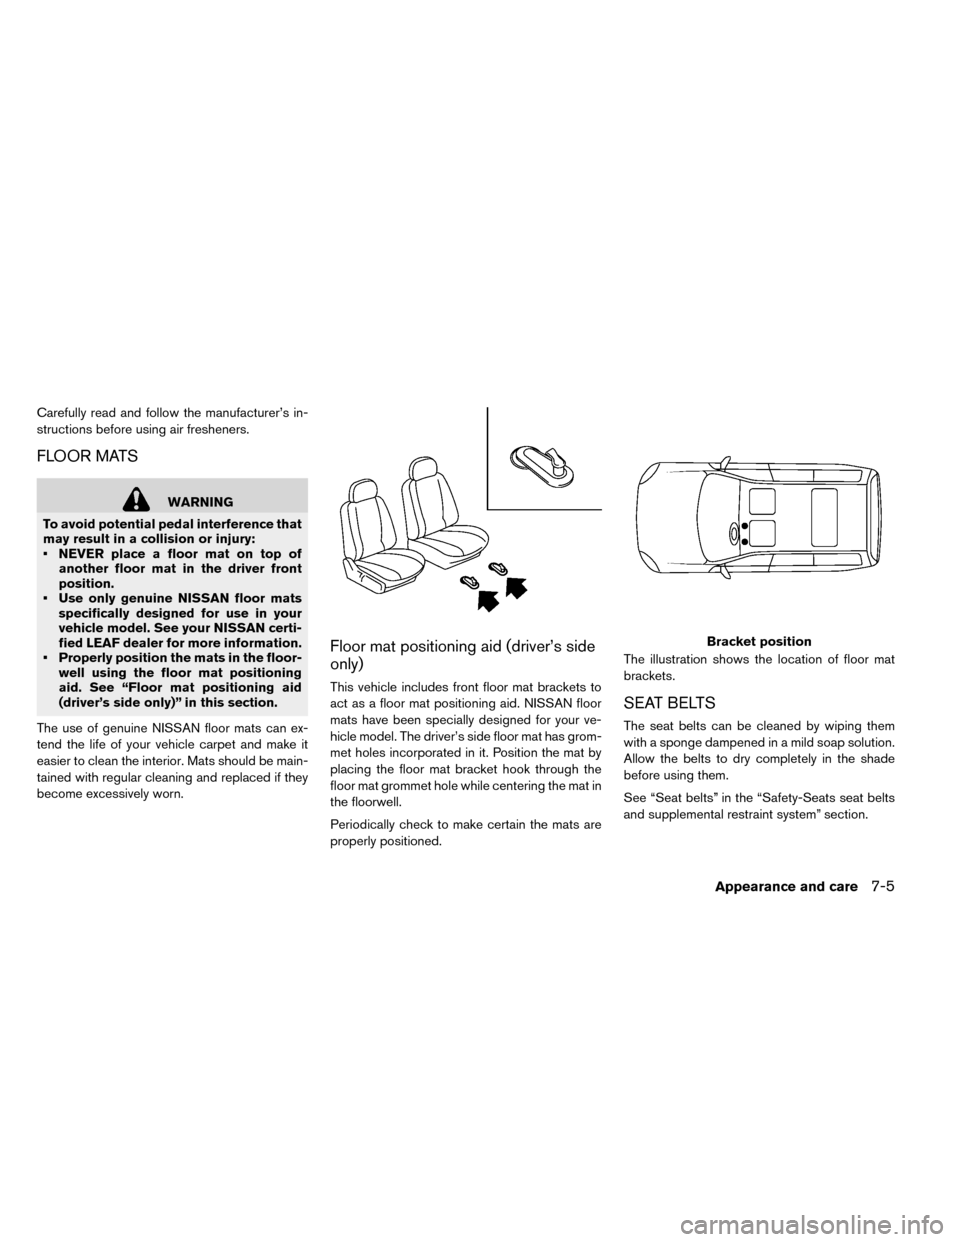
Floor mat positioning aid (driver’s side
only)
This vehicle includes front floor mat brackets to
act as a floor mat positioning aid. NISSAN floor
mats have been specially designed for your ve-
hicle model. The driver’s side floor mat has grom-
met holes incorporated in it. Position the mat by
placing the floor mat bracket hook through the
floor mat grommet hole while centering the mat in
the floorwell.
Periodically check to make certain the mats are
properly positioned. The illustration shows the location of floor mat
brackets.
SEAT BELTS
The seat belts can be cleaned by wiping them
with a sponge dampened in a mild soap solution.
Allow the belts to dry completely in the shade
before using them.
See “Seat belts” in the “Safety-Seats seat belts
and supplemental restraint system” section.
Bracket position
Appearance and care7-5
Page 385 of 412
WARNING
•
It is extremely dangerous to ride
in the cargo area inside the ve-
hicle. In a collision, people riding
in these areas are more likely to
be seriously injured or killed.
•Do not allow people to ride in
any area of your vehicle that is
not equipped with seats and seat
belts.
•Be sure everyone in your vehicle
is in a seat and using a seat belt
properly.
TERMS
It is important to familiarize yourself with
the following terms before loading your
vehicle:
• Curb Weight (actual weight of your ve- hicle) - vehicle weight including: stan-
dard and optional equipment, fluids,
emergency tools, and spare tire assem-
bly. This weight does not
include passen-
gers and cargo.
• GVW (Gross Vehicle Weight) - curb weight plus the combined weight of pas-
sengers and cargo.
• GVWR (Gross Vehicle Weight Rating) - maximum total combined weight of the
unloaded vehicle, passengers, luggage,
hitch, trailer tongue load and any other
optional equipment. This information is
located on the F.M.V.S.S./C.M.V.S.S.
label. • GAWR (Gross Axle Weight Rating) -
maximum weight (load) limit specified
for the front or rear axle. This information
is located on the F.M.V.S.S./C.M.V.S.S.
label.
• GCWR (Gross Combined Weight Rat- ing) - The maximum total weight rating of
the vehicle, passengers, cargo, and
trailer.
• Vehicle Capacity Weight, Load limit, To- tal load capacity - maximum total weight
limit specified of the load (passengers
and cargo) for the vehicle. This is the
maximum combined weight of occu-
pants and cargo that can be loaded into
the vehicle. If the vehicle is used to tow a
trailer, the trailer tongue weight must be
included as part of the cargo load. This
information is located on the Tire and
Loading Information label.
• Cargo capacity - permissible weight of cargo, the subtracted weight of occu-
pants from the load limit.
VEHICLE LOADING INFORMATION
9-10Technical and consumer information
Page 398 of 412
10 Index
A
ABS (Anti-lock Braking System)........5-22
Advanced air bag system ...........1-42
Air bag system .................1-42
Advanced air bag system ..........1-42
Front passenger air bag and status light. .1-44
Front-seat mounted side-impact
supplemental air bag system ........1-47
Roof-mounted curtain side-impact
supplemental air bag system ........1-47
Airbagwarninglabels.............1-50
Airbagwarninglight...........1-50,2-18
Air conditioner ..................9-9
Air conditioner specification label ......9-9
Air conditioning system refrigerant and
lubricant recommendations .........9-3
Alarm, How to stop alarm (see vehicle
security system) .................2-37
Alcohol, drugs and driving ............5-6
Anti-lock Braking System (ABS) ........5-22
Anti-lock braking system (ABS) warning
light .......................2-14
Appearance care .................7-2
Exterior appearance care ...........7-2
Interior appearance care ...........7-4
Audible reminders ...............2-21
Autolight system ................2-42 Automatic.....................3-5
Door locks ...................3-5
Automatic climate control (models with
Navigation System) ...............4-20
Automatic climate control (models without
Navigation System) ...............4-12
Avoiding collision and rollover ..........5-5
B
Battery......................8-11
12-volt battery ................8-11
Battery saver system ............2-43
Intelligent Key battery ............8-19
Li-ion battery .................EV-2
Li-ion battery temperature gauge ......2-7
Before starting system .............5-10
Boosterseats..................1-33
Brake ......................5-15 Anti-lock Braking System (ABS) ......5-22
Brakefluid..................8-10
Brakes....................8-15
Brake system ................5-20
BRAKE system warning light (yellow) . . .2-14
BRAKE warning light (red) .........2-15
BRAKE system warning light (yellow) .....2-14
BRAKE warning light (red) ...........2-15
Bulb replacement ................8-21
C
Cabin air filter..................4-19
Ceiling light ...................2-58
Charge .....................2-49
Charge timer OFF switch ..........2-49
Charge connector lock switch .........2-49
Charge port lid switch .............2-48
Charging ....................3-19
Chargeportlid................3-19
Charging related indicator light .....CH-28
Chargingtimer ..............CH-21
Cleaning ....................7-6
Normalcharge ...............CH-9
Precautions on charging ..........CH-2
Quickcharge...............CH-15
Specifications .................9-4
Trickle charge ...............CH-11
Charging methods ..............CH-21
Charging related indicator light .......CH-28
Charging related remote function ......CH-27
Charging status indicator light .......CH-28
Charging timer ................CH-21
Charging troubleshooting guide .......CH-33
Checking ....................2-13
Checkingbulbs...............2-13
Checking coolant level ............8-8
Child restraints .................1-18