Page 214 of 412

HOW TO USE REMOTE KEYLESS
ENTRY FUNCTION
WARNING
• Radio waves could adversely affect electric medical equipment. Those
who use a pacemaker should contact
the electric medical equipment manu-
facturer for the possible influences be-
fore use.
• The Intelligent Key transmits radio waves when the buttons are pushed.
The FAA advises that the radio waves
may affect aircraft navigation and
communication systems. Do not oper-
ate the Intelligent Key while on an air-
plane. Make sure the buttons are not
operated unintentionally when the unit
is stored during a flight.
CAUTION
• Do not allow the Intelligent Key, which contains electrical components, to
come into contact with water or salt
water. This could affect the system
function.
• Do not drop the Intelligent Key.
• Do not strike the Intelligent Key sharply against another object.
• Do not change or modify the Intelligent Key.
• Wetting may damage the Intelligent Key. If the Intelligent Key gets wet,
immediately wipe until it is completely
dry.
• Do not place the Intelligent Key for an extended period in an area where tem-
peratures exceed 140°F (60°C) .
• Do not attach the Intelligent Key with a key holder that contains a magnet.
• Do not place the Intelligent Key near equipment that produces a magnetic
field, such as a TV, audio equipment,
personal computers or cellular phone. The remote keyless entry function can operate all
door locks using the remote keyless entry func-
tion of the Intelligent Key. The remote keyless
entry function can operate at a distance of ap-
proximately 33 ft (10 m) from the vehicle. (The
operating distance depends upon the conditions
around the vehicle.)
The remote keyless entry function will not oper-
ate:
• When the Intelligent Key is not within the opera-
tional range.
• When the doors are open or not closed securely.
• When the Intelligent Key battery is discharged.
The remote keyless entry function can also oper-
ate the vehicle alarm.
Pre-driving checks and adjustments3-13
Page 228 of 412

4 Display screen, heater, air conditioner,
audio and phone systems
Rearview monitor...................... .4-2
How to read the displayed lines .............4-3
Difference between predicted and actual
distances ......................... .4-3
Adjusting the screen .................. .4-5
Adjusting the brightness setting ............4-6
RearView monitor brightness control ..........4-7
Operating tips ...................... .4-7
Vents ............................. .4-8
Center vents ....................... .4-8
Side vents ........................ .4-8
Climate control system ................... .4-9
Automatic climate control (models without
Navigation System) .................. .4-12
Automatic climate control (models with Navigation
System) ......................... .4-20
Audio system (models without Navigation System). . .4-28 Radio .......................... .4-28
FM radio reception .................. .4-29
AM radio reception .................. .4-29
Satellite radio reception ................4-29 Audio operation precautions
..............4-30
FM-AM-SAT radio with compact disc (CD) player
(models without Navigation System) .........4-36
USB connection port operation ............4-41
iPod® player operation ................4-42
CD Care and cleaning ................ .4-44
Steering wheel switch for audio control .......4-44
Antenna ......................... .4-46
Car phone or CB radio ................ .4-46
Bluetooth® hands-free phone system without
navigation system ..................... .4-47
Regulatory information ................ .4-48
Using the system ................... .4-49
Control buttons .................... .4-51
Getting started ..................... .4-51
List of voice commands ................4-53
Voice adaptation (VA) mode ..............4-57
Manual control ......................4-58
T roubleshooting
guide ................ .4-59
Page 232 of 412
Backing up behind a projecting object
The position�Cis shown farther than the position
�Bin the display. However, the position�Cis
actually at the same distance as the position
�A.
The vehicle may hit the object when backing up to the position
�Aif the object projects over the
actual backing up course.
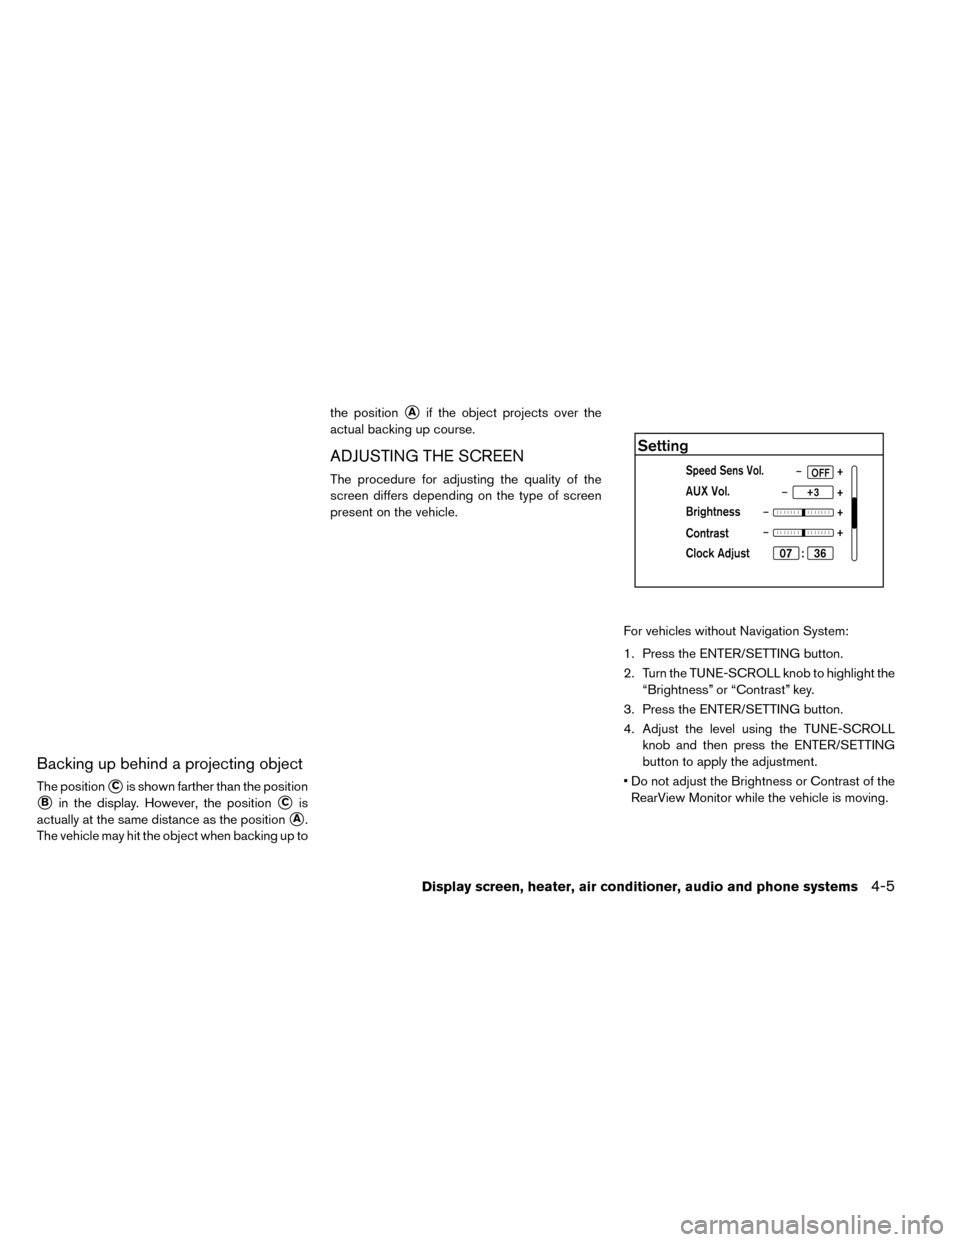
ADJUSTING THE SCREEN
The procedure for adjusting the quality of the
screen differs depending on the type of screen
present on the vehicle.
For vehicles without Navigation System:
1. Press the ENTER/SETTING button.
2. Turn the TUNE-SCROLL knob to highlight the“Brightness” or “Contrast” key.
3. Press the ENTER/SETTING button.
4. Adjust the level using the TUNE-SCROLL knob and then press the ENTER/SETTING
button to apply the adjustment.
• Do not adjust the Brightness or Contrast of the RearView Monitor while the vehicle is moving.
Display screen, heater, air conditioner, audio and phone systems4-5
Page 233 of 412
ADJUSTING THE BRIGHTNESS
SETTING
For vehicles with Navigation System:
1. Touch [SETTINGS] on the display screen.
2. Touch [DISPLAY].3. Select [BRIGHTNESS] or [CONTRAST] to
adjust the brightness setting.
4. Touch the “+” or “-” icons to adjust the Bright- ness or Contrast of the display screen.
Note
When the headlights are in the ON po-
sition, the display screen will automati-
cally default to the night screen (dark) .
4-6Display screen, heater, air conditioner, audio and phone systems
Page 237 of 412
These functions operate in the following condi-
tions.
Power switch positionLOCK/OFFACCON READY to drive
Fan --Available Available
Heater and air conditioner --Available*2 Available
Timer (Climate Ctrl. Timer) Available*1Available*1- -
Remote control*3 AvailableAvailable- -
*1: The EVSE (Electric Vehicle Supply Equip-
ment) must be connected.
*2: The climate control system will only start when charging is being performed. After
charging is complete, it will continue to op-
erate if the EVSE (Electric Vehicle Supply
Equipment) is connected.
*3: Models with Navigation System.
4-10Display screen, heater, air conditioner, audio and phone systems
Page 238 of 412

Push the STATUS button to display the climate
control system status on the navigation system
screen. (See the LEAF Nav")
DISPLAYING CLIMATE CONTROL SYSTEM
STATUS SCREEN (MODELS WITH NAVIGA-
TION SYSTEM)
Push the STATUS button to display the climate
control system status on the navigation system
screen. (See the LEAF Navigation System Own-
er’s Manual.)
NOTE:
•If the READY to drive indicator light is
illuminated and the EVSE (Electric Vehicle
Supply Equipment) is connected to the
vehicle, the power switch will change to
the ON position. At the same time, the
climate control system will stop operat-
ing. However, the fan will continue to op-
erate. If you want to turn on climate con-
trol again, place the power switch in the
OFF position and then place it in the ON
position again after confirming that the
vehicle has started charging.
• When the power switch is in the ON posi-
tion, if the power supply from the EVSE
(Electric Vehicle Supply Equipment) is in-
terrupted due to an electrical outage, etc.,
the system will operate in the following
ways. – If it occurs while charging is being per-
formed:– The climate control system will stop
once. If the power supply is restored
within approximately 5 minutes, the
climate control system will restart.
However, if more than 5 minutes
have elapsed, the climate control
system will not restart.
– If it occurs after charging has finished: –The climate control system will stop.
Display screen, heater, air conditioner, audio and phone systems4-11
Page 239 of 412

1.(fan speed control) dial
2.
(intake air control) button
3.
(front defroster) button 4. Climate Ctrl. display
5.
(rear window defroster) b")
AUTOMATIC CLIMATE CONTROL
(MODELS WITHOUT NAVIGATION
SYSTEM)
1.(fan speed control) dial
2.
(intake air control) button
3.
(front defroster) button 4. Climate Ctrl. display
5.
(rear window defroster) button (See
“Rear window and outside mirror defroster
switch” in the “Instruments and controls”
section.)
6. Temperature control dial
7. AUTO climate control ON button 8. A/C (air conditioner) ON·OFF button
9. MODE (manual air flow control) button
10. HEAT button
11. A/C-Heater ON·OFF button
Automatic operation (AUTO)
The AUTO mode may be used year-round as the
system automatically controls constant tempera-
ture, air flow distribution and fan speed.
To turn off the climate control, press the A/C-
Heater ON·OFF button.
The same operating mode (Heater or A/C) that
was active when the system is turned off is active
when system is turned back on.
While operating the climate control in the AUTO
mode, selecting any other climate control button
de-activates the AUTO mode and activates
manual mode.
Cooling and/or dehumidified heating:
The dehumidified heating mode can be used to
keep the windows from fogging. In this mode, the
heat pump compressor is used in A/C mode for
dehumidifying the air instead of heating it. The
PTC heater is also used in conjunction to heat the
air. This mode will increase energy consumption
and therefore reduce range.
4-12Display screen, heater, air conditioner, audio and phone systems
Page 247 of 412

1. Temperature control button
2. HEAT button
3. Climate Ctrl. Timer indicator4.
(front defroster) button
5.
(fan speed control) button
6.
(rea")
AUTOMATIC CLIMATE CONTROL
(MODELS WITH NAVIGATION
SYSTEM)
1. Temperature control button
2. HEAT button
3. Climate Ctrl. Timer indicator4.
(front defroster) button
5.
(fan speed control) button
6.
(rear window defroster) button (See
“Rear window and outside mirror defroster
switch” in the “Instruments and controls”
section.)
7.
(intake air control) button 8. A/C-Heater ON·OFF button
9. AUTO climate control ON button
10. MODE (manual air flow control) button
11. A/C (air conditioner) ON·OFF button
Automatic operation (AUTO)
The AUTO mode may be used year-round as the
system automatically controls constant tempera-
ture, air flow distribution and fan speed.
To turn off the climate control, press the A/C-
Heater ON·OFF button.
The same operating mode (Heater or A/C) that
was active when the system is turned off is active
when system is turned back on.
While operating the climate control in the AUTO
mode, selecting any other climate control button
de-activates the AUTO mode and activates
manual mode.
Cooling and/or dehumidified heating:
The dehumidified heating mode can be used to
keep the windows from fogging. In this mode, the
heat pump compressor is used in A/C mode for
dehumidifying the air instead of heating it. The
PTC heater is also used in conjunction to heat the
air. This mode will increase energy consumption
and therefore reduce range.
4-20Display screen, heater, air conditioner, audio and phone systems
![NISSAN LEAF 2015 1.G Owners Manual ADJUSTING THE BRIGHTNESS
SETTING
For vehicles with Navigation System:
1. Touch [SETTINGS] on the display screen.
2. Touch [DISPLAY].3. Select [BRIGHTNESS] or [CONTRAST] to
adjust the brightness settin](/manual-img/5/431/w960_431-232.png "NISSAN LEAF 2015 1.G Owners Manual ADJUSTING THE BRIGHTNESS
SETTING
For vehicles with Navigation System:
1. Touch [SETTINGS] on the display screen.
2. Touch [DISPLAY].3. Select [BRIGHTNESS] or [CONTRAST] to
adjust the brightness settin")
