2015 NISSAN LEAF Park
[x] Cancel search: ParkPage 4 of 45
3-5.4 VEHICLE FIRE . . . . . . . . . . . . . . . . . . . . . . . . . . . . . . . . . . . . . . . . . . . . . . . . .
. . . . . DG–29
3-6 LI-ION BATTERY DAMAGE AND FLUID LEAKS . . . . . . . . . . . . . . . . . . . . . . . . . . . . . . . . . DG–30
4. JUMP STARTING . . . . . . . . . . . . . . . . . . . . . . . . . . . . . . . . . . . . . . . . . . . . . . . . . . . . . . . . . . . . . DG–31
4-1 JUMP STARTING PROCEDURES . . . . . . . . . . . . . . . . . . . . . . . . . . . . . . . . . . . . . . . . . . . . DG–32
4-2 P (PARK) POSITION RELEASE PROCEDURE . . . . . . . . . . . . . . . . . . . . . . . . . . . . . . . . . . DG–334-2.1 RESET PROCEDURE . . . . . . . . . . . . . . . . . . . . . . . . . . . . . . . . . . . . . . . . . . . . . . . . DG–35
4-3 STORING THE VEHICLE . . . . . . . . . . . . . . . . . . . . . . . . . . . . . . . . . . . . . . . . . . . . . . . . . . DG–35
5. DISMANTLING INFORMATION . . . . . . . . . . . . . . . . . . . . . . . . . . . . . . . . . . . . . . . . . . . . . . . . . . DG–37 5-1 PRECAUTIONS FOR HANDLING HIGH VOLTAGE LITHIUM ION (LI-ION) BATTERY . . . . DG–37
5-2 LITHIUM-ION (LI-ION) BATTERY PACK REMOVAL . . . . . . . . . . . . . . . . . . . . . . . . . . . . . . DG–395-2.1 EXPLODED VIEW . . . . . . . . . . . . . . . . . . . . . . . . . . . . . . . . . . . . . . . . . . . . . . . . . . . DG–39
5-2.2 REMOVAL PROCEDURE . . . . . . . . . . . . . . . . . . . . . . . . . . . . . . . . . . . . . . . . . . . . . DG–40
5-3 RECOVERY/RECYCLING OF THE LI-ION HIGH VOLTAGE BATTERY . . . . . . . . . . . . . . . DG–44
DG–4
Page 13 of 45
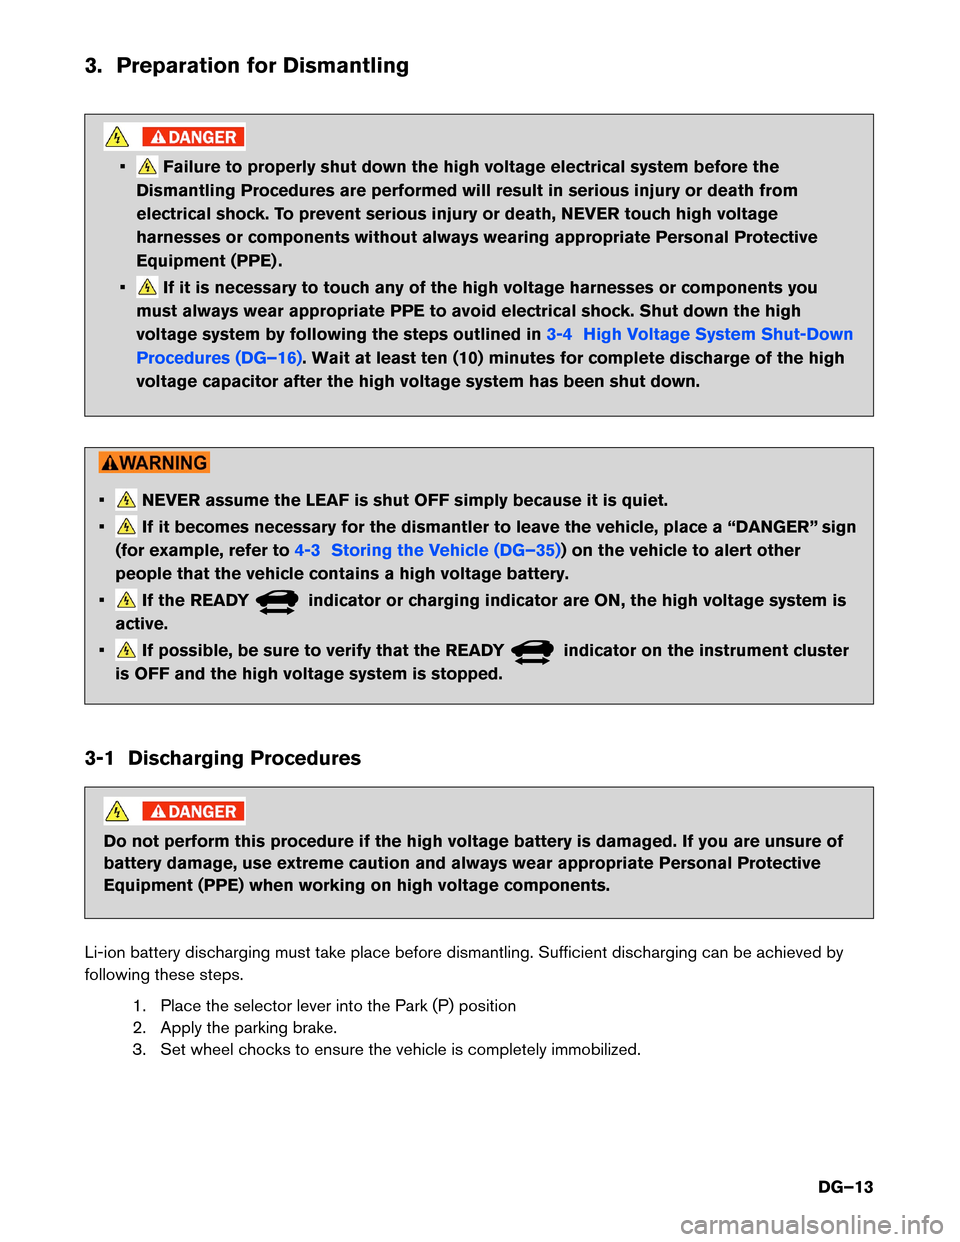
3. Preparation for Dismantling
• Failure to properly shut down the high voltage electrical system before the
Dismantling Procedures are performed will result in serious injury or death from
electrical shock. To prevent serious injury or death, NEVER touch high voltage
harnesses or components without always wearing appropriate Personal Protective
Equipment (PPE) .
• If it is necessary to touch any of the high voltage harnesses or components you
must
always wear appropriate PPE to avoid electrical shock. Shut down the high
voltage system by following the steps outlined in 3-4 High Voltage System Shut-Down
Procedures
(DG–16) . Wait at least ten (10) minutes for complete discharge of the high
voltage
capacitor after the high voltage system has been shut down. • NEVER assume the LEAF is shut OFF simply because it is quiet.
• If it becomes necessary for the dismantler to leave the vehicle, place a “DANGER” sign
(for
example, refer to 4-3 Storing the Vehicle (DG–35)) on the vehicle to alert other
people
that the vehicle contains a high voltage battery.
• If the READY indicator or charging indicator are ON, the high voltage system is
active.
• If possible, be sure to verify that the READY indicator on the instrument cluster
is
OFF and the high voltage system is stopped.
3-1 Discharging Procedures Do not perform this procedure if the high voltage battery is damaged. If you are unsure of
battery
damage, use extreme caution and always wear appropriate Personal Protective
Equipment (PPE) when working on high voltage components.
Li-ion battery discharging must take place before dismantling. Sufficient discharging can be achieved by
following these steps. 1. Place the selector lever into the Park (P) position
2. Apply the parking brake.
3. Set wheel chocks to ensure the vehicle is completely immobilized.
DG–13
Page 20 of 45
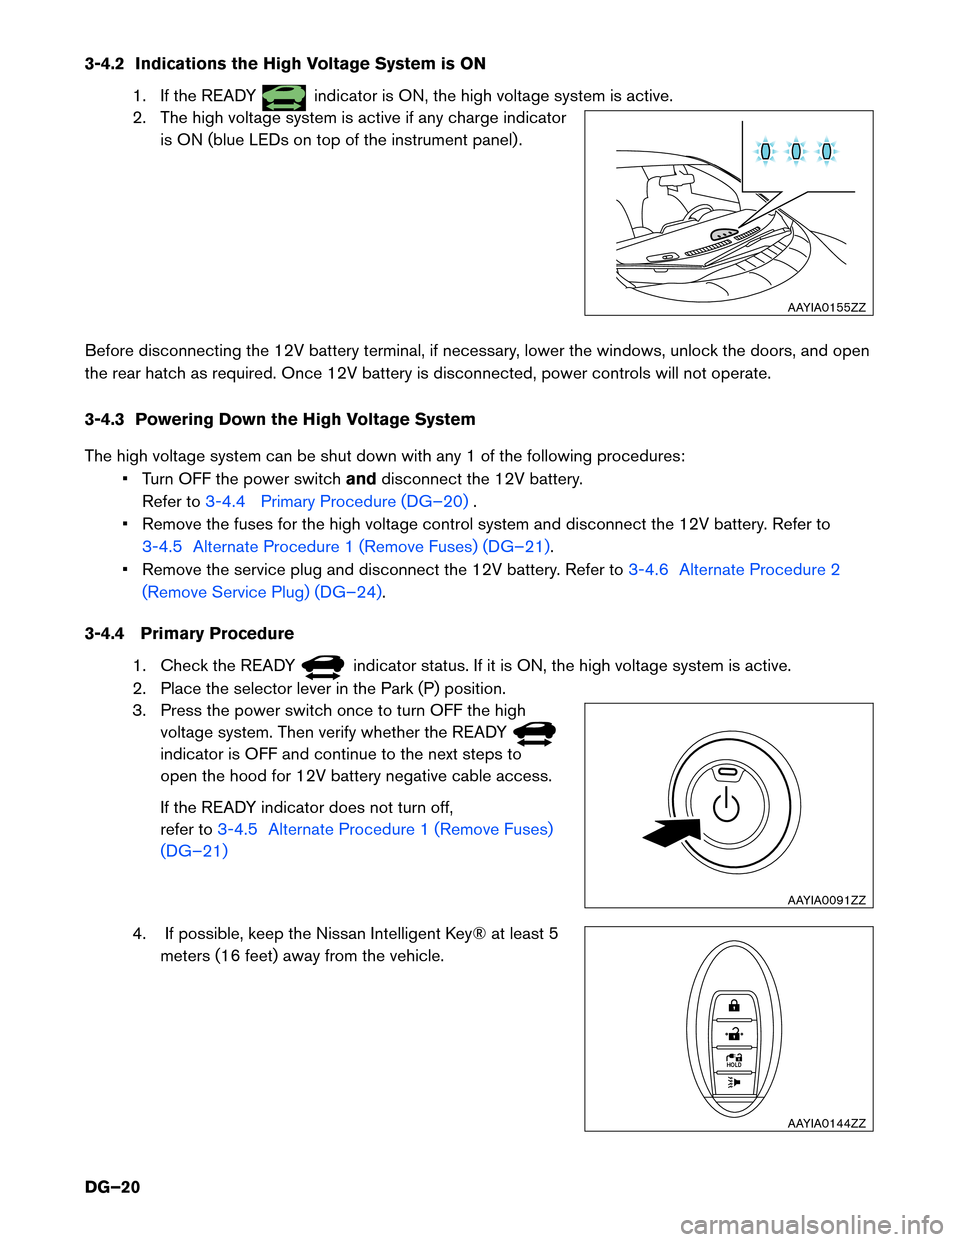
3-4.2 Indications the High Voltage System is ON
1. If the READY indicator is ON, the high voltage system is active.
2.
The high voltage system is active if any charge indicator
is ON (blue LEDs on top of the instrument panel) .
Before disconnecting the 12V battery terminal, if necessary, lower the windows, unlock the doors, and open
the rear hatch as required. Once 12V battery is disconnected, power controls will not operate.
3-4.3 Powering Down the High Voltage System
The high voltage system can be shut down with any 1 of the following procedures: • Turn OFF the power switch anddisconnect the 12V battery.
Refer to 3-4.4 Primary Procedure (DG–20) .
•
Remove the fuses for the high voltage control system and disconnect the 12V battery. Refer to
3-4.5 Alternate Procedure 1 (Remove Fuses) (DG–21).
•
Remove the service plug and disconnect the 12V battery. Refer to 3-4.6 Alternate Procedure 2
(Remove
Service Plug) (DG–24) .
3-4.4
Primary Procedure
1. Check the READY indicator status. If it is ON, the high voltage system is active.
2.
Place the selector lever in the Park (P) position.
3. Press the power switch once to turn OFF the high voltage system. Then verify whether the READY indicator is OFF and continue to the next steps to
open
the hood for 12V battery negative cable access.
If the READY indicator does not turn off,
refer to 3-4.5 Alternate Procedure 1 (Remove Fuses)
(DG–21)
4. If possible, keep the Nissan Intelligent Key® at least 5 meters
(16 feet) away from the vehicle. AAYIA0155ZZ
AAYIA0091ZZ
HOLD
AAYIA0144ZZ
DG–20
Page 31 of 45
4. Jump Starting
T
o start the EV system with a booster battery, the instructions and precautions below must be followed. If done incorrectly, jump starting can lead to a 12V battery explosion, resulting in severe
personal
injury or death. It could also damage your vehicle.
Discharged 12V battery may cause the following issues: • The instrument cluster cannot be displayed while the power switch is turned ON. The start-upsound is not audible. (The electric car system cannot start.)
• The Li-ion battery cannot be charged.
• The vehicle cannot be shifted out of PARK normally. • To avoid electrical shock, the high voltage Li-ion battery CANNOT be jump started.
•
Explosive hydrogen gas is always present in the vicinity of the 12V battery. Keep all
sparks and flames away from the 12V battery. Make sure the vent tube is correctly
installed.
• Do not allow battery fluid to come into contact with eyes, skin, clothing or painted surfaces. Battery fluid is a corrosive sulfuric acid solution that can cause severe burns.
If the fluid comes into contact with anything, immediately flush the contacted area
with water.
• The booster battery must be rated at 12 volts. Use of an improperly rated battery can damage the vehicle.
• Whenever working on or near a 12V battery, always wear suitable eye protectors (for example, goggles or industrial safety spectacles) and remove rings, metal bands, or
any other jewelry. Do not lean over the 12V battery when jump starting.
• Do not attempt to jump start a frozen battery. It could explode and cause serious injury.
• LEAF is equipped with an automatic cooling fan. It could come on at any time. Keep hands and other objects away from it.
• Always follow the jump starting instructions below. Failure to do so could result in damage to the charging system and cause personal injury. • Do not use LEAF to jump start another vehicle.
•
Do not attempt to perform a jump start on the 12V battery at the same time that the
Li-ion battery is being charged. Doing so may damage the vehicle or charging
equipment and could cause an injury.
DG–31
Page 32 of 45
4-1 Jump Starting Procedures
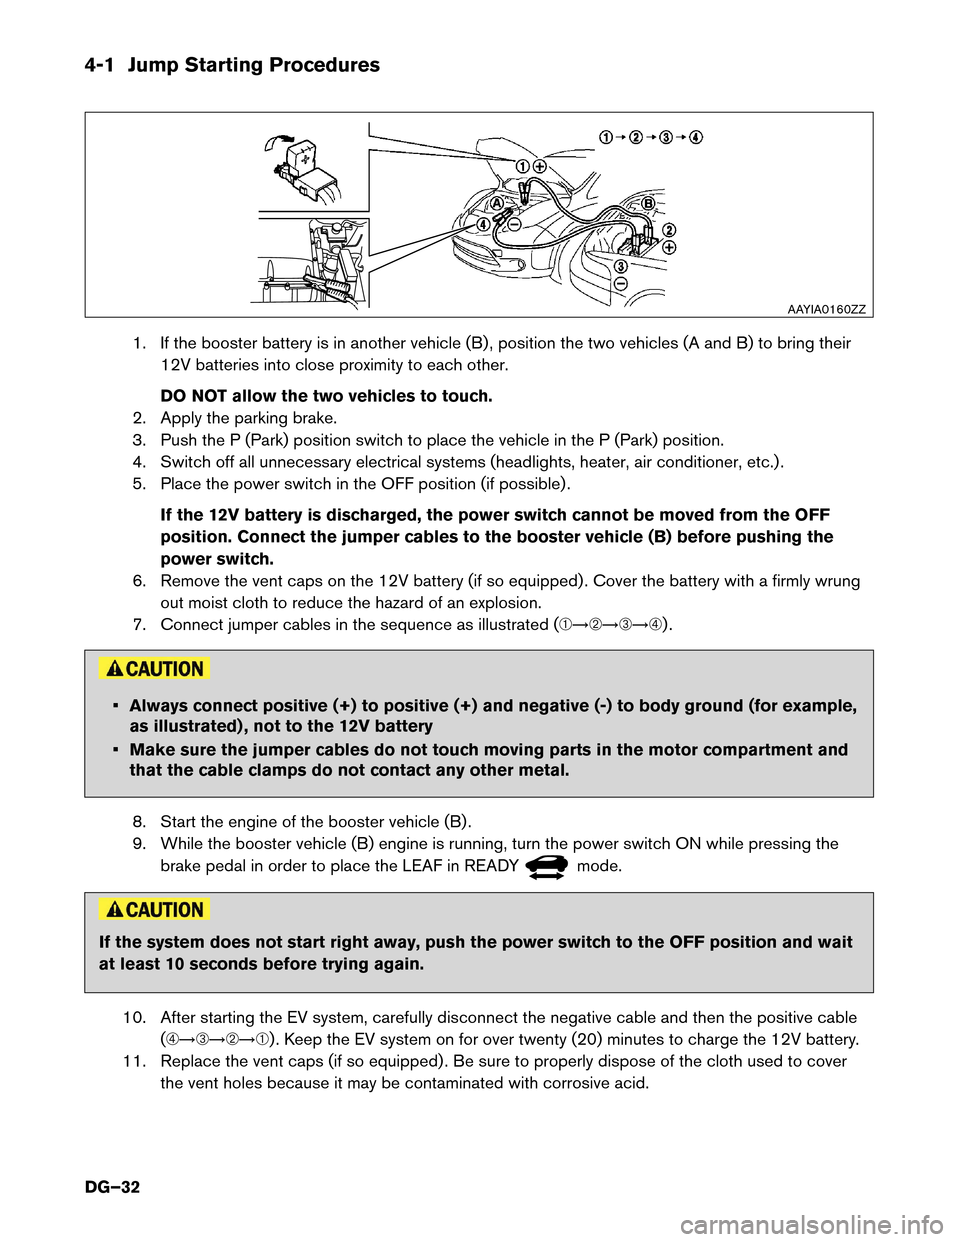
1. If the booster battery is in another vehicle (B) , position the two vehicles (A and B) to bring their
12V batteries into close proximity to each other.
DO NOT allow the two vehicles to touch.
2. Apply the parking brake.
3. Push the P (Park) position switch to place the vehicle in the P (Park) position.
4. Switch off all unnecessary electrical systems (headlights, heater, air conditioner, etc.) .
5. Place the power switch in the OFF position (if possible) .
If the 12V battery is discharged, the power switch cannot be moved from the OFF
position. Connect the jumper cables to the booster vehicle (B) before pushing the
power switch.
6. Remove the vent caps on the 12V battery (if so equipped) . Cover the battery with a firmly wrung out moist cloth to reduce the hazard of an explosion.
7. Connect jumper cables in the sequence as illustrated (�������) . • Always connect positive (+) to positive (+) and negative (-) to body ground (for example,
as
illustrated) , not to the 12V battery
• Make sure the jumper cables do not touch moving parts in the motor compartment and that the cable clamps do not contact any other metal.
8. Start the engine of the booster vehicle (B) .
9. While the booster vehicle (B) engine is running, turn the power switch ON while pressing the brake pedal in order to place the LEAF in READY mode.
If the system does not start right away, push the power switch to the OFF position and wait
at
least 10 seconds before trying again.
10. After starting the EV system, carefully disconnect the negative cable and then the positive cable (�������) . Keep the EV system on for over twenty (20) minutes to charge the 12V battery.
11. Replace the vent caps (if so equipped) . Be sure to properly dispose of the cloth used to cover the vent holes because it may be contaminated with corrosive acid. AAYIA0160ZZ
DG–32
Page 33 of 45
12. If necessary, connect the vehicle to a charging station or EVSE (Electric Vehicle Supply
Equipment) to charge the Li-ion battery. The vehicle cannot be driven unless the Li-ion battery is
charged.
NOTE:
If it is not possible to turn the LEAF system ON by following this procedure, contact a
NISSAN certified LEAF dealer immediately.
4-2 P (Park) Position Release Procedure
If you need to release the vehicle from the P (Park) position, proceed as follows. When power switch is
turned OFF or 12V battery is low, LEAF automatically shifts to P position.
NOTE: This procedure requires two (2) people.
1. To start the EV system with a booster battery, refer to 4. Jump Starting (DG–31).
2.
Turn power switch ON by pushing the power switch 2 times without pressing brake pedal.
3. Confirm parking brake is applied.
4. Close all doors and press and hold the brake pedal.
5. Place the selector lever in the N (Neutral) position.
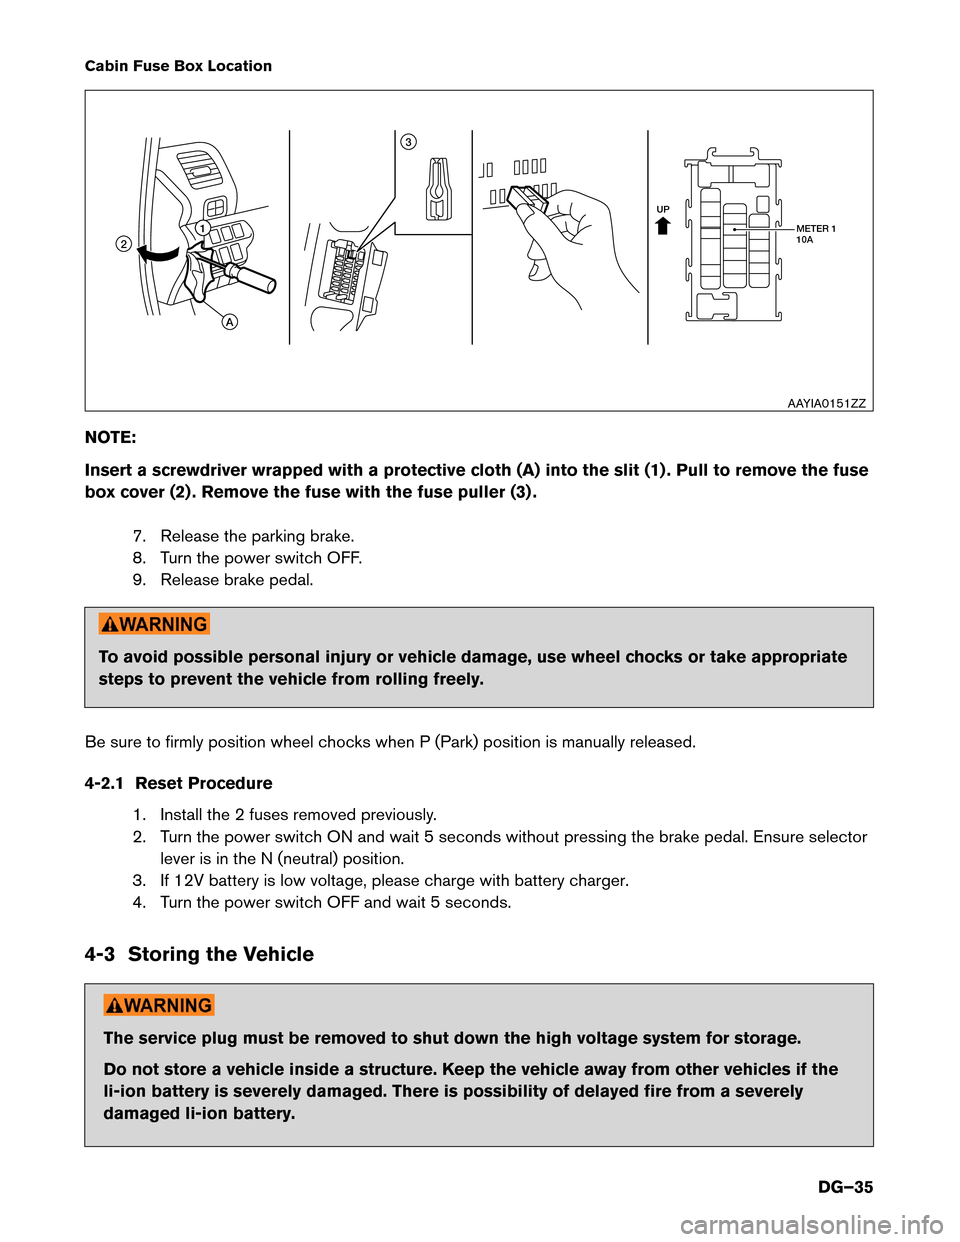
6. Remove the following 2 fuses:
• F/L 40A PBW MTR (under hood fuse and relay box)
• METER 1 10A (in the cabin fuse box)
DG–33
Page 35 of 45
Cabin Fuse Box Location
NO
TE:
Insert a screwdriver wrapped with a protective cloth (A) into the slit (1) . Pull to remove the fuse
box cover (2) . Remove the fuse with the fuse puller (3) .
7. Release the parking brake.
8. Turn the power switch OFF.
9. Release brake pedal. To avoid possible personal injury or vehicle damage, use wheel chocks or take appropriate
steps
to prevent the vehicle from rolling freely.
Be sure to firmly position wheel chocks when P (Park) position is manually released.
4-2.1 Reset Procedure 1. Install the 2 fuses removed previously.
2. Turn the power switch ON and wait 5 seconds without pressing the brake pedal. Ensure selectorlever is in the N (neutral) position.
3. If 12V battery is low voltage, please charge with battery charger.
4. Turn the power switch OFF and wait 5 seconds.
4-3 Storing the Vehicle The service plug must be removed to shut down the high voltage system for storage.
Do
not store a vehicle inside a structure. Keep the vehicle away from other vehicles if the
li-ion battery is severely damaged. There is possibility of delayed fire from a severely
damaged li-ion battery. UP
METER 1
10A
11 3
2
A
AAYIA0151ZZ
DG–35