2015 NISSAN JUKE key
[x] Cancel search: keyPage 3 of 28
NEW SYSTEM FEATURES
Around View® Monitor with Moving Object Detection (MOD) (if so equipped) ..............................2
SiriusXM Travel Link and SiriusXM Traffic (if so equipped) ................................................................. 4
Text Messaging ........................................................................\
........................................................................ 4
ESSENTIAL INFORMATION
Fuel Efficient Driving........................................................................\
............................................................... 5
Tire Pressure Monitoring System (TPMS) ........................................................................\
........................ 5
Loose Fuel Cap ........................................................................\
....................................................................... 6
Fuel-filler Door ........................................................................\
......................................................................... 6
Towing Your Vehicle ........................................................................\
.............................................................. 6
Clock Set/Adjustment (Type B – if so equipped) ........................................................................\
............ 7
FIRST DRIVE FEATURES
NISSAN Intelligent Key® System ........................................................................\
........................................8
Liftgate Release ........................................................................\
....................................................................... 9
Seat Adjustments ........................................................................\
.................................................................... 9
Heated Seats (if so equipped) ........................................................................\
............................................. 9
Outside Mirror Control Switch ........................................................................\
.......................................... 10
Starting/Stopping the Engine ........................................................................\
........................................... 10
Headlight Control Switch ........................................................................\
................................................... 11
Windshield Wiper and Washer Switch ........................................................................\
........................... 12
Automatic Climate Controls (with Integrated Control System) (if so eq\
uipped) .......................... 13
Drive Mode (with Integrated Control System) (if so equipped) ........................................................ 14
FM/AM/SiriusXM
® Satellite Radio with CD Player (if so equipped) ............................................... 15
USB (Universal Serial Bus) Connection Port/Aux Jack and iPod® Interface ................................. 16
Cruise Control ........................................................................\
...................................................................... 16
SYSTEM GUIDE
Trip Computer ........................................................................\
....................................................................... 17
NissanConnectsm mobile Apps ........................................................................\
......................................... 17
Bluetooth
Page 9 of 28
7
CLOCK SET/ADJUSTMENT (Type B – if so equipped)
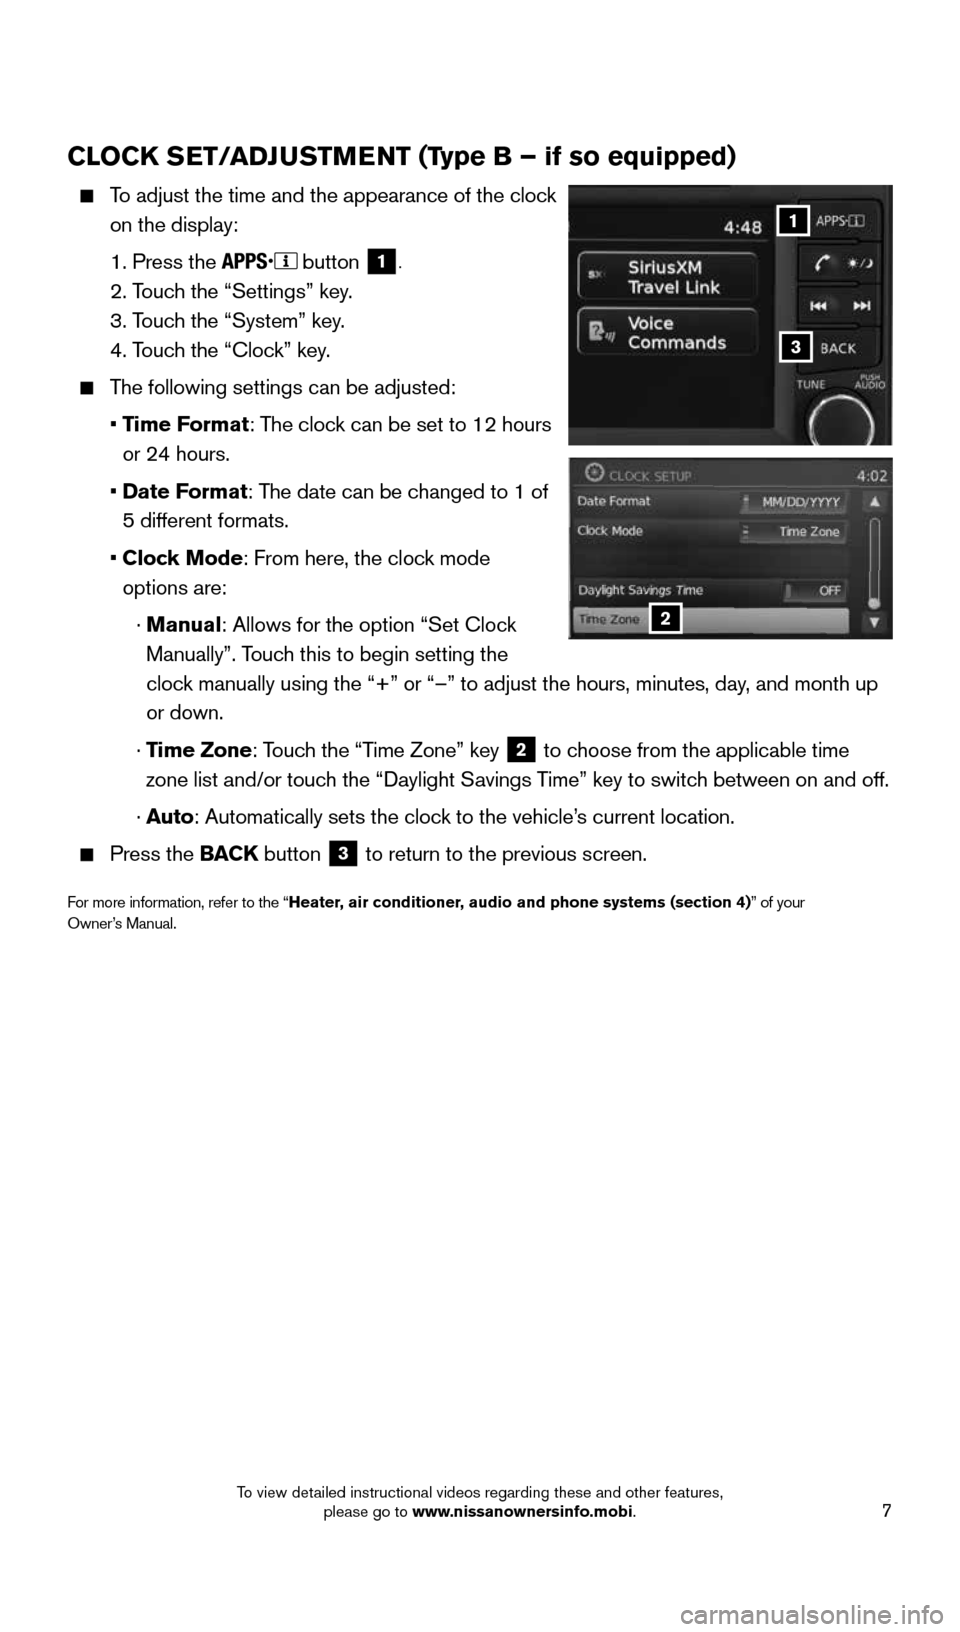
To adjust the time and the appearance of the clock
on the display:
1. Press the
button 1.
2. Touch the “Settings” key.
3. Touch the “System” key.
4. Touch the “Clock” key.
The following settings can be adjusted:
• Time Format: The clock can be set to 12 hours
or 24 hours.
• Date Format: The date can be changed to 1 of
5 different formats.
• Clock Mode: From here, the clock mode
options are:
· Manual: Allows for the option “Set Clock
Manually”. Touch this to begin setting the
clock manually using the “+” or “–” to adjust the hours, minu\
tes, day, and month up
or down.
· Time Zone: Touch the “Time Zone” key
2 to choose from the applicable time
zone list and/or touch the “Daylight Savings Time” key to switch between on and off.
· Auto: Automatically sets the clock to the vehicle’s current location.
Press the BACK button 3 to return to the previous screen.
For more information, refer to the “Heater, air conditioner, audio and phone systems (section 4)” of your Owner’s Manual.
1
2
3
1705381_15a_Juke_QRG_091814.indd 79/18/14 4:46 PM
To view detailed instructional videos regarding these and other features, please go to www.nissanownersinfo.mobi.
Page 10 of 28
8
FIRST DRIVE FEATURES
NISSAN INTELLIGENT KEY® SYSTE M
The NISSAN Intelligent Key® System allows you to
lock or unlock the vehicle, open your liftgate and start
the engine. It is important to make sure the Intelligent
Key is with you (that is, in your pocket or purse).
The operating range of the Intelligent Key is within
31.5 in (80 cm) from each request switch.
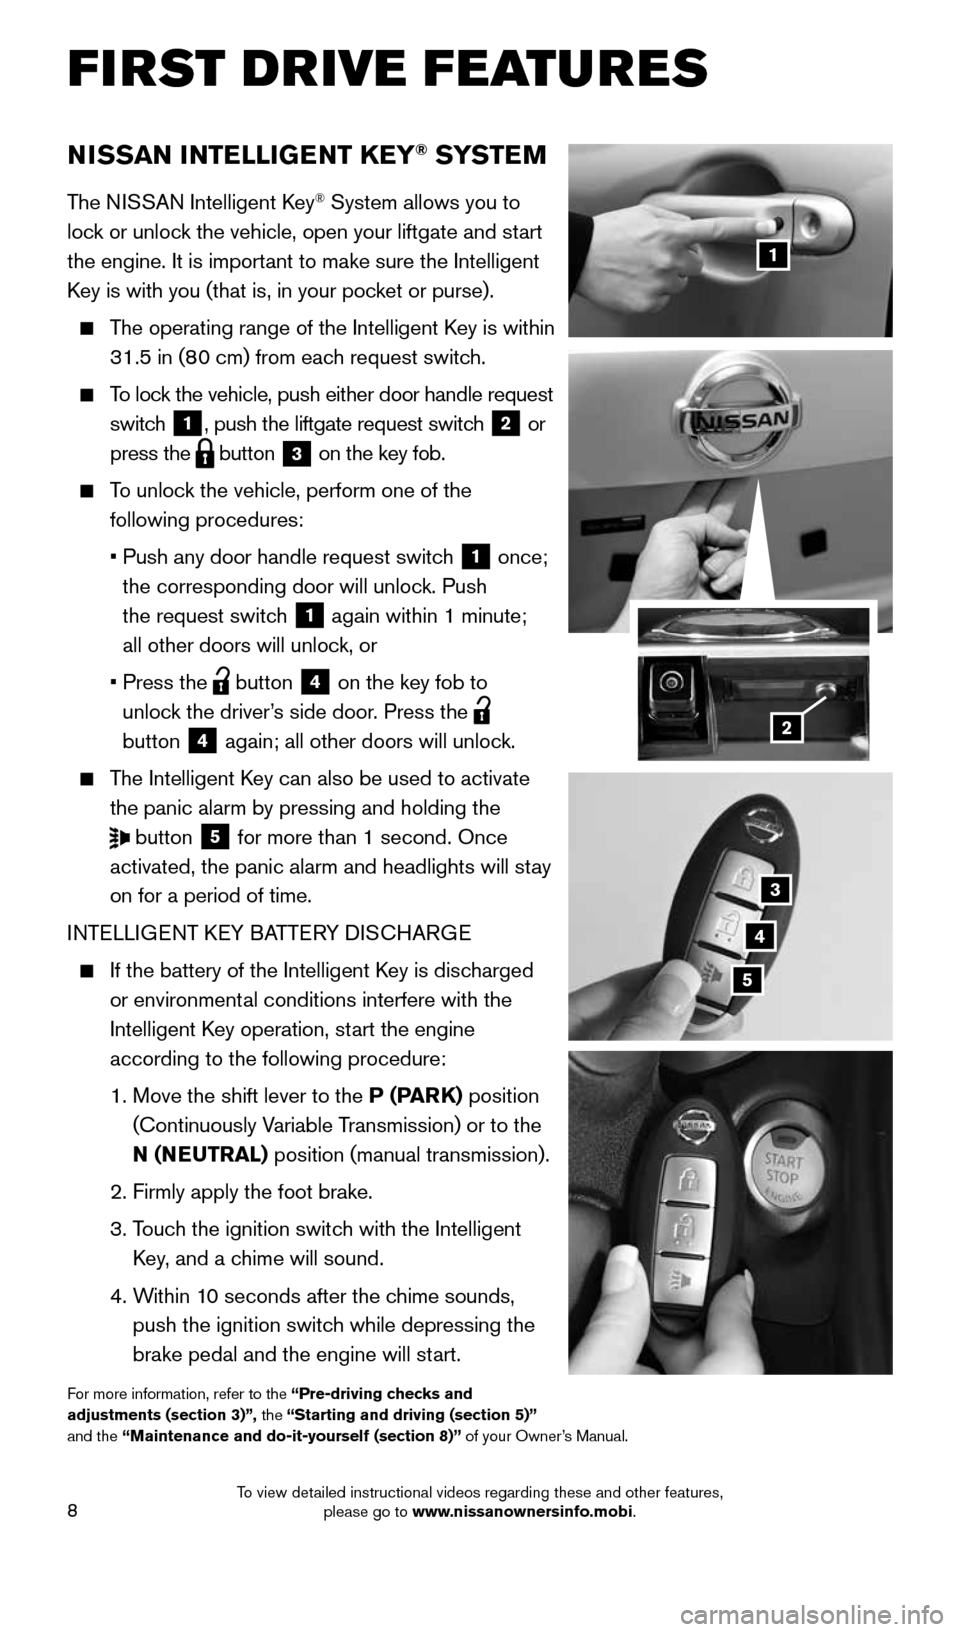
To lock the vehicle, push either door handle request
switch
1, push the liftgate request switch 2 or
press the
button
3 on the key fob.
To unlock the vehicle, perform one of the
following procedures:
• Push any door handle request switch
1 once;
the corresponding door will unlock. Push
the request switch
1 again within 1 minute;
all other doors will unlock, or
• Press the
button
4 on the key fob to
unlock the driver’s side door. Press the
button 4 again; all other doors will unlock.
The Intelligent Key can also be used to activate
the panic alarm by pressing and holding the
button
5 for more than 1 second. Once
activated, the panic alarm and headlights will stay
on for a period of time.
INTELLIGENT KEY BATTERY DISCHARGE
If the battery of the Intelligent Key is discharged
or environmental conditions interfere with the
Intelligent Key operation, start the engine
according to the following procedure:
1. Move the shift lever to the P (PARK) position
(Continuously Variable Transmission) or to the
N (NEUTRAL) position (manual transmission).
2. Firmly apply the foot brake.
3. Touch the ignition switch with the Intelligent
Key, and a chime will sound.
4. Within 10 seconds after the chime sounds,
push the ignition switch while depressing the
brake pedal and the engine will start.
For more information, refer to the “Pre-driving checks and
adjustments (section 3)”, the “Starting and driving (section 5)”
and the “Maintenance and do-it-yourself (section 8)” of your Owner’s Manual.
1
3
4
5
2
1705381_15a_Juke_QRG_091814.indd 89/18/14 4:46 PM
To view detailed instructional videos regarding these and other features, please go to www.nissanownersinfo.mobi.
Page 11 of 28
9
LIFTGATE RELEASE
It is important to make sure the Intelligent Key is
with you (that is, in your pocket or purse).
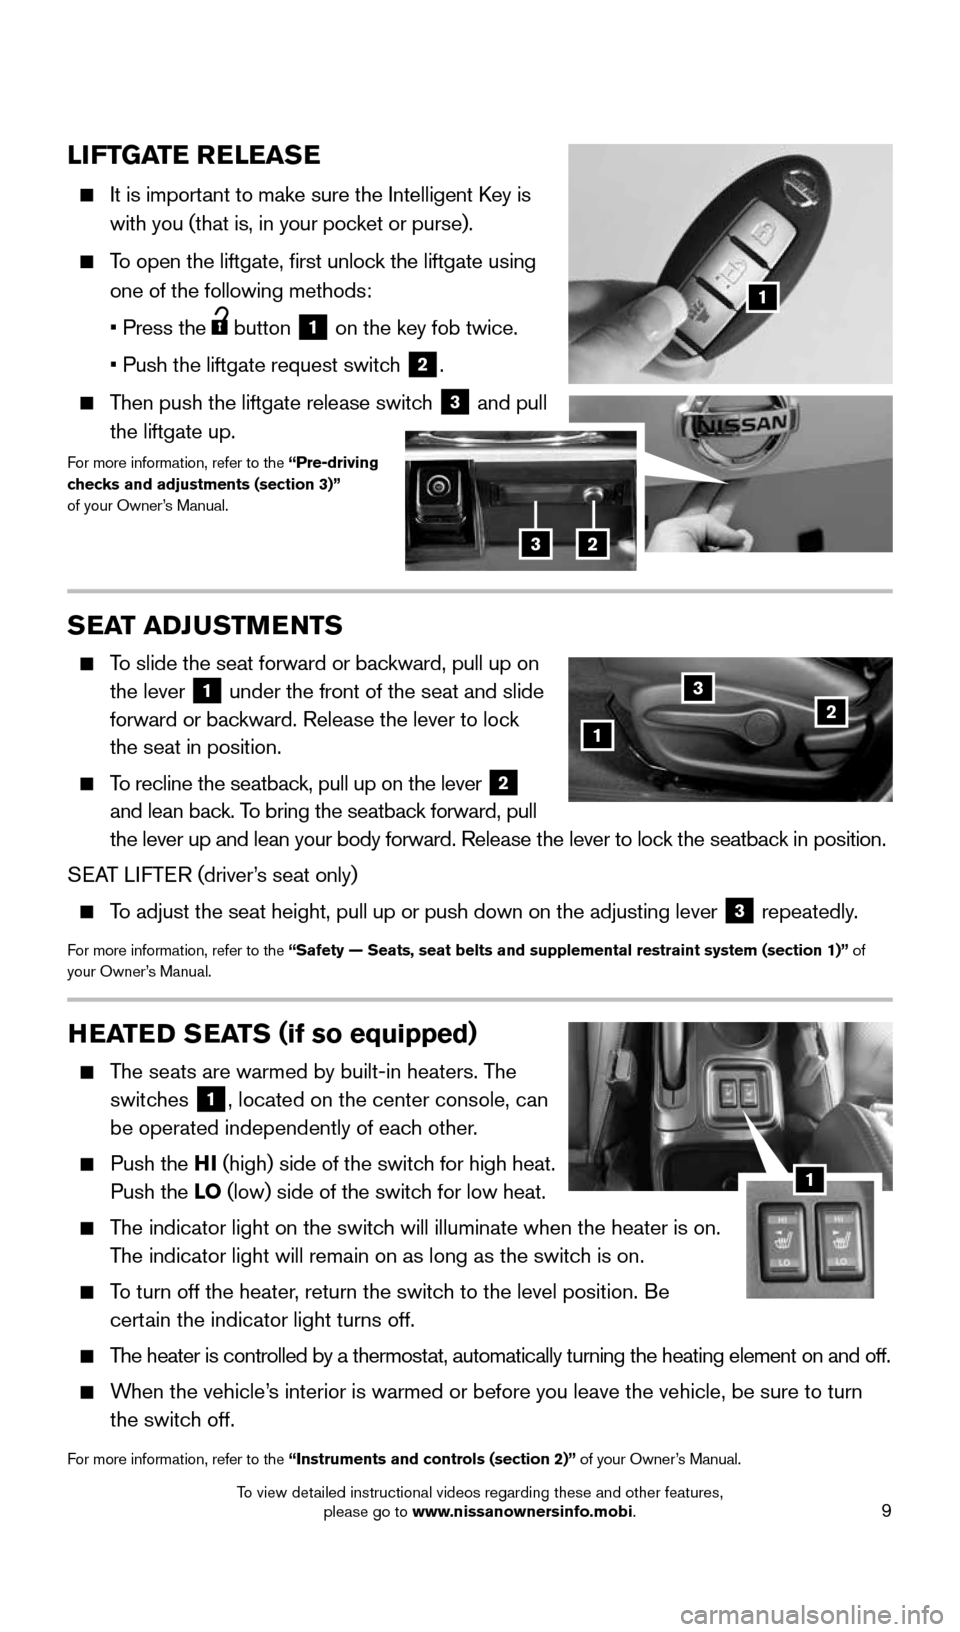
To open the liftgate, first unlock the liftgate using
one of the following methods:
• Press the
button 1 on the key fob twice.
• Push the liftgate request switch
2.
Then push the liftgate release switch 3 and pull
the liftgate up.
For more information, refer to the “Pre-driving
checks and adjustments (section 3)”
of your Owner’s Manual.
HEATED SEATS ( if so equipped)
The seats are warmed by built-in heaters. The
switches
1, located on the center console, can
be operated independently of each other.
Push the HI (high) side of the switch for high heat.
Push the LO (low) side of the switch for low heat.
The indicator light on the switch will illuminate when the heater is on.
The indicator light will remain on as long as the switch is on.
To turn off the heater, return the switch to the level position. Be
certain the indicator light turns off.
The heater is controlled by a thermostat, automatically turning the heating element on and off.
When the vehicle’s interior is warmed or before you leave the vehicle, be sure to turn
the switch off.
For more information, refer to the “Instruments and controls (section 2)” of your Owner’s Manual.
1
SEAT ADJUSTMENTS
To slide the seat forward or backward, pull up on
the lever
1 under the front of the seat and slide
forward or backward. Release the lever to lock
the seat in position.
To recline the seatback, pull up on the lever 2
and lean back. To bring the seatback forward, pull
the lever up and lean your body forward. Release the lever to lock the seatback in position.
SEAT LIFTER (driver’s seat only)
To adjust the seat height, pull up or push down on the adjusting lever 3 repeatedly.
For more information, refer to the “Safety — Seats, seat belts and supplemental restraint system (se\
ction 1)” of
your Owner’s Manual.
123
1
23
1705381_15a_Juke_QRG_091814.indd 99/18/14 4:46 PM
To view detailed instructional videos regarding these and other features, please go to www.nissanownersinfo.mobi.
Page 12 of 28
10
FIRST DRIVE FEATURES
STARTING/STOPPING THE ENGINE
CONTINUOUSLY VARIABLE TRANSMISSION
(if so equipped)
It is important to make sure the NISSAN Intelligent
Key® is with you (that is, in your pocket or purse).
Depress the brake pedal.
Move the shift lever to the P (PARK) position.
Push the ignition switch to start the engine.
MANUAL TRANSMISSION (if so equipped)
Depress the brake pedal.
Move the shift lever to the N ( NEUTRAL) position.
Depress the clutch pedal to the floor while pushing the ignition switch to start the engine.
TURNING THE ENGINE OFF
For a Continuously Variable Transmission, move the shift lever to the P (PARK) position,
apply the parking brake and push the ignition switch.
For a manual transmission, apply the foot brake and place the vehicle in \
1st gear, then
apply the parking brake and push the ignition switch.
For more information, refer to the “Starting and driving (section 5)” of your Owner’s Manual.
2
1
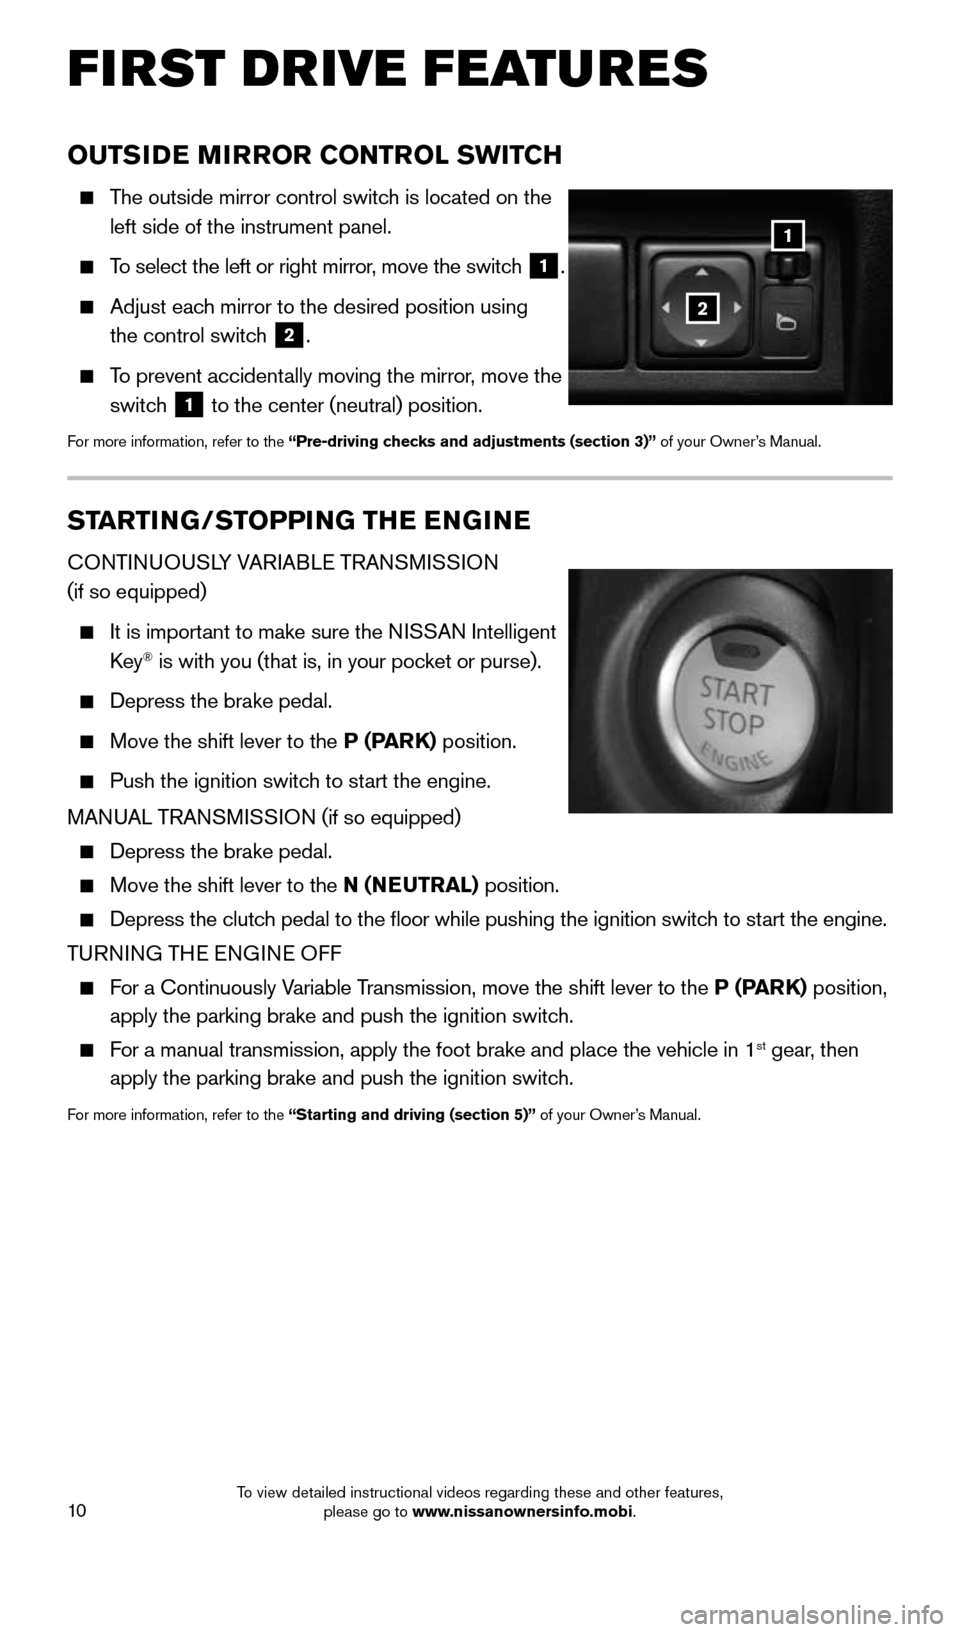
OUTSIDE MIRROR CONTROL SWITCH
The outside mirror control switch is located on the
left side of the instrument panel.
To select the left or right mirror, move the switch
1.
Adjust each mirror to the desired position using
the control switch
2.
To prevent accidentally moving the mirror, move the
switch
1 to the center (neutral) position.For more information, refer to the “Pre-driving checks and adjustments
(section 3)” of your Owner’s Manual.
1705381_15a_Juke_QRG_091814.indd 109/18/14 4:46 PM
To view detailed instructional videos regarding these and other features, please go to www.nissanownersinfo.mobi.
Page 17 of 28
15
21
56
3
FM/AM/SiriusXM®* SATELLITE RADIO WITH CD PLAYER
(if so equipped)
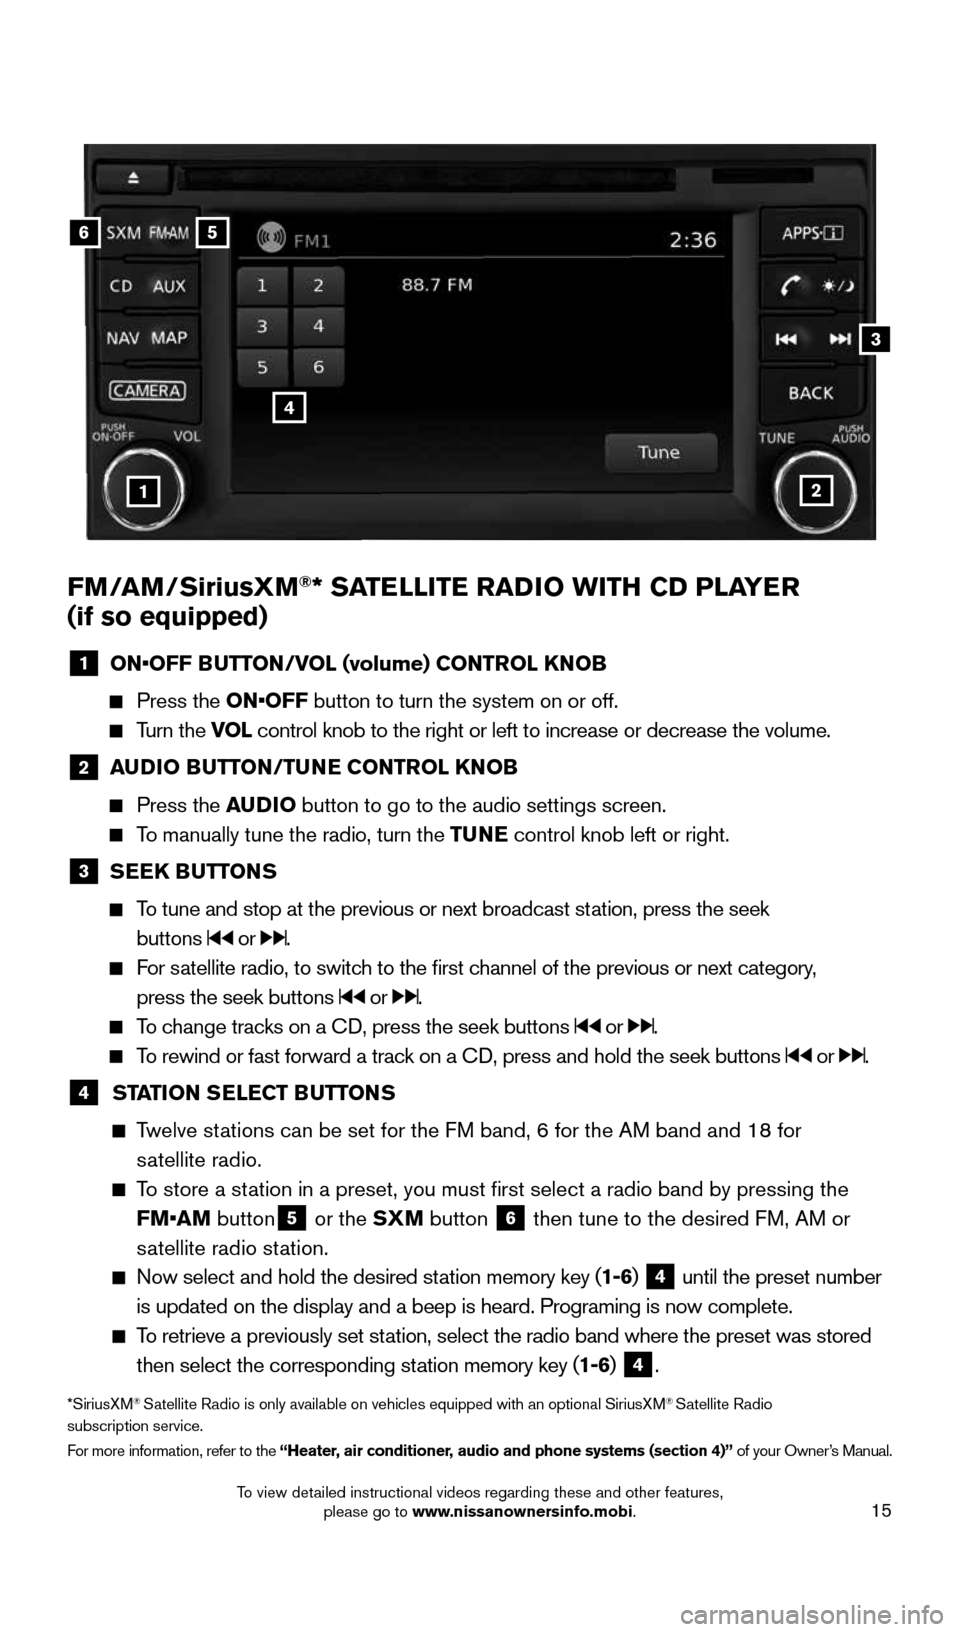
1 ON•OFF BUTTON/VOL (volume) CONTROL KNOB
Press the ON•OFF button to turn the system on or off.
Turn the VOL control knob to the right or left to increase or decrease the volume.
2 AUDIO BUTTON/TUNE CONTROL KNOB
Press the AUDIO button to go to the audio settings screen.
To manually tune the radio, turn the TUNE control knob left or right.
3 SEEK BUTTONS
To tune and stop at the previous or next broadcast station, press the seek
buttons
or .
For satellite radio, to switch to the first channel of the previous or next category,
press the seek buttons
or .
To change tracks on a CD, press the seek buttons or .
To rewind or fast forward a track on a CD, press and hold the seek buttons or .
4 STATION SELECT BUTTONS
Twelve stations can be set for the FM band, 6 for the AM band and 18 for
satellite radio.
To store a station in a preset, you must first select a radio band by pressing the \
FM•AM button
5 or the SXM button
6 then tune to the desired FM, AM or
satellite radio station.
Now select and hold the desired station memory key (1-6) 4 until the preset number
is updated on the display and a beep is heard. Programing is now complet\
e.
To retrieve a previously set station, select the radio band where the preset was stored
then select the corresponding station memory key (1-6)
4.
*SiriusXM® Satellite Radio is only available on vehicles equipped with an optional S\
iriusXM® Satellite Radio
subscription service.
For more information, refer to the “Heater, air conditioner, audio and phone systems (section 4)” of your Owner’s Manual.
4
1705381_15a_Juke_QRG_091814.indd 159/18/14 4:46 PM
To view detailed instructional videos regarding these and other features, please go to www.nissanownersinfo.mobi.
Page 22 of 28

20
SYSTEM GUIDE
BLUETOOTH® SYSTEM WITH NAVIGATION (if so equipped)
Send predefined or custom text messages* through your vehicle’s Bluetooth® system.
Receive texts through your vehicle’s Bluetooth® system that can be read to you.
Bluetooth® Streaming Audio allows you to use a compatible Bluetooth® phone to play
audio files on your device. Your compatible cellular phone can be connected to the vehicle’s audio system, allowing audio files to play through the vehicle’s speakers.
CONNECTING PROCEDURE
1. Press the
button on the control panel.
2. Touch the “Settings” key
1.
1
*Laws in some jurisdictions may restrict the use of “Text-to-Speech”. Some of the applications and features, such
as social networking and texting, may also be restricted. Check local regulations for any requirements before using
these features.
MAKING A CALL BY PHONE NUMBER
1. Press the
button. A tone will sound.
2. Say: “Call”. The system acknowledges the command and announces the next set of
available commands.
3. Say: “Phone Number”. The system acknowledges the command and announces the
next set of available commands.
4. Say the number you wish to call starting with the area code in single digit format.
5. When you have finished speaking the phone number, the system repeats it back and
announces the available commands.
6. Say: “Dial”. The system acknowledges the command and makes the call.
RECEIVING/ENDING A CALL
When you receive a phone call, a ring tone sounds through the audio syste\
m.
To accept the call, press the button.
To reject the call, press the button.
To hang-up the phone at the end of a call or to disconnect during call pl\
acement,
press the
button.
1705381_15a_Juke_QRG_091814.indd 209/18/14 4:46 PM
To view detailed instructional videos regarding these and other features, please go to www.nissanownersinfo.mobi.
Page 23 of 28
21
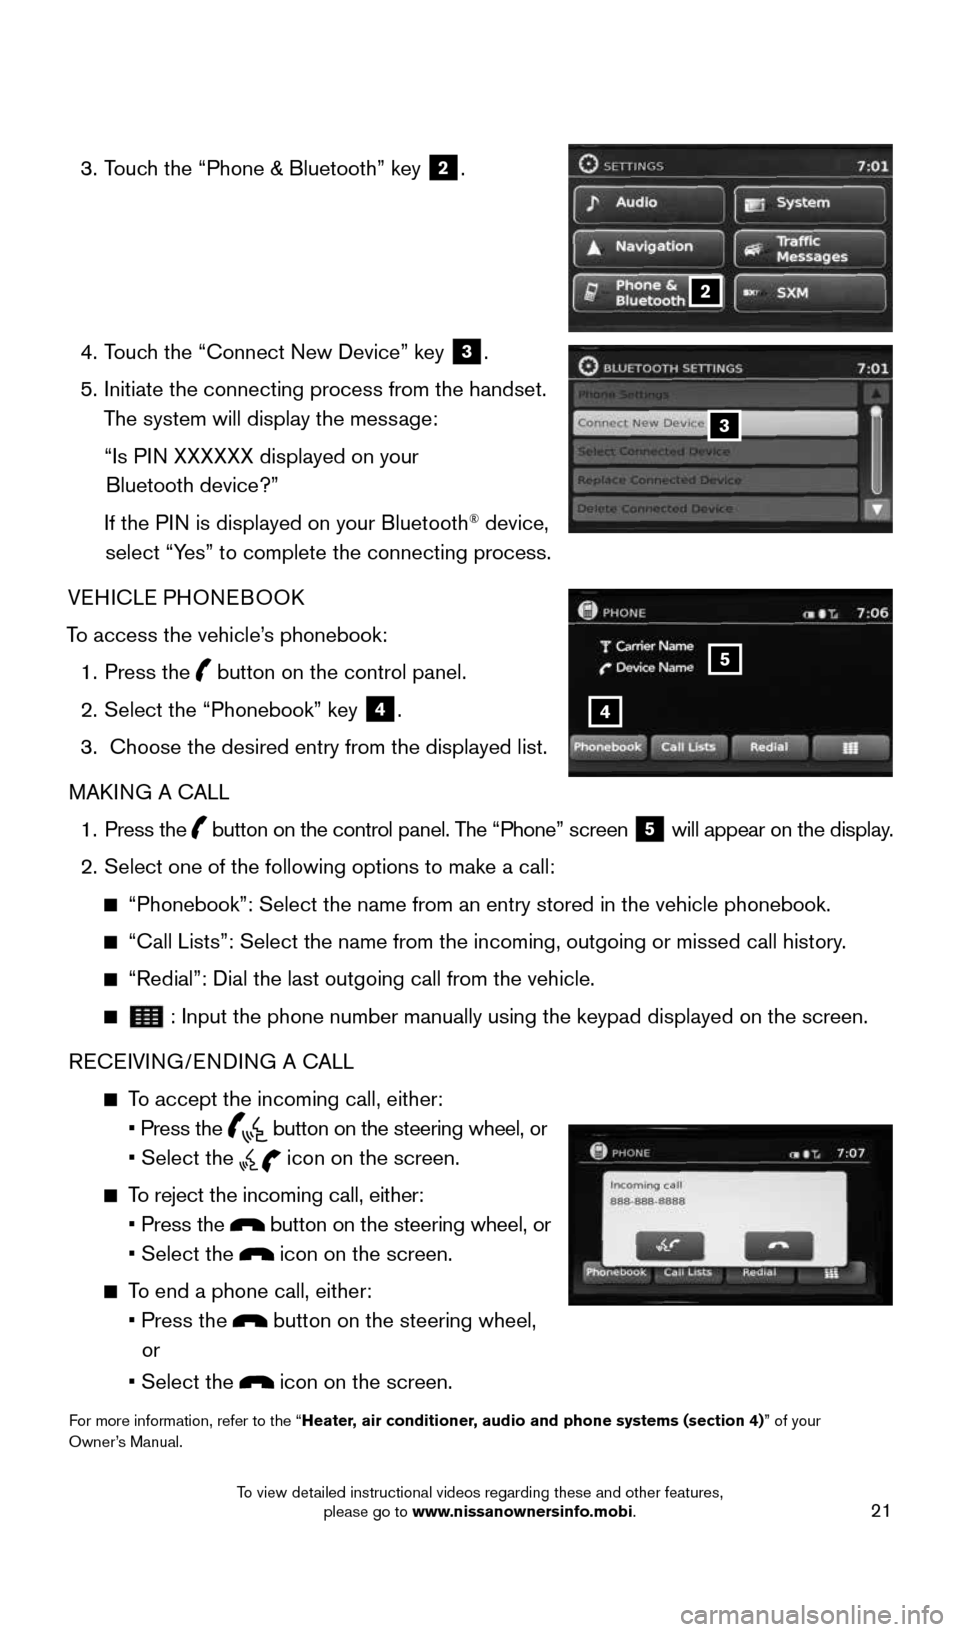
3. Touch the “Phone & Bluetooth” key
2.
4. Touch the “Connect New Device” key
3.
5. Initiate the connecting process from the handset.
The system will display the message:
“Is PIN XXXXXX displayed on your
Bluetooth device?”
If the PIN is displayed on your Bluetooth
® device,
select “Yes” to complete the connecting process.
VEHICLE PHONEBOOK
To access the vehicle’s phonebook: 1. Press the
button on the control panel.
2. Select the “Phonebook” key
4.
3. Choose the desired entry from the displayed list.
MAKING A CALL
1. Press the
button on the control panel. The “Phone” screen
5 will appear on the display.
2. Select one of the following options to make a call:
“Phonebook”: Select the name from an entry stored in the vehicle p\
honebook.
“Call Lists”: Select the name from the incoming, outgoing or misse\
d call history.
“Redial”: Dial the last outgoing call from the vehicle.
: Input the phone number manually using the keypad displayed on the scre\
en.
RECEIVING/ENDING A CALL
To accept the incoming call, either:
• Press the
button on the steering wheel, or
• Select the
icon on the screen.
To reject the incoming call, either:
• Press the
button on the steering wheel, or
• Select the
icon on the screen.
To end a phone call, either:
• Press the
button on the steering wheel,
or
• Select the
icon on the screen.
For more information, refer to the “Heater, air conditioner, audio and phone systems (section 4)” of your
Owner’s Manual.
2
3
4
5
1705381_15a_Juke_QRG_091814.indd 219/18/14 4:46 PM
To view detailed instructional videos regarding these and other features, please go to www.nissanownersinfo.mobi.