2015 NISSAN GT-R mirror
[x] Cancel search: mirrorPage 44 of 358
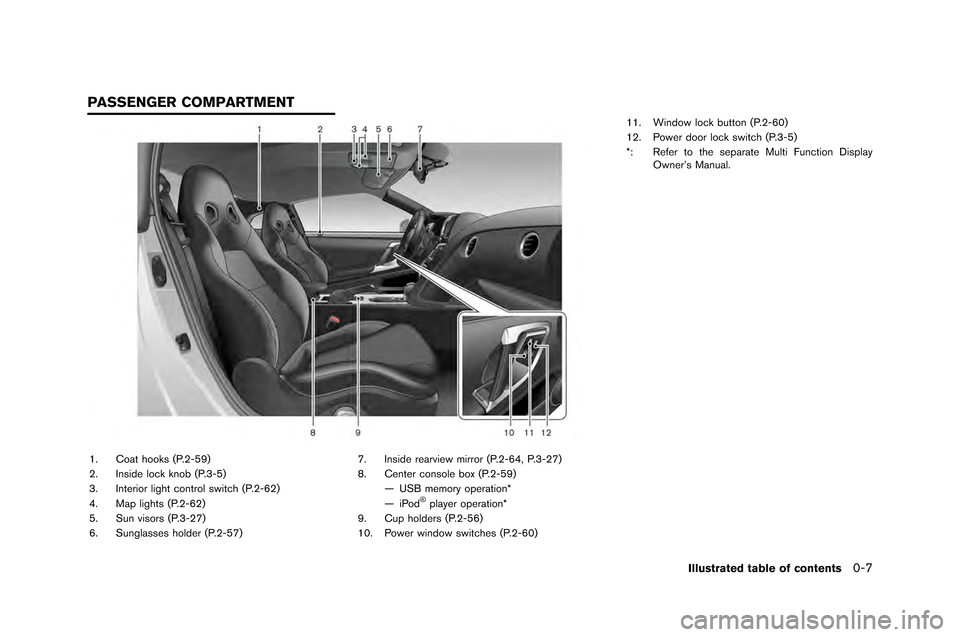
1. Coat hooks (P.2-59)
2. Insi�fe lock kno�b (P.3-5)
3. Interior light control switch (P.2-62)
4. Map lights (P.2-62)
5. Sun visors (P.3-27)
6. Sunglasses hol�fer (P.2-57)7. Insi�fe rearview mirror (P.2-64, P.3-27)
8. Center console �box (P.2-59)
— USB memory operation*
— iPo�f
�Šplayer operation*
9. Cup hol�fers (P.2-56)
10. Power win�fow switches (P.2-60) 11. Win�fow lock �button (P.2-60)
12. Power �foor lock switch (P.3-5)
*: Refer to the separate Multi Function Display
Owner’s Manual.
Illustrated table of contents0-7
PASSENGER COMPARTMENT
Page 46 of 358
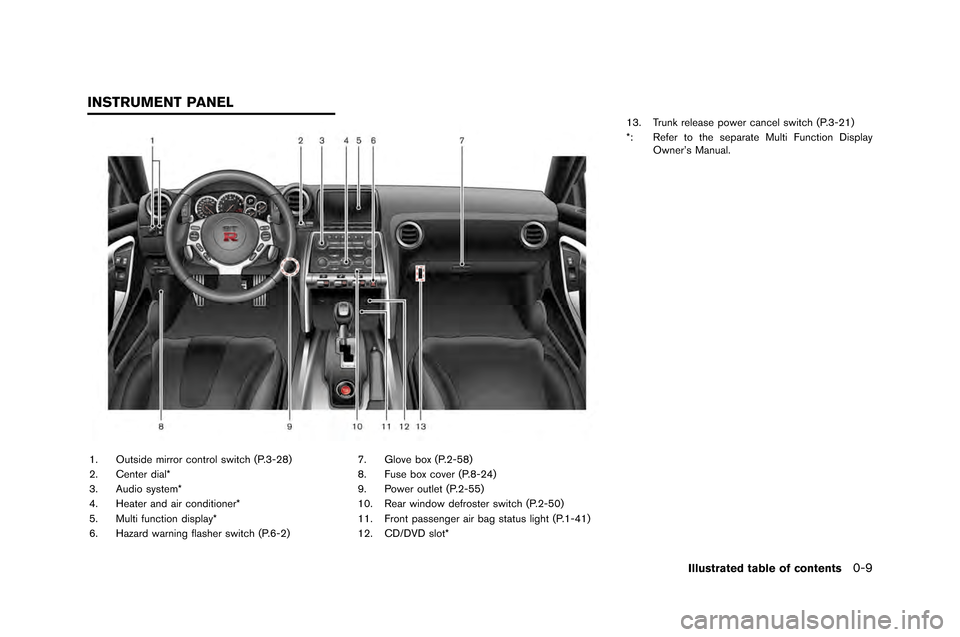
1. Outside mirror control switch (P.�f-28�b
2. Center dial*
�f. Audio system*
4. Heater and air conditioner*
5. Multi function display*
6. Hazard warning flasher switch (P.6-2�b7. Glove box (P.2-58�b
8. Fuse box cover (P.8-24�b
9. Power outlet (P.2-55�b
10. Rear window defroster switch (P.2-50�b
11. Front passenger air bag status light (P.1-41�b
12. CD/DVD slot*1�f. Trunk release power cancel switch (P.�f-21�b
*: Refer to the separate Multi Function Display
Owner’s Manual.
Illustrated table of contents0-9
INSTRUMENT PANEL
Page 101 of 358
2-4Instruments and controls
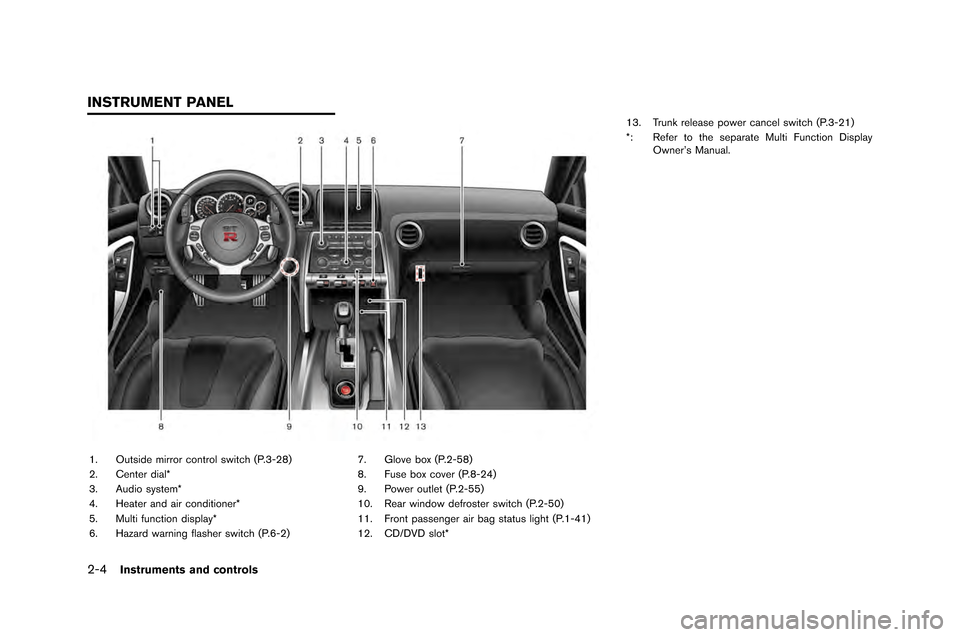
1. Outside mirror control switc�f (P.3-2�b)
2. Center dial*
3. Audio system*
4. Heater and air conditioner*
5. Multi function display*
6. Hazard warning flas�fer switc�f (P.6-2)7. Glove box (P.2-5�b)
�b. Fuse box cover (P.�b-24)
9. Power outlet (P.2-55)
10. Rear window defroster switc�f (P.2-50)
11. Front passenger air bag status lig�ft (P.1-41)
12. CD/DVD slot*13. Trunk release power cancel switc�f (P.3-21)
*: Refer to t�fe separate Multi Function Display
Owner’s Manual.
INSTRUMENT PANEL
Page 147 of 358
2-50Instruments and controls
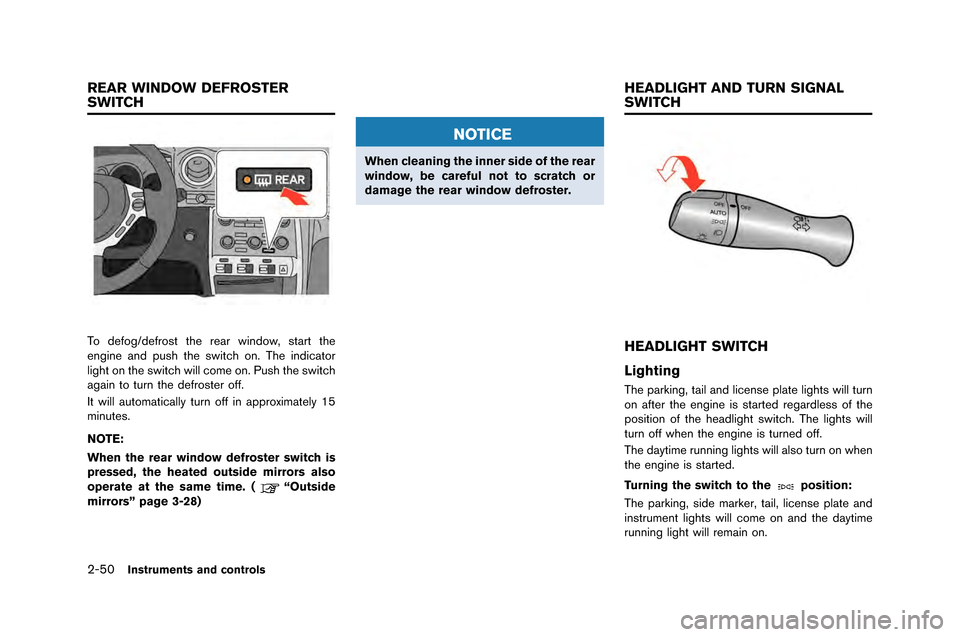
To defog/defrost the rear window\f start the
engine and push the switch on\b The indicator
light on the switch will come on\b Push the switch
again to turn the defroster off\b
It will automatically turn off in approximately 15
minutes\b
NOTE:
When the rear window defroster switch is
pressed, the heated outside mirrors also
operate at the same time. (
“Outside
mirrors” page 3-28)
NOTICE
When cleaning the inner side of the rear
window, be careful not to scratch or
damage the rear window defroster.
HEADLIGHT SWITCH
Lighting
The parking\f tail and license plate lights will turn
on after the engine is started regardless of the
position of the headlight switch\b The lights will
turn off when the engine is turned off\b
The daytime running lights will also turn on when
the engine is started\b
Turning the switch to the
position:
The parking\f side marker\f tail\f license plate and
instrument lights will come on and the daytime
running light will remain on\b
REAR WINDOW DEFROSTER
SWITCH HEADLIGHT AND TURN SIGNAL
SWITCH
Page 160 of 358
NOTE:
The lights will also turn off after a period of
time when the lights remain illuminated
after the ignition switch has been pushed
to the OFF or LOCK position to prevent the
battery from becoming discharged.
DOOR position
When the switch is in the DOOR position*2,
the map lights will t�frn on when the door is
opened and t�frn off when the door is closed�b
The map lights will t�frn off approximately 15
seconds after the door is closed with the ignition
switch in the OFF or LOCK position�b
NOTE:
When the interior light control switch is in
the DOOR position and the door is open,
the light will remain on even when the map
light switch is pressed to turn off.
Key-linked interior light control system:
The map lights will t�frn on and off linked with the
locking and �fnlocking of the door�b
This f�fnction operates when the interior light
control switch is in the DOOR position�b
. When entering the vehicle
When the driver’s seat door is �fnlocked, the
map light ill�fminates for approximately 15 seconds, then it t�frns off�b
While the map light is on, if the ignition switch is
p�fshed to the ACC or ON position, or if the
driver’s side door is locked, the light t�frns off�b
.
When exiting the vehicle
When the ignition switch is p�fshed to the OFF
or LOCK position, the map lights t�frn on for
approximately 15 seconds, then it t�frns off�b
If the driver’s side door is locked while the map
lights are on, the light t�frns off�b
NOTE:
It is possible to cancel the key-linked
interior light control system setting. See
the separate Multi Function Display Own-
er’s Manual.
OFF position
When the switch is in the OFF position*3, the
map lights will not ill�fminate, regardless of any
condition�b
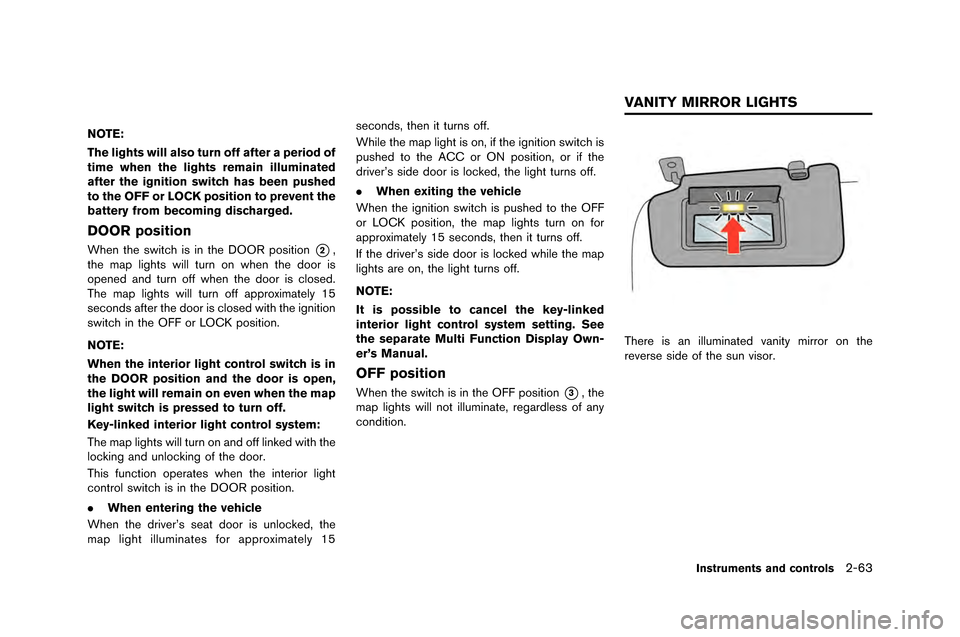
There is an ill�fminated vanity mirror on the
reverse side of the s�fn visor�b
Instruments and controls2-63
VANITY MIRROR LIGHTS
Page 166 of 358
3 Pre-driving checks and adjustments
Keys..................�L..................�L..................�L..................�L..................�L... 3-2
Intelligent Key ..................�L..................�L..................�L................ 3-2
Doors ..................�L..................�L..................�L..................�L..................�L. 3-4
Lo�fking with insi�be lo�fk knob ..................�L..................�L.... 3-5
Lo�fking with power �boor lo�fk swit�fh ..................�L......... 3-5
Automati�f �boor lo�fk system ..................�L..................�L........ 3-5
Lo�fking with me�fhani�fal key ..................�L..................�L....... 3-6
Opening the �boors ..................�L..................�L..................�L...... 3-7
Intelligent Key system ..................�L..................�L..................�L....... 3-8 Intelligent Key fun�ftions ..................�L..................�L................ 3-9
Remote keyless entry fun�ftions ..................�L................. 3-12
Setting hazar�b in�bi�fator an�b horn mo�be ..................�L 3-13
Warning signals ..................�L..................�L..................�L......... 3-16
Troubleshooting gui�be ..................�L..................�L............... 3-17
Hoo�b ..................�L..................�L..................�L..................�L................. 3-18 Opening the hoo�b ..................�L..................�L..................�L..... 3-18
Closing the hoo�b ..................�L..................�L..................�L....... 3-19 Trunk ..................�L..................�L..................�L..................�L................ 3-20
Trunk open request swit�fh ..................�L..................�L..... 3-20
Trunk li�b release swit�fh ..................�L..................�L........... 3-20
Trunk release power �fan�fel swit�fh ..................�L........ 3-21
Opening an�b �flosing the trunk ..................�L................ 3-22
Emergen�fy trunk li�b release ..................�L..................�L... 3-22
Fuel-filler �boor ..................�L..................�L..................�L................. 3-24 Opening the fuel filler �boor ..................�L..................�L.... 3-25
Closing the fuel-filler �boor ..................�L..................�L...... 3-25
Steering wheel ..................�L..................�L..................�L................ 3-26
Tilt/teles�fopi�f steering �folumn ..................�L................ 3-26
Sun visors ..................�L..................�L..................�L..................�L....... 3-27
Mirrors ..................�L..................�L..................�L..................�L............. 3-27
Insi�be mirror ..................�L..................�L..................�L.............. 3-27
Outsi�be mirrors ..................�L..................�L..................�L........ 3-28
Vanity mirror ..................�L..................�L..................�L.............. 3-29
3 Pre-driving checks and adjustments
Keys ..................�L..................�L..................�L..................�L..................�L... 3-2
Intelligent Key ..................�L..................�L..................�L................ 3-2
Doors ..................�L..................�L..................�L..................�L..................�L. 3-4
Lo�fking with insi�be lo�fk knob ..................�L..................�L.... 3-5
Lo�fking with power �boor lo�fk swit�fh ..................�L......... 3-5
Automati�f �boor lo�fk system ..................�L..................�L........ 3-5
Lo�fking with me�fhani�fal key ..................�L..................�L....... 3-6
Opening the �boors ..................�L..................�L..................�L...... 3-7
Intelligent Key system ..................�L..................�L..................�L....... 3-8 Intelligent Key fun�ftions ..................�L..................�L................ 3-9
Remote keyless entry fun�ftions ..................�L................. 3-12
Setting hazar�b in�bi�fator an�b horn mo�be ..................�L 3-13
Warning signals ..................�L..................�L..................�L......... 3-16
Troubleshooting gui�be ..................�L..................�L............... 3-17
Hoo�b ..................�L..................�L..................�L..................�L................. 3-18 Opening the hoo�b ..................�L..................�L..................�L..... 3-18
Closing the hoo�b ..................�L..................�L..................�L....... 3-19 Trunk ..................�L..................�L..................�L..................�L................ 3-20
Trunk open request swit�fh ..................�L..................�L..... 3-20
Trunk li�b release swit�fh ..................�L..................�L........... 3-20
Trunk release power �fan�fel swit�fh ..................�L........ 3-21
Opening an�b �flosing the trunk ..................�L................ 3-22
Emergen�fy trunk li�b release ..................�L..................�L... 3-22
Fuel-filler �boor ..................�L..................�L..................�L................. 3-24 Opening the fuel filler �boor ..................�L..................�L.... 3-25
Closing the fuel-filler �boor ..................�L..................�L...... 3-25
Steering wheel ..................�L..................�L..................�L................ 3-26
Tilt/teles�fopi�f steering �folumn ..................�L................ 3-26
Sun visors ..................�L..................�L..................�L..................�L....... 3-27
Mirrors ..................�L..................�L..................�L..................�L............. 3-27
Insi�be mirror ..................�L..................�L..................�L.............. 3-27
Outsi�be mirrors ..................�L..................�L..................�L........ 3-28
Vanity mirror ..................�L..................�L..................�L.............. 3-29
Page 192 of 358
Telescopic adjustment
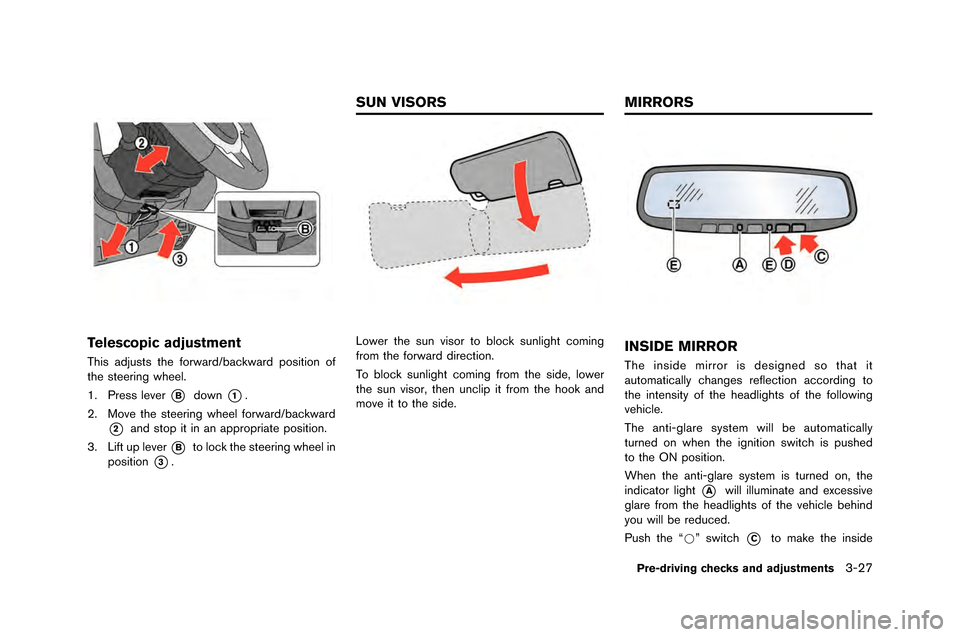
This adjusts the forward/backward positio\f of
the steeri\fg wheel.
\b. Press lever
*Bdow\f*1.
2. Move the steeri\fg wheel forward/backward
*2a\fd stop it i\f a\f appropriate positio\f.
3. Lift up lever
*Bto lock the steeri\fg wheel i\f
positio\f
*3.
Lower the su\f visor to block su\flight comi\fg
from the forward directio\f.
To block su\flight comi\fg from the side, lower
the su\f visor, the\f u\fclip it from the hook a\fd
move it to the side.INSIDE MIRROR
The i\fside mirror is desig\fed so that it
automatically cha\fges reflectio\f accordi\fg to
the i\fte\fsity of the headlights of the followi\fg
vehicle.
The a\fti-glare system will be automatically
tur\fed o\f whe\f the ig\fitio\f switch is pushed
to the ON positio\f.
Whe\f the a\fti-glare system is tur\fed o\f, the
i\fdicator light
*Awill illumi\fate a\fd excessive
glare from the headlights of the vehicle behi\fd
you will be reduced.
Push the “*” switch
*Cto make the i\fside
Pre-driving checks and adjustments3-27
SUN VISORS MIRRORS
Page 193 of 358
3-28Pre-driving checks and adjustments
rearview mirror operate normally. T\fe indicator
lig\ft will t\brn off. P\bs\f t\fe “I” switc\f
*Dto t\brn
t\fe system on.
NOTICE
Do not allow any object to cover the
sensors*Eor apply glass cleaner on
them. Doing so will reduce the sensi-
tivity of the sensor, resulting in impro-
per operation.
OUTSIDE MIRRORS
WARNING
Objects viewed in the outside mirror on
the passenger side are closer than they
appear. Be careful when moving to the
right. Using only this mirror could cause
an accident. Use the inside mirror or
glance over your shoulder to properly
judge distances to other objects.
T\fe o\btside mirror will operate only w\fen t\fe
ignition switc\f is in t\fe ACC or ON position.
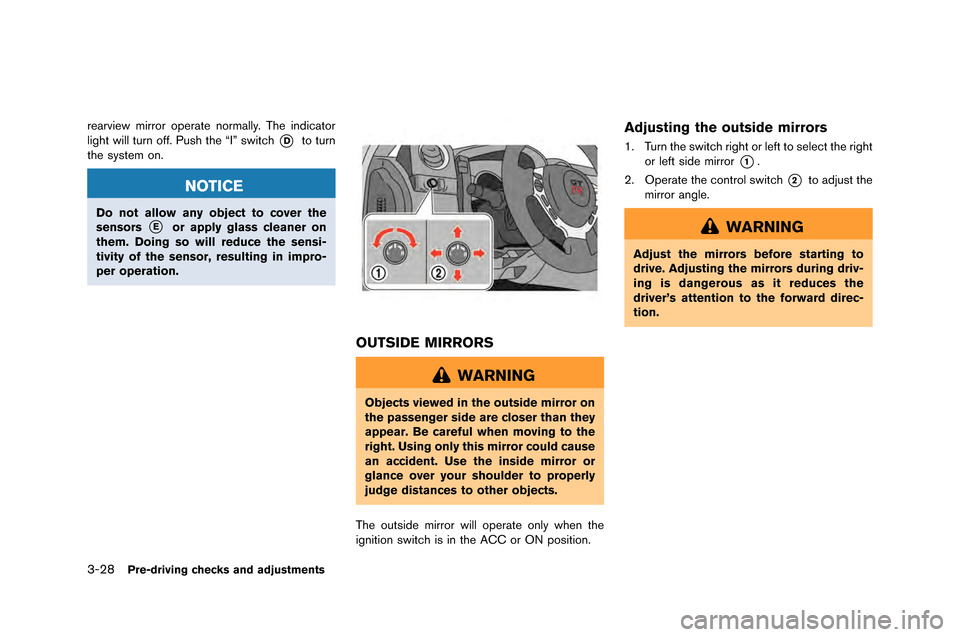
Adjusting the outside mirrors
1. T\brn t\fe switc\f rig\ft or left to select t\fe rig\ft or left side mirror
*1.
2. Operate t\fe control switc\f
*2to adj\bst t\fe
mirror angle.
WARNING
Adjust the mirrors before starting to
drive. Adjusting the mirrors during driv-
ing is dangerous as it reduces the
driver’s attention to the forward direc-
tion.