Page 175 of 466

●When thebutton is pressed with
all doors locked, the hazard warning lights
flash twice and the horn beeps once as a
reminder that the doors are already
locked.
● If a door is open and you press
the
button, the doors will lock
but the horn will not beep and the hazard
lights will not flash.
The horn may or may not beep. For additional
information, refer to “Silencing the horn beep
feature” in this section.
Unlocking doors
Press thebutton on the key fob once.
● Only the driver’s door unlocks.
● The hazard warning lights flash once if all
doors are completely closed with the ignition
switch in any position except the ON posi-
tion.
● The interior lights illuminate for a period of
time when the interior light switch is in the
normal operation position. Press the
button on the key fob again
within 5 seconds.
● All doors unlock.
● The hazard warning lights flash once if all
doors are completely closed.
The interior lights can be turned off without wait-
ing by inserting the key into the ignition switch
and placing the ignition switch in the ON or
START position, locking the doors with the key
fob or pushing the interior light switch to the OFF
position.
Auto relock
When thebutton on the key fob is
pressed, all doors will lock automatically within
1 minute unless one of the following operations is
performed:
● Any door is opened.
● A key is inserted into the ignition switch and
the switch is cycled from OFF to ON.LPD0210
3-8Pre-driving checks and adjustments
Page 176 of 466
Opening windows (if so equipped)
The key fob allows you to open windows
equipped with automatic operation.● To open the windows, press the
but-
ton on the key fob for longer than 3 sec-
onds after all doors are unlocked.
The door windows will open while pressing
the
button on the key fob.
The door windows cannot be closed by
using the key fob.
Using the panic alarm
If you are near your vehicle and feel threatened,
you may activate the panic alarm to call attention
by pressing and holding the
button on the
key fob for longer than 0.5 seconds.
The panic alarm and headlights will stay on for a
period of time. The panic alarm stops when:
● it has run for a period of time, or
● any button is pressed on the key fob.
Using the interior lights
Press thebutton on the key fob once to
turn on the interior lights.
For additional information, refer to “Interior lights”
in the “Instruments and controls” section in this
manual.
LPD0211
Pre-driving checks and adjustments3-9
Page 177 of 466

Silencing the horn beep feature
If desired, the horn beep feature can be deacti-
vated using the key fob.
To deactivate:Press and hold the
andbuttonsfor at least 2 seconds.
The hazard warning lights will flash three times to
confirm that the horn beep feature has been
deactivated.
To activate: Press and hold the
andbuttonsfor at least 2 seconds once
more. The hazard warning lights will flash once and the
horn will sound once to confirm that the horn
beep feature has been reactivated.
Deactivating the horn beep feature does not si-
lence the horn if the alarm is triggered.
�1Pull the hood lock release handle located
below the driver’s side instrument panel. The
hood will spring up slightly.
�2Push the lever at the front of the hood to the
side as illustrated with your fingertips and
raise the hood.
�3Insert the support rod into the slot on the
underside of the hood.
When closing the hood, return the hood rod to its
original position. Lower the hood approximately
12 in (30 cm) above the latch and release it. This
allows proper engagement of the hood latch.
LPD0262LPD0302
HOOD
3-10Pre-driving checks and adjustments
Page 179 of 466

– Keep the pump nozzle in contactwith the container while you are fill-
ing it.
– Use only approved portable fuel con- tainers for flammable liquid.
CAUTION
●Do not use E-15 or E-85 fuel in your
vehicle. For additional information, re-
fer to the “Fuel Recommendation” in
the “Technical and consumer informa-
tion” section of this manual.
● The LOOSE FUEL CAP warning mes-
sage will be displayed if the fuel-filler
cap is not properly tightened. It may
take a few driving trips for the message
to be displayed. Failure to tighten the
fuel-filler cap properly after the LOOSE
FUEL CAP warning message is dis-
played may cause the
Malfunc-
tion Indicator Light (MIL) to illuminate. ●
Failure to tighten the fuel-filler cap
properly may cause the
Malfunc-
tion Indicator Light (MIL) to illuminate.
If the
light illuminates because
the fuel-filler cap is loose or missing,
tighten or install the cap and continue
to drive the vehicle. The
light
should turn off after a few driving trips.
If the
light does not turn off after a
few driving trips, have the vehicle in-
spected by a NISSAN dealer.
● For additional information, refer to the
“Malfunction Indicator Light (MIL)” in
the “Instruments and Controls” section
in this manual.
● If fuel is spilled on the vehicle body,
flush it away with water to avoid paint
damage. To remove the fuel-filler cap:
1. Turn the fuel-filler cap counterclockwise to remove.
2. Loop the tether strap around the hook
�1
while refueling.
To install the fuel-filler cap: 1. Insert the fuel-filler cap straight into the fuel- filler tube.
2. Turn the fuel-filler cap clockwise until a single click is heard.
LPD0325
3-12Pre-driving checks and adjustments
Page 180 of 466

Loose Fuel Cap warning message
The LOOSE FUEL CAP warning message dis-
plays in the odometer when the fuel-filler cap is
not tightened correctly after the vehicle has been
refueled. It may take a few driving trips for the
message to be displayed. To turn off the warning
message, perform the following:1. Remove and install the fuel-filler cap as de- scribed above as soon as possible.
2. Tighten the fuel-filler cap until it clicks. 3. Push the loose fuel cap warning reset button
�Ain the meter for about 1 second to turn off
the LOOSE FUEL CAP warning message
after tightening the fuel-filler cap.
For additional information, refer to “Meters and
gauges” in the “Instruments and Controls” sec-
tion in this manual.
TILT OPERATION (if so equipped)
Pull the lock lever forward and hold it to adjust the
steering wheel up or down to the desired posi-
tion.
Release the lock lever to lock the steering wheel
in place.
WARNING
Do not adjust the steering wheel while
driving. You could lose control of your
vehicle and cause an accident.
LRS2004LPD0304
STEERING WHEEL
Pre-driving checks and adjustments3-13
Page 181 of 466
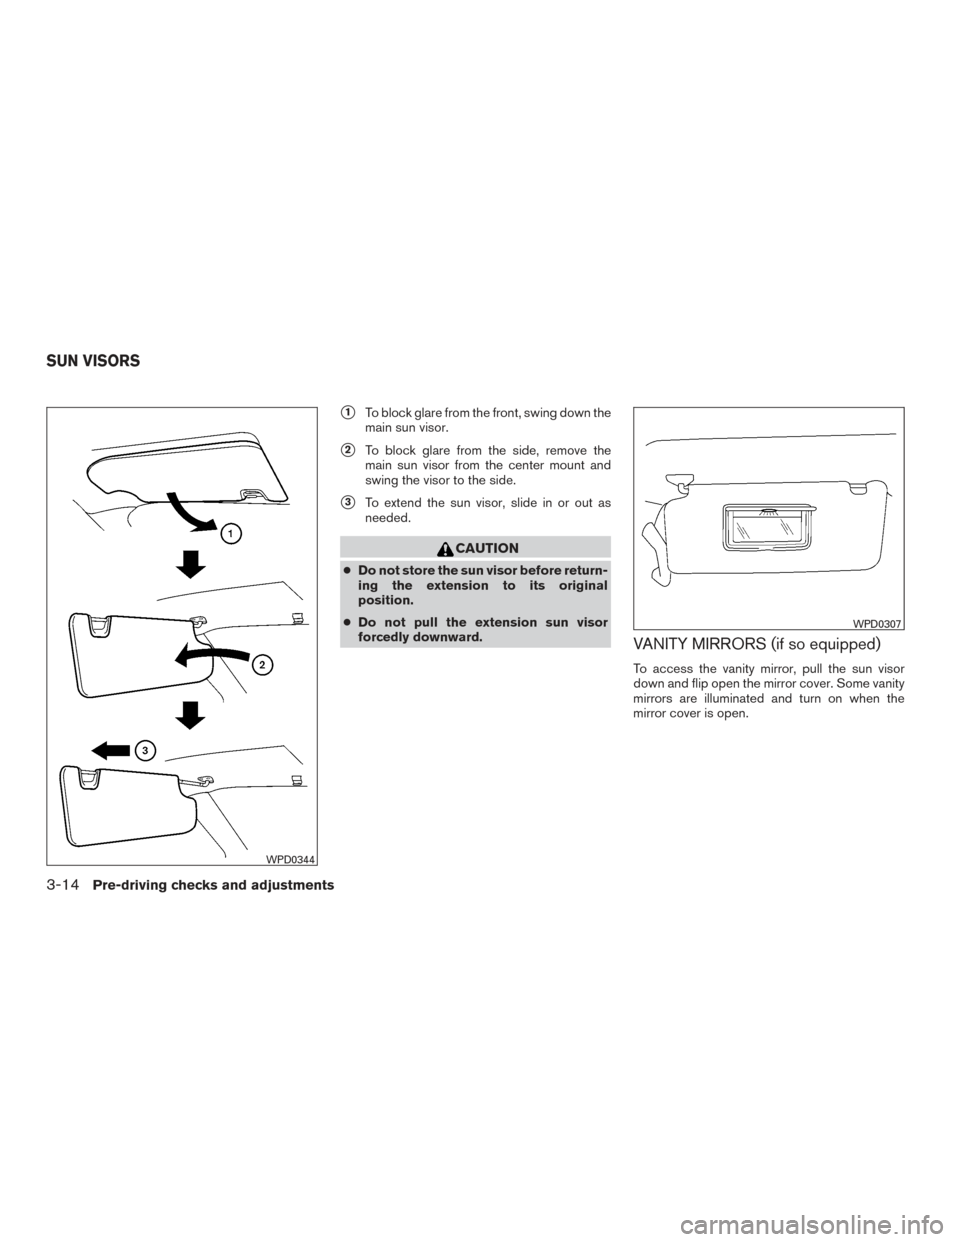
�1To block glare from the front, swing down the
main sun visor.
�2To block glare from the side, remove the
main sun visor from the center mount and
swing the visor to the side.
�3To extend the sun visor, slide in or out as
needed.
CAUTION
● Do not store the sun visor before return-
ing the extension to its original
position.
● Do not pull the extension sun visor
forcedly downward.
VANITY MIRRORS (if so equipped)
To access the vanity mirror, pull the sun visor
down and flip open the mirror cover. Some vanity
mirrors are illuminated and turn on when the
mirror cover is open.
WPD0344
WPD0307
SUN VISORS
3-14Pre-driving checks and adjustments
Page 185 of 466
TAILGATE
Opening the tailgate
Pull the tailgate handle upward and lower the
tailgate. The support cables hold the tailgate
open.
When closing the tailgate, make sure the latches
are securely locked.
Do not drive the vehicle with the tailgate
down, unless equipped with NISSAN’s Bed
Extender (accessory) or equivalent in the
extended position.For additional information on proper truck box
loading, refer to “Vehicle loading information” in
the “Technical and consumer information” sec-
tion of this manual.
WARNING
●
It is extremely dangerous to ride in a
cargo area inside a vehicle. In a colli-
sion, people riding in these areas are
more likely to be seriously injured or
killed.
● Do not allow people to ride in any area
of your vehicle that is not equipped with
seats and seat belts.
● Be sure everyone in your vehicle is in a
seat and using a seat belt properly.
LPD0270
TRUCK BOX
3-18Pre-driving checks and adjustments
Page 186 of 466

Before removing the tailgate disconnect the rear
camera by performing the following:1. Open the tailgate to access the rear camera connector bracket
�1lo")
Disconnecting the rear camera (if so
equipped)
Before removing the tailgate disconnect the rear
camera by performing the following:1. Open the tailgate to access the rear camera connector bracket
�1located on the rear
sill.
2. Remove the connector bracket
�2from the
sill by pressing the locking tab inward, in the
direction shown, while pulling the bracket
apart. 3. Disconnect the chassis wiring harness
�3
by pressing inward on the locking tab, in the
direction shown, while pulling the connec-
tors apart. Hold the connector firmly to pre-
vent the connector in the chassis harness
from falling into the sill.
4. Take the chassis plug and bracket from the glove box and connect them to the chassis
wiring harness to avoid contamination to the
terminals which will lead to malfunction of
the rear camera.
5. Insert the bracket back into the sill. 6. Take the tailgate plug from the glove box and
connect it to the tailgate wiring harness to
avoid contamination which will lead to mal-
function of the rear camera.
7. Remove the tailgate. For additional informa- tion, refer to “Removing the tailgate” in this
section.
LPD2097
Pre-driving checks and adjustments3-19

The key fob allows you to open windows
equipped with automatic operation.● To open the windows, press the
but-
ton on the key fob for longer than 3 sec-
onds after a")