Page 137 of 466
 ,
start the engine and push the rear window de-
froster switch on. The rear window defroster in-
dicator light on the switch comes on. Push the
switch")
To defrost the rear window glass (if so equipped) ,
start the engine and push the rear window de-
froster switch on. The rear window defroster in-
dicator light on the switch comes on. Push the
switch again to turn the defroster off.
To defrost the outside mirrors (if so equipped) ,
start the engine and push the rear window de-
froster switch on. The rear window defroster in-
dicator light on the switch comes on. Push the
switch again to turn the defroster off.
The rear window defroster automatically turns off
after approximately 15 minutes.CAUTION
When cleaning the inner side of the rear
window, be careful not to scratch or dam-
age the rear window defroster.
HEADLIGHT CONTROL SWITCH
Lighting
�1When turning the switch to theposi-
tion, the front parking, tail, license plate and
instrument panel lights come on.
�2When turning the switch to theposi-
tion, the headlights come on and all the other
lights remain on.
Type A (if so equipped)
LIC0783
Type B (if so equipped)
LIC1419
Type A (if so equipped)
WIC1424
REAR WINDOW OR OUTSIDE
MIRROR DEFROSTER SWITCH (if so
equipped) HEADLIGHT AND TURN SIGNAL
SWITCH
2-28Instruments and controls
Page 148 of 466
●Use power outlets with the engine run-
ning to avoid discharging the vehicle
battery.
● Avoid using power outlets when the air
conditioner, headlights or rear window
defroster is on.
● Before inserting or disconnecting a
plug, be sure the electrical accessory
being used is turned OFF.
● Push the plug in as far as it will go. If
good contact is not made, the plug may
overheat or the internal temperature
fuse may open.
● When not in use, be sure to close the
cap. Do not allow water or any other
liquids to contact the outlet.
STORAGE TRAYS
WARNING
Do not place sharp objects in the trays to
help prevent injury in an accident or sud-
den stop.
Top center tray
LIC1539
A/T model
LIC0818
STORAGE
Instruments and controls2-39
Page 157 of 466
 evenly distributed. Be careful that your
vehicle does not exceed the Gross Vehicle
Weight Rating (G")
Always evenly distribute the cargo on the tubular
roof rack.The maximum total load is 125 lb
(56 kg) evenly distributed. Be careful that your
vehicle does not exceed the Gross Vehicle
Weight Rating (GVWR) or the Gross Axle
Weight Ratings (GAWR front and rear) . The
GVWR and GAWR are located on the F.M.V.S.S.
label (located on the driver’s side door jamb
pillar) . For additional information regarding
GVWR and GAWR, refer to “Vehicle loading
information” in the “Technical and consumer in-
formation” section of this manual.
The front crossbar can be adjusted or removed.
Use the TORX® driver provided in the tool kit to
loosen both crossbar adjusting screws.
To adjust:
1. Loosen the adjusting screws with the TORX® driver
�1by turning counterclock-
wise
�A.
2. When the clamp is loosened, move the crossbar so the cargo can be positioned on
the crossbar
�B.
3. Tighten the crossbar adjusting screws with the TORX® driver by turning clockwise.
4. Secure the cargo with rope.
5. Always check the tightness of the crossbar adjusting screws. To remove:
1. Loosen the adjusting screws with the TORX® driver
�1by turning counterclock-
wise
�A.
2. Rotate the clamps
�C.
3. Remove the crossbar.
4. Reverse to install.
5. Always check the tightness of the crossbar adjusting screws.
If you hear wind noise coming from the roof rack
while driving, adjust the roof rack crossbar to the
neutral position.
MANUAL WINDOWS (if so equipped)
The side windows can be opened or closed by
turning the hand crank on each door.
POWER WINDOWS (if so equipped)
WARNING
● Make sure that all passengers have
their hands, etc. inside the vehicle while
it is in motion and before closing the
windows. Use the window lock switch to
prevent unexpected use of the power
windows.
WIC0263
WINDOWS
2-48Instruments and controls
Page 158 of 466

●Do not leave children unattended inside
the vehicle. They could unknowingly ac-
tivate switches or controls and become
trapped in a window. Unattended chil-
dren could become involved in serious
accidents.
The power windows operate when the ignition
switch is placed in the ON position, or for a
period of time after the ignition switch is placed in
the OFF position. If the driver’s or passenger’s
door is opened during this period of time, the
power to the windows is canceled.
1. Window lock button
2. Power door lock switch
3. Front passenger side window switch
4. Right rear passenger window switch (Crew Cab models only)
5. Left rear passenger window switch
(Crew Cab models only)
6. Driver’s side automatic switch
Driver’s side power window switch
The driver’s side control panel is equipped with
switches to open or close the front and rear
passenger windows.
To open a window, push the switch and hold it
down. To close a window, pull the switch and
hold it up. To stop the opening or closing function
at any time, simply release the switch.
LIC1329
Instruments and controls2-49
Page 159 of 466
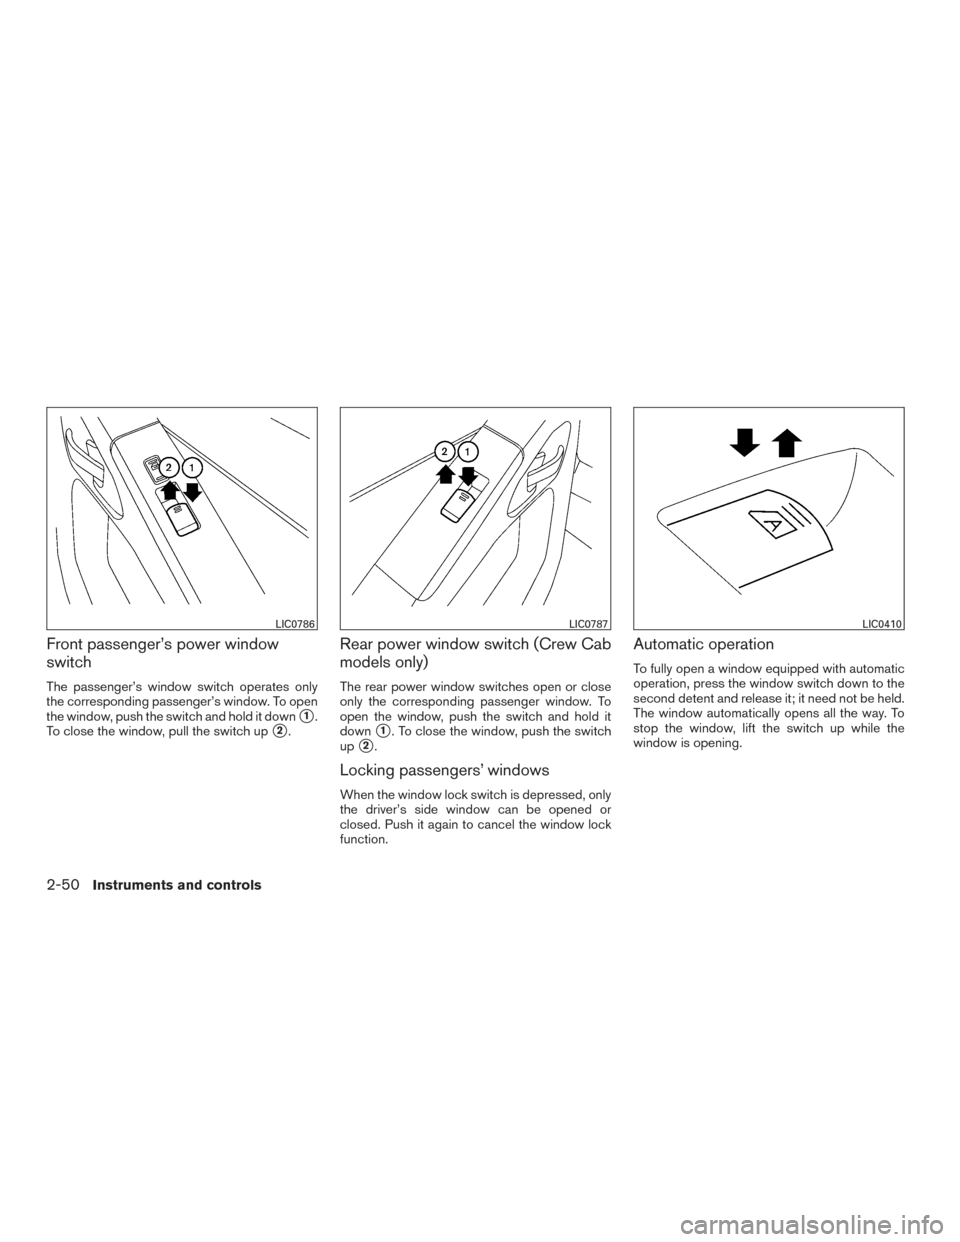
Front passenger’s power window
switch
The passenger’s window switch operates only
the corresponding passenger’s window. To open
the window, push the switch and hold it down
�1.
To close the window, pull the switch up
�2.
Rear power window switch (Crew Cab
models only)
The rear power window switches open or close
only the corresponding passenger window. To
open the window, push the switch and hold it
down
�1. To close the window, push the switch
up
�2.
Locking passengers’ windows
When the window lock switch is depressed, only
the driver’s side window can be opened or
closed. Push it again to cancel the window lock
function.
Automatic operation
To fully open a window equipped with automatic
operation, press the window switch down to the
second detent and release it; it need not be held.
The window automatically opens all the way. To
stop the window, lift the switch up while the
window is opening.
LIC0786LIC0787LIC0410
2-50Instruments and controls
Page 160 of 466

Squeeze the handles of the lever�1, then slide
the window open
�2.
POWER MOONROOF
The moonroof will only operate when the ignition
switch is in the ON position. Th")
REAR SLIDING WINDOW (if so
equipped)
Squeeze the handles of the lever�1, then slide
the window open
�2.
POWER MOONROOF
The moonroof will only operate when the ignition
switch is in the ON position. The power moonroof
is operational for about 45 seconds, even if the
ignition switch is turned to the ACC or OFF
position. If the driver’s door or the front passen-
ger’s door is opened during this period of about
45 seconds, power to the moonroof is canceled.
Sliding the moonroof
To fully open the moonroof, push the switch to-
ward DOWN/OPEN
�1.
To fully close the moonroof, push the switch
toward UP/CLOSE
�2. To open or close the moonroof part way, push the
switch in any direction while the moonroof is
sliding to stop it in the desired position.
Tilting the moonroof
Close the moonroof by pushing the switch to-
ward UP/CLOSE
�2. Release the switch, then
push the UP/CLOSE switch again to tilt the
moonroof up.
To tilt the moonroof down, push the switch to-
ward DOWN/OPEN
�1.
Auto-reverse function (when closing or
tilting down the moonroof)
The auto-reverse function can be activated when
the moonroof is closed or tilted down by auto-
matic operation when the ignition switch is
placed in the ON position or for a period of time
after the ignition switch is placed in the OFF
position.
Depending on the environment or driving
conditions, the auto-reverse function may
be activated if an impact or load similar to
something being caught in the moonroof
occurs.
WIC0856WIC0882
MOONROOF (if so equipped)
Instruments and controls2-51
Page 174 of 466

As many as 5 key fobs can be used with one
vehicle. For information concerning the purchase
and use of additional key fobs, contact a NISSAN
dealer.
The key fob will not function when:● the battery is discharged
● the distance between the vehicle and the
key fob is over 33 ft (10 m)
The panic alarm will not activate when the
key is in the ignition switch.
CAUTION
Listed below are conditions or occur-
rences which will damage the key fob:
● Do not allow the key fob, which con-
tains electrical components, to come
into contact with water or salt water.
This could affect the system function.
● Do not drop the key fob.
● Do not strike the key fob sharply
against another object.
● Do not change or modify the key fob.
● Wetting may damage the key fob. If the
key fob gets wet, immediately wipe until
it is completely dry. ●
Do not place the key fob for an ex-
tended period in an area where tem-
peratures exceed 140°F (60°C) .
● Do not attach the key fob with a key
holder that contains a magnet.
● Do not place the key fob near equip-
ment that produces a magnetic field,
such as a TV, audio equipment and per-
sonal computers.
If a key fob is lost or stolen, NISSAN rec-
ommends erasing the ID code of that key
fob. This will prevent the key fob from
unauthorized use to unlock the vehicle.
For information regarding the erasing
procedure, please contact a NISSAN
dealer.HOW TO USE REMOTE KEYLESS
ENTRY SYSTEM
Locking doors
1. Close all windows.
2. Remove the key from the ignition switch.
3. Close the hood and all doors.
4. Press the
button on the key fob. All
the doors lock. The hazard warning lights
flash twice and the horn beeps once to
indicate all doors are locked.
LPD0209
Pre-driving checks and adjustments3-7
Page 176 of 466
Opening windows (if so equipped)
The key fob allows you to open windows
equipped with automatic operation.● To open the windows, press the
but-
ton on the key fob for longer than 3 sec-
onds after all doors are unlocked.
The door windows will open while pressing
the
button on the key fob.
The door windows cannot be closed by
using the key fob.
Using the panic alarm
If you are near your vehicle and feel threatened,
you may activate the panic alarm to call attention
by pressing and holding the
button on the
key fob for longer than 0.5 seconds.
The panic alarm and headlights will stay on for a
period of time. The panic alarm stops when:
● it has run for a period of time, or
● any button is pressed on the key fob.
Using the interior lights
Press thebutton on the key fob once to
turn on the interior lights.
For additional information, refer to “Interior lights”
in the “Instruments and controls” section in this
manual.
LPD0211
Pre-driving checks and adjustments3-9


The key fob allows you to open windows
equipped with automatic operation.● To open the windows, press the
but-
ton on the key fob for longer than 3 sec-
onds after a")