Page 9 of 28

7
3RD ROW POWER FOLDING SEATS (if so equipped)
Before operating the 3RD row seats:
• Make sure the 2ND row seatback is not reclined.
• Lower the 3RD row headrest to the full down position.
• Disconnect and secure the center seat belt and tongue into the retractor\
base. Always
reconnect the center seat belt when the seat is returned to the upright \
position.
• Make sure that there are no objects on the seatback cushion.
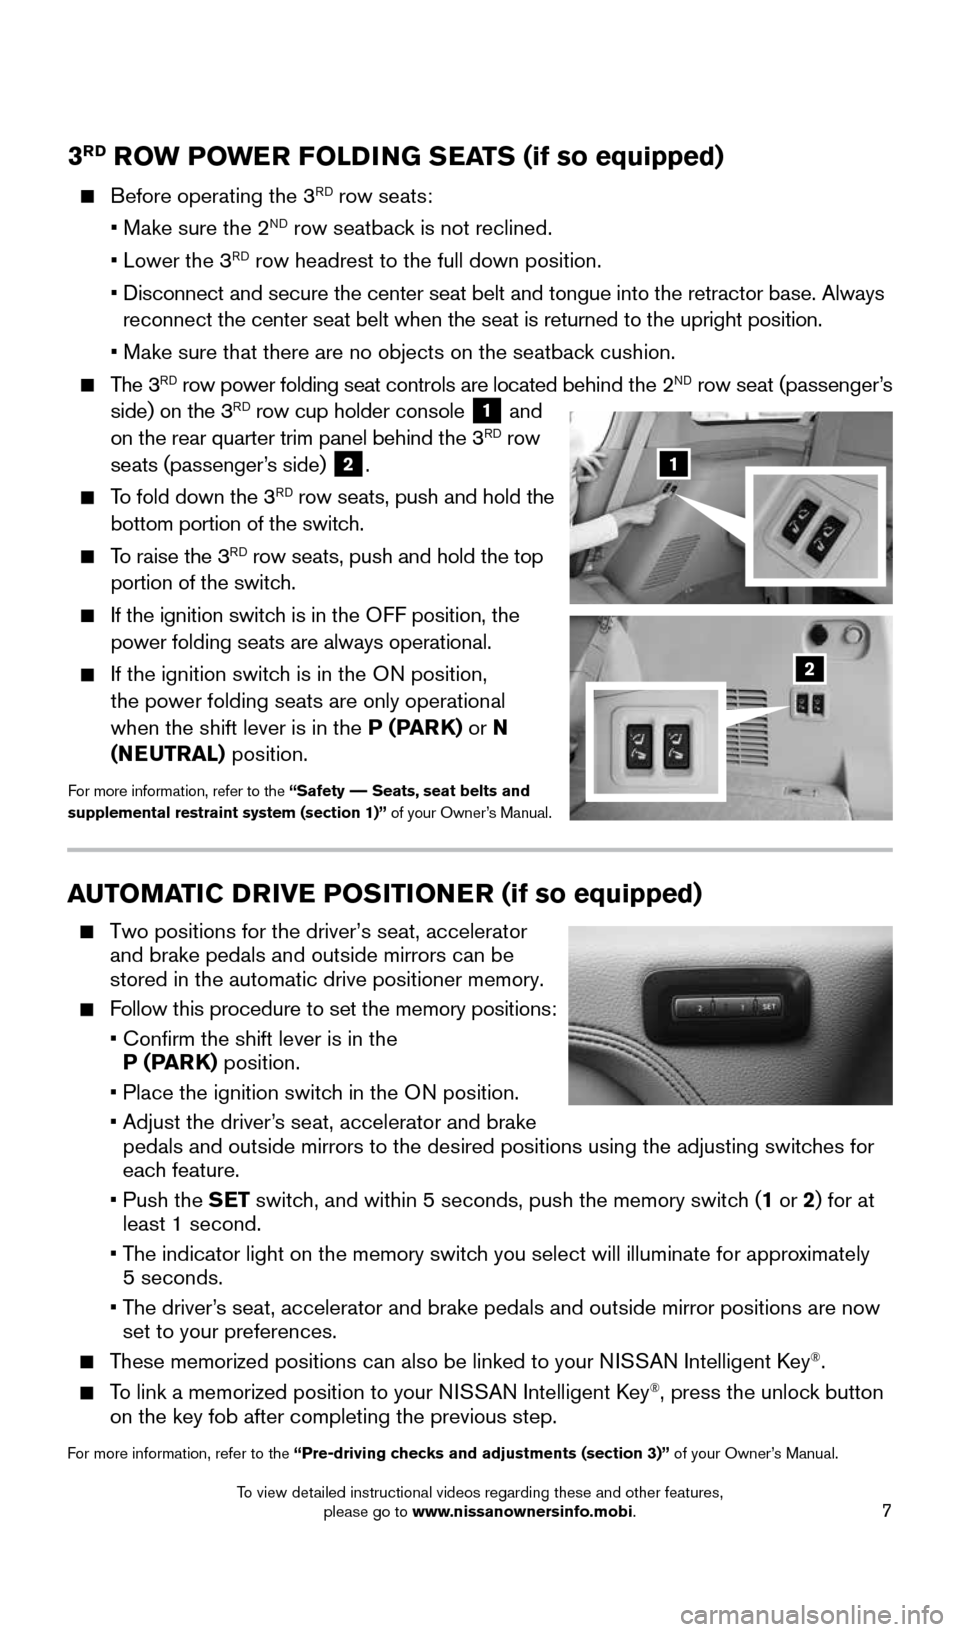
The 3RD row power folding seat controls are located behind the 2ND row seat (passenger’s
side) on the 3RD row cup holder console 1 and
on the rear quarter trim panel behind the 3RD row
seats (passenger’s side) 2.
To fold down the 3RD row seats, push and hold the
bottom portion of the switch.
To raise the 3RD row seats, push and hold the top
portion of the switch.
If the ignition switch is in the OFF position, the
power folding seats are always operational.
If the ignition switch is in the ON position,
the power folding seats are only operational
when the shift lever is in the P (PARK) or N
(NEUTRAL) position.
For more information, refer to the “Safety –– Seats, seat belts and
supplemental restraint system (section 1)” of your Owner’s Manual.
AUTOMATIC DRIVE POSITIONER (if so equipped)
Two positions for the driver’s seat, accelerator
and brake pedals and outside mirrors can be
stored in the automatic drive positioner memory.
Follow this procedure to set the memory positions:
• Confirm the shift lever is in the
P (PARK) position.
• Place the ignition switch in the ON position.
• Adjust the driver’s seat, accelerator and brake
pedals and outside mirrors to the desired positions using the adjusting \
switches for
each feature.
• Push the SET switch, and within 5 seconds, push the memory switch (1 or 2) for at
least 1 second.
• The indicator light on the memory switch you select will illuminate for approximately
5 seconds.
• The driver’s seat, accelerator and brake pedals and outside mirror positions are no\
w
set to your preferences.
These memorized positions can also be linked to your NISSAN Intelligent Key®.
To link a memorized position to your NISSAN Intelligent Key®, press the unlock button
on the key fob after completing the previous step.
For more information, refer to the “Pre-driving checks and adjustments (section 3)” of your Owner’s Manual.
1
2
1904705_15c_Armada_QRG_072315.indd 77/23/15 8:58 AM
To view detailed instructional videos regarding these and other features, please go to www.nissanownersinfo.mobi.
Page 14 of 28

12
CRUISE CONTROL
The cruise control system enables you to set a
constant cruising speed once the vehicle has
reached 25 mph (40 km/h).
The system will automatically maintain the set
speed until you tap the brake pedal, accelerate,
cancel or turn the system off.
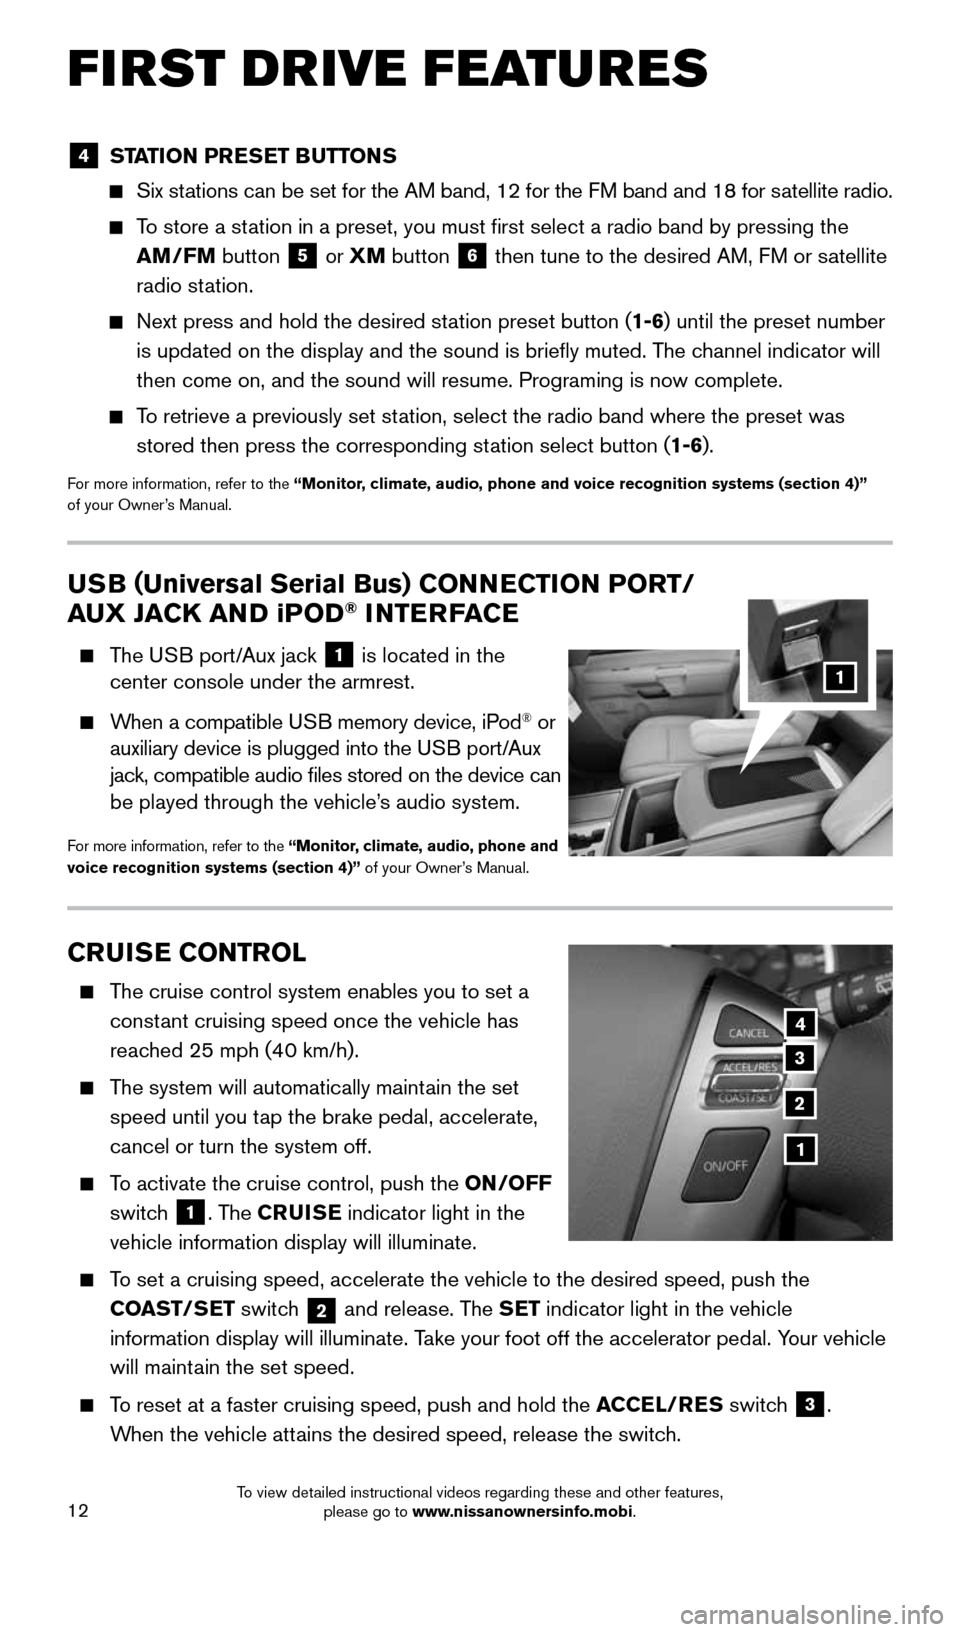
To activate the cruise control, push the ON/OFF
switch
1. The CRUISE indicator light in the
vehicle information display will illuminate.
To set a cruising speed, accelerate the vehicle to the desired speed, pus\
h the
COAST/SET switch
2 and release. The SET indicator light in the vehicle
information display will illuminate. Take your foot off the accelerator pedal. Your vehicle
will maintain the set speed.
To reset at a faster cruising speed, push and hold the ACCEL/RES switch
3.
When the vehicle attains the desired speed, release the switch.
4
3
2
1
USB ( Universal Serial Bus) CONNECTION PORT/
AUX JACK AND iPOD® INTERFACE
The USB port/Aux jack
1 is located in the
center console under the armrest.
When a compatible USB memory device, iPod® or
auxiliary device is plugged into the USB port/Aux
jack, compatible audio files stored on the device can
be played through the vehicle’s audio system.
For more information, refer to the “Monitor, climate, audio, phone and
voice recognition systems (section 4)” of your Owner’s Manual.
1
4 STATION PRESET BUTTONS
Six stations can be set for the AM band, 12 for the FM band and 18 for satellite radio.
To store a station in a preset, you must first select a radio band by pressing the \
AM/FM button
5 or XM
button
6 then tune to the desired AM, FM or satellite
radio station.
Next press and hold the desired station preset button (1-6) until the preset number
is updated on the display and the sound is briefly muted. The channel indicator will
then come on, and the sound will resume. Programing is now complete.
To retrieve a previously set station, select the radio band where the preset was
stored then press the corresponding station select button (1-6).
For more information, refer to the “Monitor, climate, audio, phone and voice recognition systems (section 4)”
of your Owner’s Manual.
FIRST DRIVE FEATURES
1904705_15c_Armada_QRG_072315.indd 127/23/15 8:58 AM
To view detailed instructional videos regarding these and other features, please go to www.nissanownersinfo.mobi.
Page 15 of 28

13
POWER OUTLETS
The power outlets are used for powering
electrical accessories such as cellular
telephones. They are rated at 12 volt,
120W (10A) maximum.
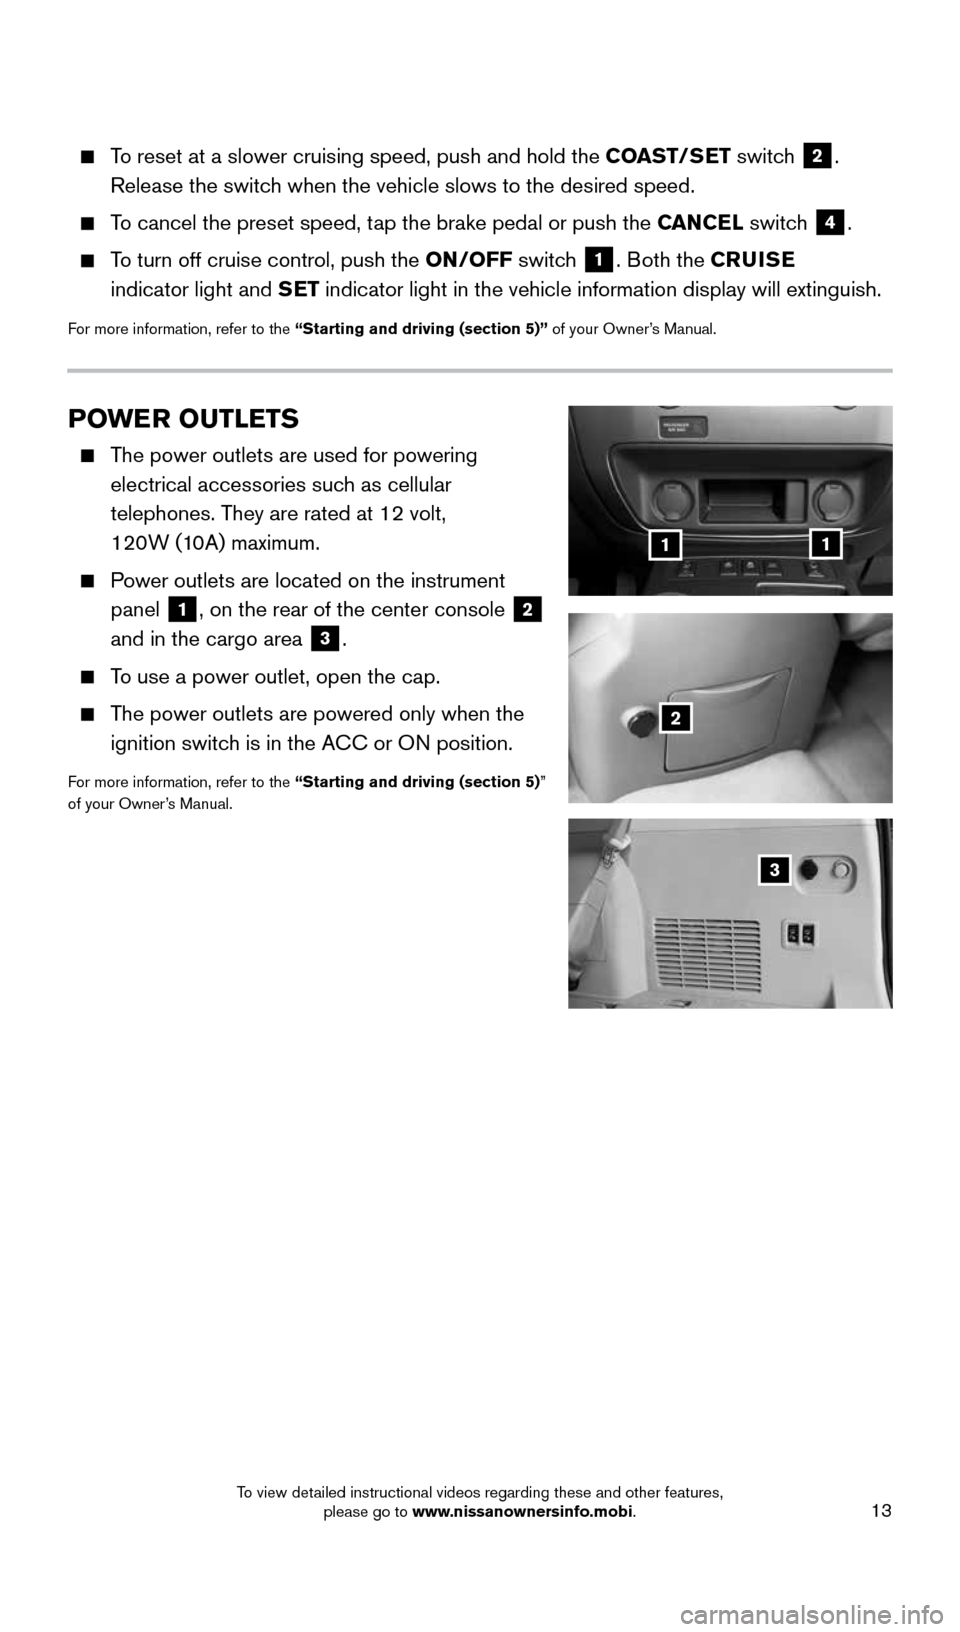
Power outlets are located on the instrument
panel
1, on the rear of the center console 2
and in the cargo area 3.
To use a power outlet, open the cap.
The power outlets are powered only when the
ignition switch is in the ACC or ON position.
For more information, refer to the “Starting and driving (section 5)”
of your Owner’s Manual.
11
2
3
To reset at a slower cruising speed, push and hold the COAST/SET switch
2.
Release the switch when the vehicle slows to the desired speed.
To cancel the preset speed, tap the brake pedal or push the CANCEL switch
4.
To turn off cruise control, push the ON/OFF switch
1. Both the CRUISE
indicator light and SET indicator light in the vehicle information display will extinguish.
For more information, refer to the “Starting and driving (section 5)” of your Owner’s Manual.
1904705_15c_Armada_QRG_072315.indd 137/23/15 8:58 AM
To view detailed instructional videos regarding these and other features, please go to www.nissanownersinfo.mobi.