Page 426 of 510

CAUTION
Be careful not to burn yourself. The engine
oil may be hot.6. Clean and reinstall the drain plug and a new washer. Securely tighten the drain plug with
a wrench. Do not use excessive force.
Drain plug tightening torque: 25 ft-lb (34 N·m)
7. Refill engine with recommended oil through the oil filler opening, then install the oil filler
cap securely.
For additional information, refer to “Recom-
mended fluids/lubricants and capacities” in
the “Technical and consumer information”
section of this manual for drain and refill
capacity.
The drain and refill capacity depends on the
oil temperature and drain time. Use these
specifications for reference only. Always use
the dipstick to determine when the proper
amount of oil is in the engine. 8. Start the engine. Check for leakage around
the drain plug and oil filter. Correct as re-
quired.
9. Turn the engine off and wait more than ten minutes. Check the oil level with the dipstick.
Add engine oil if necessary.
CHANGING ENGINE OIL FILTER
Page 430 of 510
●Keep the battery surface clean and dry.
Clean the battery with a solution of baking
soda and water.
● Make certain the terminal connections are
clean and securely tightened.
● If the vehicle is not to be used for 30 days or
longer, disconnect the negative (-) battery
terminal cable to prevent discharge.
NOTE:
Care should be taken to avoid situations
that can lead to potential battery discharge
and potential no-start conditions such as: 1. Installation or extended use of electronic accessories that consume battery power
when the engine is not running (Phone char-
gers, GPS, DVD players, etc) .
2. Vehicle is not driven regularly and/or only driven short distances. In these cases, the
battery may need to be charged to maintain
battery health.
Page 440 of 510
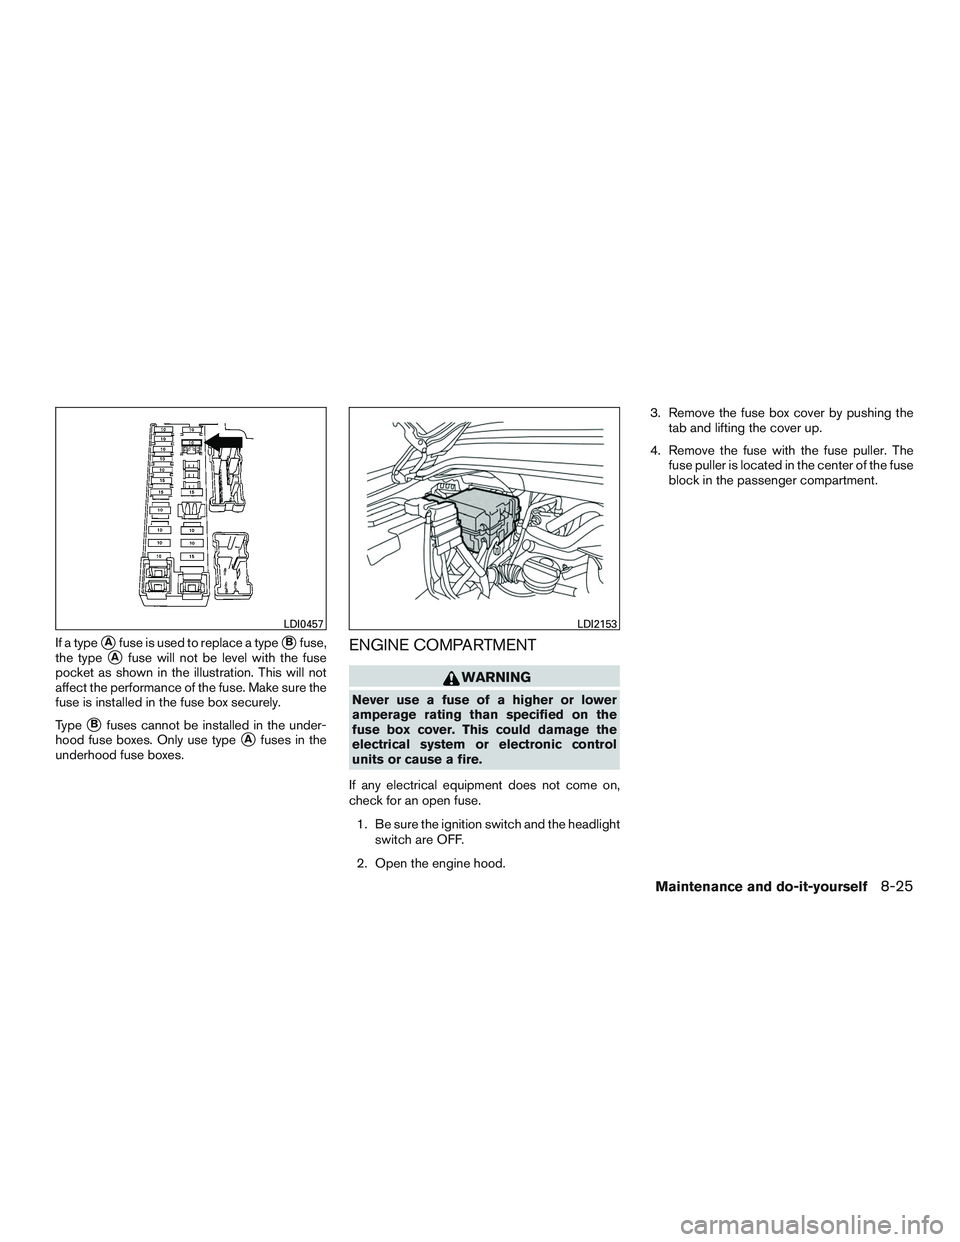
If a type�Afuse is used to replace a type�Bfuse,
the type
�Afuse will not be level with the fuse
pocket as shown in the illustration. This will not
affect the performance of the fuse. Make sure the
fuse is installed in the fuse box securely.
Type
�Bfuses cannot be installed in the under-
hood fuse boxes. Only use type
�Afuses in the
underhood fuse boxes.
ENGINE COMPARTMENT
Page 446 of 510

4. Close the lid securely as illustrated�C�D.
5. Operate the buttons to check the operation.
See a NISSAN dealer if you need assistance for
replacement.
FCC Notice:
For USA:
This device complies with Part 15 of the
FCC Rules. Operation is subject to the fol-
lowing two conditions: (1) This device may
not cause harmful interference, and (2) this
device must accept any interference re-
ceived, including interference that may
cause undesired operation. Note: Changes or modifications not ex-
pressly approved by the party responsible
for compliance could void the user’s au-
thority to operate the equipment.
For Canada:
This device complies with Industry Canada
licence-exempt RSS standard(s) . Opera-
tion is subject to the following two condi-
tions: (1) this device may not cause inter-
ference, and (2) this device must accept any
interference, including interference that
may cause undesired operation of the de-
vice.
HEADLIGHTS
Replacing the halogen headlight bulb
The headlight is a semi-sealed beam type which
uses a replaceable headlight (halogen) bulb. Be-
cause the headlight assembly must be removed
from the vehicle for bulb replacement, see your
NISSAN dealer.
Page 480 of 510

5. Determine the combined weight ofluggage and cargo being loaded on
the vehicle. That weight may not
safely exceed the available cargo and
luggage load capacity calculated in
step 4.
6. If your vehicle will be towing a trailer, load from your trailer will be trans-
ferred to your vehicle. Consult this
manual to determine how this re-
duces the available cargo and lug-
gage load capacity of your vehicle.
Before driving a loaded vehicle, confirm
that you do not exceed the GVWR or the
GAWR for your vehicle. For additional
information, refer to “Measurement of
weights” in this section.
Also check tires for proper inflation pres-
sures. For additional information, refer to
the “Tire and Loading Information label” in
the Maintenance and do-it-yourself” sec-
tion of this manual.
SECURING THE LOAD
There are tie down hooks located in the cargo
area as shown. The tie down hooks can be used
to secure cargo with ropes or other types of
straps.
Do not apply a total load of more than
55 lbs. (245 N) to a single
�Aplastic hook or
44 lbs. (196 N) to a single
�Bplastic hook
when securing cargo.
Do not apply a total load of more than
110 lbs. (490 N) to a single metal floor
tie-down hook when securing cargo.
Page 486 of 510
TOWING SAFETY
Trailer hitch
Your vehicle may be equipped with an optional
trailer tow package. The trailer tow package in-
cludes a receiver-type frame mounted hitch. This
hitch is rated for the maximum towing capacity of
this vehicle when the proper towing equipment is
used. Choose a proper ball mount and hitch ball
that is rated for the trailer to be towed. Genuine
NISSAN ball mounts and hitch balls are available
from a NISSAN dealer.
If your vehicle is not equipped with the optional
trailer tow package, check the towing capacity of
your bumper hitch or receiver-type frame
mounted hitch. Choose a proper hitch for your
vehicle and trailer. A Genuine NISSAN trailer
hitch is available from a NISSAN dealer. Make
sure the trailer hitch is securely attached to the
vehicle to help avoid personal injury or property
damage due to sway caused by crosswinds,
rough road surfaces or passing trucks.
Page 488 of 510
 . Suitable genu-
ine NISSAN hitches, ball mounts and
hitch balls for pickup trucks and s")
CAUTION
●Special hitches which include frame re-
inforcements are required for towing
above 2,000 lb (907 kg) . Suitable genu-
ine NISSAN hitches, ball mounts and
hitch balls for pickup trucks and sport
utility vehicles are available at a
NISSAN dealer.
● The hitch should not be attached to or
affect the operation of the impact-
absorbing bumper.
● Do not use axle-mounted hitches.
● Do not modify the vehicle exhaust sys-
tem, brake system, etc. to install a
trailer hitch.
● To reduce the possibility of additional
damage if your vehicle is struck from
the rear, where practical, remove the
receiver when not in use.
● Regularly check that all trailer hitch
mounting bolts are securely mounted.
Tire pressures
● When towing a trailer, inflate the ve-
hicle tires to the recommended cold
tire pressure indicated on the Tire
and Loading Information label.
● Trailer tire condition, size, load rating
and proper inflation pressure should
be in accordance with the trailer and
tire manufacturer’s specifications.
Safety chains
Always use suitable safety chains between your
vehicle and the trailer. The safety chains should
be crossed and should be attached to the hitch,
not to the vehicle bumper or axle. The safety
chains can be attached to the bumper if the hitch
ball is mounted to the bumper. Be sure to leave
enough slack in the chains to permit turning
corners.
Trailer lights
Page 503 of 510

iPod®Player ...............4-71,4-74
ISOFIX child restraints.............1-34
J
Jump starting ...............6-10,8-16
K
Key.........................3-2
Key fob battery replacement .......8-28,8-29
Keyless entry With Intelligent Key system
(See Intelligent Key system) .........3-17
Without Intelligent Key system
(See remote keyless entry system) ......3-8
Keyless entry system
(See remote keyless entry system) ........3-7
Keys NISSAN Intelligent Key® .......3-2,3-12
L
Labels Air conditioner specification label .....9-13
C.M.V.S.S. certification label ........9-12
Emissioncontrolinformationlabel.....9-12
Engine serial number ............9-12
F.M.V.S.S. certification label .........9-12
Tire and Loading Information label .....9-13
Vehicle identification number (VIN) .....9-11
Vehicle identification number (VIN) plate . .9-11
Warning labels (for SRS) ..........1-72LATCH (Lower Anchors and Tethers for CHildren)
System
......................1-34
License plate Installing the license plate ..........9-13
Liftgate ......................3-23
Liftgate release ..................3-27
Light Air bag warning light .........1-72,2-18
Brake light (See stop light) .........8-33
Bulb check/instrument panel ........2-13
Bulbreplacement..............8-33
Charge warning light ............2-15
Foglights...................8-32
Foglightswitch ...............2-38
Headlight and turn signal switch ......2-34
Headlight control switch ..........2-35
Headlights..................8-31
Interiorlight..................2-62
Lightbulbs..................8-31
Low tire pressure warning light .......2-16
Low windshield-washer fluid
warning light ..............2-17,2-27
Passenger air bag and status light .....1-64
Personal lights ................2-63
Security indicator light ............2-20
Warning/indicator lights and
audiblereminders.......2-12,2-13,2-18
Lights.......................8-31 Maplights ..................2-63
Lock Child safety rear door lock ..........3-7
Door locks ...................3-5
Gloveboxlock................2-47
Liftgate release ................3-27
Power door locks ...............3-6
Loose fuel cap warning ..........2-28,3-28 Low fuel warning light
.......2-16,2-17,2-27
Low tire pressure warning light .........2-16
Low windshield-washer fluid warning
light ....................2-17,2-27
Luggage hook ..................2-53
Luggage rack (see roof rack) ..........2-55
Luggage (See vehicle loading information) . .9-14
Luggage storage
(see vehicle loading information) ........2-52
M
Maintenance General maintenance .............8-2
Insidethevehicle...............8-3
Maintenance precautions ...........8-5
Outside the vehicle ..............
8-2
Seat belt maintenance ............1-29
Under the hood and vehicle .........8-4
Maintenance requirements ............8-2
Malfunction indicator light ............2-19
Manual vent windows ..............2-60
Maplights ....................2-63
Mappocket....................2-45
Memory Seat ...............3-36,3-36
Meters and gauges ................2-3
Instrument brightness control ........2-37
Mirror Automatic anti-glare inside mirror ......3-33
Outside mirror control ............3-34
Outside mirrors ...............3-34
Rearview ...................3-33
Vanity mirror .................3-32
Mirrors ......................3-33
Moonroof .....................2-60
10-4