Page 61 of 510
5. Check to make sure the child restraint isproperly secured prior to each use. If the
child restraint is loose, repeat steps 1
through 4.
REAR-FACING CHILD RESTRAINT
INSTALLATION USING THE SEAT
BELTS
Page 67 of 510
WARNING
Child restraint anchorages are designed
to withstand only those loads imposed by
correctly fitted child restraints. Under no
circumstances are they to be used to at-
tach adult seat belts, or other items or
equipment to the vehicle. Doing so could
damage the child restraint anchorages.
The child restraint will not be properly
installed using the damaged anchorage,
and a child could be seriously injured or
killed in a collision.
FORWARD-FACING CHILD
RESTRAINT INSTALLATION USING
THE SEAT BELTS
Page 72 of 510
WARNING
Child restraint anchorages are designed
to withstand only those loads imposed by
correctly fitted child restraints. Under no
circumstances are they to be used to at-
tach adult seat belts, or other items or
equipment to the vehicle. Doing so could
damage the child restraint anchorages.
The child restraint will not be properly
installed using the damaged anchorage,
and a child could be seriously injured or
killed in a collision.
Installing top tether strap (3rd row
bench seat)
1. Top tether strap
2. Anchor point
Page 73 of 510
WARNING
Child restraint anchorages are designed
to withstand only those loads imposed by
correctly fitted child restraints. Under no
circumstances are they to be used to at-
tach adult seat belts, or other items or
equipment to the vehicle. Doing so could
damage the child restraint anchorages.
The child restraint will not be properly
installed using the damaged anchorage,
and a child could be seriously injured or
killed in a collision.
BOOSTER SEATS
For additional information on installing a booster
seat in your vehicle, follow the instructions out-
lined in this section.
Precautions on booster seats
Page 74 of 510

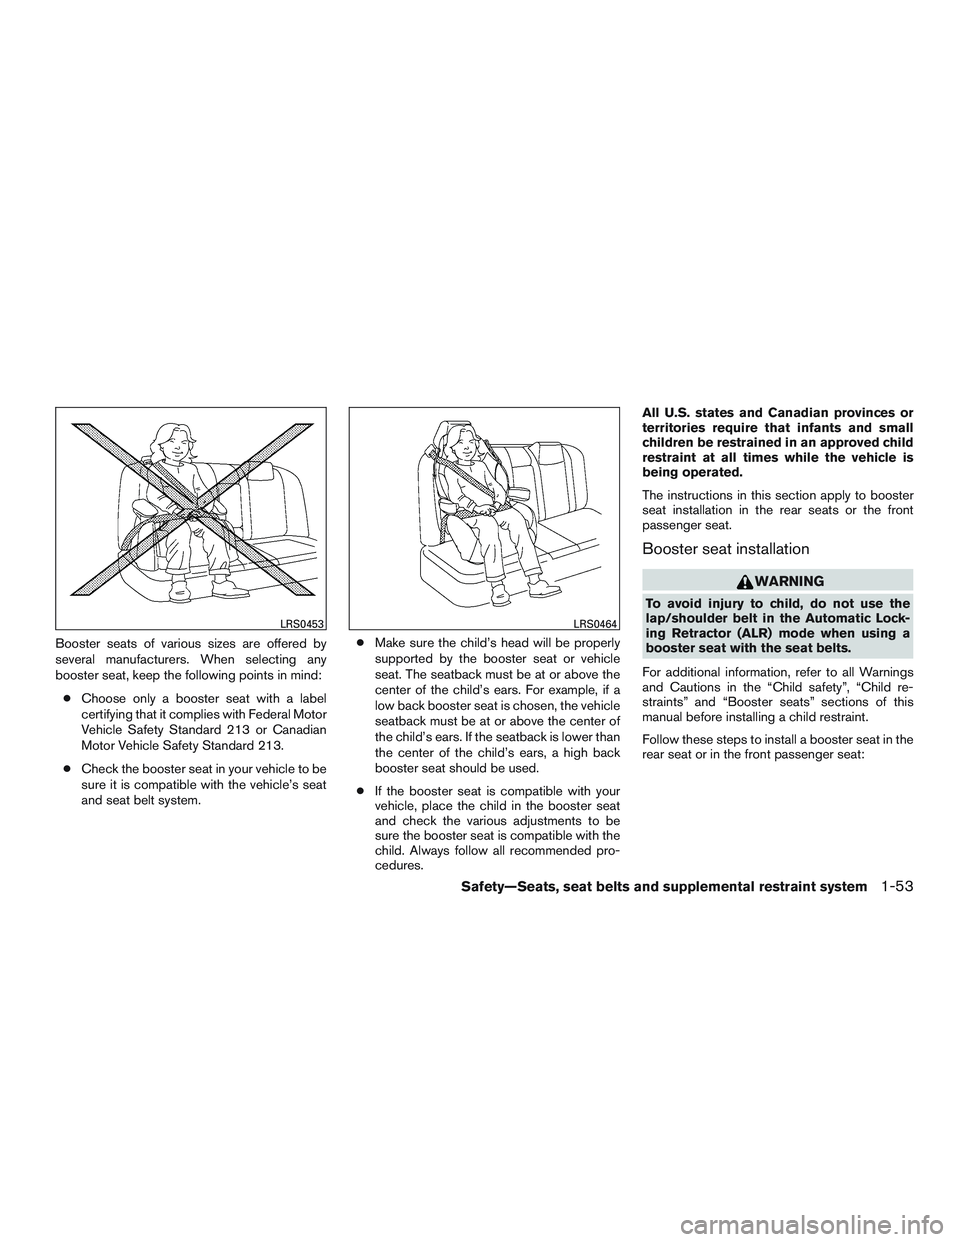
Booster seats of various sizes are offered by
several manufacturers. When selecting any
booster seat, keep the following points in mind:● Choose only a booster seat with a label
certifying that it complies with Federal Motor
Vehicle Safety Standard 213 or Canadian
Motor Vehicle Safety Standard 213.
● Check the booster seat in your vehicle to be
sure it is compatible with the vehicle’s seat
and seat belt system. ●
Make sure the child’s head will be properly
supported by the booster seat or vehicle
seat. The seatback must be at or above the
center of the child’s ears. For example, if a
low back booster seat is chosen, the vehicle
seatback must be at or above the center of
the child’s ears. If the seatback is lower than
the center of the child’s ears, a high back
booster seat should be used.
● If the booster seat is compatible with your
vehicle, place the child in the booster seat
and check the various adjustments to be
sure the booster seat is compatible with the
child. Always follow all recommended pro-
cedures. All U.S. states and Canadian provinces or
territories require that infants and small
children be restrained in an approved child
restraint at all times while the vehicle is
being operated.
The instructions in this section apply to booster
seat installation in the rear seats or the front
passenger seat.
Booster seat installation
Page 80 of 510
WARNING
●Even with the NISSAN Advanced Air
Bag System, never install a rear-facing
child restraint in the front seat. An in-
flating front air bag could seriously in-
jure or kill your child. For additional
information, refer to “Child restraints”
in this section.
Page 89 of 510
If the vehicle is moving, please come to a stop
when it is safe to do so. Check and correct any of
the above conditions. Restart the vehicle and
wait 1 minute.
NOTE:
A system check will be performed during
which the front passenger air bag status
light will remain lit for about 7 seconds
initially.
If the light is still OFF after this, the small adult,
child or child restraint should be repositioned in
the rear seat and the vehicle should be checked
as soon as possible. It is recommended you visit
a NISSAN dealer for this service.
Other supplemental front-impact air bag
precautions
Page 501 of 510

Bulb replacement................8-33
C
Capacities and recommended fuel/lubricants . .9-2
Captain’s chair adjustment (2nd row) . . .1-6, 1-7
Cargolight....................2-64
Cargo(Seevehicleloadinginformation)....9-14
Car phone or CB radio .............4-108
CD care and cleaning ..............4-80
CD player (See audio system) ......4-53,4-59
Check tire pressure ...............2-28
Child restraints .......1-30,1-31,1-32,1-34
LATCH (Lower Anchors and Tethers for
CHildren) System ..............1-34
Precautions on child
restraints.........1-32,1-40,1-46,1-52
Top tether strap anchor point locations . .1-38
Child restraint with top tether strap .......1-37
Child safety rear door lock ............3-7
Chimes, audible reminders ...........2-20
Cleaningexteriorandinterior........7-2,7-4
Clock.......................4-50
Clock setting
(models with Navigation System) ........4-16
Clock setting
(models without Navigation System) .......4-8
C.M.V.S.S. certification label ..........9-12
Cold weather driving ...............5-37
Compact disc (CD) player ........4-53,4-59
Consolebox................2-46,2-51
Control panel buttons ..............4-10
Brightness/contrast button ......4-10,4-19
Enterbutton...............4-4,4-10
Without navigation system ..........4-4Controls
Audio controls (steering wheel) .......4-81
Heater and air conditioner controls .....4-29
Rear seat air conditioner ..........4-31
Coolant Capacities and recommended
fuel/lubricants .................9-2
Changingenginecoolant...........8-8
Checking engine coolant level ........8-8
Engine coolant temperature gauge .....2-5
Corrosion protection ...............7-5
Cruisecontrol ...........5-20,5-20,5-20
Cupholders...................2-49
Curtainside-impactandrolloverairbag....1-69
D
Daytime running light system (Canada only) . .2-36
Defroster switch Rear window and outside mirror defroster
switch.....................2-34
Digital Versatile Disc (DVD) player .......4-63
Digital video disc DVD ..............4-83
Dimensionsandweights ............9-10
Dimmer switch for instrument panel ......2-37
Display......................2-21
Display controls
(seecontrolpanelbuttons) ........4-4,4-10
Door locks .....................3-5
Drive belt .....................8-17
Drive positioner, Automatic ........3-36,3-36
Driving Cold weather driving .............5-37
Driving with automatic transmission ....5-15
Precautions when starting and driving ....5-2Driving the vehicle
................5-14
E
Economy-fuel..................5-23
Emission control information label .......9-12
Emission control system warranty .......9-32
Engine Before starting the engine ..........5-13
Blockheater.................5-39
Capacities and recommended
fuel/lubricants.................9-2
Changing engine coolant ...........8-8
Changingengineoil.............8-10
Changing engine oil filter ..........8-11
Checking engine coolant level ........8-8
Checking engine oil level ...........8-9
Engine compartment check locations ....
8-6
Engine coolant temperature gauge .....2-5
Engine cooling system ............8-7
Engineoil ...................8-9
Engine oil and oil filter recommendation . . .9-7
Engineoilpressuregauge..........2-7
Engine oil viscosity ..............9-8
Engine serial number ............9-12
Engine specifications .............9-9
Starting the engine .............5-13
Engine coolant temperature gauge .......2-5
Engine oil pressure gauge ............2-7
Engine oil pressure low/engine coolant
temperature high warning light .........2-15
Enter button .................4-4,4-10
Event Data recorders ..............9-34
Exhaust gas (Carbon monoxide) .........5-2
Explanation of maintenance items ........8-2
10-2