Page 121 of 441
 System/Lane Departure Warning
(LDW) System” in the “Starting and driving” sec-
ti")
twice and the BSW indicator light will flash. For
additional information, refer to “Blind Spot Warn-
ing (BSW) System/Lane Departure Warning
(LDW) System” in the “Starting and driving” sec-
tion.
The LDW system will sound a warning chime and
the LDW indicator light (orange) in the vehicle
information display blinks to alert the driver if the
vehicle is traveling close to either the left or the
right of a traveling lane when detected by the
camera unit. For additional information, refer to
“Blind Spot Warning (BSW) System/Lane De-
parture Warning (LDW) System” in the “Starting
and driving” section.The vehicle should be driven with the VDC sys-
tem on for most driving conditions.
If the vehicle is stuck in mud or snow, the VDC
system reduces the engine output to reduce
wheel spin. The engine speed will be reduced
even if the accelerator is depressed to the floor. If
maximum engine power is needed to free a stuck
vehicle, turn the VDC system off.
To turn off the VDC system, push the VDC OFF
switch. The
indicator will come on.Push the VDC OFF switch again or restart the
engine to turn on the system. For additional infor-
mation, refer to “Vehicle Dynamic Control (VDC)
system” in the “Starting and driving” section of
this manual.
LIC2315
VEHICLE DYNAMIC CONTROL (VDC)
OFF SWITCH
Instruments and controls2-39
Page 170 of 441

LOOSE FUEL CAP warning
The LOOSE FUEL CAP warning appears in the
vehicle information display when the fuel-filler
cap is not tightened correctly after the vehicle has
been refueled. It may take a few driving trips for
the message to be displayed. To turn off the
warning, perform the following:1. Remove and install the fuel-filler cap as soon as possible. For additional information, refer
to “Fuel-filler cap” in this section.
2. Tighten the fuel-filler cap until it clicks. 3. Press the
next button�Aon the steer-
ing wheel for about 1 second to turn off the
LOOSE FUEL CAP warning
�Bafter tight-
ening the fuel-filler cap.
WARNING
● Do not adjust the steering wheel while
driving. You could lose control of your
vehicle and cause an accident.
● Do not adjust the steering wheel any
closer to you than is necessary for
proper steering operation and comfort.
The driver’s air bag inflates with great
force. If you are unrestrained, leaning
forward, sitting sideways or out of posi-
tion in any way, you are at greater risk of
injury or death in a crash. You may also
receive serious or fatal injuries from the
air bag if you are up against it when it
inflates. Always sit back against the
seatback and as far away as practical
from the steering wheel. Always use the
seat belts.
LPD2090
TILT/TELESCOPIC STEERING
3-34Pre-driving checks and adjustments
Page 171 of 441
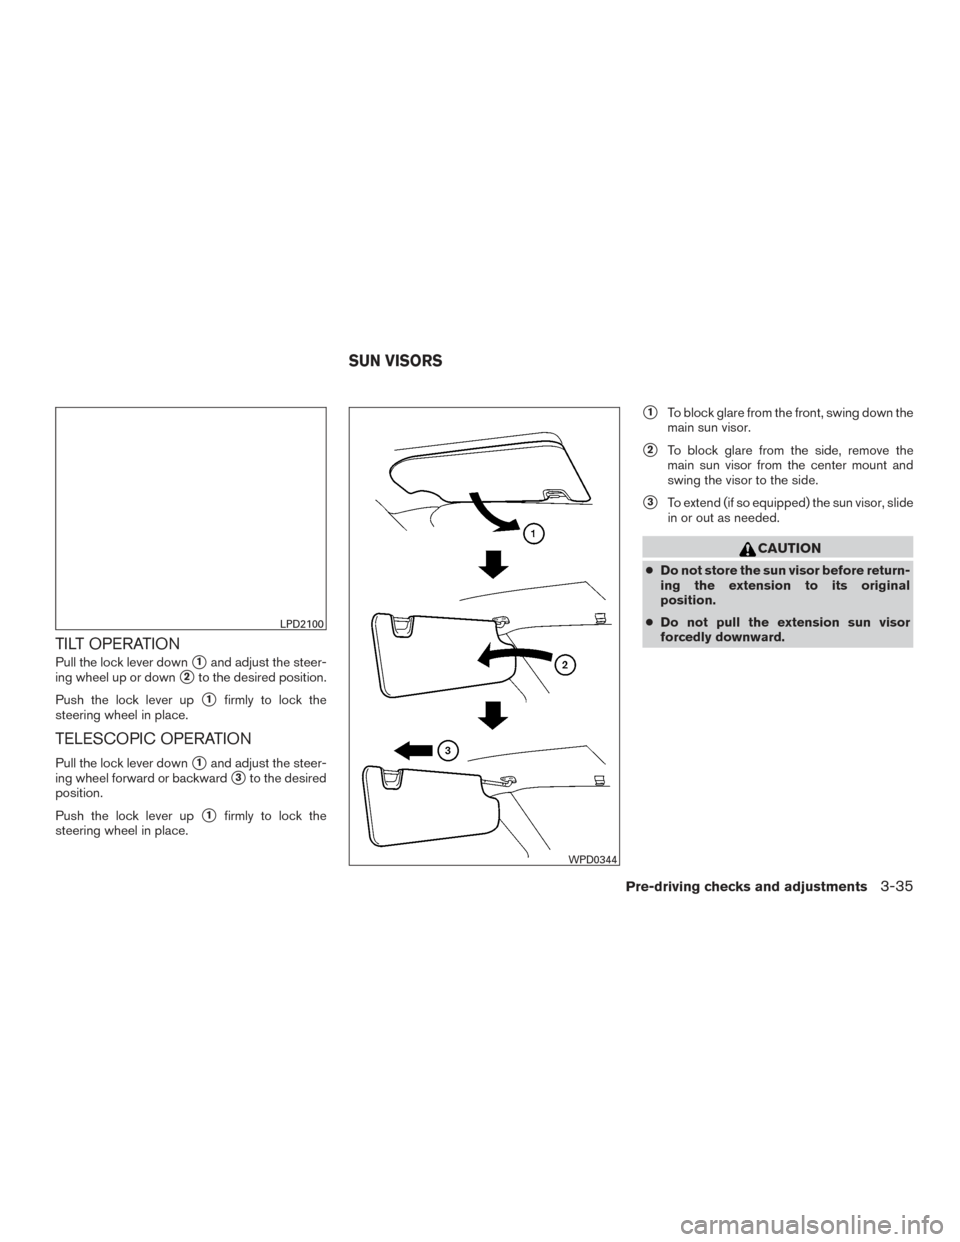
TILT OPERATION
Pull the lock lever down�1and adjust the steer-
ing wheel up or down
�2to the desired position.
Push the lock lever up
�1firmly to lock the
steering wheel in place.
TELESCOPIC OPERATION
Pull the lock lever down�1and adjust the steer-
ing wheel forward or backward
�3to the desired
position.
Push the lock lever up
�1firmly to lock the
steering wheel in place.
�1To block glare from the front, swing down the
main sun visor.
�2To block glare from the side, remove the
main sun visor from the center mount and
swing the visor to the side.
�3To extend (if so equipped) the sun visor, slide
in or out as needed.
CAUTION
● Do not store the sun visor before return-
ing the extension to its original
position.
● Do not pull the extension sun visor
forcedly downward.
LPD2100
WPD0344
SUN VISORS
Pre-driving checks and adjustments3-35
Page 176 of 441

player (Type B) (if so equipped).................4-62
USB (Universal Serial Bus) connection port
(models without Navigation System)
(if so equipped) ............")
FM/AM/SAT radio with compact disc (CD)
player (Type B) (if so equipped).................4-62
USB (Universal Serial Bus) connection port
(models without Navigation System)
(if so equipped) ............................... 4-68
USB (Universal Serial Bus) connection port
(models with Navigation System)
(if so equipped) ............................... 4-70
iPod®* player operation without Navigation
System (if so equipped) ........................ 4-73
iPod®* player operation with Navigation
System (if so equipped) ........................ 4-75
Bluetooth® streaming audio without
Navigation System (Type A) (if so equipped) ......4-78
Bluetooth® streaming audio without
Navigation System (Type B) (if so equipped) ......4-79
Bluetooth® streaming audio with Navigation
System ....................................... 4-79
CD care and cleaning .......................... 4-81
Steering wheel switch for audio control ..........4-81
Antenna ...................................... 4-82
NissanConnect
SMMobile Apps (if so equipped) .....4-83
Registering with NissanConnectSMMobile
Apps ......................................... 4-83Connect Phone
............................... 4-83
Application Download .......................... 4-84
Car phone or CB radio ............................ 4-84
Bluetooth® Hands-Free Phone System without
Navigation System (Type A) (if so equipped) .........4-85
Regulatory Information ......................... 4-86
Using the system .............................. 4-87
Control buttons ............................... 4-89
Getting started ................................ 4-89
List of voice commands ........................ 4-91
Voice Adaptation (VA) mode ....................4-96
Manual control . . .............................. 4-97
Troubleshooting guide ......................... 4-98
Bluetooth® Hands-Free Phone System without
Navigation System (Type B) (if so equipped) .........4-99
Regulatory Information ........................ 4-100
Using the system ............................. 4-101
Control buttons .............................. 4-102
Connecting procedure ........................ 4-103
Voice commands ............................. 4-104
Making a call . ................................ 4-105
Receiving a call .............................. 4-106
During a call ................................. 4-106
Page 191 of 441

Rear view
Guiding lines which indicate the vehicle width
and distances to objects with reference to the
bumper line
�Aare displayed on the monitor.
Distance guide lines:
Indicate distances from the bumper. ● Red line
�1: approx. 1.5 ft (0.5 m)
● Yellow line
�2: approx. 3 ft (1 m)
● Green line
�3: approx. 7 ft (2 m)
● Green line
�4:approx.10 ft (3 m) Vehicle width guidelines
�5:
Indicate the vehicle width when backing up
Predictive course lines
�6(Rear view only) :
Indicates the predictive course when backing up.
The predictive course lines will be displayed on
the monitor when the shift lever is in the R (Re-
verse) position and the steering wheel is turned.
The predictive course lines will move depending
on how much the steering wheel is turned and
will not be displayed while the steering wheel is in
the neutral position.
Rear-wide view
The rear-wide view displays an approximately
180–degree area. The predictive course lines are
not displayed on the rear-wide view.
Distance guide lines:
Indicates distance from the bumper. ● Red line
�1: approx. 1.5 ft. (0.5 m)
● Yellow line
�2: approx. 3 ft. (1 m )
● Green line
�3: approx. 7 ft. (2 m )
● Green line
�4: approx. 10 ft. (3 m)
LHA1196LHA2749
Monitor, climate, audio, phone and voice recognition systems4-17
Page 192 of 441

Vehicle width guide lines�5:
Indicates the vehicle width when backing up.
HOW TO PARK WITH PREDICTED
COURSE LINES
WARNING
● Always turn and check that it is safe to
do so before backing up. Always back
up slowly.
● Use the displayed lines as a reference.
The lines are highly affected by the
number of occupants, fuel level, vehicle
position, road conditions and road
grade.
● If the tires are replaced with different
sized tires, the predicted course lines
may be displayed incorrectly.
● On a snow-covered or slippery road,
there may be a difference between the
predicted course line and the actual
course line.
● If the battery is disconnected or be-
comes discharged, the predicted course
lines may be displayed incorrectly. If
this occurs, please perform the follow-
ing procedures: – Turn the steering wheel from lock to
lock while the engine is running.
– Drive the vehicle on a straight road for more than 5 minutes.
● When the steering wheel is turned with
the ignition switch in the ACC position,
the predicted course lines may be dis-
played incorrectly.
● The distance guide line and the vehicle
width line should be used as a reference
only when the vehicle is on a level
paved surface. The distance viewed on
the monitor is for reference only and
may be different than the actual dis-
tance between the vehicle and dis-
played objects.
● When backing up the vehicle up a hill,
objects viewed in the monitor are fur-
ther than they appear. When backing up
the vehicle down a hill, objects viewed
in the monitor are closer than they ap-
pear. Use the inside mirror or glance
over your shoulder to properly judge
distances to other objects.
The vehicle width and predicted course
lines are wider than the actual width and
course. 1. Visually check that the parking space is safe
before parking your vehicle.
2. The rear view of the vehicle is displayed on the screen
�Awhen the shift lever is moved
to the R (Reverse) position.
LHA1197
4-18Monitor, climate, audio, phone and voice recognition systems
Page 193 of 441
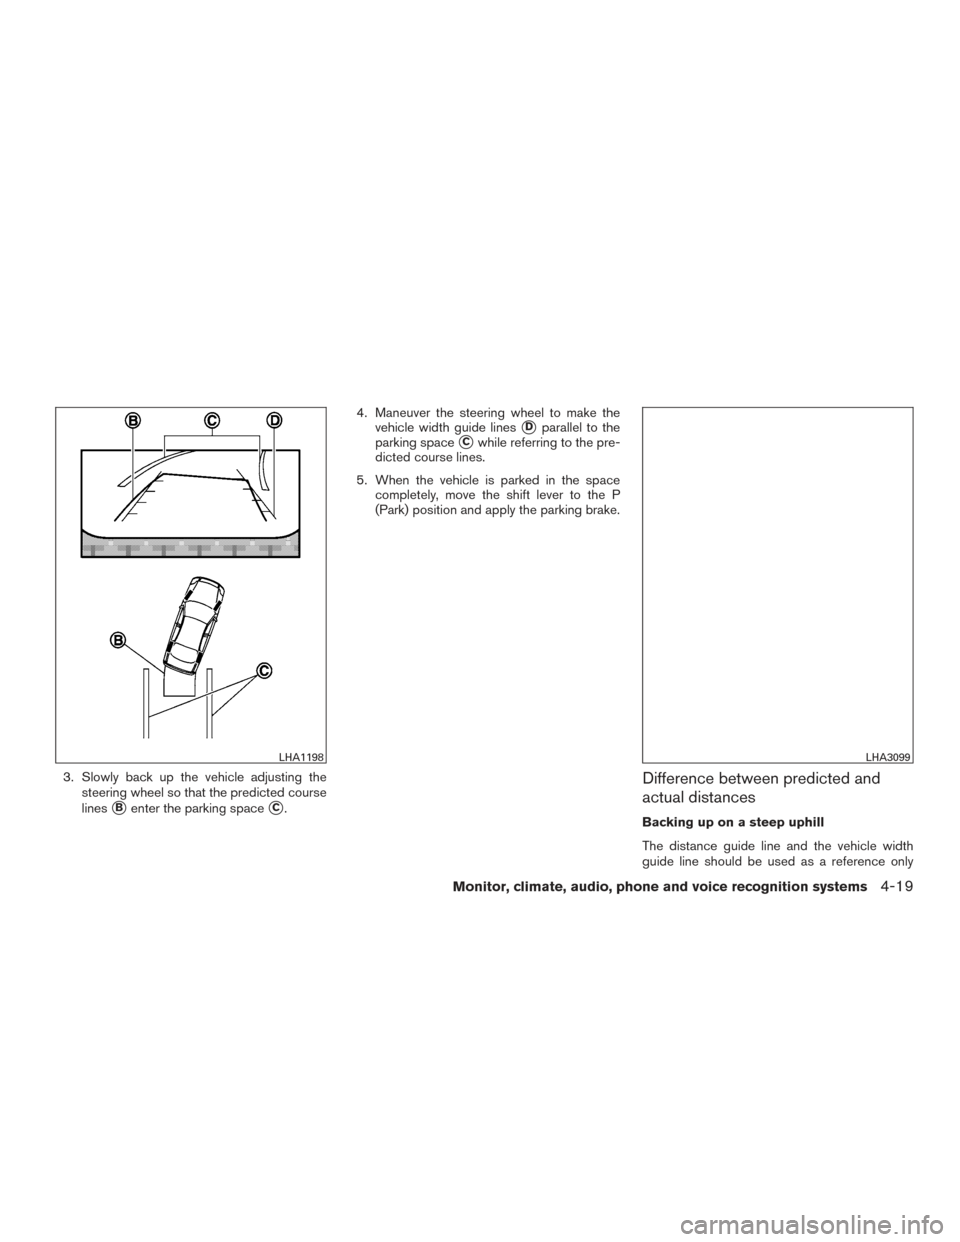
3. Slowly back up the vehicle adjusting thesteering wheel so that the predicted course
lines
�Benter the parking space�C. 4. Maneuver the steering wheel to make the
vehicle width guide lines
�Dparallel to the
parking space
�Cwhile referring to the pre-
dicted course lines.
5. When the vehicle is parked in the space completely, move the shift lever to the P
(Park) position and apply the parking brake.
Difference between predicted and
actual distances
Backing up on a steep uphill
The distance guide line and the vehicle width
guide line should be used as a reference only
LHA1198LHA3099
Monitor, climate, audio, phone and voice recognition systems4-19
Page 255 of 441
CD CARE AND CLEANING
●Handle a CD by its edges. Do not bend the
disc. Never touch the surface of the disc.
● Always place the discs in the storage case
when they are not being used.
● To clean a disc, wipe the surface from the
center to the outer edge using a clean, soft
cloth. Do not wipe the disc using a circular
motion.
● Do not use a conventional record cleaner or
alcohol intended for industrial use. ●
A new disc may be rough on the inner and
outer edges. Remove the rough edges by
rubbing the inner and outer edges with the
side of a pen or pencil as illustrated.
1. SOURCE button
2.
Menu control switch/ENTER
button
3.
(back) switch
4. Volume control switch
STEERING WHEEL SWITCH FOR
AUDIO CONTROL
SOURCE select switch
With the ignition switch in the ACC or ON posi-
tion, push the SOURCE switch to turn the audio
system on.
LHA0049LHA2266
Monitor, climate, audio, phone and voice recognition systems4-81