2015 MITSUBISHI OUTLANDER SPORT steering
[x] Cancel search: steeringPage 199 of 384
Bluetooth® 2.0 interface (if so equipped) 5-136 Features and controls
5
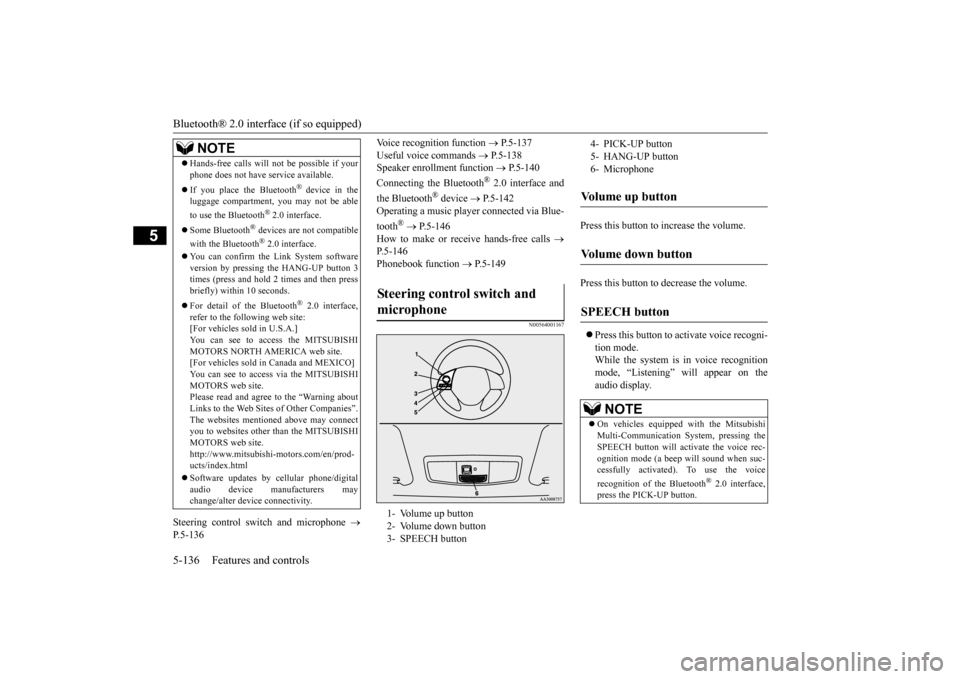
Steering control switch and microphone
P.5-136
Voice recognition function
P.5-137
Useful voice commands
P.5-138
Speaker enrollment function
P.5-140
Connecting the Bluetooth
® 2.0 interface and
the Bluetooth
® device
P.5-142
Operating a music player connected via Blue- tooth
® P.5-146
How to make or receive hands-free calls
P.5-146 Phonebook function
P.5-149
N00564001167
Press this button to increase the volume. Press this button to decrease the volume. Press this button to activate voice recogni- tion mode. While the system is in voice recognition mode, “Listening” will appear on theaudio display.
Hands-free calls will not be possible if your phone does not have service available. If you place the Bluetooth
® device in the
luggage compartment, you may not be able to use the Bluetooth
® 2.0 interface.
Some Bluetooth
® devices are not compatible
with the Bluetooth
® 2.0 interface.
You can confirm the Link System software version by pressing the HANG-UP button 3 times (press and hold 2 times and then pressbriefly) within 10 seconds. For detail of the Bluetooth
® 2.0 interface,
refer to the following web site: [For vehicles sold in U.S.A.]You can see to access the MITSUBISHI MOTORS NORTH AMERICA web site. [For vehicles sold in Canada and MEXICO]You can see to access via the MITSUBISHI MOTORS web site. Please read and agree to the “Warning aboutLinks to the Web Sites of Other Companies”. The websites mentioned above may connect you to websites other than the MITSUBISHIMOTORS web site. http://www.mitsubishi-motors.com/en/prod- ucts/index.html Software updates by cellular phone/digital audio device manufacturers maychange/alter device connectivity.NOTE
Steering control switch and microphone 1- Volume up button 2- Volume down button3- SPEECH button
4- PICK-UP button5- HANG-UP button6- MicrophoneVolume up button Volume down button SPEECH button
NOTE
On vehicles equipped with the Mitsubishi Multi-Communication System, pressing the SPEECH button will activate the voice rec- ognition mode (a beep will sound when suc- cessfully activated). To use the voice recognition of the Bluetooth
® 2.0 interface,
press the PICK-UP button.
BK0206700US.book
136 ページ 2014年3月25日 火曜日 午後4時42分
Page 212 of 384
Bluetooth® 2.0 interface (if so equipped)
Features and controls 5-149
5
“
N00565801058
If an incoming phone call is received whilethe ignition switch is in the “ACC” or “ON”position, the audio system will be automati- cally turned on and switched to the incoming call, even when the audio system was origi-nally off. The voice guide announcement for the incoming call will be emitted from the frontpassenger’s seat speaker. If the CD player or radio was playing when the incoming call was received, the audio sys-tem will mute the sound from the CD player or radio and emit only the incoming call. To receive the call, press the PICK-UP buttonon the steering wheel control switch. When the call is over,
the audio system will
return to its previous state.
N00565900010
At any time during a call, you can mute thevehicle microphone. Pressing the SPEECH button and then saying “Mute” during a call will turn ON the mute function and mute the microphone.Saying “Mute off” in the same way will turn off the mute function and cancel the mute on the microphone.
N00566600014
The Bluetooth
® 2.0 interface can switch
between hands-free mode (hands-free calls) and private mode (calls using cellular phone). If you press the SPEECH button and say“Transfer call” during a hands-free call, you can stop the hands-free mode and talk in pri- vate mode. To return to hands-free mode, press the SPEECH button again and say “Transfer call.”
N00566000018
The Bluetooth
® 2.0 interface has 2 types of
unique phonebooks that are different from thephonebook stored in the cellular phone. They
are the vehicle phonebook and the mobile phonebook. These phonebooks are used to register tele- phone numbers and make calls to desirednumbers via voice recognition function.
N00566101146
This phonebook is us
ed when making calls
with the voice recognition function. Up to 32 names can be registered in the vehi- cle phonebook per language.Also, each entry has 4 locations associated with: home, work, mobile and other. You can register one telephone number for each loca-tion. You can register a desired name as a name for any phonebook entry registered in the vehicle phonebook.Names and telephone numbers can be changed later on. The vehicle phonebook can be used with all paired cellular phones.
Receiving calls
Mute function Switching between hands-free mode and private mode Phonebook function
NOTE
Disconnecting the battery cable will not delete information registered in the phone- book.
Vehicle phonebook
BK0206700US.book
149 ページ 2014年3月25日 火曜日 午後4時42分
Page 237 of 384
Vehicle preparation before driving 6-4 Driving safety
6
N00629000669
For a safer and more enjoyable trip, always check for the following: Before starting the vehicle, make certain that you and all passengers are seated and wearing their seat belts properly (with children in the rear seat, in appropriaterestraints), and that all the doors and lift- gate are locked. Move the driver’s seat as far backward as possible, while still keeping good visibil- ity, and good control of the steering wheel, brakes, accelerator, and controls.Check the instrument panel indicators and multi-information display for any possible problem. In the same way, the front passenger seat should also be moved as far back as possi- ble. Make sure that infants and small children are properly restrained in accordance with all laws and regulations.
Check these by selecting the defroster mode, and set the blower switch on high. You shouldbe able to feel the air blowing against the windshield. Refer to “Defrosting or defogging (wind-shield, door windows)” on page 7-8, 7-13, 7-19, 7-24. Check all the tires for heavy tread wear or uneven wear patterns. Look for stones, nails, glass, or other objects stuck in the tread. Look for any tread cuts or sidewall cracks. Checkthe wheel nuts for tightness, and the tires (including spare tire) for proper pressure. Replace your tires before they are heavilyworn out. As your vehicle is equipped with a tire pres- sure monitoring system, there is a risk ofdamage to the tire inflation pressure sensors when the tire is replaced on the rim. Tire replacement should, therefore, be performedonly by an authorized Mitsubishi Motors dealer.
Have someone watch while you turn all the exterior lights on and off. Also check the turnsignal indicators and high-beam indicators on the instrument panel. Check the ground under the vehicle after parking overnight, for fuel, water, oil, or other leaks. Make sure all the fluid levels are correct. Also, if you can smell fuel, you needto find out why immediately and have it fixed.
N00629200094
Even this vehicle’s safety equipment, andyour safest driving, cannot guarantee that you can avoid an accident or injury. However, ifyou give extra attention to the following areas, you can better protect yourself and your passengers: Drive defensively. Be aware of traffic, road and weather conditions. Leave plenty of stopping distance between your vehicle and the vehicle ahead.
Vehicle preparation before driving Seat belts and seats
Defrosters Tires
Lights Fluid leaks Safe driving techniques
BK0206700US.bo
ok 4 ページ 2014年3月25日 火曜日 午後4時42分
Page 240 of 384
Loading information Driving safety 6-7
6
More effort could be required to turn the steering wheel.Refer to “Electric power steering system (EPS)” on page 5-67. Always remove the key from the ignition switch and lock all doors and the liftgate when leaving the vehicle unattended.Always try to park your vehicle in a well lit area.
N00629900408
It is very importan
t to know how much
weight your vehicle can carry. This weight is called the vehicle capacity weight andincludes the weight of all occupants, cargo (including the roof load), non-factory-
installed options, if any, being towed. The tire and loading information placard located on the driver’s door sill of your vehicle will show how much weight it may properly carry. It is important to fami
liarize yourself with the
following terms before loading your vehicle: Vehicle maximum load on the tire: load on an individual tire that is determined by distributing to each axle its share of the maximum loaded vehicle weight anddividing by two. Vehicle normal load on the tire: load on an individual tire that is determined by dis-tributing to each axle its share of the curb weight, accessory weight, and normal occupant weight and dividing by two. Maximum loaded vehicle weight: the sum of - (a) Curb weight;(b) Accessory weight; (c) Vehicle capacity weight; and (d) Production options weight.
Curb weight: the weight of a motor vehi- cle with standard equipment including the maximum capacity of fuel, oil, and cool- ant. Accessory weight: the combined weight (in excess of those standard items which may be replaced) of automatic transmis-sion, power steering, power brakes, power windows, power seats, radio, and heater, to the extent that these items are availableas factory- installed equipment (whetherinstalled or not). Vehicle capacity weight: the rated cargo and luggage load plus 150 lbs (68 kg)
*
times the vehicle’s designated seating capacity. Production options weight: the combined weight of those installed regular produc- tion options weighing over 5 lbs (2.3 kg) in excess of those standard items whichthey replace, not previously considered in curb weight or accessory weight, includ- ing heavy duty brakes, ride levelers, roofrack, heavy duty battery, and special trim. Normal occupant weight: 150 lbs (68 kg)
* times the number of specified
occupants. (In your vehicle the number is 3)
WA R N I N G Do not park your vehicle in areas where combustible materials such as dry grass or leaves can come in contact with a hot exhaust, since a fire could occur.
Do not keep the steering wheel fully turned for a long time When leaving the vehicle Loading information
WA R N I N G Never overload your vehicle. Overloading can damage your vehicle, adversely affectvehicle performance, including handling and braking, cause tire failure, and result in an accident.
BK0206700US.bo
ok 7 ページ 2014年3月25日 火曜日 午後4時42分
Page 283 of 384
Operation Keys 7-36 Comfort controls
7
N00716300021 N00716400022
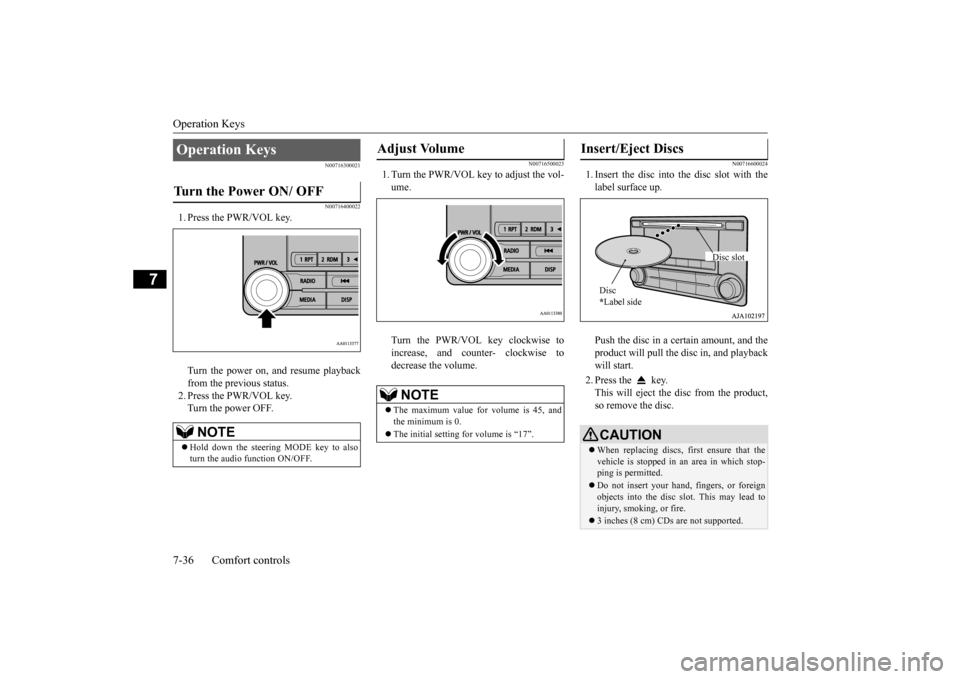
1. Press the PWR/VOL key. Turn the power on, and resume playback from the previous status. 2. Press the PWR/VOL key.Turn the power OFF.
N00716500023
1. Turn the PWR/VOL key to adjust the vol-ume. Turn the PWR/VOL key clockwise to increase, and counter- clockwise todecrease the volume.
N00716600024
1. Insert the disc into the disc slot with thelabel surface up. Push the disc in a certain amount, and the product will pull the disc in, and playbackwill start. 2. Press the key. This will eject the disc from the product, so remove the disc.
Operation Keys Turn the Power ON/ OFF
NOTE
Hold down the steering MODE key to also turn the audio function ON/OFF.
Adjust Volume
NOTE
The maximum value for volume is 45, and the minimum is 0. The initial setting for volume is “17”.
Insert/Eject Discs
CAUTIONWhen replacing discs, first ensure that the vehicle is stopped in an area in which stop-ping is permitted. Do not insert your hand, fingers, or foreign objects into the disc slot. This may lead to injury, smoking, or fire. 3 inches (8 cm) CDs are not supported.Disc * Label side
Disc slot
BK0206700US.bo
ok 36 ページ 2014年3月25日 火曜日 午後4時42分
Page 285 of 384
Listen to Radio 7-38 Comfort controls
7
N00716800068
N00716900043
This explains how to
listen to AM and FM
radio broadcasts. Press the RADIO key to switch the band. Switch between AM and FM bands. The selected band is indicated on the display.
13-
5 key Play/Pause Bluetooth Audio
*2, and use
as preset key 5 for radio.
14-
6 key Return during audio track search, and stop Bluetooth Audio
*2.
For radio, use as preset key 6.
15-
key/ key
For audio, select audio track/file; forradio, perform automatic station selec- tion. Select channels in the satellite radio*
1.
16- MENU key
Switch to Menu mode.
17-
/SEL key
Adjust audio quality and select items.For radio, manually select stations. Select channels in the satellite radio*
1.
*1: Requires a satellite tuner connection.*2: Requires a separately-purchased Blue- tooth-capable audio device in equip- ment by type (vehicles with a Bluetooth
® 2.0 interface).
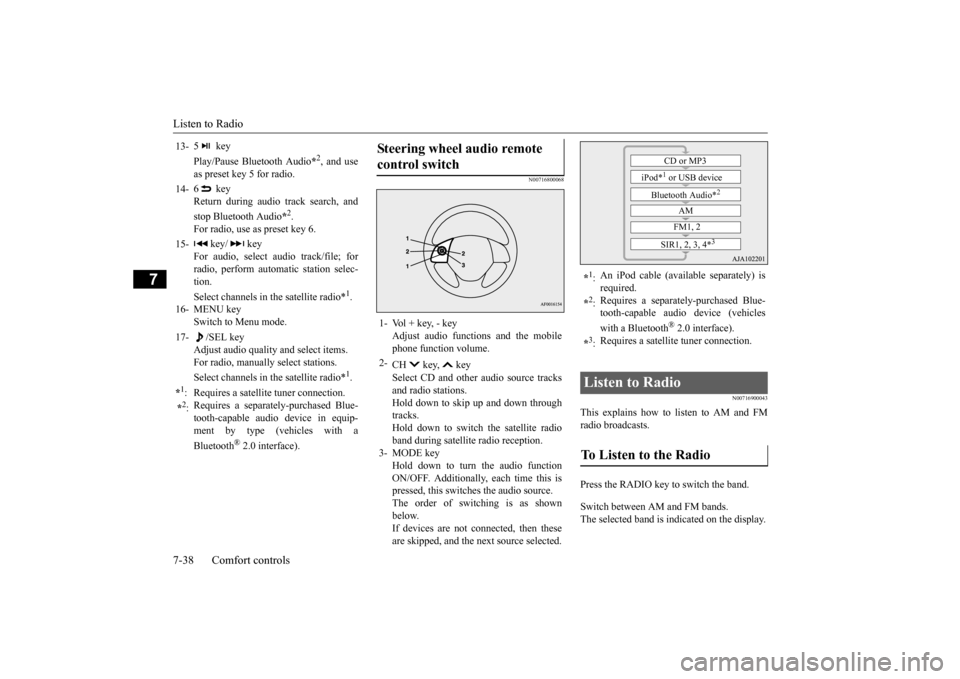
Steering wheel audio remote control switch 1- Vol + key, - key
Adjust audio functions and the mobilephone function volume.
2-
CH key, key Select CD and other audio source tracks and radio stations.Hold down to skip up and down through tracks. Hold down to switch the satellite radioband during satellite radio reception.
3- MODE key
Hold down to turn the audio functionON/OFF. Additionally, each time this is pressed, this switches the audio source. The order of switching is as shownbelow.If devices are not connected, then these are skipped, and the next source selected.
*1: An iPod cable (available separately) is required.
*2: Requires a separately-purchased Blue- tooth-capable audio device (vehicles with a Bluetooth
® 2.0 interface).
*3: Requires a satellite tuner connection.
Listen to Radio To Listen to the Radio
CD or MP3
iPod*
1 or USB device
Bluetooth Audio*
2
AM FM1, 2
SIR1, 2, 3, 4*
3
BK0206700US.bo
ok 38 ページ 2014年3月25日 火曜日 午後4時42分
Page 287 of 384
Listen to Satellite Radio (if so equipped) 7-40 Comfort controls
7
1. During FM reception, press the PTY key. This switches to the PTY selection mode. 2. Press the PTY key to select PTY. 3. Press the SCAN key.When a broadcast stat
ion is received, this
is played for 5 seconds, then the product searches for the next station.
N00717000038
This section explains ho
w to listen to satellite
radio.
Press the RADIO key to switch the band. Switches between SIR1, SIR2, SIR3, and SIR4 bands.The selected band is indicated on the display. Press the key or key to select the sta- tion.
Channels are received in order and take 10 seconds each. Press the SCAN key. All of the channels are scanned.
NOTE
Press the SCAN key again while receiving the station to cancel scan searching.
Listen to Satellite Radio
(if so
equipped)
NOTE
A subscription is required to listen to satel- lite radio. Once the free trial period has expired, satellite radi
o can only be received
with a valid subscription. If no subscription has been made when the free trial period expires, the display willalternate between “CALL” and “888-539- SIRI”.
To listen to Satellite Radio
NOTE
Bands switch in the order AM, FM1, FM2, SIR1, SIR2*, SIR3*, and SIR4*. Switch satellite radio bands by holding down the key or key on the steering remote control switch.*:If no signal is received, bands will not be switched.
Select a Station
key
Go down one step from the channel being received.
key
Go up one step from the channel being received.
key
(Hold down)
While the key is held down, it will cycle down through the channels being received.
key
(Hold down)
While the key is held down, it will cycle up through the channels being received.
NOTE
When cycling up/down through channels, the channel number display in the upper level ofthe display changes. When channel number “000” is selected, the SIRIUS ID (12 digits) is displayed.
Scan Station Selection
Scan All Channels
NOTE
Press this key again while receiving the channel to cancel scan searching.
BK0206700US.bo
ok 40 ページ 2014年3月25日 火曜日 午後4時42分
Page 309 of 384
If the vehicle breaks down 8-2 For emergencies
8
N00836300187
If your vehicle breaks down on the road, move to the shoulder and turn on the hazardwarning flashers. If there is no shoulder, or the shoulder is not safe, drive in the right lane slowly, with the hazard lights flashing, untilyou come to a safe stopping place. Keep the flashers flashing. If the engine stops, there will be no power assist to the steering and brakes, making these difficult to use. The brake booster will not work, so the brakes will not grip well. The brake pedalwill be harder to press than usual. Since there is no power steering assist, the steering wheel will be hard to turn.
Get help from your passengers, bystanders, etc. to push the vehicl
e and move it to a safe
zone.
N00836401781
If the engine cannot be started because the battery is weak or dead, you can start it withthe battery from another vehicle using jumper cables. 1. Take off any metal jewelry such as watch bands or bracelets that might make an accidental electrical contact.
2. Position the vehicles close enough together so that the jumper cables can reach, but be sure the vehicles aren’t touching each other. 3. You could be injured if the vehicles move. Set the parking brake firmly on each vehi- cle. Put an automatic transaxle or CVT in “P” (PARK) or a manual transaxle in “N”(Neutral). 4. Turn the ignition switch to the “OFF” position or put the operation mode inOFF.
If the vehicle breaks down If the engine stops/fails When the engine fails at the intersection
Jump-starting the engine
WA R N I N G When using jumper cables to start a vehi- cle, follow the procedures and be very cau- tious. If the electrolyte fluid looks frozen, DO NOT ATTEMPT JUMP STARTING!! The battery might split open or explode ifthe temperature is below the freezing point.CAUTION Do not try to start your vehicle by pushing or towing. Vehicles with automatic transaxles cannot be started this way. Also, there is more risk of an accident when a vehicle isbeing pushed or towed.
CAUTION Check the other vehicle. It must have a 12- volt battery. If the other system isn’t 12-volt, both systems can be damaged.WA R N I N G Perform step 4 on both vehicles before- hand. Make sure that the cables or your clothes cannot be ca
ught by the fan or
drive belt. Personal injury could result.NOTE
Turn off all lights, heater, and other electrical loads. This will avoid sparks and help save both batteries.
BK0206700US.bo
ok 2 ページ 2014年3月25日 火曜日 午後4時42分