2015 MITSUBISHI OUTLANDER SPORT engine
[x] Cancel search: enginePage 325 of 384
Service precautions 9-2 Vehicle care and maintenance
9
N00937301401
Taking regular care of your vehicle will pre- serve its value and appearance as long as pos-sible. You can do some of the maintenance work yourself, and the rest should only be per- formed by an authorized Mitsubishi Motorsdealer or a repair facility of your choice.If you discover a malfunction or other prob- lem, have it corrected by an authorized Mitsubishi Motors dealer or a repair facilityof your choice. This section describes the maintenance inspections that you can do yourself, if you sodesire. Follow the instructions and precau- tions for each procedure.
Have you purchased the Mitsubishi Motors Diamond Care Protection Plan? The Plan supplements your new vehicle warranties. See your authorized Mitsubishi Motors dealerfor details.
N00937400447
The catalytic converter requires you to useunleaded fuel only. Leaded gasoline will destroy the emission-control effectiveness of the converter. Normally, the catalytic converter does not require maintenance. However, it is important to keep the engine properly tuned for the con- verter to continue to work properly.
Service precautions
WA R N I N G When checking or servicing the inside of the engine compartment, be sure theengine is stopped and has had a chance to cool down. If you need to work in the engine compart- ment with the engine running, be espe-cially careful that your clothing, hair, etc. does not get caught in
the fan, drive belts,
or other moving parts.
The fan can turn on automatically even if the engine is not running. Turn the igni- tion switch to the “OFF” position or put the operation mode in OFF to be safe while you work in the engine compart-ment. Do not smoke or allow open flames around fuel or the battery. The fumes are flamma- ble. Be extremely careful when working around the battery. It contains poisonous and corrosive sulfuric acid. Do not get under your vehicle while it is on a jack.Always use properly rated automotive jack stands. Handling your vehicle’s parts and materi- als in the wrong way can injure you. Ask an authorized Mitsubishi Motors dealeror a repair facility of your choice if you have questions.WA R N I N G
Catalytic converter
BK0206700US.bo
ok 2 ページ 2014年3月25日 火曜日 午後4時42分
Page 326 of 384
Engine hood
Vehicle care and maintenance 9-3
9
To reduce the possibility of catalytic con- verter damage: Use UNLEADED GASOLINE ONLY of the type of recommended in “Fuel selec- tion”. Do not drive with an extremely low fuel level. Running out of gas could damage the catalytic converter. Do not try to start the engine by pushing or towing the vehicle. If the battery is weak or run down, use jumper cables to properly start the engine.
Do not idle the engine with any spark plug wires disconnected or removed, such as when performing diagnostic tests. Do not idle the engine for a long time if it is idling roughly or otherwise obviously malfunctioning. To prevent the catalytic converter from being damaged from unburned gas, do not race the engine when stopping the engine. Stop driving the vehicle if you think the performance is noticeably low, or theengine has a malfunction such as with the ignition, etc. If you
are not able to stop
driving immediately, slow down and drivefor only a short time. Have your vehicle checked at an authorized Mitsubishi Motors dealer or a repair facility of yourchoice as soon as possible. In unusual situations involving major engine problems, a burning odor mayindicate severe and abnormal catalytic converter overheating. If this occurs, stop in a safe place, shut the engine off and letthe vehicle cool. Once the engine is cool, immediately take your vehicle to a dealer or a repair facility of your choice for ser-vice.
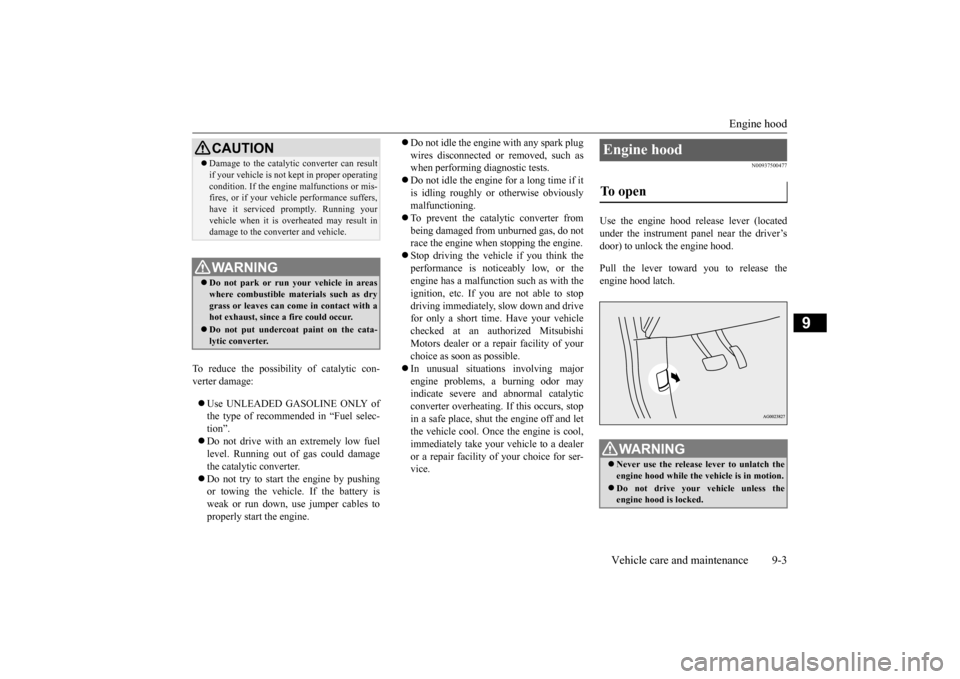
N00937500477
Use the engine hood release lever (locatedunder the instrument panel near the driver’sdoor) to unlock the engine hood. Pull the lever toward you to release the engine hood latch.
CAUTION Damage to the catalytic converter can result if your vehicle is not kept in proper operating condition. If the engine malfunctions or mis- fires, or if your vehicle performance suffers, have it serviced promptly. Running yourvehicle when it is overheated may result in damage to the converter and vehicle.WA R N I N G Do not park or run your vehicle in areas where combustible materials such as dry grass or leaves can come in contact with a hot exhaust, since a fire could occur. Do not put undercoat paint on the cata- lytic converter.
Engine hood To open
WA R N I N G Never use the release lever to unlatch the engine hood while the vehicle is in motion. Do not drive your vehicle unless the engine hood is locked.
BK0206700US.bo
ok 3 ページ 2014年3月25日 火曜日 午後4時42分
Page 327 of 384
Engine hood 9-4 Vehicle care and maintenance
9
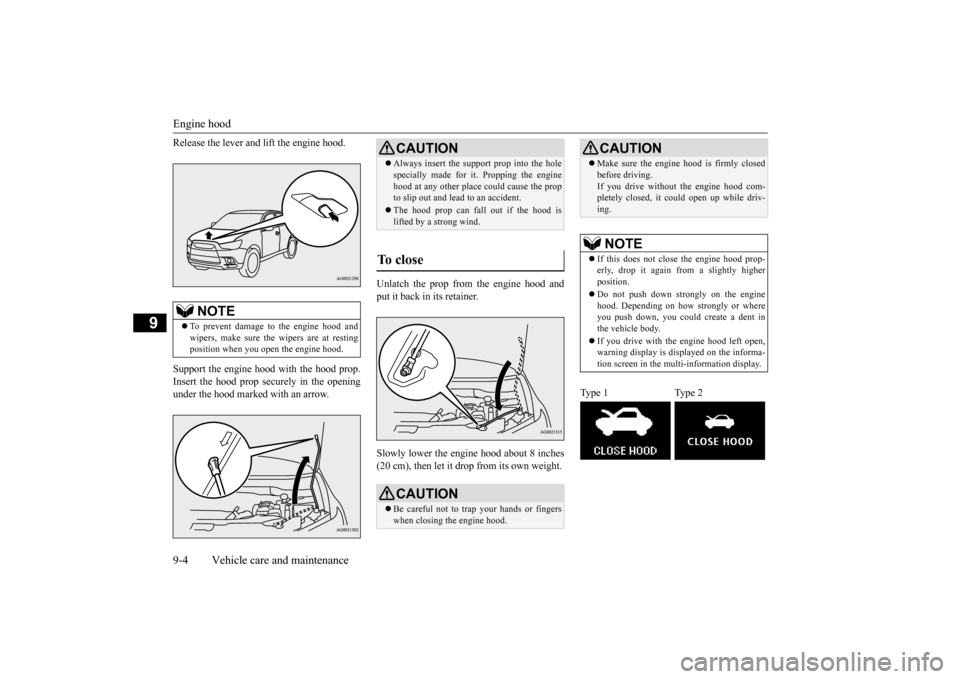
Release the lever and lift the engine hood. Support the engine hood with the hood prop. Insert the hood prop securely in the opening under the hood marked with an arrow.
Unlatch the prop from the engine hood and put it back in its retainer. Slowly lower the engine hood about 8 inches (20 cm), then let it drop from its own weight.
NOTE
To prevent damage to the engine hood and wipers, make sure the wipers are at resting position when you open the engine hood.
CAUTION Always insert the support prop into the hole specially made for it. Propping the engine hood at any other place could cause the prop to slip out and lead to an accident. The hood prop can fall out if the hood is lifted by a strong wind.
To close
CAUTION Be careful not to trap your hands or fingers when closing the engine hood.
Make sure the engine hood is firmly closed before driving. If you drive without the engine hood com- pletely closed, it could open up while driv- ing.NOTE
If this does not close the engine hood prop- erly, drop it again from a slightly higher position. Do not push down strongly on the engine hood. Depending on how strongly or where you push down, you could create a dent inthe vehicle body. If you drive with the engine hood left open, warning display is displayed on the informa- tion screen in the multi-information display.
Type 1 Type 2
CAUTION
BK0206700US.bo
ok 4 ページ 2014年3月25日 火曜日 午後4時42分
Page 328 of 384
View of the engine compartment
Vehicle care and maintenance 9-5
9
N00937600625
N00937702053
It is normal for an engi
ne to use oil. You may
need to add oil between the recommended oilchange intervals. Before starting the engine, check the engine oil level. Refill if necessary. To check the oil level, remove the dipstick, wipe it off, and gently reinsert it all the way. Slowly pull the dipstick straight out andcheck the oil level by checking the upper sur- face of the dipstick. Th
e oil level must not go
above the line on the dipstick. If the level does not reach the line which shows the smallest amount of oil required, remove the oil filler cap on the engine valve cover, and fill to within the “Good” range.
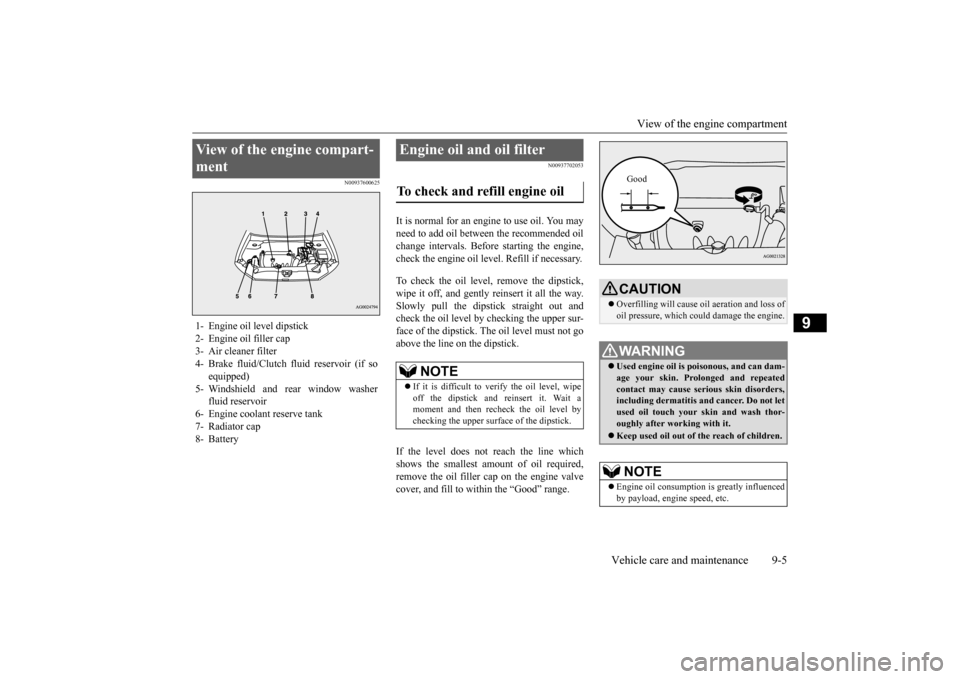
View of the engine compart- ment 1- Engine oil level dipstick 2- Engine oil filler cap 3- Air cleaner filter4- Brake fluid/Clutch fluid reservoir (if so
equipped)
5- Windshield and rear window washer
fluid reservoir
6- Engine coolant reserve tank 7- Radiator cap 8- Battery
Engine oil and oil filter To check and refill engine oil
NOTE
If it is difficult to verify the oil level, wipe off the dipstick and reinsert it. Wait a moment and then recheck the oil level bychecking the upper surface of the dipstick.
CAUTION Overfilling will cause oil aeration and loss of oil pressure, which could damage the engine.WA R N I N G Used engine oil is poisonous, and can dam- age your skin. Prolonged and repeated contact may cause serious skin disorders, including dermatitis and cancer. Do not letused oil touch your skin and wash thor- oughly after working with it. Keep used oil out of the reach of children.NOTE
Engine oil consumption
is greatly influenced
by payload, engine speed, etc.Good
BK0206700US.bo
ok 5 ページ 2014年3月25日 火曜日 午後4時42分
Page 329 of 384
Engine oil and oil filter 9-6 Vehicle care and maintenance
9
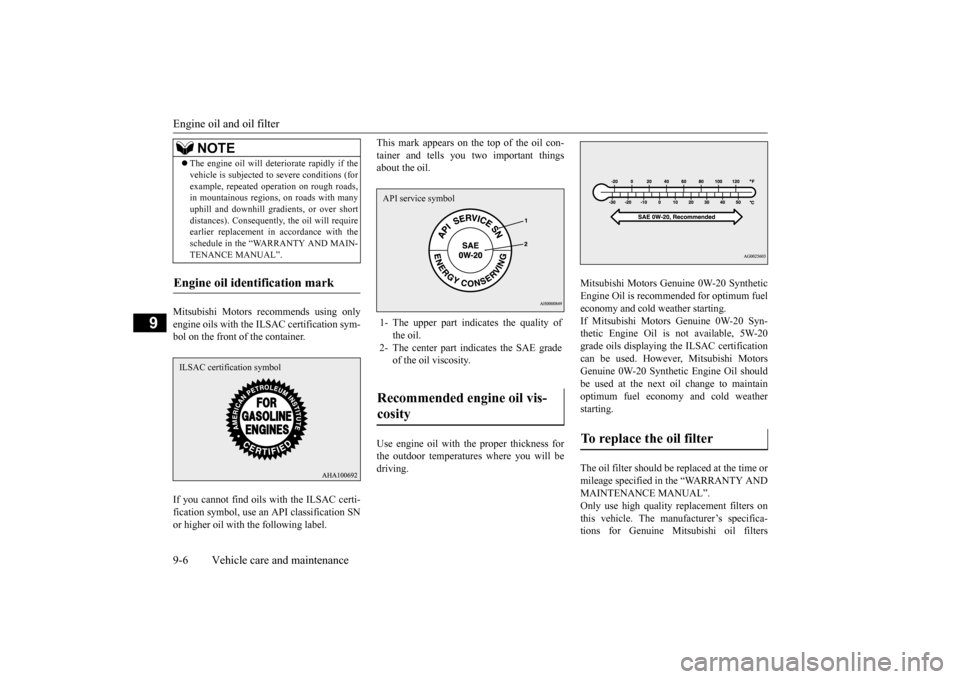
Mitsubishi Motors recommends using only engine oils with the ILSAC certification sym- bol on the front of the container. If you cannot find oils with the ILSAC certi- fication symbol, use an API classification SN or higher oil with the following label.
This mark appears on the top of the oil con- tainer and tells you two important things about the oil. Use engine oil with the proper thickness for the outdoor temperatures where you will bedriving.
Mitsubishi Motors Ge
nuine 0W-20 Synthetic
Engine Oil is recommended for optimum fuel economy and cold weather starting.If Mitsubishi Motors Genuine 0W-20 Syn- thetic Engine Oil is
not available, 5W-20
grade oils displaying the ILSAC certificationcan be used. However, Mitsubishi Motors Genuine 0W-20 Synthetic Engine Oil should be used at the next oil change to maintainoptimum fuel economy and cold weatherstarting. The oil filter should be
replaced at the time or
mileage specified in the “WARRANTY AND MAINTENANCE MANUAL”. Only use high quality replacement filters onthis vehicle. The manufacturer’s specifica- tions for Genuine Mitsubishi oil filters
The engine oil will deteriorate rapidly if the vehicle is subjected to severe conditions (for example, repeated operation on rough roads, in mountainous regions, on roads with many uphill and downhill gradients, or over shortdistances). Consequently, the oil will require earlier replacement in accordance with the schedule in the “WARRANTY AND MAIN-TENANCE MANUAL”.
Engine oil identification mark
NOTE
ILSAC certification symbol
1- The upper part indicates the quality of
the oil.
2- The center part indicates the SAE grade
of the oil viscosity.
Recommended engine oil vis- cosity API service symbol
To replace the oil filter
BK0206700US.bo
ok 6 ページ 2014年3月25日 火曜日 午後4時42分
Page 330 of 384
Engine coolant
Vehicle care and maintenance 9-7
9
require that the filter can withstand a pressure of 256 psi (1.8 MPa). A Genuine Mitsubishi oil filter is the best replacement filter. Follow the installation
instructions printed on
the filter.
N00937800584
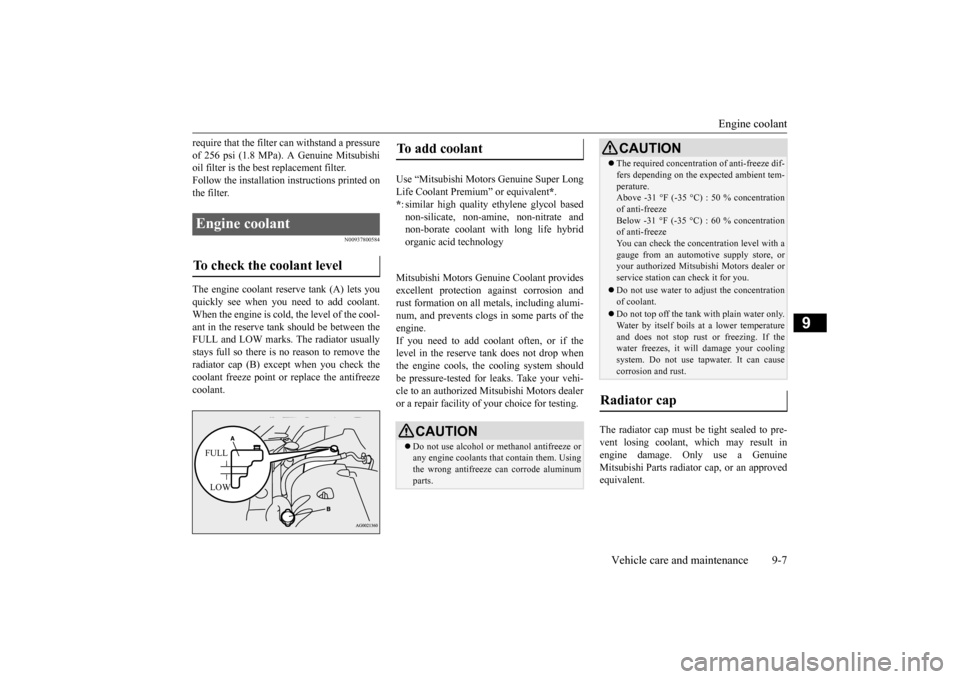
The engine coolant reserve tank (A) lets you quickly see when you need to add coolant. When the engine is cold, the level of the cool-ant in the reserve tank should be between the FULL and LOW marks. The radiator usually stays full so there is no reason to remove theradiator cap (B) except when you check the coolant freeze point or replace the antifreeze coolant.
Mitsubishi Motors Genuine Coolant provides excellent protection against corrosion andrust formation on all metals, including alumi- num, and prevents clogs in some parts of the engine.If you need to add co
olant often, or if the
level in the reserve tank does not drop when the engine cools, the cooling system shouldbe pressure-tested for leaks. Take your vehi- cle to an authorized
Mitsubishi Motors dealer
or a repair facility of your choice for testing.
The radiator cap must be tight sealed to pre- vent losing coolant, which may result in engine damage. Only use a GenuineMitsubishi Parts radiator cap, or an approved equivalent.
Engine coolant To check the coolant level
FULL LOW
To add coolant Use “Mitsubishi Motors Genuine Super LongLife Coolant Premium” or equivalent
*.
* : similar high quality ethylene glycol based non-silicate, non-amine, non-nitrate and non-borate coolant with long life hybrid organic acid technologyCAUTION Do not use alcohol or methanol antifreeze or any engine coolants that contain them. Using the wrong antifreeze can corrode aluminum parts.
The required concentration of anti-freeze dif- fers depending on the expected ambient tem- perature. Above -31 °F (-35 °C) : 50 % concentration of anti-freezeBelow -31 °F (-35 °C) : 60 % concentration of anti-freeze You can check the concentration level with agauge from an automotive supply store, or your authorized Mitsubishi Motors dealer or service station can check it for you. Do not use water to adjust the concentration of coolant. Do not top off the tank with plain water only. Water by itself boils at a lower temperatureand does not stop rust or freezing. If the water freezes, it will damage your cooling system. Do not use tapwater. It can causecorrosion and rust.
Radiator cap
CAUTION
BK0206700US.bo
ok 7 ページ 2014年3月25日 火曜日 午後4時42分
Page 331 of 384
Air cleaner filter 9-8 Vehicle care and maintenance
9
Do not overfill the reserve tank. Your vehicle uses a special radiator cap that stays sealed and lets the coolant flow from the reserve tank back to the radiatorwhen the engine cools down. If you need to change the cap, use the exact same kind. Check the coolant freeze point in the radi- ator with the proper gauge, and only when it is safe. If you add antifreeze, the con-tents of the reserve tank must be protected against freezing. Keep the front of the radiator and con- denser clean. If the engine coolant temperature does not rise after the engine is warmed-up, takeyour vehicle to an authorized Mitsubishi Motors dealer or a repair facility of your choice to have the thermostat checked,and replaced if necessary.
N00937901465
The air cleaner filter w
ill get dirty and dusty
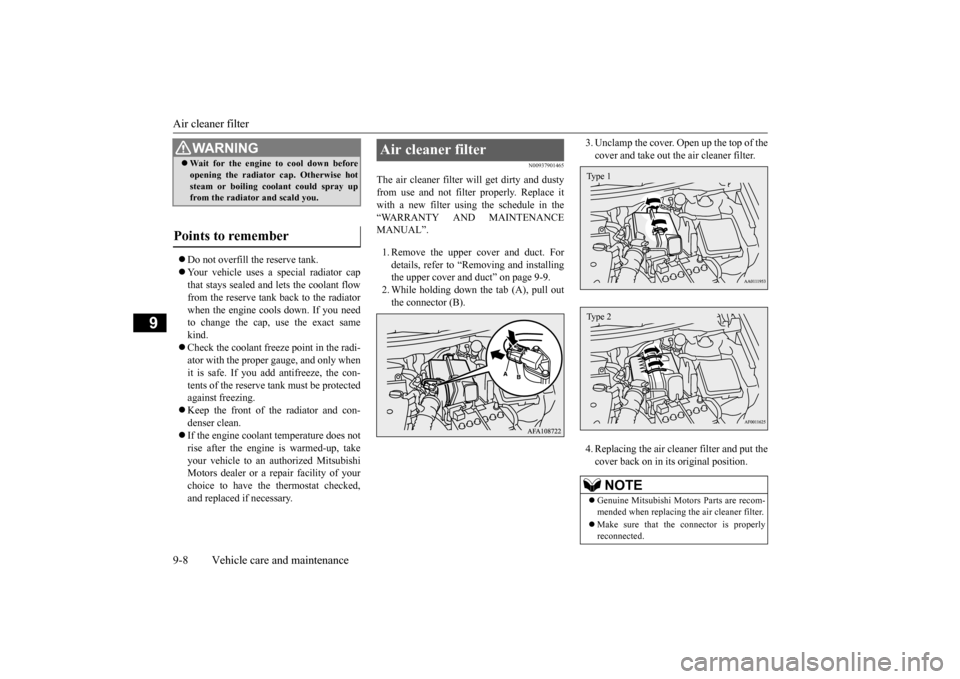
from use and not filter properly. Replace itwith a new filter using the schedule in the “WARRANTY AND MAINTENANCE MANUAL”. 1. Remove the upper cover and duct. For details, refer to “Removing and installingthe upper cover and duct” on page 9-9. 2. While holding down
the tab (A), pull out
the connector (B).
3. Unclamp the cover. Open up the top of the cover and take out the air cleaner filter. 4. Replacing the air cleaner filter and put the cover back on in its original position.
WA R N I N G Wait for the engine to cool down before opening the radiator cap. Otherwise hot steam or boiling coolant could spray up from the radiator and scald you.
Points to remember
Air cleaner filter
NOTE
Genuine Mitsubishi Moto
rs Parts are recom-
mended when replacing the air cleaner filter. Make sure that the connector is properly reconnected.Type 1Type 2
BK0206700US.bo
ok 8 ページ 2014年3月25日 火曜日 午後4時42分
Page 332 of 384
Air cleaner filter
Vehicle care and maintenance 9-9
9
5. Put the duct and upper cover back on in its original position. For details, refer to “Removing and installing the upper cover and duct” on page 9-9.
N00956000022
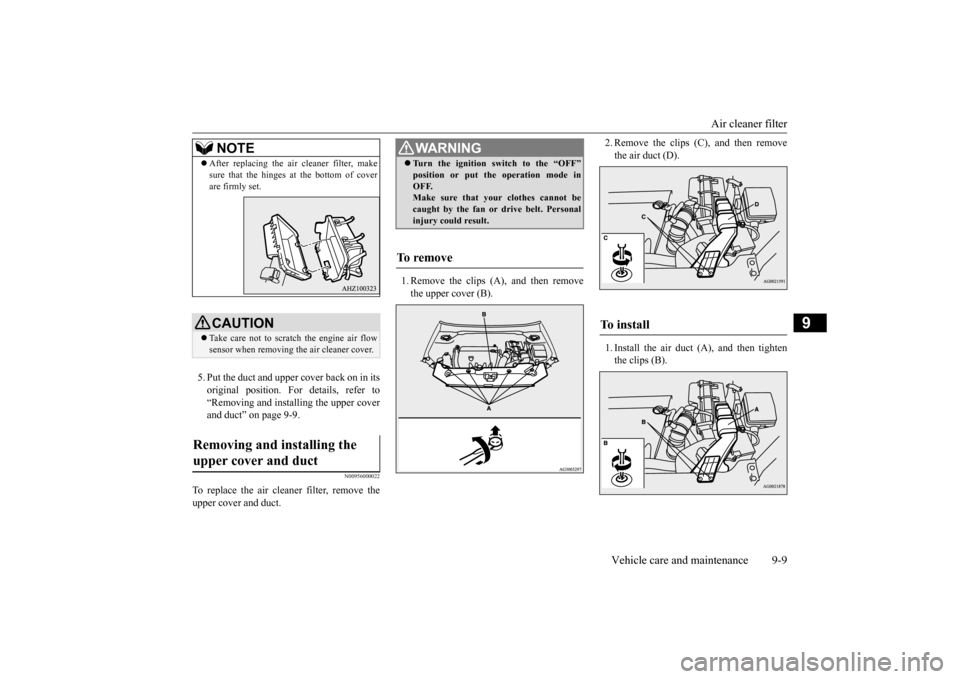
To replace the air cleaner filter, remove theupper cover and duct.
1. Remove the clips (A), and then remove the upper cover (B).
2. Remove the clips (C), and then remove the air duct (D). 1. Install the air duct
(A), and then tighten
the clips (B).
After replacing the air cleaner filter, make sure that the hinges at the bottom of cover are firmly set.CAUTION Take care not to scratch the engine air flow sensor when removing the air cleaner cover.
Removing and installing the upper cover and duct
NOTE
WA R N I N G Turn the ignition switch to the “OFF” position or put the operation mode in OFF. Make sure that your clothes cannot be caught by the fan or drive belt. Personalinjury could result.
To remove
To install
BK0206700US.bo
ok 9 ページ 2014年3月25日 火曜日 午後4時42分