2015 MITSUBISHI OUTLANDER fold seats
[x] Cancel search: fold seatsPage 30 of 446
Seat arrangement
Seat and restraint systems 4-3
4
N00401701122
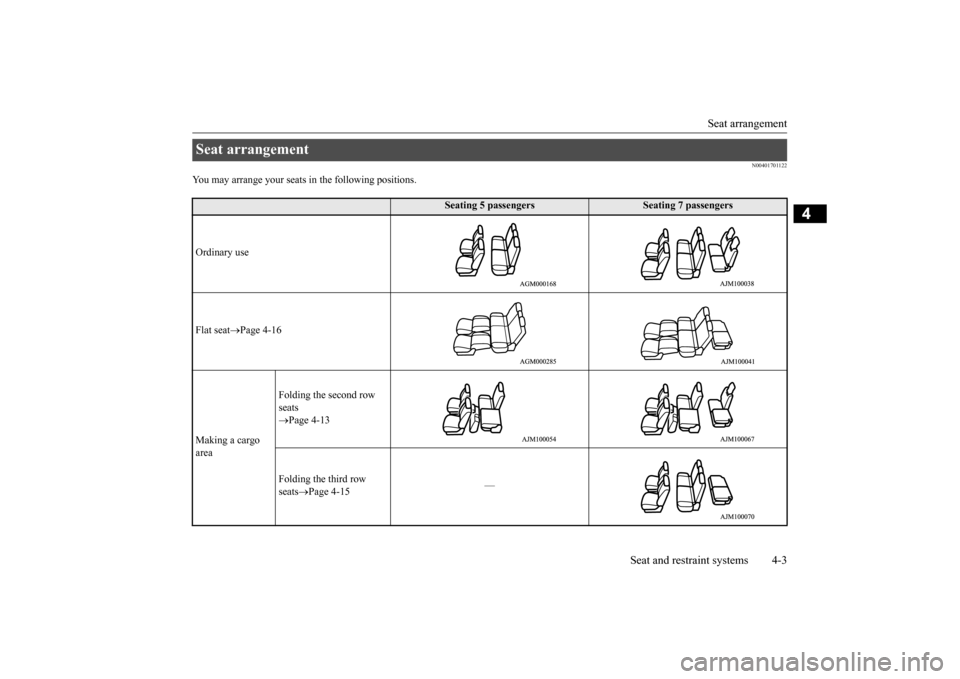
You may arrange your seats
in the following positions.
Seat arrangement
Seating 5 passengers
Seating 7 passengers
Ordinary use Flat seat
Page 4-16
Making a cargo area
Folding the second row seats Page 4-13 Folding the third row seats
Page 4-15
—
BK0211800US.book 3 ページ 2014年3月12日 水曜日 午後2時42分
Page 32 of 446
Front seats
Seat and restraint systems 4-5
4
N00401901326
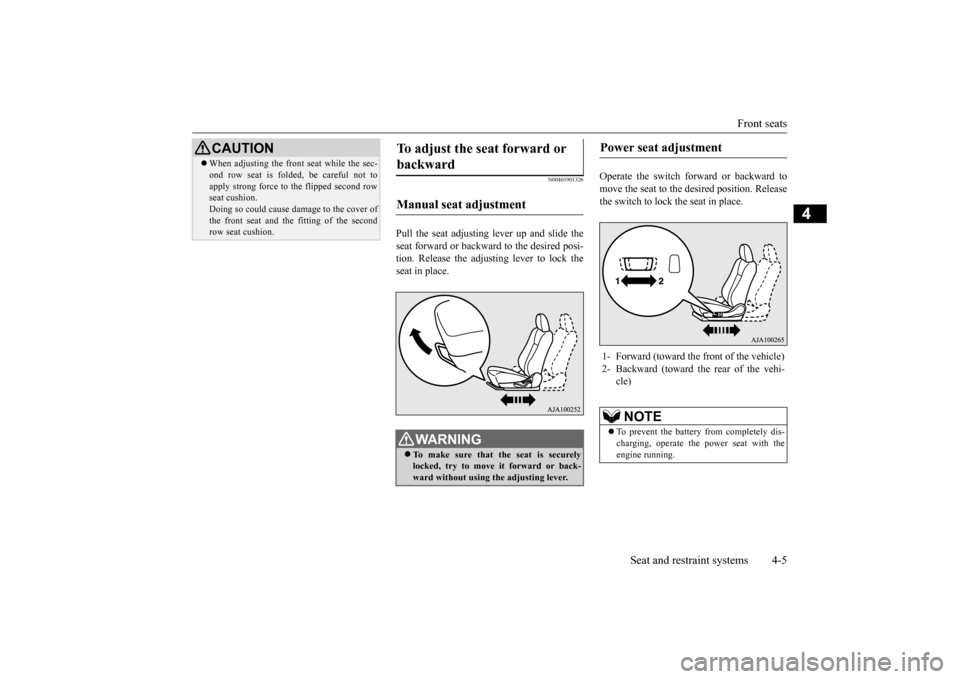
Pull the seat adjusting lever up and slide the seat forward or backward to the desired posi-tion. Release the adjusting lever to lock the seat in place.
Operate the switch forward or backward to move the seat to the de
sired position. Release
the switch to lock the seat in place.
When adjusting the front seat while the sec- ond row seat is folded, be careful not toapply strong force to the flipped second rowseat cushion. Doing so could cause da
mage to the cover of
the front seat and the
fitting of the second
row seat cushion.CAUTION
To adjust the seat forward or backward Manual seat adjustment
WA R N I N G To make sure that the seat is securely locked, try to move
it forward or back-
ward without using
the adjusting lever.
Power seat adjustment 1- Forward (toward the front of the vehicle) 2- Backward (toward the rear of the vehi-
cle)NOTE
To prevent the battery from completely dis- charging, operate the
power seat with the
engine running.
BK0211800US.book 5 ページ 2014年3月12日 水曜日 午後2時42分
Page 39 of 446
Making a cargo area 4-12 Seat and restraint systems
4
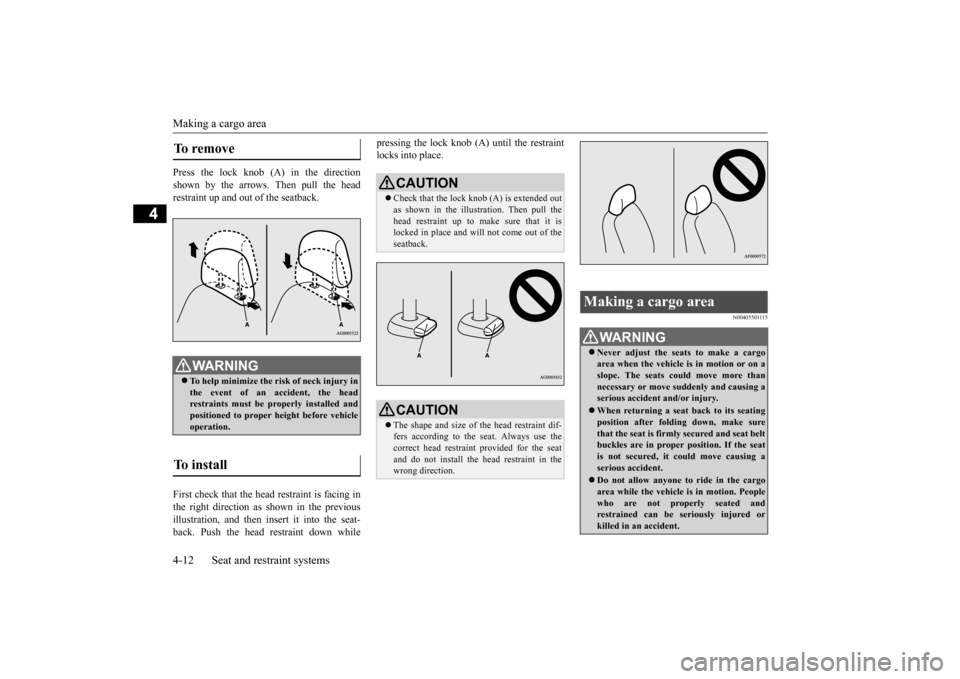
Press the lock knob (A) in the direction shown by the arrows. Then pull the head restraint up and out of the seatback. First check that the head restraint is facing in the right direction as
shown in the previous
illustration, and then insert it into the seat- back. Push the head restraint down while
pressing the lock knob (A) until the restraint locks into place.
N00405501115
To remove
WA R N I N G To help minimize the risk of neck injury in the event of an
accident, the head
restraints must be properly installed and positioned to proper height before vehicle operation.
To install
CAUTION Check that the lock knob (A) is extended out as shown in the illustration. Then pull the head restraint up to make sure that it is locked in place and will
not come out of the
seatback.CAUTION The shape and size of the head restraint dif- fers according to the seat. Always use the correct head restrain
t provided for the seat
and do not install the he
ad restraint in the
wrong direction.
Making a cargo area
WA R N I N G Never adjust the seats to make a cargo area when the vehicle is
in motion or on a
slope. The seats could move more thannecessary or move suddenly and causing a serious accident
and/or injury.
When returning a seat back to its seating position after folding down, make sure that the seat is firmly secured and seat beltbuckles are in proper position. If the seat is not secured, it could move causing a serious accident. Do not allow anyone to ride in the cargo area while the vehicle
is in motion. People
who are not properly seated and restrained can be seriously injured or killed in an accident.
BK0211800US.book 12 ページ 2014年3月12日 水曜日 午後2時42分
Page 40 of 446
Making a cargo area
Seat and restraint systems 4-13
4
N00405701120
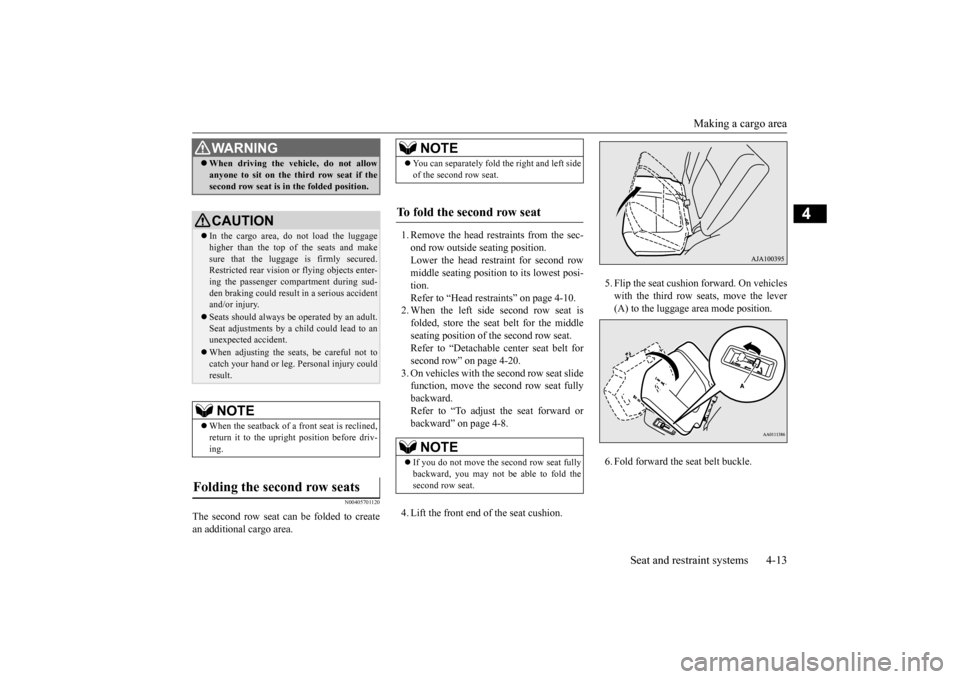
The second row seat can be folded to create an additional cargo area.
1. Remove the head rest
raints from the sec-
ond row outside seating position. Lower the head restraint for second rowmiddle seating position
to its lowest posi-
tion. Refer to “Head restraints” on page 4-10.2. When the left side second row seat is folded, store the seat belt for the middle seating position of the second row seat.Refer to “Detachable center seat belt for second row” on page 4-20. 3. On vehicles with th
e second row seat slide
function, move the second row seat fully backward. Refer to “To adjust the seat forward orbackward” on page 4-8. 4. Lift the front end of the seat cushion.
5. Flip the seat cushi
on forward. On vehicles
with the third row seats, move the lever(A) to the luggage area mode position. 6. Fold forward the seat belt buckle.
When driving the vehicle, do not allow anyone to sit on the third row seat if thesecond row seat is in the folded position.CAUTION In the cargo area, do not load the luggage higher than the top of the seats and makesure that the luggage is firmly secured. Restricted rear vision
or flying objects enter-
ing the passenger compartment during sud-den braking could result
in a serious accident
and/or injury. Seats should always be
operated by an adult.
Seat adjustments by a child could lead to an unexpected
accident.
When adjusting the seats, be careful not to catch your hand or leg.
Personal injury could
result.NOTE
When the seatback of a front seat is reclined, return it to the upright position before driv- ing.
Folding the second row seats
WA R N I N G
NOTE
You can separately fold
the right and left side
of the second row seat.
To fold the second row seat
NOTE
If you do not move the second row seat fully backward, you may not be able to fold the second row seat.
BK0211800US.book 13 ページ 2014年3月12日 水曜日 午後2時42分
Page 41 of 446
Making a cargo area 4-14 Seat and restraint systems
4
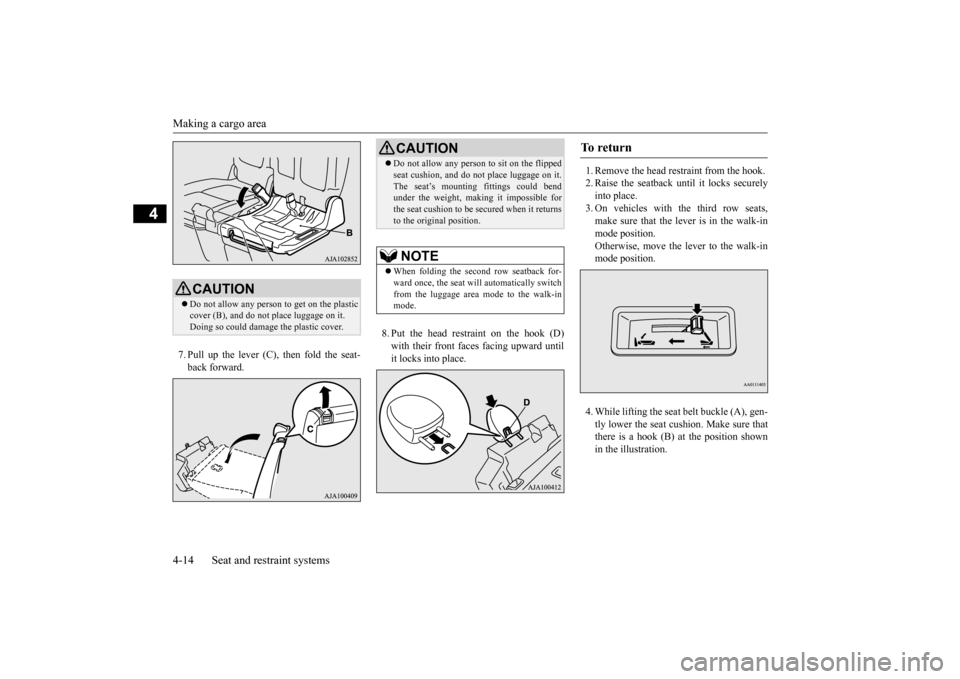
7. Pull up the lever (C), then fold the seat- back forward.
8. Put the head restraint on the hook (D) with their front faces facing upward until it locks into place.
1. Remove the head restraint from the hook. 2. Raise the seatback until it locks securely into place. 3. On vehicles with the third row seats,make sure that the lever is in the walk-in mode position. Otherwise, move the lever to the walk-inmode position. 4. While lifting the seat
belt buckle (A), gen-
tly lower the seat cushion. Make sure thatthere is a hook (B) at the position shown in the illustration.
CAUTION Do not allow any person
to get on the plastic
cover (B), and do not
place luggage on it.
Doing so could damage
the plastic cover.
CAUTIONDo not allow any person to sit on the flipped seat cushion, and do no
t place luggage on it.
The seat’s mounting
fittings could bend
under the weight, maki
ng it impossible for
the seat cushion to be secured when it returns to the original position.NOTE
When folding the second row seatback for- ward once, the seat will automatically switch from the luggage area
mode to the walk-in
mode.
To r e t u r n
BK0211800US.book 14 ページ 2014年3月12日 水曜日 午後2時42分
Page 42 of 446
Making a cargo area
Seat and restraint systems 4-15
4
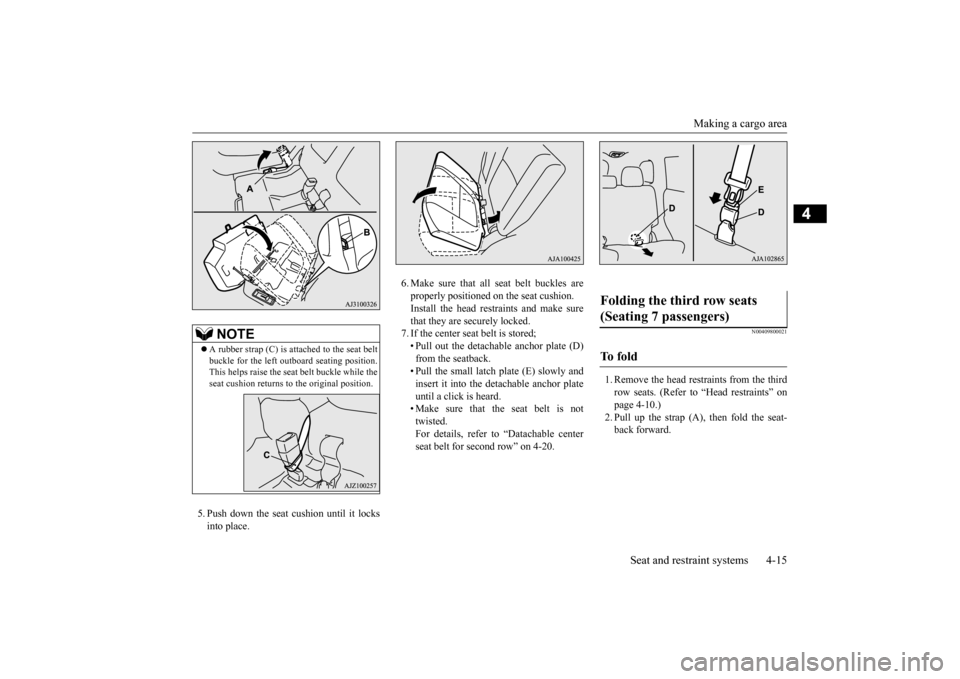
5. Push down the seat cushion until it locks into place.
6. Make sure that all seat belt buckles are properly positioned on the seat cushion.Install the head restraints and make sure that they are securely locked. 7. If the center seat belt is stored;• Pull out the detachable anchor plate (D) from the seatback. • Pull the small latch plate (E) slowly andinsert it into the detachable anchor plate until a click is heard. • Make sure that the seat belt is nottwisted. For details, refer to “Datachable center seat belt for second row” on 4-20.
N00409800021
1. Remove the head restraints from the thirdrow seats. (Refer to
“Head restraints” on
page 4-10.) 2. Pull up the strap (A), then fold the seat-back forward.
NOTE
A rubber strap (C) is attached to the seat belt buckle for the left out
board seating position.
This helps raise the seat
belt buckle while the
seat cushion returns to the original position.
Folding the third row seats (Seating 7 passengers) To f o l d
BK0211800US.book 15 ページ 2014年3月12日 水曜日 午後2時42分
Page 292 of 446
Storage spaces
Features and controls 5-215
5
N00551601244
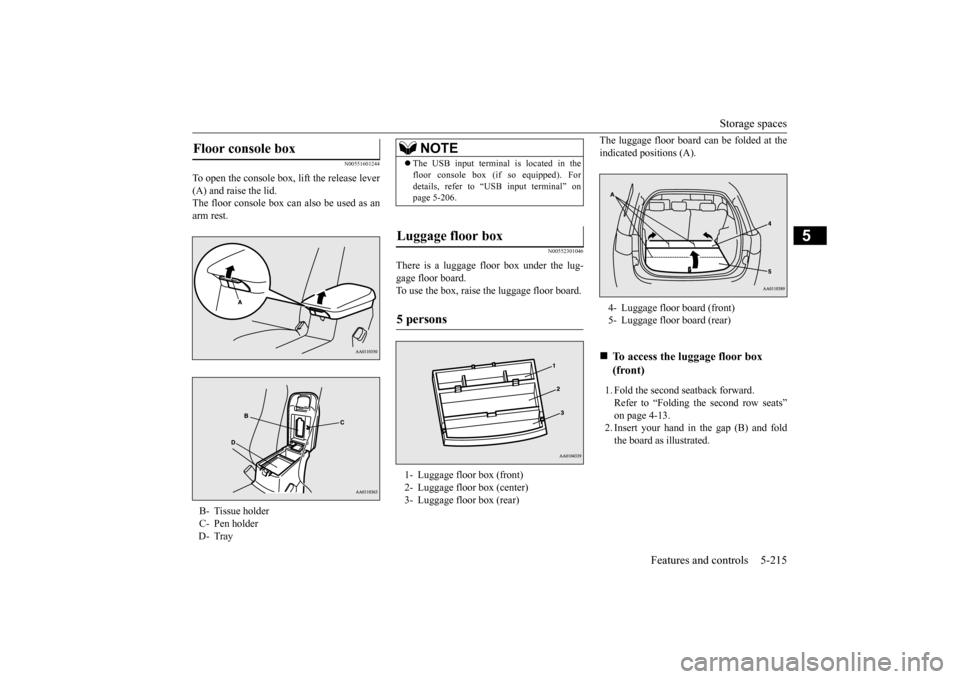
To open the console box, lift the release lever (A) and raise the lid. The floor console box can also be used as anarm rest.
N00552301046
There is a luggage floor box under the lug-gage floor board. To use the box, raise the luggage floor board.
The luggage floor board can be folded at the indicated positions (A). 1. Fold the second seatback forward. Refer to “Folding the second row seats” on page 4-13. 2. Insert your hand in the gap (B) and foldthe board as illustrated.
Floor console box B- Tissue holderC- Pen holderD- Tray
NOTE
The USB input terminal is located in the floor console box (if
so equipped). For
details, refer to “USB input terminal” onpage 5-206.
Luggage floor box 5 persons 1- Luggage floor box (front) 2- Luggage floor box (center) 3- Luggage floor box (rear)
4- Luggage floor board (front)5- Luggage floor board (rear)
To access the lu
ggage floor box
(front)
BK0211800US.book 215 ページ 2014年3月12日 水曜日 午後2時42分