2015 MITSUBISHI OUTLANDER light
[x] Cancel search: lightPage 33 of 446
Front seats 4-6 Seat and restraint systems
4
N00402001379
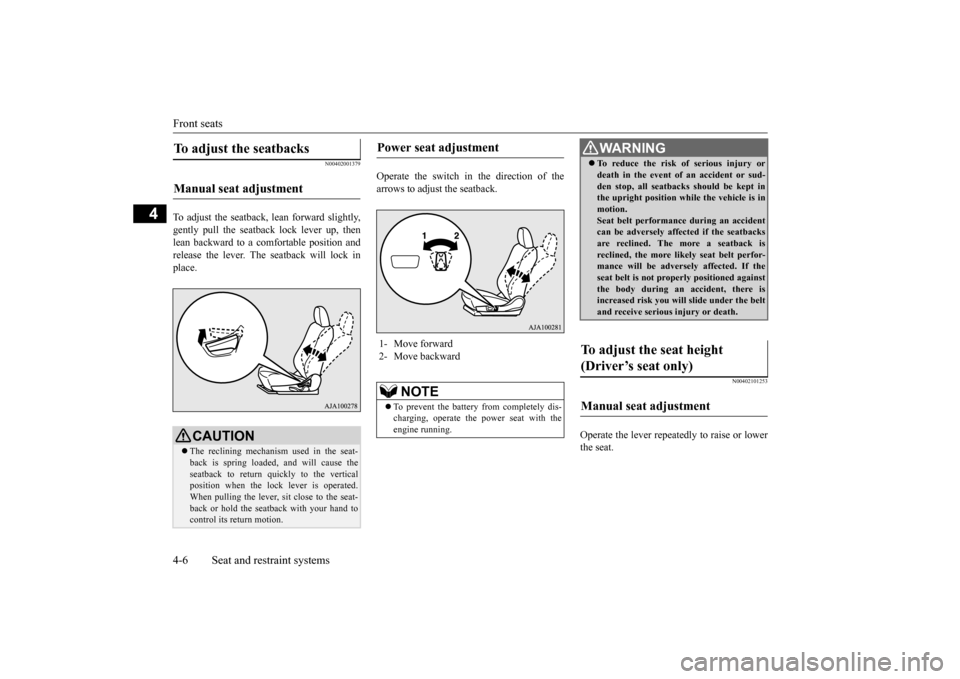
To adjust the seatback, lean forward slightly, gently pull the seatback lock lever up, then lean backward to a comfortable position andrelease the lever. The seatback will lock in place.
Operate the switch in the direction of the arrows to adjust the seatback.
N00402101253
Operate the lever repeatedly to raise or lower the seat.
To adjust the seatbacks Manual seat adjustment
CAUTION The reclining mechanism used in the seat- back is spring loaded, and will cause theseatback to return quickly to the vertical position when the lock lever is operated. When pulling the lever, sit close to the seat-back or hold the seatback with your hand to control its return motion.
Power seat adjustment 1- Move forward 2- Move backward
NOTE
To prevent the battery from completely dis- charging, operate the
power seat with the
engine running.
WA R N I N G To reduce the risk of serious injury or death in the event of
an accident or sud-
den stop, all seatbacks should be kept inthe upright position while the vehicle is in motion. Seat belt performance during an accidentcan be adversely affect
ed if the seatbacks
are reclined. The more a seatback is reclined, the more likely seat belt perfor-mance will be adversely affected. If the seat belt is not proper
ly positioned against
the body during an accident, there isincreased risk you will slide under the belt and receive serious
injury or death.
To adjust the seat height (Driver’s seat only) Manual seat adjustment
BK0211800US.book 6 ページ 2014年3月12日 水曜日 午後2時42分
Page 35 of 446
Second row seats 4-8 Seat and restraint systems
4
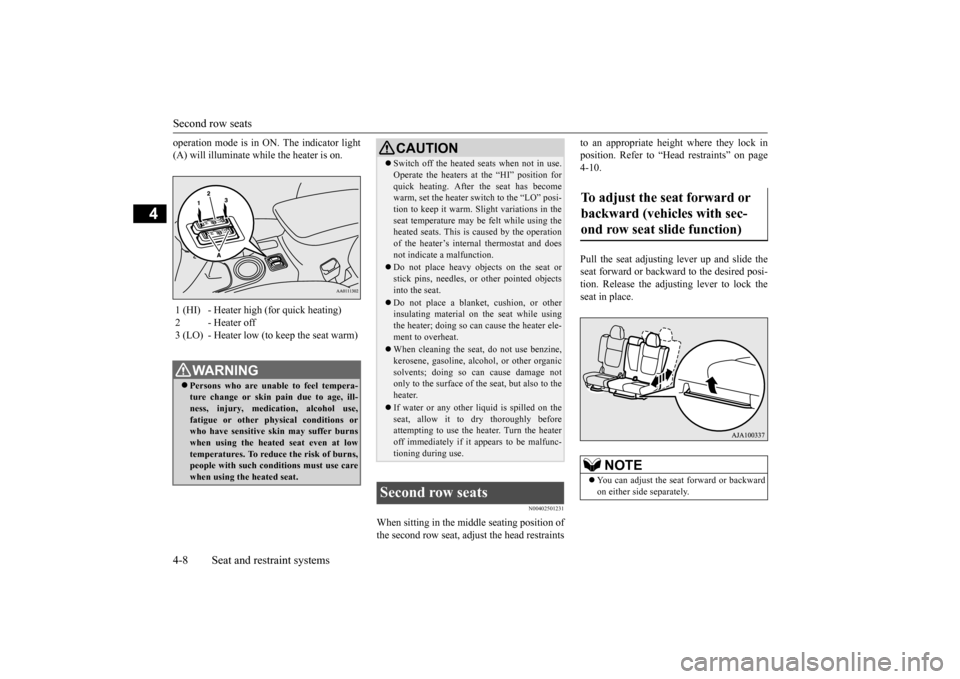
operation mode is in ON. The indicator light (A) will illuminate while the heater is on.
N00402501231
When sitting in the middle seating position of the second row seat, adju
st the head restraints
to an appropriate height where they lock in position. Refer to “Hea
d restraints” on page
4-10. Pull the seat adjusting lever up and slide the seat forward or backward to the desired posi- tion. Release the adjusting lever to lock the seat in place.
1 (HI) - Heater high (for quick heating) 2 - Heater off 3 (LO) - Heater low (to keep the seat warm)
WA R N I N G Persons who are unable
to feel tempera-
ture change or skin
pain due to age, ill-
ness, injury, medication, alcohol use, fatigue or other phys
ical conditions or
who have sensitive skin may suffer burns when using the heated seat even at low temperatures. To reduce the risk of burns,people with such conditions must use care when using the heated seat.
CAUTION Switch off the heated seats when not in use. Operate the heaters at the “HI” position forquick heating. After the seat has becomewarm, set the heater switch to the “LO” posi- tion to keep it warm. Sl
ight variations in the
seat temperature may be felt while using theheated seats. This is caused by the operation of the heater’s internal thermostat and does not indicate a malfunction. Do not place heavy obj
ects on the seat or
stick pins, needles, or
other pointed objects
into the seat. Do not place a blanket,
cushion, or other
insulating material on the seat while using the heater; doing so can
cause the heater ele-
ment to overheat. When cleaning the seat, do not use benzine, kerosene, gasoline, alc
ohol, or other organic
solvents; doing so can cause damage not only to the surface of the seat, but also to the heater. If water or any other liquid is spilled on the seat, allow it to dry thoroughly beforeattempting to use the heater. Turn the heater off immediately if it a
ppears to be malfunc-
tioning during use.
Second row seats
To adjust the seat forward or backward (vehicles with sec- ond row seat slide function)
NOTE
You can adjust the seat
forward or backward
on either side separately.
BK0211800US.book 8 ページ 2014年3月12日 水曜日 午後2時42分
Page 43 of 446
Making a flat seat 4-16 Seat and restraint systems
4
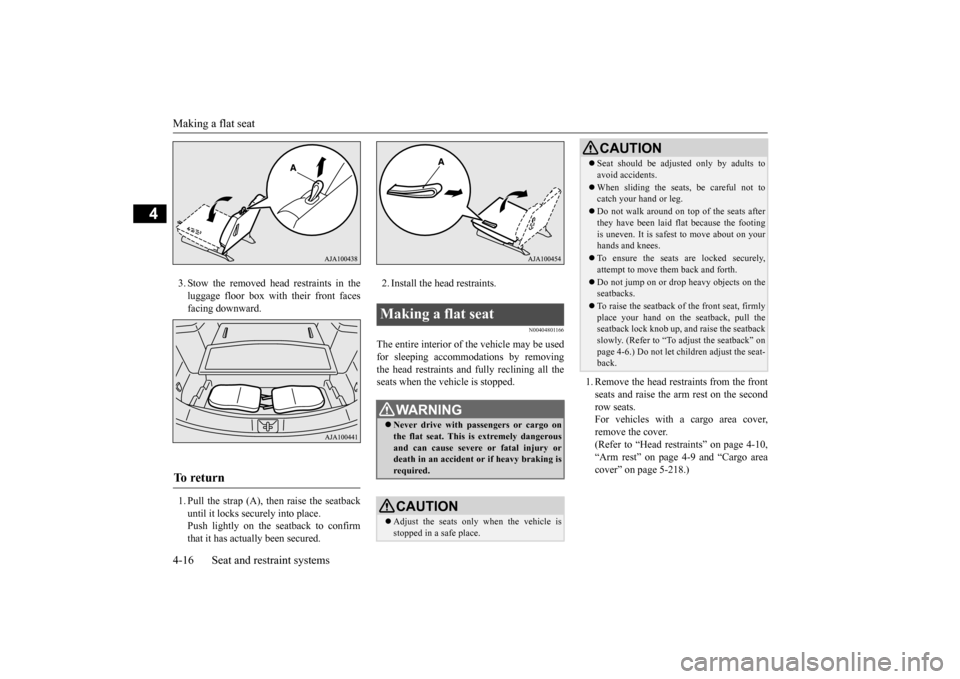
3. Stow the removed head restraints in the luggage floor box with their front facesfacing downward. 1. Pull the strap (A), then raise the seatback until it locks securely into place.Push lightly on the seatback to confirm that it has actually been secured.
2. Install the head restraints.
N00404801166
The entire interior of the vehicle may be used for sleeping accomm
odations by removing
the head restraints and fully reclining all theseats when the vehicle is stopped.
1. Remove the head re
straints from the front
seats and raise the arm rest on the second row seats. For vehicles with a cargo area cover,remove the cover. (Refer to “Head restraints” on page 4-10, “Arm rest” on page 4-9 and “Cargo areacover” on page 5-218.)
To r e t u r n
Making a flat seat
WA R N I N G Never drive with passengers or cargo on the flat seat. This is extremely dangerous and can cause severe or fatal injury or death in an accident
or if heavy braking is
required.CAUTION Adjust the seats only
when the vehicle is
stopped in a safe place.
Seat should be adjusted only by adults to avoid accidents. When sliding the seat
s, be careful not to
catch your hand or leg. Do not walk around on top of the seats after they have been laid flat because the footing is uneven. It is safest to move about on yourhands and knees. To ensure the seats are locked securely, attempt to move them back and forth. Do not jump on or drop heavy objects on the seatbacks. To raise the seatback of the front seat, firmly place your hand on th
e seatback, pull the
seatback lock knob up,
and raise the seatback
slowly. (Refer to “To adjust the seatback” onpage 4-6.) Do not let ch
ildren adjust the seat-
back.CAUTION
BK0211800US.book 16 ページ 2014年3月12日 水曜日 午後2時42分
Page 49 of 446

Seat belts 4-22 Seat and restraint systems
4
N00418401394
A tone and warning light are used to remind the driver to fasten the seat belt. If the ignition switch is turned to the “ON” position or the operation mode is put in ONwithout the driver’s seat belt being fastened, a
warning light will come on and a tone will sound for approximately 6 seconds to remindyou to fasten your seat belt. If the vehicle is driven with the seat belt still unfastened, the warning light will blink andthe tone will sound inte
rmittently until the
seat belt is fastened. At the same time, “FAS- TEN SEAT BELT” is displayed on the infor-mation screen in the multi information display (Type 1 only).
N00418301247
The front passenger seat
belt warning light is
located in the instrument panel. When the ignition switch is turned to the “ON” position or the ope
ration mode is put in
ON, this indicator
normally comes on and
goes off a few seconds later.The light comes on when a person sits on the front passenger seat but does not fasten the seat belt. It goes off wh
en the seat belt is sub-
sequently fastened.
Driver’s seat belt reminder/warning light and display Type 1 Type 2
WA R N I N G In order to reduce the risk of serious injury or death in an accident, always fas- ten your own seat belt. Do not allow any-one to ride in your ve
hicle unless he or she
is also seated and fastening a seat belt. Children should additi
onally be restrained
in a secure child restraint system.NOTE
If the seat belt subs
equently remains unfas-
tened, the warning li
ght and the tone will
issue further warnings
each time the vehicle
starts moving from a stop.
Front passenger seat belt warn- ing light
BK0211800US.book 22 ページ 2014年3月12日 水曜日 午後2時42分
Page 50 of 446
Seat belts
Seat and restraint systems 4-23
4
N00406301354
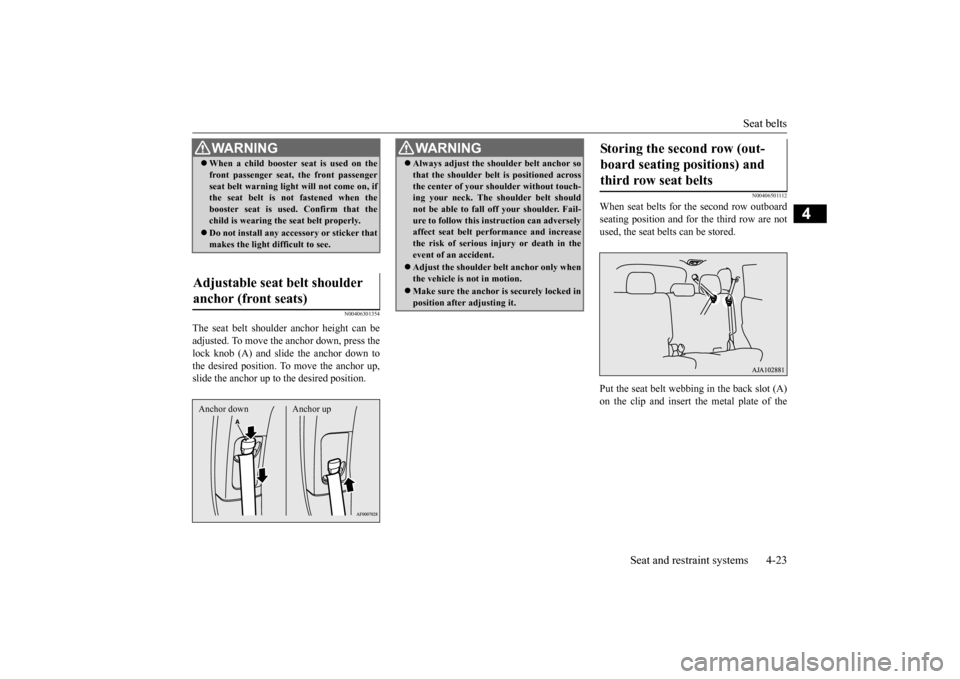
The seat belt shoulder
anchor height can be
adjusted. To move the anchor down, press thelock knob (A) and slide the anchor down to the desired position. To
move the anchor up,
slide the anchor up to the desired position.
N00406501112
When seat belts for the second row outboardseating position and for the third row are not used, the seat belts can be stored. Put the seat belt webbing in the back slot (A) on the clip and insert the metal plate of the
WA R N I N G When a child booster se
at is used on the
front passenger seat, the front passengerseat belt warning ligh
t will not come on, if
the seat belt is not fastened when the booster seat is used
. Confirm that the
child is wearing the seat belt properly. Do not install any acce
ssory or sticker that
makes the light difficult to see.
Adjustable seat belt shoulder anchor (front seats) Anchor down Anchor up
WA R N I N G Always adjust the shou
lder belt anchor so
that the shoulder belt
is positioned across
the center of your shoulder without touch-ing your neck. The sh
oulder belt should
not be able to fall off your shoulder. Fail- ure to follow this instruction can adverselyaffect seat belt performance and increase the risk of serious in
jury or death in the
event of an accident. Adjust the shoulder be
lt anchor only when
the vehicle is not in motion. Make sure the anchor is securely locked in position after adjusting it.
Storing the second row (out- board seating positions) and third row seat belts
BK0211800US.book 23 ページ 2014年3月12日 水曜日 午後2時42分
Page 52 of 446
Child restraint systems
Seat and restraint systems 4-25
4
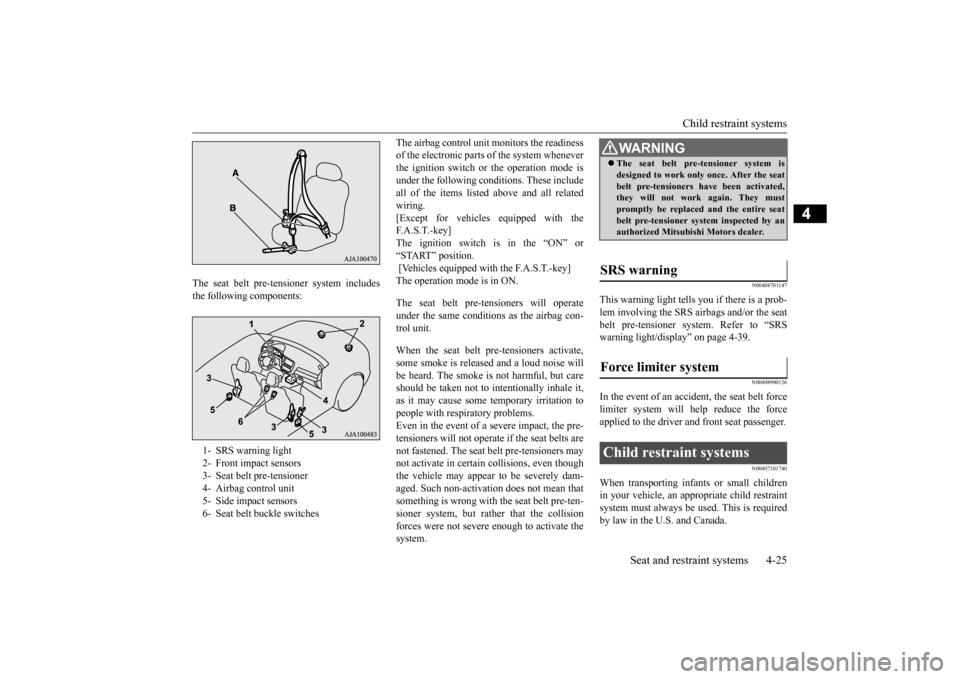
The seat belt pre-tensioner system includes the following components:
The airbag control unit
monitors the readiness
of the electronic parts of the system wheneverthe ignition switch or the operation mode is under the following conditions. These include all of the item
s listed above a
nd all related
wiring. [Except for vehicles equipped with the F. A . S . T. - k e y ]The ignition switch is in the “ON” or “START” position. [Vehicles equipped with the F.A.S.T.-key] The operation mode is in ON. The seat belt pre-tens
ioners will operate
under the same conditions
as the airbag con-
trol unit. When the seat belt pre-tensioners activate, some smoke is released
and a loud noise will
be heard. The smoke is
not harmful, but care
should be taken not to in
tentionally inhale it,
as it may cause some
temporary irritation to
people with respiratory problems.Even in the event of a severe impact, the pre- tensioners will
not operate if the seat belts are
not fastened. The seat be
lt pre-tensioners may
not activate in certai
n collisions, even though
the vehicle may appear
to be severely dam-
aged. Such non-activation does not mean thatsomething is wrong with the seat belt pre-ten- sioner system, but rather that the collision forces were not severe
enough to activate the
system.
N00408701147
This warning light tells you if there is a prob-lem involving the SRS airbags and/or the seat belt pre-tensioner system. Refer to “SRS warning light/display” on page 4-39.
N00408900126
In the event of an accident, the seat belt forcelimiter system will help reduce the forceapplied to the driver a
nd front seat passenger.
N00407101740
When transporting infants or small children in your vehicle, an appr
opriate child restraint
system must always be
used. This is required
by law in the U.S. and Canada.
1- SRS warning light 2- Front impact sensors 3- Seat belt
pre-tensioner
4- Airbag control unit 5- Side impact sensors 6- Seat belt
buckle switches
WA R N I N GThe seat belt pre-tensioner system is designed to work only
once. After the seat
belt pre-tensioners have been activated,they will not work again. They must promptly be replaced and the entire seat belt pre-tensioner system inspected by anauthorized Mitsubis
hi Motors dealer.
SRS warning Force limiter system Child restraint systems
BK0211800US.book 25 ページ 2014年3月12日 水曜日 午後2時42分
Page 62 of 446
Supplemental Restraint System (SRS) - airbag
Seat and restraint systems 4-35
4
N00407801532
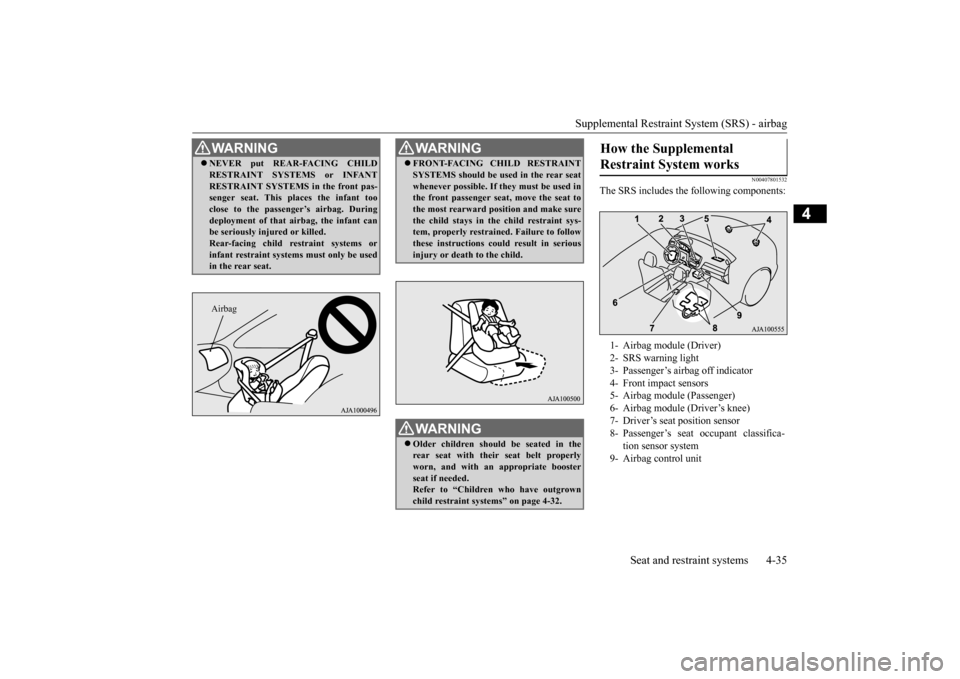
The SRS includes the following components:
WA R N I N G NEVER put REAR-FACING CHILD RESTRAINT SYSTEMS or INFANTRESTRAINT SYSTEMS in the front pas-senger seat. This pl
aces the infant too
close to the passenger’s airbag. During deployment of that airbag, the infant canbe seriously inju
red or killed.
Rear-facing child restraint systems or infant restraint systems must only be usedin the rear seat.Airbag
WA R N I N G FRONT-FACING CHILD RESTRAINT SYSTEMS should be used in the rear seatwhenever possible. If they must be used inthe front passenger seat, move the seat to the most rearward po
sition and make sure
the child stays in the child restraint sys-tem, properly restrained. Failure to follow these instructions could result in serious injury or death to the child.WA R N I N G Older children should be seated in the rear seat with thei
r seat belt properly
worn, and with an
appropriate booster
seat if needed. Refer to “Children
who have outgrown
child restraint systems” on page 4-32.
How the Supplemental Restraint System works 1- Airbag module (Driver) 2- SRS warning light 3- Passenger’s airb
ag off indicator
4- Front impact sensors5- Airbag module (Passenger) 6- Airbag module (Driver’s knee) 7- Driver’s seat
position sensor
8- Passenger’s seat oc
cupant classifica-
tion sensor system
9- Airbag control unit
BK0211800US.book 35 ページ 2014年3月12日 水曜日 午後2時42分
Page 64 of 446
Supplemental Restraint System (SRS) - airbag
Seat and restraint systems 4-37
4
To read data recorded
by an EDR, special
equipment is requi
red, and access to the vehi-
cle or the EDR is needed. In addition to thevehicle manufacturer, ot
her parties, such as
law enforcement, that have the special equip- ment, can read the information if they haveaccess to the vehicle or the EDR.
N00417900177
The driver’s seat posit
ion sensor is attached
to the seat rail and pr
ovides the airbag control
unit with information
on the seat’s fore-aft
position. The airbag control unit controlsdeployment of the driver’s front airbag in accordance with the information it receives from this sensor.If there is a problem involving the driver’s seat position sensor, the SRS warning light in
the instrument panel will come on. Refer to “SRS warning light/display” on page 4-39.
N00418001374
The passenger’s seat oc
cupant classification
sensor system is attached to the front passen- ger seat cushion and provides the airbag con-trol unit with inform
ation regarding the
occupant on the front passenger seat. The air-
bag control unit controls deployment of the passenger’s front airbag
in accordance with
the information it receives from this system. The passenger’s front airbag will not deploy in an impact when the system senses no occu-pant on the front passenge
r’s seat or a child in
a child restraint system. In this case, the pas- senger airbag off indi
cator will come on.
Refer to “Passenger’s ai
rbag off indicator” on
page 4-38. If there is a problem involving the passen- ger’s seat occupant cl
assification sensor sys-
tem, the SRS warning light in the instrumentpanel will come on. Re
fer to “SRS warning
light/display” on page 4-39.
NOTE
EDR data are recorded by your vehicle only if a non-trivial crash si
tuation occurs; no data
are recorded by the EDR under normal driv-ing conditions and no
personal data (e.g.,
name, gender, age, a
nd crash location) are
recorded. However, other parties, such aslaw enforcement, could combine the EDR data with the type of personally identifying data routinely acquire
d during a crash inves-
tigation.
Driver’s seat position sensor
WA R N I N G If the SRS warning li
ght or warning dis-
play comes on, have th
e vehicle inspected
by an authorized
Mitsubishi Motors
dealer as soon
as possible.
Please observe the following instructions to ensure that the driver’s seat positionsensor can operate correctly.• Adjust the seat to the correct position,and sit well back
against the seatback.
Refer to “Front seats” on page 4-4.• Do not recline the seatback more thannecessary when driving.• Do not place metall
ic objects or luggage
under the front seat.
If the vehicle is
involved in a severe
impact, have the SRS sensors inspected by an authorized Mitsubi
shi Motors dealer as
soon as possible.
Passenger’s seat occupant clas- sification sensor system
WA R N I N G If any of the following conditions occur, you should immediatel
y have your vehicle
inspected by an authorized Mitsubishi Motors dealer as soon as possible:• The SRS warning light does not initiallycome on when the ignition switch or the operation mode is under the followingconditions. [Except for vehicles equipped with the F. A . S . T. - k e y ]The ignition switch is in the “ON” or “START” position. [Vehicles equipped with the F.A.S.T.-key]The operation mode is in ON.• The SRS warning light does not go outafter several seconds.
BK0211800US.book 37 ページ 2014年3月12日 水曜日 午後2時42分