2015 MITSUBISHI OUTLANDER III USB
[x] Cancel search: USBPage 4 of 446

Instruments and controls
Overview 1-2
1
Audio (if so equipped) P.7-15 Mitsubishi Multi-Communication Syst
em (MMCS) (if so equipped)
[For DISPLAY AUDIO and MMCS, refer to the separate owner’s manuals.]
Hazard warning flasher switch P.5-177
Electric rear window defogger switch P.5-183 Fuel tank filler door release lever P. 3 - 3
Drive mode selector (if so equipped) P.5-75 S-AWC drive mode-selector (if so equipped) P.5-78
Selector lever P.5-60, 5-67
Parking brake lever P.5-52
Supplemental restraint system (SRS) - air bag (for front passenger’s seat) P.4-33, 4-39
Air conditioner P.7-5 Hood release lever P. 9 - 3
Floor console box P.5-215 Arm rest 12 V power outlet P.5-210 USB input terminal (if so equipped) P.5-206 Heated seat switch (if so equipped) P. 4 - 7
Cup holder P.5-217
12 V power outlet P.5-210
Power liftgate main sw
itch (if so equipped)
P.5-37
Key slot (if so equipped) P.5-25
Glove compartment P.5-214 Card holder P.5-214
Passenger’s vents P. 7 - 2
Passenger’s airbag off indicator P.4-38
Front passenger seat belt warning light P.4-22
BK0211800US.book 2 ページ 2014年3月12日 水曜日 午後2時42分
Page 79 of 446
5
Features and controlsECO mode switch ........................................................................ 5-177 Front fog light switch (if so equipped) ......................................... 5-178 Wiper and washer switch ............................................................ 5-178Electric rear window def
ogger switch ......
...........
...........
............. 5-183
Horn switch ................................................................................. 5-184 Link System (if so equipped) ....................................................... 5-184 Bluetooth
® 2.0 interface (if so equipped) .................................... 5-185
USB input terminal (if so equipped) ............................................ 5-206 Sun visors .................................................................................... 5-20912 V power outlets ...................................................................... 5-210 Interior lights ............................................................................... 5-211 Storage spaces ............................................................................. 5-213Cup holders ................................................................................. 5-217 Bottle holders .............................................................................. 5-218 Cargo area cover (if so equipped) ............................................... 5-218Assist grips .................................................................................. 5-220 Coat hooks ................................................................................... 5-220 Luggage hooks ............................................................................ 5-221BK0211800US.book 2 ページ 2014年3月12日 水曜日 午後2時42分
Page 261 of 446
Horn switch 5-184 Features and controls
5
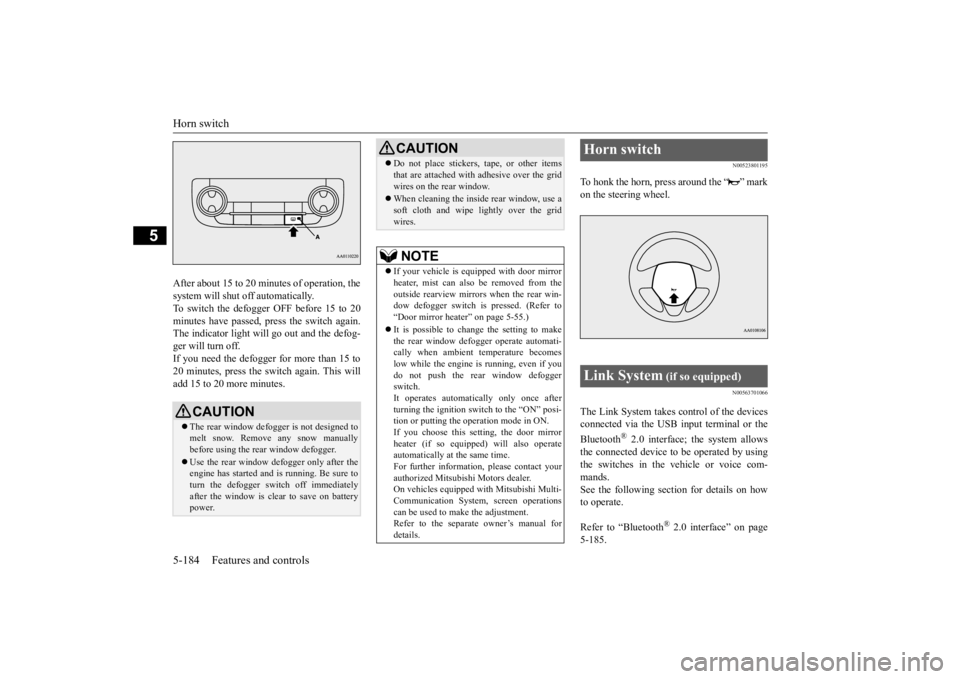
After about 15 to 20 minutes of operation, the system will shut off automatically.To switch the defogger OFF before 15 to 20 minutes have passed,
press the switch again.
The indicator light will
go out and the defog-
ger will turn off. If you need the defogger for more than 15 to 20 minutes, press the switch again. This willadd 15 to 20 more minutes.
N00523801195
To honk the horn, press around the “ ” markon the steering wheel.
N00563701066
The Link System takes co
ntrol of the devices
connected via the USB input terminal or the Bluetooth
® 2.0 interface; the system allows
the connected device to
be operated by using
the switches in the vehicle or voice com- mands. See the following secti
on for details on how
to operate. Refer to “Bluetooth
® 2.0 interface” on page
5-185.
CAUTION The rear window defogge
r is not designed to
melt snow. Remove any snow manually before using the rear window defogger. Use the rear window defogger only after the engine has started and
is running. Be sure to
turn the defogger switch off immediatelyafter the window is clea
r to save on battery
power.
Do not place stickers,
tape, or other items
that are attached with adhesive over the gridwires on the rear window. When cleaning the inside
rear window, use a
soft cloth and wipe lightly over the gridwires.NOTE
If your vehicle is e
quipped with door mirror
heater, mist can also be removed from the outside rearview mirror
s when the rear win-
dow defogger switch is
pressed. (Refer to
“Door mirror heater” on page 5-55.) It is possible to cha
nge the setting to make
the rear window defogger operate automati- cally when ambient temperature becomes low while the engine is running, even if youdo not push the rear window defogger switch. It operates automatically only once afterturning the ignition sw
itch to the “ON” posi-
tion or putting the ope
ration mode in ON.
If you choose this setting, the door mirrorheater (if so equipped) will also operateautomatically at the same time. For further informati
on, please contact your
authorized Mitsubishi Motors dealer.On vehicles equipped
with Mitsubishi Multi-
Communication System,
screen operations
can be used to make the adjustment.Refer to the separate owner’s manual for details.CAUTION
Horn switch Link System
(if so equipped)
BK0211800US.book 184 ページ 2014年3月12日 水曜日 午後2時42分
Page 262 of 446
Bluetooth® 2.0 interface (if so equipped)
Features and controls 5-185
5
Refer to “USB input terminal” on page 5-206. Bluetooth
® is a registered trademark of
BLUETOOTH SIG, INC.
N00563801025
You have acquired a devi
ce that includes soft-
ware licensed to Mitsubishi Motors Corpora- tion from JOHNSON CONTROLS Inc (the automotive experience business unit), and their subsequent 3rd
party suppliers. For a
complete list of these
3rd party products and
their end user license agreements, please go to the following website. http://www.jciblueconne
ct.com/faq/fulldis-
closure.pdf
N00563901260
The Bluetooth
® 2.0 interface allows for mak-
ing/receiving ha
nds-free calls in the vehicle
using a Bluetooth
® compatible cellular
phone. It also allows the user to play music, saved in a Bluetooth
® music player, from the
vehicle’s speakers.
The system is equipped
with a voice recogni-
tion function, which allows you to makehands-free calls by simple switch operations and voice command operations using a defined voice tree. The Bluetooth
® 2.0 interface
can be used
when the ignition switch or the operation mode is in ON or ACC. Before you can use the Bluetooth
® 2.0 inter-
face, you must pa
ir the Bluetooth
® device
and Bluetooth
® 2.0 interface. Refer to “Con-
necting the Bluetooth
® 2.0 interface and
Bluetooth
® device” on page 5-191.
Bluetooth
® is a registered trademark of
BLUETOOTH SIG, INC.
Link System End User License Agreement
Bluetooth
® 2.0 interface
(if so
equipped)
WA R N I N G Although the Bluetooth
® 2.0 interface
allows you to make ha
nds-free calls, if you
choose to use the cellular phone while driving, you must not allow yourself to bedistracted from the sa
fe operation of your
vehicle. Anything, including cellular phone usage, that distracts you from thesafe operation of your vehicle increases your risk of an accident. Refer to and comply with all state and local laws in your area regarding cellular phone usage wh
ile driving.
NOTE
If the ignition switch
or the operation mode
is left in ACC, the accessory power willautomatically turn off after a certain periodof time and you will no longer be able to use the Bluetooth
® 2.0 interface. The accessory
power comes on again if the ignition switch or the engine switch is operated. Refer to“ACC power auto-cutout function” on page 5-18 and 5-56. The Bluetooth
® 2.0 interface cannot be used
if the Bluetooth
® device has a dead battery
or the device power is turned off. Hands-free calls will
not be possible if your
phone does not have
service available.
If you place the Bluetooth
® device in the
vehicle’s third seat or luggage compartment, you may not be able to use the Bluetooth
®
2.0 interface. Some Bluetooth
® devices are not compatible
with the Bluetooth
® 2.0 interface.
You can confirm the Link System software version by pressing the HANG-UP button 3times (press and hold 2 times and then press briefly) within 10 seconds.
BK0211800US.book 185 ページ 2014年3月12日 水曜日 午後2時42分
Page 283 of 446
USB input terminal (if so equipped) 5-206 Features and controls
5
N00566701041
You can connect your USB memory device or iPod
* to play music files stored in the USB
memory device or iPod. The following explains how to connect and remove a USB memory device or iPod. * : “iPod” is a register
ed trademark of Apple
Inc. in the United Stat
es and other countries.
N00566801114
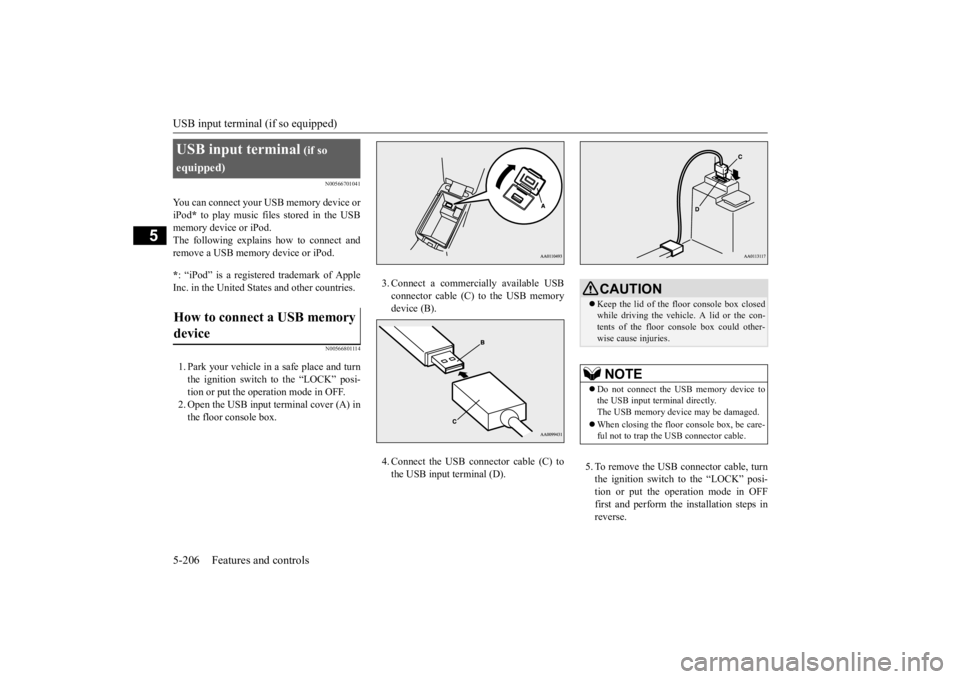
1. Park your vehicle in a safe place and turn the ignition switch to the “LOCK” posi- tion or put the operation mode in OFF. 2. Open the USB input terminal cover (A) inthe floor console box.
3. Connect a commercially available USB connector cable (C) to the USB memorydevice (B). 4. Connect the USB c
onnector cable (C) to
the USB input terminal (D).
5. To remove the USB connector cable, turn the ignition switch to the “LOCK” posi-tion or put the operation mode in OFF first and perform the
installation steps in
reverse.
USB input terminal
(if so
equipped)How to connect a USB memory device
CAUTION Keep the lid of the floor console box closed while driving the vehicle. A lid or the con-tents of the floor console box could other- wise cause injuries.NOTE
Do not connect the US
B memory device to
the USB input term
inal directly.
The USB memory devi
ce may be damaged.
When closing the floor
console box, be care-
ful not to trap the USB connector cable.
BK0211800US.book 206 ページ 2014年3月12日 水曜日 午後2時42分
Page 284 of 446
USB input terminal (if so equipped)
Features and controls 5-207
5
N00566901102
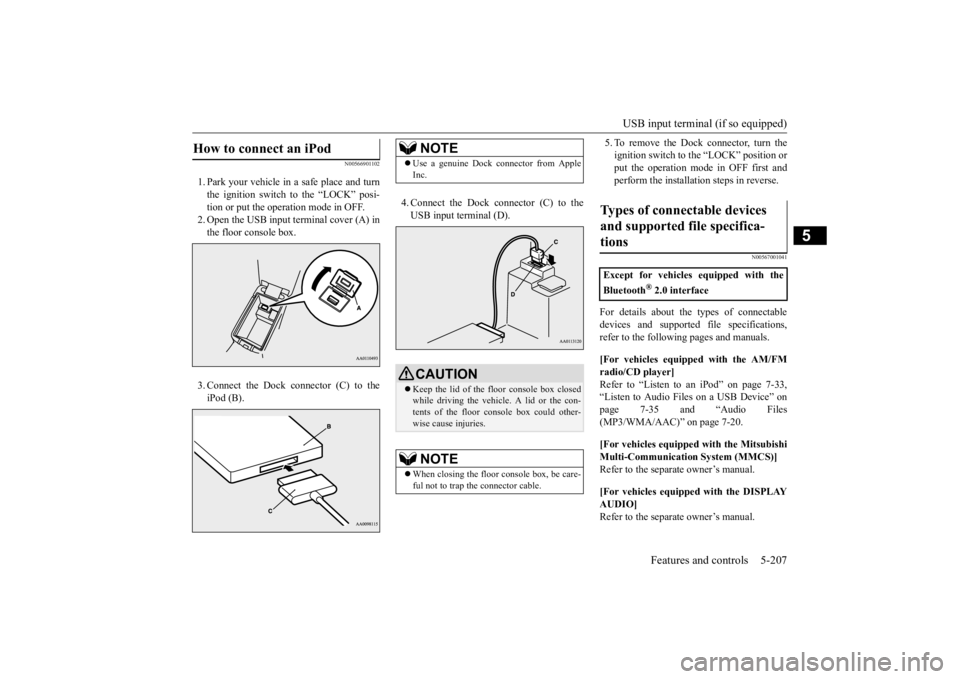
1. Park your vehicle in
a safe place and turn
the ignition switch to the “LOCK” posi-tion or put the opera
tion mode in OFF.
2. Open the USB input
terminal cover (A) in
the floor console box. 3. Connect the Dock connector (C) to the iPod (B).
4. Connect the Dock connector (C) to the USB input terminal (D).
5. To remove the Dock connector, turn the ignition switch to the “LOCK” position orput the operation mode in OFF first and perform the installation steps in reverse.
N00567001041
For details about the
types of connectable
devices and supported fi
le specifications,
refer to the following pages and manuals. [For vehicles equipped with the AM/FM radio/CD player] Refer to “Listen to an
iPod” on page 7-33,
“Listen to Audio File
s on a USB Device” on
page 7-35 and “Audio Files (MP3/WMA/AAC)” on page 7-20. [For vehicles equipped with the Mitsubishi Multi-Communication
System (MMCS)]
Refer to the separa
te owner’s manual.
[For vehicles equipped with the DISPLAY AUDIO] Refer to the separa
te owner’s manual.
How to connect an iPod
NOTE
Use a genuine Dock connector from Apple Inc.CAUTION Keep the lid of the floor console box closed while driving the vehicle. A lid or the con- tents of the floor console box could other-wise cause injuries.NOTE
When closing the floor console box, be care- ful not to trap the connector cable.
Types of connectable devices and supported file specifica-tions
Except for vehicles equipped with the Bluetooth
® 2.0 interface
BK0211800US.book 207 ページ 2014年3月12日 水曜日 午後2時42分
Page 285 of 446
USB input terminal (if so equipped) 5-208 Features and controls
5
For details about the types of connectable devices and supported fi
le specifications,
refer to the following section.
N00567101130
Devices of the follow
ing types can be con-
nected. For these connectable de
vice types, “iPod*,”
“iPod classic*,” “iP
od nano*,” “iPod touch*”
and “iPhone*,” refer to the following web- site: [For vehicles sold in U.S.A.]You can access the Mitsubishi Motors North America website. [For vehicles sold in Canada and Mexico]
You can access the Mi
tsubishi Motors web-
site. Please read and agree to the “Warningabout Links to the Web Sites of Other Com- panies”. The websites
mentioned above may
connect you to websites
other than the Mit-
subishi Motors website. http://www.mitsubishi-
motors.com/en/prod-
ucts/index.html * : “iPod,” “iPod classic,” “iPod nano,” “iPod touch,” and “iPhone” are registered trade- marks of Apple Inc. in the United States and other countries.
N00567201056
You can play music files of the followingspecifications that are saved in a USB mem- ory device or other device supporting mass storage class. When you connect your iPod,playable file specifications depend on the connected iPod.
For vehicles equipped with the Blue- tooth
® 2.0 interface
Device types
Model name
Condition
USB memory device
Storage capac- ity of 256 Mbytes or more
Models other than USB memory devices and iPods
Digital audio player support-ing mass stor- age class
NOTE
Depending on the type of the USB memory device or other devi
ce connected, the con-
nected device may not
function properly or
the available functi
ons may be limited.
It is recommended to use an iPod with firm- ware updated to th
e latest version.
You can charge your iP
od by connecting it to
the USB input terminal
when the ignition
switch or the operation mode is in ON or ACC. Do not keep your USB memory device or iPod in your vehicle. It is recommended that you back up the files in case of data damage.
Do not connect to the USB input terminal any device (hard disk, card reader, memoryreader, etc.) other than the connectabledevices specified in the previous section. The device and/or data
may be damaged. If
any of these devices
was connected by mis-
take, remove it afte
r turning the ignition
switch to the “LOCK”
position or putting the
operation mode in OFF.
File specifications
Item
Condition
File format
MP3, WMA, AAC, WAV
Maximum number of levels (including the root)
Level 8
Number of folders 700 Number of files 65,535
NOTE
BK0211800US.book 208 ページ 2014年3月12日 水曜日 午後2時42分
Page 292 of 446
Storage spaces
Features and controls 5-215
5
N00551601244
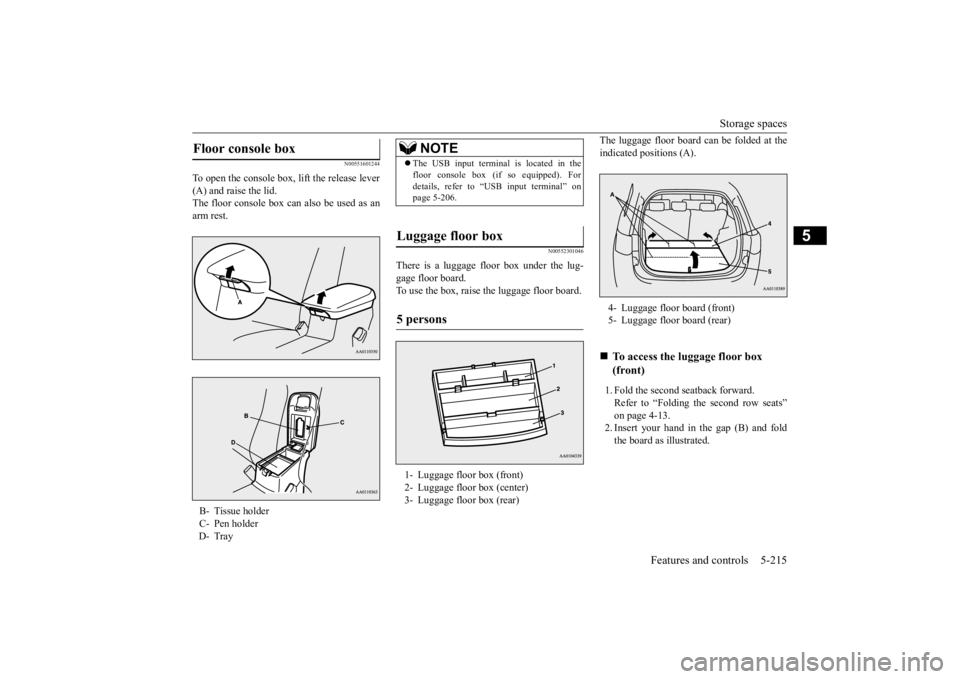
To open the console box, lift the release lever (A) and raise the lid. The floor console box can also be used as anarm rest.
N00552301046
There is a luggage floor box under the lug-gage floor board. To use the box, raise the luggage floor board.
The luggage floor board can be folded at the indicated positions (A). 1. Fold the second seatback forward. Refer to “Folding the second row seats” on page 4-13. 2. Insert your hand in the gap (B) and foldthe board as illustrated.
Floor console box B- Tissue holderC- Pen holderD- Tray
NOTE
The USB input terminal is located in the floor console box (if
so equipped). For
details, refer to “USB input terminal” onpage 5-206.
Luggage floor box 5 persons 1- Luggage floor box (front) 2- Luggage floor box (center) 3- Luggage floor box (rear)
4- Luggage floor board (front)5- Luggage floor board (rear)
To access the lu
ggage floor box
(front)
BK0211800US.book 215 ページ 2014年3月12日 水曜日 午後2時42分