2015 MITSUBISHI OUTLANDER III spare tire
[x] Cancel search: spare tirePage 230 of 446
Indicator light, warning light, and information screen display list (multi information display - Type 1)
Features and controls 5-153
5
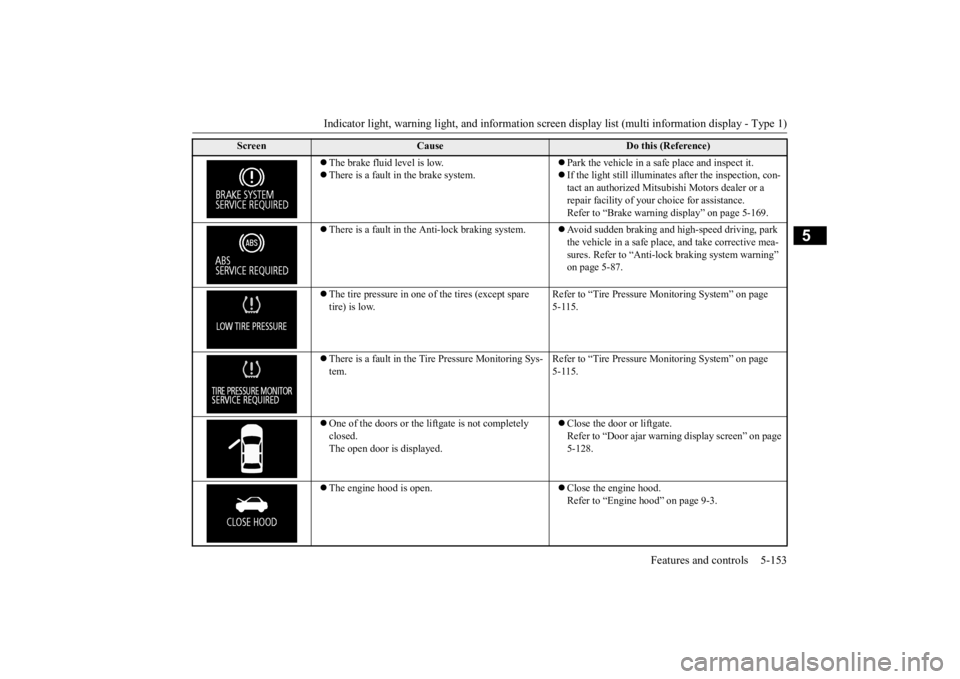
The brake fluid level is low. There is a fault in the brake system.
Park the vehicle in a sa
fe place and inspect it.
If the light still illuminates after the inspection, con- tact an authorized Mitsubishi Motors dealer or a repair facility of your
choice for assistance.
Refer to “Brake warning display” on page 5-169.
There is a fault in the Anti-lock braking system.
Avoid sudden braking and hi
gh-speed driving, park
the vehicle in a safe place, and take corrective mea- sures. Refer to “Anti-lock braking system warning” on page 5-87.
The tire pressure in one of the tires (except spare tire) is low.
Refer to “Tire Pressure
Monitoring System” on page
5-115.
There is a fault in the Tire Pressure Monitoring Sys- tem.
Refer to “Tire Pressure
Monitoring System” on page
5-115.
One of the doors or the liftgate is not completely closed. The open door is displayed.
Close the door or liftgate. Refer to “Door ajar warni
ng display screen” on page
5-128.
The engine hood is open.
Close the engine hood. Refer to “Engine hood” on page 9-3.
Screen
Cause
Do this (Reference)
BK0211800US.book 153 ページ 2014年3月12日 水曜日 午後2時42分
Page 303 of 446
Vehicle preparation before driving 6-4 Driving safety
6
N00629001709
For a safer and more enjoyable trip, always check for the following: Before starting the vehicle, make certain that you and all passengers are seated and wearing their seat
belts properly (with
children in the rear seat, in appropriate restraints), and that all the doors and the liftgate are locked. Move the driver’s seat as far backward as possible, while keep
ing good visibility,
and good control of the steering wheel,brakes, accelerator,
and controls. Check
the instrument panel
indicators and multi-
information display for any possible prob-lem. Similarly, the front
passenger seat should
also be moved as far back as possible. Make sure that infa
nts and small children
are properly restrained in accordance with all laws and regulations.
Check these by selecting the defroster mode, and set the blower swit
ch on high. You should
be able to feel the air blowing against thewindshield. Refer to “Defrosti
ng or defogging (wind-
shield, door windows)” on page 7-13 Check all the tires for heavy tread wear or uneven wear patterns. Look for stones, nails, glass, or other objects
stuck in the tread. Look
for any tread cuts or
sidewall cracks. Check
the wheel nuts for tightness, and the tires (including spare tire) for proper pressure. Replace your tires before they are heavilyworn out. As your vehicle is equi
pped with a tire pres-
sure monitoring system, there is a risk ofdamage to the tire inflation pressure sensors when the tire is replaced on the rim. Tire replacement should, only, be performed by anauthorized Mitsubishi Motors dealer. Have someone watch while you turn all the exterior lights on and off. Also check the turn
signal indicators and hi
gh-beam indicators on
the instrument panel. Check the ground under the vehicle after parking overnight, for
fuel, water, oil, or
other leaks. Make sure
all the fluid levels are
correct. Also, if you
can smell fuel, you need
to find out why imme
diately and have it
fixed.
N00629201134
Even this vehicle’s sa
fety equipment, and
your safest driving, ca
nnot guarantee that you
can avoid an accident or injury. However, ifyou give extra attention to the following areas, you can better protect yourself and your passengers: Drive defensively. Be aware of traffic, road and weather conditions. Leave plenty of stopping distance between your vehicle and the vehicle ahead. Before changing lanes, check your mir- rors, blind spots, and use your turn-signal light. While driving, watch the behavior of other drivers, bicyc
lists, and pedestrians.
Vehicle preparation before driving Seat belts and seats
Defrosters Tires Lights
Fluid leaks Safe driving techniques
BK0211800US.book 4 ページ 2014年3月12日 水曜日 午後2時42分
Page 372 of 446
How to change a tire
For emergencies 8-7
8
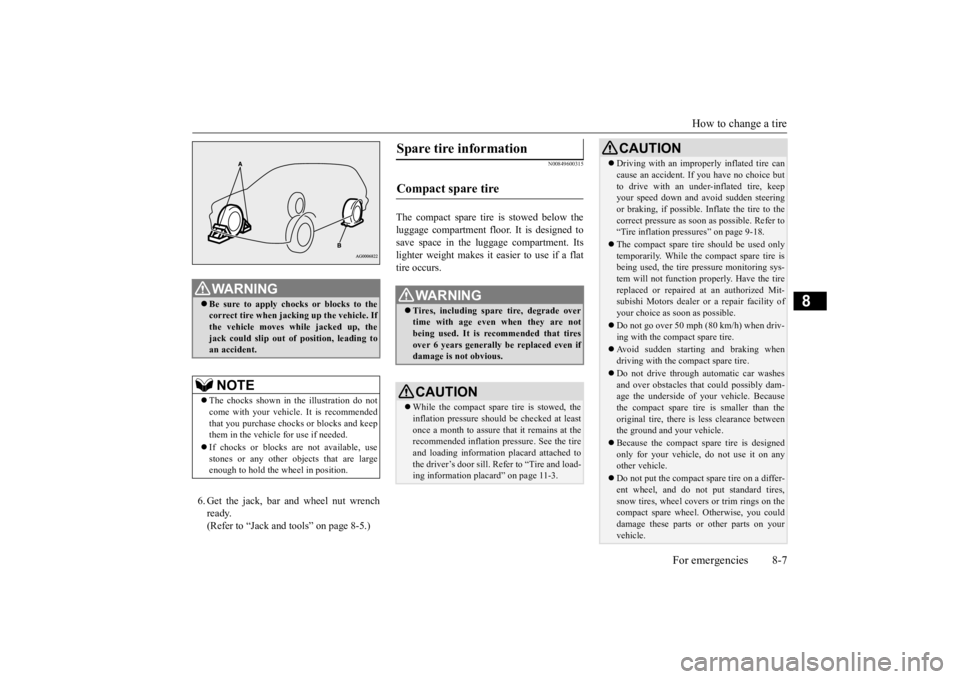
6. Get the jack, bar and wheel nut wrench ready.(Refer to “Jack and t
ools” on page 8-5.)
N00849600315
The compact spare tire is stowed below the luggage compartment fl
oor. It is designed to
save space in the luggage compartment. Itslighter weight makes it easier to use if a flat tire occurs.
WA R N I N G Be sure to apply choc
ks or blocks to the
correct tire when jacking up the vehicle. Ifthe vehicle moves while jacked up, the jack could slip out of
position, leading to
an accident.NOTE
The chocks shown in the illustration do not come with your vehicl
e. It is recommended
that you purchase chocks or blocks and keep them in the vehicle for use if needed. If chocks or blocks
are not available, use
stones or any other obj
ects that are large
enough to hold the wheel in position.
Spare tire information Compact spare tire
WA R N I N G Tires, including spar
e tire, degrade over
time with age even when they are not being used. It is recommended that tiresover 6 years generally
be replaced even if
damage is not obvious.CAUTION While the compact spare tire is stowed, the inflation pressure shoul
d be checked at least
once a month to assure that it remains at the recommended inflation pressure. See the tire and loading informati
on placard attached to
the driver’s door sill. Refer to “Tire and load-ing information placard” on page 11-3.
Driving with an imprope
rly inflated tire can
cause an accident. If
you have no choice but
to drive with an under-inflated tire, keepyour speed down and avoid sudden steering or braking, if possible. Inflate the tire to the correct pressure as s
oon as possible. Refer to
“Tire inflation pressures” on page 9-18. The compact spare tire should be used only temporarily. While the compact spare tire is being used, the tire pr
essure monitoring sys-
tem will not function pr
operly. Have the tire
replaced or repaired at an authorized Mit- subishi Motors dealer or
a repair facility of
your choice as soon as possible. Do not go over 50 mph (80 km/h) when driv- ing with the compact spare tire. Avoid sudden starting and braking when driving with the compact spare tire. Do not drive through automatic car washes and over obstacles that
could possibly dam-
age the underside of your vehicle. Because the compact spare tire is smaller than the original tire, there is less clearance betweenthe ground and your vehicle. Because the compact spare tire is designed only for your vehicle, do not use it on any other vehicle. Do not put the compact spare tire on a differ- ent wheel, and do not put standard tires, snow tires, wheel covers
or trim rings on the
compact spare wheel. Otherwise, you could damage these parts or other parts on your vehicle.CAUTION
BK0211800US.book 7 ページ 2014年3月12日 水曜日 午後2時42分
Page 373 of 446
How to change a tire 8-8 For emergencies
8
N00849701296
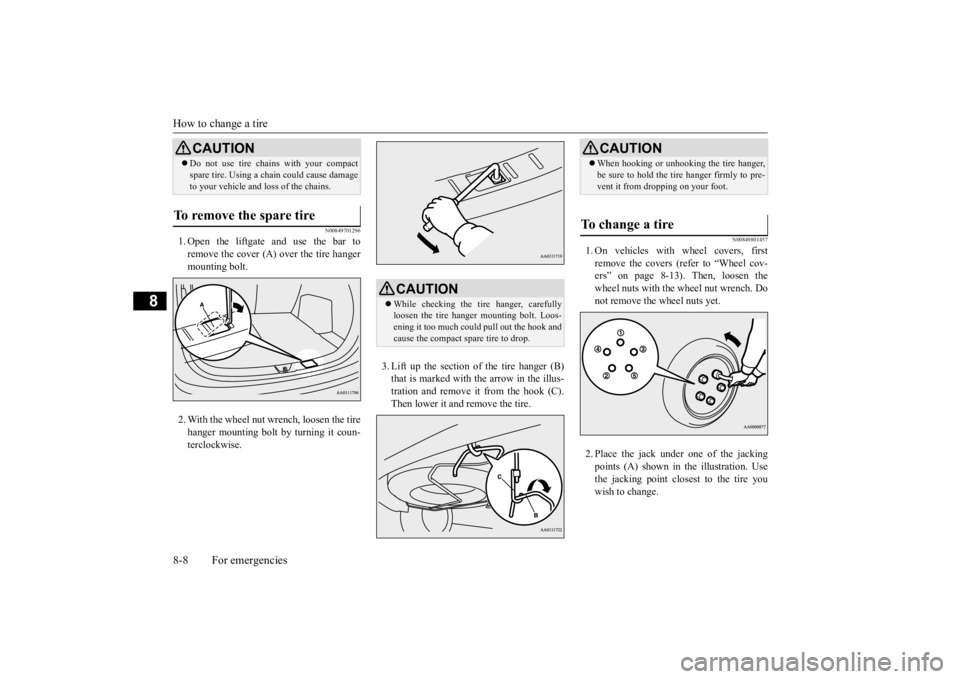
1. Open the liftgate and use the bar to remove the cover (A)
over the tire hanger
mounting bolt. 2. With the wheel nut wrench, loosen the tire hanger mounting bolt by turning it coun- terclockwise.
3. Lift up the section of the tire hanger (B) that is marked with the arrow in the illus-tration and remove it from the hook (C). Then lower it and remove the tire.
N00849801457
1. On vehicles with
wheel covers, first
remove the covers (re
fer to “Wheel cov-
ers” on page 8-13). Then, loosen thewheel nuts with the wheel nut wrench. Do not remove the wheel nuts yet. 2. Place the jack under one of the jacking points (A) shown in the illustration. Use the jacking point closest to the tire you wish to change.
Do not use tire chains with your compact spare tire. Using a ch
ain could cause damage
to your vehicle and loss of the chains.
To remove the spare tire
CAUTION
CAUTION While checking the tir
e hanger, carefully
loosen the tire hanger mounting bolt. Loos-ening it too much could pull out the hook and cause the compact spare tire to drop.
CAUTION When hooking or unhooking the tire hanger, be sure to hold the tire hanger firmly to pre-vent it from dropping on your foot.
To change a tire
BK0211800US.book 8 ページ 2014年3月12日 水曜日 午後2時42分
Page 374 of 446

How to change a tire
For emergencies 8-9
8
3. Rotate the jack by hand until the flange portion (B) fits in the groove (C) at the top of the jack. 4. Insert the bar (D) into the wheel nut wrench (E). Then put the end of the bar into the shaft’s jack end, as shown in the illustration.Slowly rotate the wheel nut wrench until the tire is raised slightly off the ground surface.
WA R N I N G Set the jack only at
the positions shown
here. If the jack is se
t at a wrong position,
it could dent your vehicle or the jack might fall over and ca
use personal injury.
Do not use the jack on a tilted or soft sur- face. Otherwise, the jack might slip and causepersonal injury. Always
use the jack on a
flat, hard surface. Before setting the jack, make sure there are no sand or pebblesunder the jack base.NOTE
Put the spare wheel under the vehicle body near the jack. This makes it safer if the jack slips out of position.
WA R N I N G Stop jacking up the ve
hicle as soon as the
tire is raised off the ground. It is danger-ous to raise the ve
hicle any higher.
Do not get under your vehicle while using the jack. Do not bump the raised
vehicle or leave it
sitting on the jack for a long time. Both are very dangerous. Do not use a jack except the one that came with your vehicle. The jack should not
be used for any pur-
pose other than to change a tire. No one should be
in your vehicle when
using the jack. Do not start or run
the engine while your
vehicle is on the jack. Do not turn the raised wheel. The tires that are still on the ground could turn and make your vehicle fall off the jack.
BK0211800US.book 9 ページ 2014年3月12日 水曜日 午後2時42分
Page 375 of 446
How to change a tire 8-10 For emergencies
8
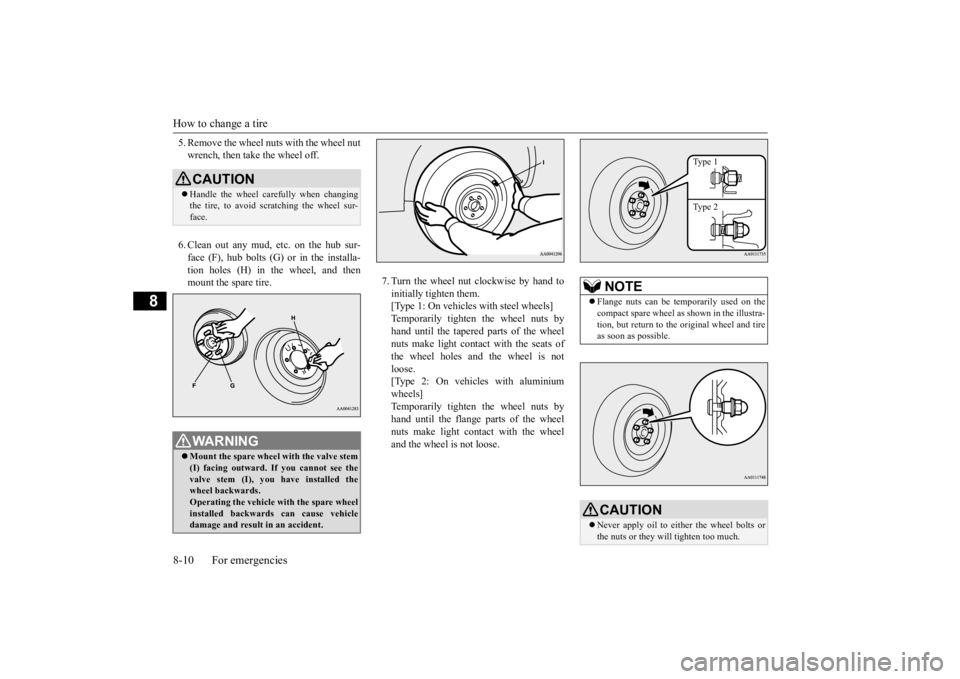
5. Remove the wheel nuts with the wheel nut wrench, then take the wheel off. 6. Clean out any mud, etc. on the hub sur- face (F), hub bolts (G)
or in the installa-
tion holes (H) in the wheel, and then mount the spare tire.
7. Turn the wheel nut clockwise by hand to initially tighten them. [Type 1: On vehicles
with steel wheels]
Temporarily tighten the wheel nuts by hand until the tapered parts of the wheel nuts make light contac
t with the seats of
the wheel holes and the wheel is not loose. [Type 2: On vehicles with aluminiumwheels] Temporarily tighten the wheel nuts by hand until the flange parts of the wheelnuts make light cont
act with the wheel
and the wheel is not loose.
CAUTION Handle the wheel carefully when changing the tire, to avoid scratching the wheel sur- face.WA R N I N G Mount the spare wheel with the valve stem (I) facing outward. If
you cannot see the
valve stem (I), you
have installed the
wheel backwards.Operating the vehicle with the spare wheel installed backwards can cause vehicle damage and result
in an ac
cident.
NOTE
Flange nuts can be te
mporarily used on the
compact spare wheel as shown in the illustra- tion, but return to the original wheel and tire as soon as possible.CAUTION Never apply oil to either the wheel bolts or the nuts or they will tighten too much.
Type 1 Type 2
BK0211800US.book 10 ページ 2014年3月12日 水曜日 午後2時42分
Page 377 of 446
How to change a tire 8-12 For emergencies
8
N00832300020
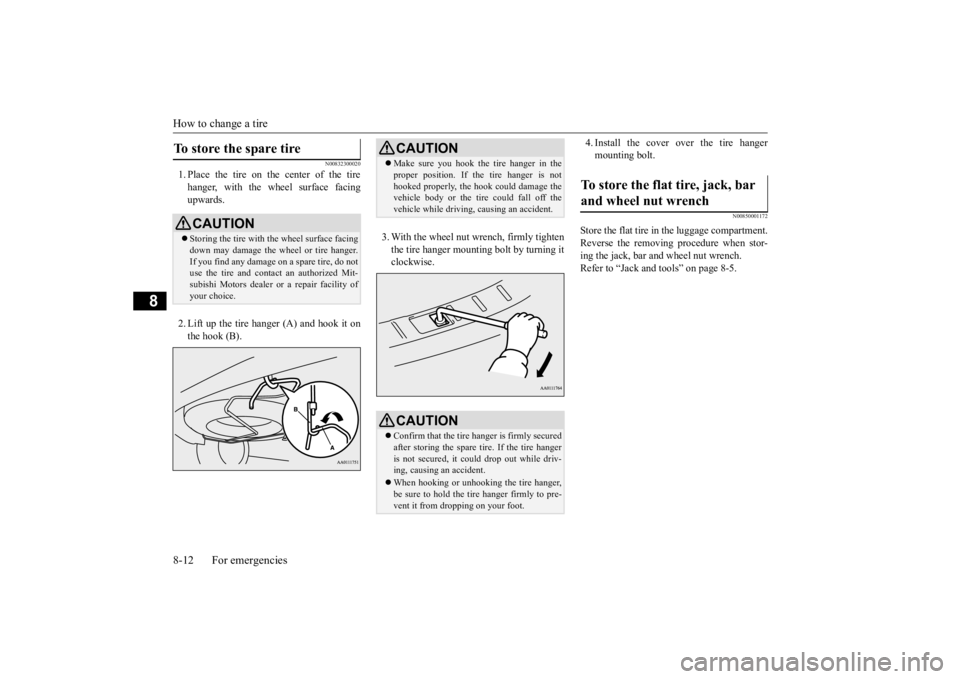
1. Place the tire on the center of the tire hanger, with the wheel surface facing upwards. 2. Lift up the tire hanger (A) and hook it on the hook (B).
3. With the wheel nut wrench, firmly tighten the tire hanger mounti
ng bolt by turning it
clockwise.
4. Install the cover over the tire hanger mounting bolt.
N00850001172
Store the flat tire in the luggage compartment.Reverse the removing procedure when stor- ing the jack, bar and wheel nut wrench. Refer to “Jack and t
ools” on page 8-5.
To store the spare tire
CAUTIONStoring the tire with the wheel surface facing down may damage the wheel or tire hanger. If you find any damage
on a spare tire, do not
use the tire and contact an authorized Mit- subishi Motors dealer or a repair facility of your choice.
CAUTION Make sure you hook the tire hanger in the proper position. If the tire hanger is nothooked properly, the hook
could damage the
vehicle body or the tire
could fall off the
vehicle while driving,
causing an accident.
CAUTIONConfirm that the tire hanger is firmly secured after storing the spare
tire. If the tire hanger
is not secured, it c
ould drop out while driv-
ing, causing
an accident.
When hooking or unhooking the tire hanger, be sure to hold the tire hanger firmly to pre-vent it from dropping on your foot.
To store the flat tire, jack, bar and wheel nut wrench
BK0211800US.book 12 ページ 2014年3月12日 水曜日 午後2時42分
Page 397 of 446

Tires 9-16 Vehicle care and maintenance
9
EXAMPLE: 95H
Maximum load indicates the maxi- mum load this tire is designed to carry.
R
Construction code •“R” means radial construc- tion. •“D” means diagonal or bias construction.
15 Rim diameter in inches (in)
NOTE
European/Japanese metric tire sizing is based on European/Jap- anese design standards. Tires designed to these standards havethe tire size molded into the sidewall beginning with the sec- tion width. The letter “P” isabsent from this tire size desig- nation. Example: 215/65R15 96H.
LT (Light Truck) -metric tiresizing is based on U.S.A. design standards. The size designation for LT-metric tires is the same asfor P-metric tires except for the letters “LT” that are molded into the sidewall preceding the sizedesignation. Example: LT235/85R16.Temporary spare tires are highpressure compact spares designed for temporary emer-gency use only. Tires designed to this standard have the letter “T” molded into the sidewallpreceding the si
ze designation.
Example: T145/80D18 103M.
Service Description 95
Load index A numerical code associated with the maximum load a tire can carry.NOTE
H
Speed symbol A symbol indicating the range of speeds at which a tire can carry a load corre- sponding to its load index under certain operating con- ditions. The maximum speed corre-sponding to the speed symbol should only be achieved under specified operating conditions. (i.e. tire pressure, vehicle loading, road condi- tions and posted speed limits)
Maximum Load
BK0211800US.book 16 ページ 2014年3月12日 水曜日 午後2時42分