2015 MITSUBISHI LANCER roof
[x] Cancel search: roofPage 70 of 434

5
Features and controlsBreak-in recommendation
s ..............................................................5-3
Keys ..........................................
.......................................................5-3
Electronic immobilizer (Anti-thef
t starting system) ........................5-4
Keyless entry system (if so equipped) ..............................................5-7Free-hand Advanced Security Transmitter (F.A.S.T.-key) (if so
equipped) ..................................................5-12
Door locks .......................
...............................................................5-35
Power door locks ............
...............................................................5-37
“Child safety locks” for
rear door ..................................................5-39
Trunk lid ...................................
.....................................................5-39
Inside emergency trunk lid
release ................................................5-41
Theft-alarm system
................................................
........................5-42
Power windows ...............
...............................................................5-44
Sunroof (if so equipped
) .........................................
........................5-46
Parking brake ..................
...............................................................5-48
Steering wheel tilt lock lever .........................................................5-50Inside day/night rearview
mirror ...................................................5-50
Outside rearview mirr
ors ...............................................................5-52
Ignition switch ......
.................................................
........................5-53
Steering wheel lock
................................................
........................5-55
Starting and stopping the e
ngine ....................................................5-55
Turbocharger operation (if so equipped) ........................................5-59Manual transaxle (if so equipped) ..................................................5-59Continuously variable transmissi
on (CVT) (if so equipped)..........5-61
Twin Clutch SST (Sportronic Shift Transmission) (if so equipped) .
.................................................
........................5-70
ACD (Active center differential system) (if so equipped)..............5-82 Electronically controlled 4WD system (if so equipped).................5-84
All-wheel driving opera
tion .................................
......................... 5-86
Cautions on handling of all-wheel drive vehicles ......................... 5-87 Limited-slip differential (i
f so equipped) ....................................... 5-88
Service brake .................
.................................................
............... 5-89
Brake assist system
...............................................
......................... 5-90
Hill start assist (vehicles with
Twin Clutch SST) .......................... 5-90
Anti-lock braking syst
em .....................................
......................... 5-91
Active Stability Control (ASC
) (if so equipped) ............................ 5-94
Power steering system
..........................................
......................... 5-96
Cruise control (if so eq
uipped) ....................................................... 5-97
Tire pressure monitoring
system ................................................. 5-102
Rear-view camera (if so
equipped)..............
................................. 5-106
Instrument cluster
.................................................
....................... 5-108
Multi-information display ........................................................... 5-110 Indicator light, warning light, and information screen display list .......................................
.................................................... 5-131
Indicators .................................
.................................................... 5-143
Warning lights ................
.................................................
............. 5-144
Information screen disp
lay ...................................
....................... 5-145
Combination headlights and dimmer switch ............................... 5-147 Headlight leveling switch (if
so equipped)................................... 5-152
Turn signal lever ..
.................................................
....................... 5-152
Hazard warning flasher
switch .................................................... 5-153
Front fog light switch (if so
equipped) ......................................... 5-153
Wiper and washer swit
ch ......................................
....................... 5-154
Electric rear window def
ogger switch ......................................... 5-158
Horn switch .............................
.................................................... 5-159
Link System (if so equi
pped) ....................................................... 5-159
BK0210300US.bo
ok 1 ページ 2014年4月8日 火曜日 午前10時46分
Page 115 of 434

Sunroof (if so equipped) 5-46 Features and controls
5
N00549000127
When this switch is in the lock mode, the main switch for passenger door window and the sub switch cannot be used to open or close the door window, and the main switch
will open or close only the driver’s door win- dow. To unlock the switch, press it again.
N00551400014
Wind buffeting can be described as the per- ception of pressure on the ears or a booming or rumbling sound. Your vehicle may exhibitwind buffeting when driving with one or both
rear door windows down or partially opened. This is a normal occurrence that can be mini- mized. If the buffeting occurs with the rear door windows open, open the front door win-dows as well as the rear door windows to minimize the condition.
N00511000656
The sunroof can be opened and closed with the ignition switch in the “ON” position.
NOTE
The safety mechanism can be activated if the driving conditions or other circumstances cause the door window to be subjected to a physical shock similar to that caused by trapped hand or head. If the safety mechanism is activated 3 or more times consecutively, the safety mecha-nism is deactivated and normal closing of the door window will be aborted. Use the following method to return to normaloperation. 1. If the door window is open, repeatedly pull up the power window switch to fully close the door window. 2. With fully closing the window, release the switch and then pull up the switch again for about 1 second.
Lock switch
1- Lock 2- UnlockWA R N I N G Before driving with a child in the vehicle, be sure to lock the window switch to makeit inoperative. Children tampering with the switch could easily trap their hands or heads in the window.
What to do if you hear wind buffeting when driving
Sunroof
(if so equipped)
WA R N I N G Do not stick your head, hands or anything else in the sunroof opening. Before operating the sunroof, make sure that nothing can be trapped (head, hands, fingers, etc.). Never leave a child (or other person who is incapable of safely operating the sunroof switch) alone in the vehicle.
BK0210300US.bo
ok 46 ページ 2014年4月8日 火曜日 午前10時46分
Page 116 of 434

Sunroof (if so equipped)
Features and controls 5-47
5
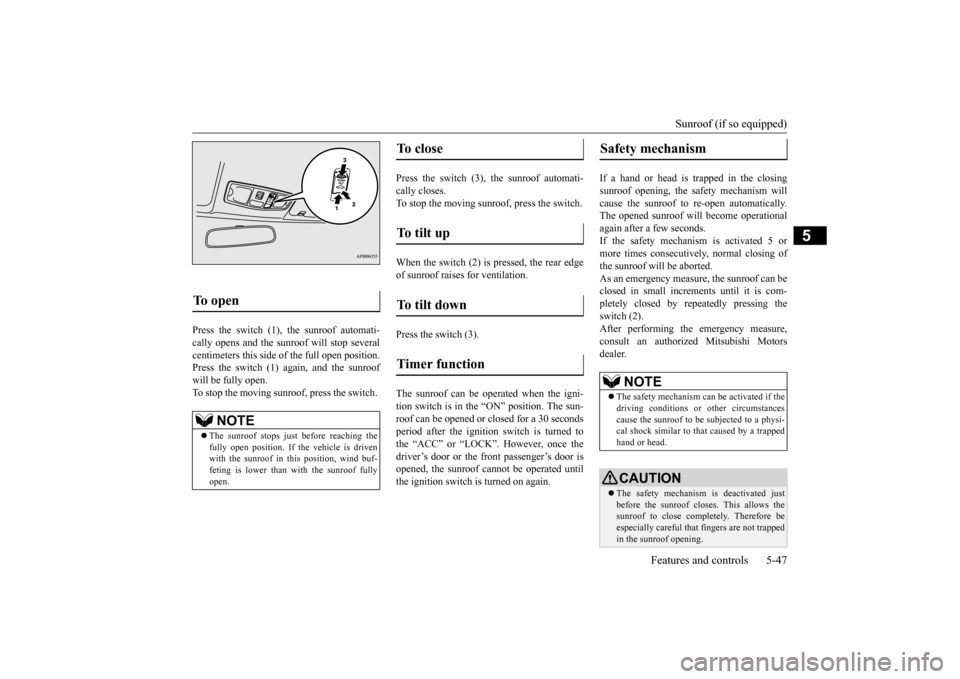
Press the switch (1), the sunroof automati- cally opens and the sunroof will stop several centimeters this side of the full open position. Press the switch (1) again, and the sunroofwill be fully open.To stop the moving sunroo
f, press the switch.
Press the switch (3), the sunroof automati- cally closes.To stop the moving sunroof, press the switch. When the switch (2) is pressed, the rear edge of sunroof raises for ventilation. Press the switch (3). The sunroof can be oper
ated when the igni-
tion switch is in the “ON” position. The sun- roof can be opened or closed for a 30 secondsperiod after the ignition
switch is turned to
the “ACC” or “LOCK”. However, once the driver’s door or the front passenger’s door isopened, the sunroof cannot be operated until the ignition switch is turned on again.
If a hand or head is trapped in the closing sunroof opening, the safety mechanism willcause the sunroof to re-open automatically. The opened sunroof will become operational again after a few seconds.If the safety mechanism is activated 5 or more times consecutively, normal closing of the sunroof will be aborted.As an emergency measure, the sunroof can beclosed in small increments until it is com- pletely closed by repeatedly pressing the switch (2).After performing the emergency measure, consult an authorized Mitsubishi Motors dealer.
To open
NOTE
The sunroof stops just before reaching the fully open position. If the vehicle is driven with the sunroof in this position, wind buf- feting is lower than with the sunroof fullyopen.
To close
To tilt up
To tilt down
Timer function
Safety mechanism
NOTE
The safety mechanism can be activated if the driving conditions or other circumstances cause the sunroof to be subjected to a physi-cal shock similar to that caused by a trapped hand or head.CAUTION The safety mechanism is deactivated just before the sunroof closes. This allows the sunroof to close completely. Therefore beespecially careful that fingers are not trapped in the sunroof opening.
BK0210300US.bo
ok 47 ページ 2014年4月8日 火曜日 午前10時46分
Page 117 of 434

Parking brake 5-48 Features and controls
5
The sunshade can be opened or closed manu- ally while the sunroof is closed. When the sunroof is opened, the sunshade will also open automatically.
N00511400298
To park the vehicle, first bring it to a com-plete stop, fully engage the parking brake,and then move the gearshift lever to 1st (on a uphill) or “R” (Reverse) (on a downhill) posi- tion, for vehicles with a manual transaxle, setthe selector lever {continuously variable transmission (CVT)} or the gearshift lever (Twin Clutch SST) to “P” (PARK) positionfor vehicles with CVT or Twin Clutch SST.
The safety mechanism is deactivated while the switch (2) is pressed. Therefore be espe- cially careful that fingers are not trapped in the sunroof opening. Do not deliberately trap your hands or head in order to activate the safety mechanism. Personal injury and malfunction of the sun-roof could result.
Sunshade
CAUTION Do not attempt to close the sunshade when the sunroof is opened.CAUTION
Be careful that hands are not trapped when closing the sunshade.NOTE
Be sure to tilt down the sunroof before clos- ing the sunshade. When leaving the vehicle unattended, be sure to close the sunroof and without the ignition key. Do not try to operate the sunroof if it is fro- zen closed (after snowfall or during extreme cold). Do not sit on or place heavy luggage on the sunroof or roof opening edge. Do not apply any force that may cause dam- age to the sunroof. Release the switch when the sunroof has reached a completely open or completelyclosed position. If the sunroof does not operate when the sun- roof switch is operated, release the switch and check whether some
thing is trapped by
the sunroof. If nothing is trapped, have thesunroof checked at an authorized Mitsubishi Motors dealer. Be careful when tilting
up the sunroof if a ski
carrier or a roof carrier is installed. Depend-ing on the model of ski car
rier or roof carrier,
the sunroof may contact the carrier when the sunroof is tilted up.CAUTION
Be sure to close the sunroof completely when washing the vehicle or when leaving the vehicle. Do not put any wax on the weatherstrip (black rubber) around the sunroof opening. If it is waxed, the weatherstrip cannot maintain a weatherproof seal with the sunroof. After washing the vehicle or after rain be sure to wipe off any water that is on the sun-roof before operating it. Operating the sunroof repeatedly with the engine turned off will run down the battery. Operate the sunroof only while the engine is running.
Parking brake
NOTE
BK0210300US.bo
ok 48 ページ 2014年4月8日 火曜日 午前10時46分
Page 270 of 434

Loading information Driving safety 6-7
6
It is important to fami
liarize yourself with the
following terms before loading your vehicle: Vehicle maximum load on the tire: load on an individual tire that is determined by distributing to each axle its share of themaximum loaded vehicle weight and dividing by two. Vehicle normal load on the tire: load on an individual tire that is determined by dis- tributing to each axle its share of the curb weight, accessory weight, and normaloccupant weight and dividing by two. Maximum loaded vehicle weight: the sum of - (a) Curb weight;(b) Accessory weight; (c) Vehicle capacity weight; and (d) Production options weight. Curb weight: the weight of a motor vehi- cle with standard equipment including the maximum capacity of fuel, oil, and cool-ant. Accessory weight: the combined weight (in excess of those standard items whichmay be replaced) of automatic transmis- sion, power steering, power brakes, power windows, power seats, radio, and heater,to the extent that these items are available as factory- installed equipment (whether installed or not).
Vehicle capacity weight: the rated cargo and luggage load plus 150 lbs (68 kg)
*
times the vehicle’s designated seating capacity. Production options weight: the combined weight of those installed regular produc- tion options weighing over 5 lbs (2.3 kg)in excess of those standard items which they replace, not previously considered in curb weight or accessory weight, includ-ing heavy duty brakes, ride levelers, roofrack, heavy duty battery, and special trim. Normal occupant weight: 150 lbs (68 kg)
*
times the number of specified occupants.(In your vehicle the number is 3) Occupant distribution: distribution of occupants in a vehicle as specified. (Inyour vehicle the distribution is 2 in front, 1 in second row seat)
N00630100309
The tire and loading information placard is located on the driver’s door sill.
This placard shows the maximum number of occupants permitted to ride in your vehicle aswell as “the combined weight of occupants and cargo” (A), which is called the vehicle capacity weight. The weight of roof road isincluded in the definition of “cargo” when determining the vehicle capacity weight. This placard also tells you the size and recom-mended inflation pressure for the originalequipment tires on your vehicle. For more information, refer to “Tires” on page 9-17.
* :150 lbs (68 kg) is the weight of one per- son as defined by U.S.A. and Canadian regulations.
Tire and loading information placard
BK0210300US.bo
ok 7 ページ 2014年4月8日 火曜日 午前10時46分
Page 273 of 434

Cargo loads 6-10 Driving safety
6
N00629700464
To determine the cargo load capacity for your vehicle, subtract the weight of all vehicleoccupants from the vehicle capacity weight. For added information, if needed, refer to “Steps for Determining Correct Load Limit”on page 6-8.DO NOT USE the Gross Vehicle Weight Rat- ing and Gross Axle Weight Rating numbers listed on the safety certification label (A)located on the inside sill of the driver’s door as the guide for passengers and/or cargo weight.
N00630400113
Cargo loads Cargo load precautions
WA R N I N G To reduce the risk of serious injury or death, the combined weights of the driver, passengers and cargo and must never exceed the vehicle capacity weight. Exceeding the vehicle capacity weight will adversely affect vehicle performance, including handling and braking, and maycause an accident. Do not load cargo or luggage higher than the top of the seatback. Be sure that your cargo or luggage cannot move when your vehicle is in motion.Having either the rear view blocked, or your cargo being thrown inside the cabin if you suddenly have to brake can cause aserious accident or injury or death. Put cargo or luggage in the cargo area of your vehicle. Try to spread the weight evenly.
Loading cargo on the roof
WA R N I N G Weight placed on the roof of the vehicle will raise the vehicle’s center of gravity and adversely affect its handling charac-teristics. As a result, driving errors or emergency maneuvers could lead to a loss of control and result in an accident. Driveslowly and avoid excessive maneuvers such as sudden braking or quick turning.
Make sure that the weight of luggage and the roof carrier do not exceed the maxi- mum roof load, 110 lb (50 kg). If the maxi- mum roof load is exceeded, this could cause damage to the ve
hicle or result in an
accident. The total weight of all occupants and lug- gage, including your roof load, must not exceed the vehicle capacity weight. For more information, refer to “Tire and load-ing information placard” on page 11-3. Roof load is determined by adding the weight of the roof carrier and the weight of the luggage placed on the roof carrier. For additional information, refer to “Maximum roof load” on page 11-4.CAUTION Do not load luggage directly onto the roof. Use a roof carrier th
at properly fits your
vehicle. For installation, refer to the instruction man- ual provided with the roof carrier. Place the luggage on the carrier so that its weight is distributed evenly with the heaviest items on the bottom. Do not load items that are wider than the roof carrier.WA R N I N G
BK0210300US.bo
ok 10 ページ 2014年4月8日 火曜日 午前10時46分
Page 274 of 434

Trailer towing
Driving safety 6-11
6
N00630600102
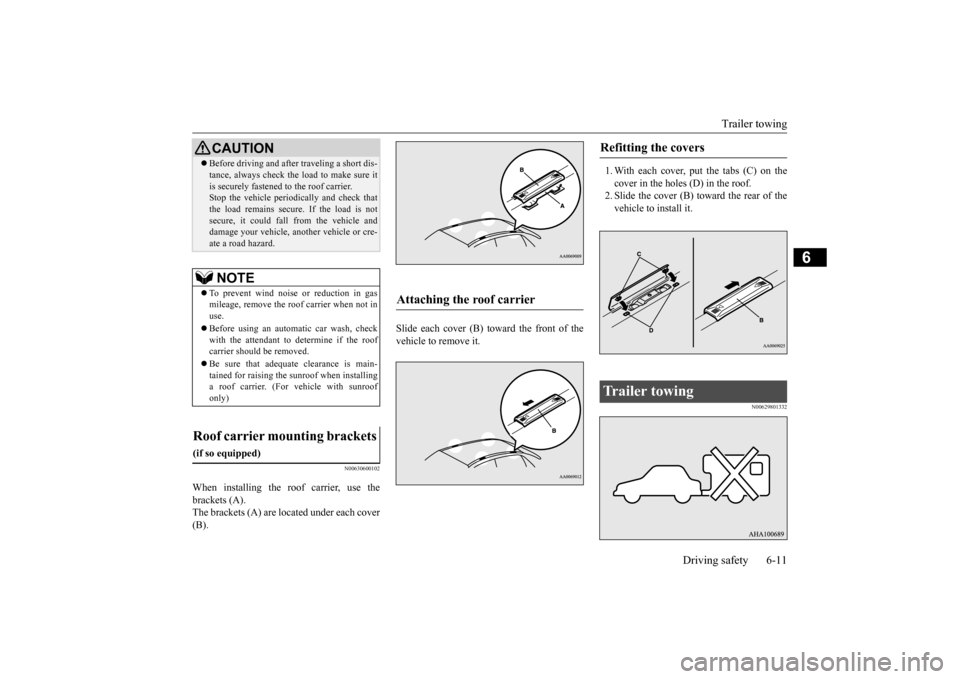
When installing the roof carrier, use the brackets (A). The brackets (A) are located under each cover (B).
Slide each cover (B) toward the front of the vehicle to remove it.
1. With each cover, put the tabs (C) on the cover in the holes (D) in the roof. 2. Slide the cover (B) toward the rear of thevehicle to install it.
N00629801332
Before driving and after traveling a short dis- tance, always check the load to make sure it is securely fastened to the roof carrier. Stop the vehicle periodically and check that the load remains secure. If the load is notsecure, it could fall from the vehicle and damage your vehicle, another vehicle or cre- ate a road hazard.NOTE
To prevent wind noise or reduction in gas mileage, remove the roof carrier when not in use. Before using an automatic car wash, check with the attendant to determine if the roof carrier should be removed. Be sure that adequate clearance is main- tained for raising the sunroof when installinga roof carrier. (For vehicle with sunroof only)
Roof carrier mounting brackets
(if so equipped)
CAUTION
Attaching the roof carrier
Refitting the covers
Trailer towing
BK0210300US.bo
ok 11 ページ 2014年4月8日 火曜日 午前10時46分
Page 337 of 434

Antenna 7-62 Comfort controls
7
Here is a list of symptoms, causes and responses
if you think something is not working properly.
N00734200426
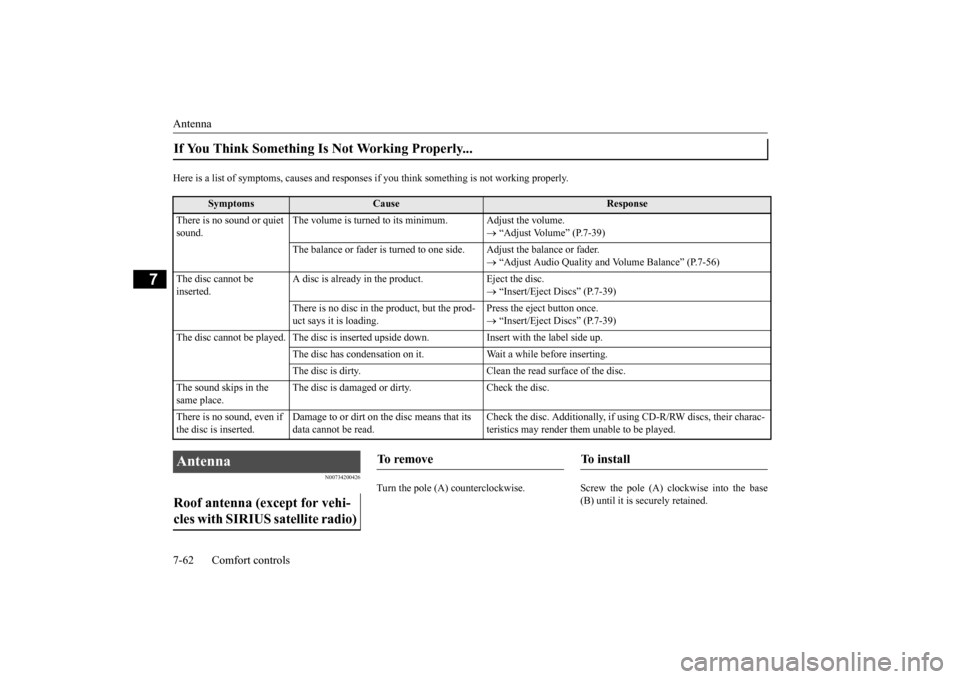
Turn the pole (A) counterclockwise. Screw
the pole (A) clockwise into the base
(B) until it is securely retained.
If You Think Something Is Not Working Properly...
Symptoms
Cause
Response
There is no sound or quiet sound.
The volume is turned to its minimum. Adjust the volume.
“Adjust Volume” (P.7-39)
The balance or fader is turned to one side. Adjust the balance or fader.
“Adjust Audio Quality and Volume Balance” (P.7-56)
The disc cannot be inserted.
A disc is already in the product. Eject the disc.
“Insert/Eject Discs” (P.7-39)
There is no disc in the product, but the prod- uct says it is loading.
Press the eject button once. “Insert/Eject Discs” (P.7-39)
The disc cannot be played. The disc is inserted upside down. Insert with the label side up.
The disc has condensation on it. W
ait a while before inserting.
The disc is dirty. Clean the read surface of the disc.
The sound skips in the same place.
The disc is damaged or dirty. Check the disc.
There is no sound, even if the disc is inserted.
Damage to or dirt on the disc means that its data cannot be read.
Check the disc. Additionally, if using CD-R/RW discs, their charac- teristics may render them unable to be played.
Antenna Roof antenna (except for vehi- cles with SIRIUS satellite radio)
To remove
To i n s t a l l
BK0210300US.bo
ok 62 ページ 2014年4月8日 火曜日 午前10時46分