2015 MITSUBISHI LANCER EVOLUTION ECU
[x] Cancel search: ECUPage 72 of 229

72 Set an Address in the Address Book
Set an Address in
the Address Book
Setting a location you have gone to, a
location you want to go see, or the like
in the address book makes route setting
simple.
The
DEST key may change to the
key depending on the model.
ADVICE
• Up to 200 addresses can be registered in
the address book.
Register the Current Location
This registers the location where you are now
(your car's location) from the current location
screen.
1On the current location screen,
touch
▲ .
2Touch Set Location .
▼
Registration of the current location is complete.
ADVICE
• The address book information screen is
not displayed and the address is set in
the address book with the name blank.
• Fill in the blank column of the address
book information according to the
objective.
→“Change Address Book
Information”(P74)
Register a Searched for
Location
This section explains the series of operations
for registering a location searched for from the
destination menu
(P22) in the address book.
ADVICE
• You can also register by touching [DEST]
key, [Address Book], and [New].
1Press the DEST key.
This displays the destination menu.
2Touch any “search method”
and search for the location.
→“Destination Menu”(P22)
3When the location you
searched for is displayed,
touch
Address Book .
ADVICE
• Depending on the search method, the
establishment name and telephone
number may not be displayed.
4Touch Set to Addr. Book .
▼
This displays the mark at the searched
for location
and the address book information screen
(P74).
▼
Registration of the search for location is
complete.
ADVICE
• You can change the address book
information displayed here.
Execute the procedure for Steps 5
and beyond in
“Change Address Book
Information”(P74).
Page 80 of 229

80 Registering the RTT Surveillance Map
Registering the RTT
Sur veillance Map
Areas can be registered to check traffi c
messages.
NOTE
• Up to 3 areas can be registered.
Registering from RTT Traffi c
Messages
1Execute up to Step 2 in
“Checking the RTT Traffi c
Messages” (P79)
.
▼
2Touch Map .
3Touch Set .
4Touch RTT Surveillance Map
to register.
If you select the registered [RTT
Surveillance Map], it is overwritten.
▼
Registration of the RTT Surveillance Map is
complete.
Registering from Scroll Menu
1Scroll the map (P40) and line up
the
mark with the “location”
to register.
2Touch Set .
3Touch Set as RTT Surveillance .
4Touch RTT Surveillance Map
to register.
If you select the registered [RTT
Surveillance Map], it is overwritten.
▼
Registration of the RTT Surveillance Map is
complete.
Page 86 of 229

86 Handling of Discs
Types of Disc That Can Be Played Back
The following marks are printed on the disc label, package, or jacket.
Type Size Maximum
playback timeComments
CD-DA5 inches
(12 cm)74 minutes―
CD-TEXT
5 inches
(12 cm)74 minutes―
CD-R/RW
5 inches
(12 cm)―• Disc containing MP3/WMA/AAC fi les
Discs That May Not Be Played Back
• Playback of discs other than those described in “Types of Disc That Can Be Played Back” is
not guaranteed.
• 3 inches(8 cm) discs may not be used.
• Do not insert irregularly-shaped discs (for example, heart-shaped), as these may result in
malfunction.
Additionally, discs that have transparent portions may not be played back.
• Discs that have not been fi nalized cannot be played back.
• Even if recorded using the correct format on a recorder or computer, application software
settings and environments; disc peculiarities, damage, or marking; or dirt or condensation on
the lens inside the product may render the disc unplayable.
• Depending on the disc, some functions may not be used, or the disc may not play back.
• Do not use discs with cracks or warps.
• If the disc has stickers affi xed, remains from removed stickers, or affi xed adhesive, then do not
use the disc.
• Discs that have decorative labels or stickers may not be used.
Nonstandard CDs
This product will play back audio CDs,
however please be aware of the following
points regarding CD standards.
• Ensure that you use discs with
on the
label surface.
• Playback of other than standard CDs is
not guaranteed. Even if the audio can be
played back, the audio quality cannot be
guaranteed.
• When playing back other than standard CDs,
the following may occur.
● There may be noise during playback.
● There may be jumping in the audio.
● The disc may not be recognized.
● The fi rst track may not be played back.
● It may take longer than usual until start of
playback of tracks.
● Playback may start from within the track.
● Some parts may not be played back.
● Tracks may freeze during playback.
● Tracks may be displayed erroneously.
Page 104 of 229

104 Listen to Satellite Radio
ADVICE
• “Channel locked” is displayed in the
channel name on the source plate.
• “CH Locked” is displayed in the preset
switch and the channel list.
• When the set channel is received, the
sound is muted.
Unlocking All Locked
Channels
Cancels the listening restrictions on all
channels.
1On the SIRIUS broadcast
information screen, touch
Channel List .
The channel list screen is displayed.
2Touch Category Filter .
Displays the category list screen.
3Touch LockReset .
4Enter the “passcode”, then
touch
Enter .
▼
5Touch Ye s .
▼
Cancels the listening restrictions on all
channels.
Changing the Lock Passcode
Changes the listening restriction passcode.
1On the passcode entry screen,
touch
Change Password .
2Enter the “current passcode”,
then touch
Enter .
3Enter the “new passcode”,
then touch
Enter .
4Enter the “new passcode”
again, then touch
Enter .
▼
The passcode change is complete.
NOTE
• If the passcode has been forgotten, it can
be initialized.
• To initialize the passcode, open
the passcode entry screen (with no
characters entered yet) and touch [Clear]
5 times consecutively.
Page 155 of 229

Maintenance
155
INFO/SETTINGS INFO
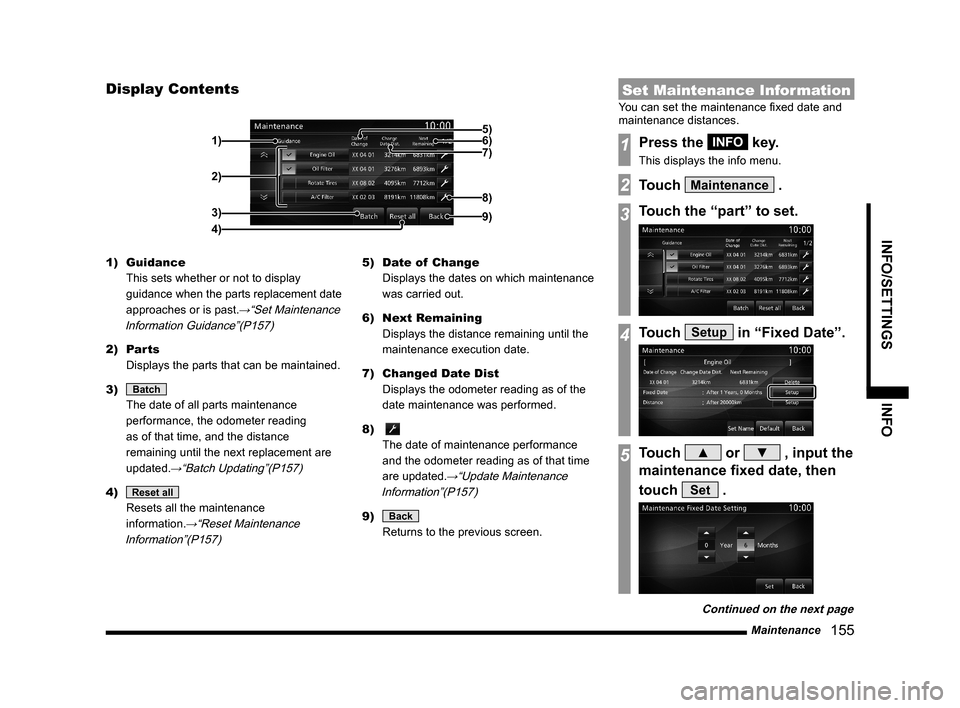
Display Contents
2)
3)
4) 1)
9)
8)
7) 6) 5)
1) Guidance
This sets whether or not to display
guidance when the parts replacement date
approaches or is past.
→“Set Maintenance
Information Guidance”(P157)
2) Parts
Displays the parts that can be maintained.
3)
Batch
The date of all parts maintenance
performance, the odometer reading
as of that time, and the distance
remaining until the next replacement are
updated.
→“Batch Updating”(P157)
4) Reset all
Resets all the maintenance
information.
→“Reset Maintenance
Information”(P157)
5) Date of Change
Displays the dates on which maintenance
was carried out.
6) Next Remaining
Displays the distance remaining until the
maintenance execution date.
7) Changed Date Dist
Displays the odometer reading as of the
date maintenance was performed.
8)
The date of maintenance performance
and the odometer reading as of that time
are updated.
→“Update Maintenance
Information”(P157)
9) Back
Returns to the previous screen.
Set Maintenance Information
You can set the maintenance fi xed date and
maintenance distances.
1Press the INFO key.
This displays the info menu.
2Touch Maintenance .
3Touch the “part” to set.
4Touch Setup in “Fixed Date”.
5Touch ▲ or ▼ , input the
maintenance fi xed date, then
touch
Set .
Continued on the next page
Page 168 of 229

168 Voice Control
About the Learning Function
The voice control system has a learning
function. (This function cannot be used by
voice control systems using a Bluetooth
®
2.0 interface.) This learning function inputs
the driver's voice and way of speaking, and
makes voice recognition easier.
Also, the learned data can be reset (deleted), so
reset the data if the user will change for a long
period of time.
→“Voice control settings” (P215)
Skip Audio Guide
During audio guide, press the “SPEECH” key
again to skip the guide.
End Voice Control
• To stop voice control after starting up,
execute one of the following procedures.
- Press and hold down “SPEECH” key.
- Press a key such as
MODE key.
• If you do not speak after starting up voice
control, the system will automatically be in
pause mode.
(Press the “SPEECH” key again to restart
voice control.) If there is no operation for
a while in pause mode, voice control will
automatically end.
• If voice control is forced to shut down such
as by pressing the
MODE key, the voice
control cannot restart from where you left off.
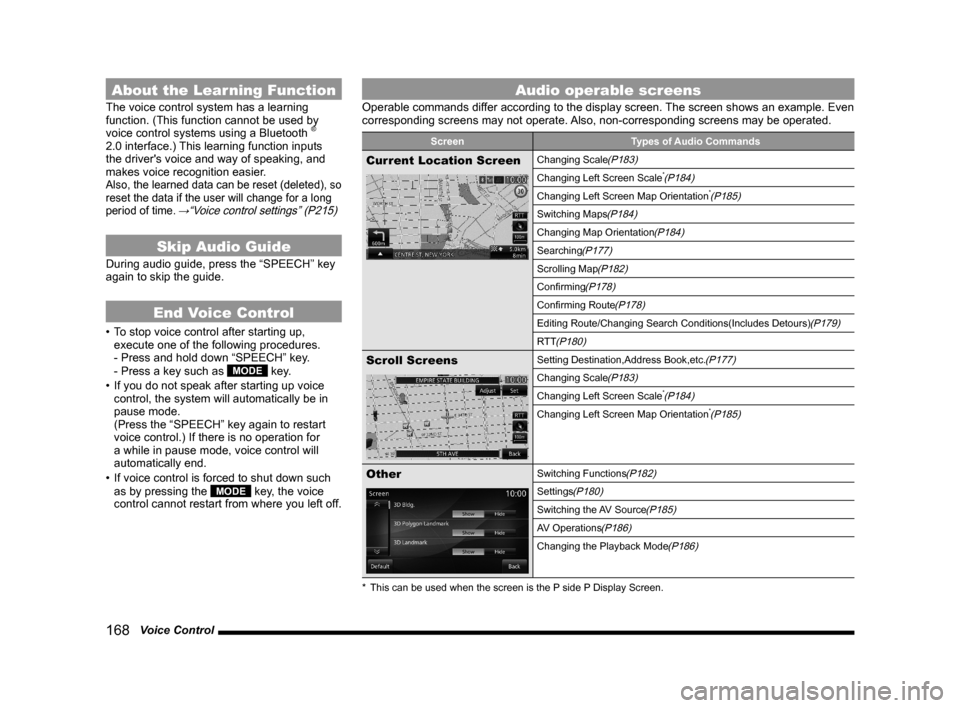
Audio operable screens
Operable commands differ according to the display screen. The screen shows an example. Even
corresponding screens may not operate. Also, non-corresponding screens may be operated.
Screen Types of Audio Commands
Current Location ScreenChanging Scale(P183)
Changing Left Screen Scale*(P184)
Changing Left Screen Map Orientation*(P185)
Switching Maps(P184)
Changing Map Orientation(P184)
Searching(P177)
Scrolling Map(P182)
Confi rming(P178)
Confi rming Route(P178)
Editing Route/Changing Search Conditions(Includes Detours)(P179)
RTT
(P180)
Scroll ScreensSetting Destination,Address Book,etc.(P177)
Changing Scale(P183)
Changing Left Screen Scale*(P184)
Changing Left Screen Map Orientation*(P185)
OtherSwitching Functions(P182)
Settings(P180)
Switching the AV Source(P185)
AV Operations(P186)
Changing the Playback Mode(P186)
* This can be used when the screen is the P side P Display Screen.
Page 180 of 229

180 List of Accepted Commands
RTT
RTT Traffi c
MessagesRTT Traffi c Messages
RTT message
Display RTT message
Settings
3D Bldg.
3D Bldg.
3D Building
3D view
Show building in 3D
3D Polygon
Landmark3D Polygon Landmark
POI Icons on Map
Display POI icons on map
3D Scroll
3D Scroll
2 Screen Scroll
2 Screen Scroll
Double screen scroll
Scroll 2 screens
Scroll both screens
Day & Night Color
Day & Night Color
Day & Night Colors
Switch Day and Night
Switch Day & Night Colors
Change day and night colors
Day Map Color
Day Map Color
Daytime map color
Night Map Color
Night Map Color
Nighttime map color
Evening map color
Character Size
Character Size
Font size
Letter size
Motorway
Simplifi ed Map
Automatic
DisplayMotorway Simplifi ed Map
Automatic Display
Freeway Simplifi ed Map
Automatic Display
Show simplifi ed freeway map
automatically
Automatically show simple
freeway map
Automatically view simple
freeway map
Current Street
NameCurrent Street Name
Display Current Street name
Address Book
NamesAddress Book Names
Display Address Book entry
Lane Information
Lane Information
Lane Info
Lane description
Route Tracking
Route Tracking
Searched Route
Searched Route
Route searched
Search route
Checked route
AV Icon
AV Icon
AV image
AV pictureMobile Phone
IconMobile Phone Icon
Telephone Icon
Phone image
Phone picture
Speed Indicator
Speed Indicator
Speed gauge
Change 3D point
of viewChange 3D point of view
Switch to 3D point of view
Switch overhead view angle
Change overhead view angle
Switch to 3D perspective
Change to 3D perspective
Switch to 3D view
Route Priority
Route Priority
Route priority setting
Minimize
FreewaysMinimize Freeways
Minimize Freeways setting
Minimize Toll
RoadsMinimize Toll Roads
Minimize Toll Roads setting
Minimize Ferries
Minimize Ferries
Minimize Ferries setting
Avoid Selected
AreasAvoid Selected Areas
Avoid Selected Areas setting
Travel Time
Travel Time
Avoid Time Restricted Roads
setting
Time/Distance
RemainingTime/Distance Remaining
Time/Distance Remaining
Display setting
Page 181 of 229

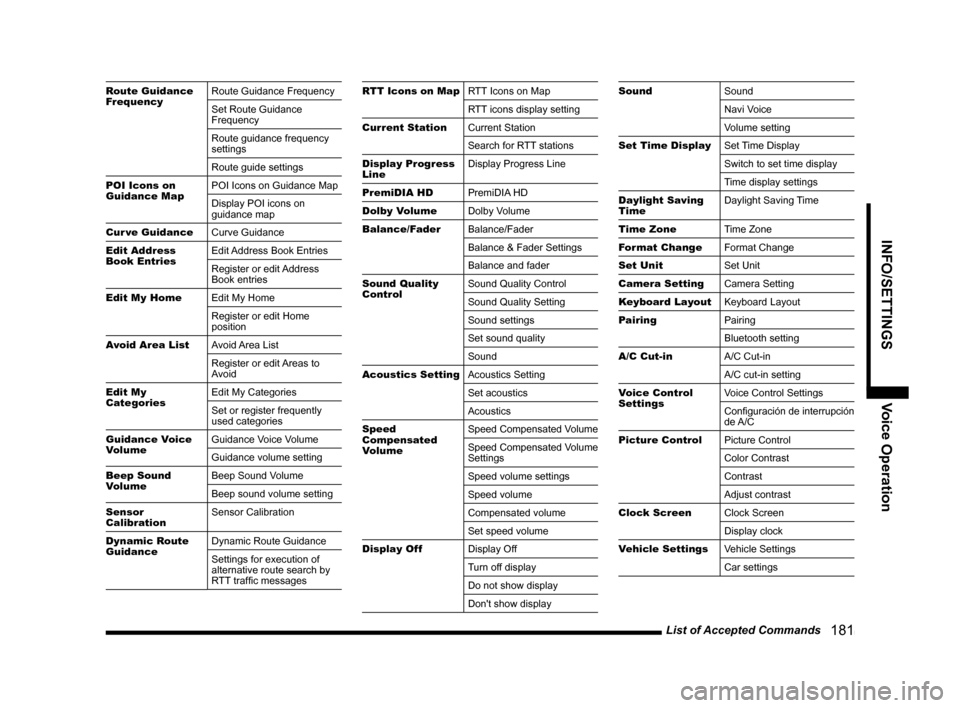
List of Accepted Commands
181
INFO/SETTINGS Voice Operation
Route Guidance
FrequencyRoute Guidance Frequency
Set Route Guidance
Frequency
Route guidance frequency
settings
Route guide settings
POI Icons on
Guidance MapPOI Icons on Guidance Map
Display POI icons on
guidance map
Cur ve Guidance
Curve Guidance
Edit Address
Book EntriesEdit Address Book Entries
Register or edit Address
Book entries
Edit My Home
Edit My Home
Register or edit Home
position
Avoid Area List
Avoid Area List
Register or edit Areas to
Avoid
Edit My
CategoriesEdit My Categories
Set or register frequently
used categories
Guidance Voice
VolumeGuidance Voice Volume
Guidance volume setting
Beep Sound
VolumeBeep Sound Volume
Beep sound volume setting
Sensor
CalibrationSensor Calibration
Dynamic Route
GuidanceDynamic Route Guidance
Settings for execution of
alternative route search by
RTT traffi c messagesRTT Icons on MapRTT Icons on Map
RTT icons display setting
Current Station
Current Station
Search for RTT stations
Display Progress
LineDisplay Progress Line
PremiDIA HD
PremiDIA HD
Dolby Volume
Dolby Volume
Balance/Fader
Balance/Fader
Balance & Fader Settings
Balance and fader
Sound Quality
ControlSound Quality Control
Sound Quality Setting
Sound settings
Set sound quality
Sound
Acoustics Setting
Acoustics Setting
Set acoustics
Acoustics
Speed
Compensated
VolumeSpeed Compensated Volume
Speed Compensated Volume
Settings
Speed volume settings
Speed volume
Compensated volume
Set speed volume
Display Off
Display Off
Turn off display
Do not show display
Don't show displaySound
Sound
Navi Voice
Volume setting
Set Time Display
Set Time Display
Switch to set time display
Time display settings
Daylight Saving
TimeDaylight Saving Time
Time Zone
Time Zone
Format Change
Format Change
Set Unit
Set Unit
Camera Setting
Camera Setting
Keyboard Layout
Keyboard Layout
Pairing
Pairing
Bluetooth setting
A/C Cut-in
A/C Cut-in
A/C cut-in setting
Voice Control
Settings Voice Control Settings
Confi guración de interrupción
de A/C
Picture Control
Picture Control
Color Contrast
Contrast
Adjust contrast
Clock Screen
Clock Screen
Display clock
Vehicle Settings
Vehicle Settings
Car settings