2015 MINI COUPE ROADSTER CONVERTIBLE ECU
[x] Cancel search: ECUPage 149 of 231
▷"Road Assist": Roadside Assistance, if help
is required in the event of a breakdown.▷"Serv. Appt.": MINI service center, if a serv‐
ice appointment needs to be arranged.▷"Cust Relat": Customer Relations, for infor‐
mation on all aspects of your vehicle.
Displaying the phone numbers
1.Switch on the radio ready state or the igni‐
tion.2. Press the button.3."MINI"4.Turn the right knob until the desired phone
number is displayed.
Snap-in adapter
General information More information on compatible snap-in
adapters that support the functions of the mo‐
bile phone is available at the service center.
Notes At high temperatures, the charging function of
the mobile phone may be limited and functions
may not be executed.
When using the mobile phone via the vehicle,
note the operating instructions of the mobile
phone.
Installation position In the center armrest.
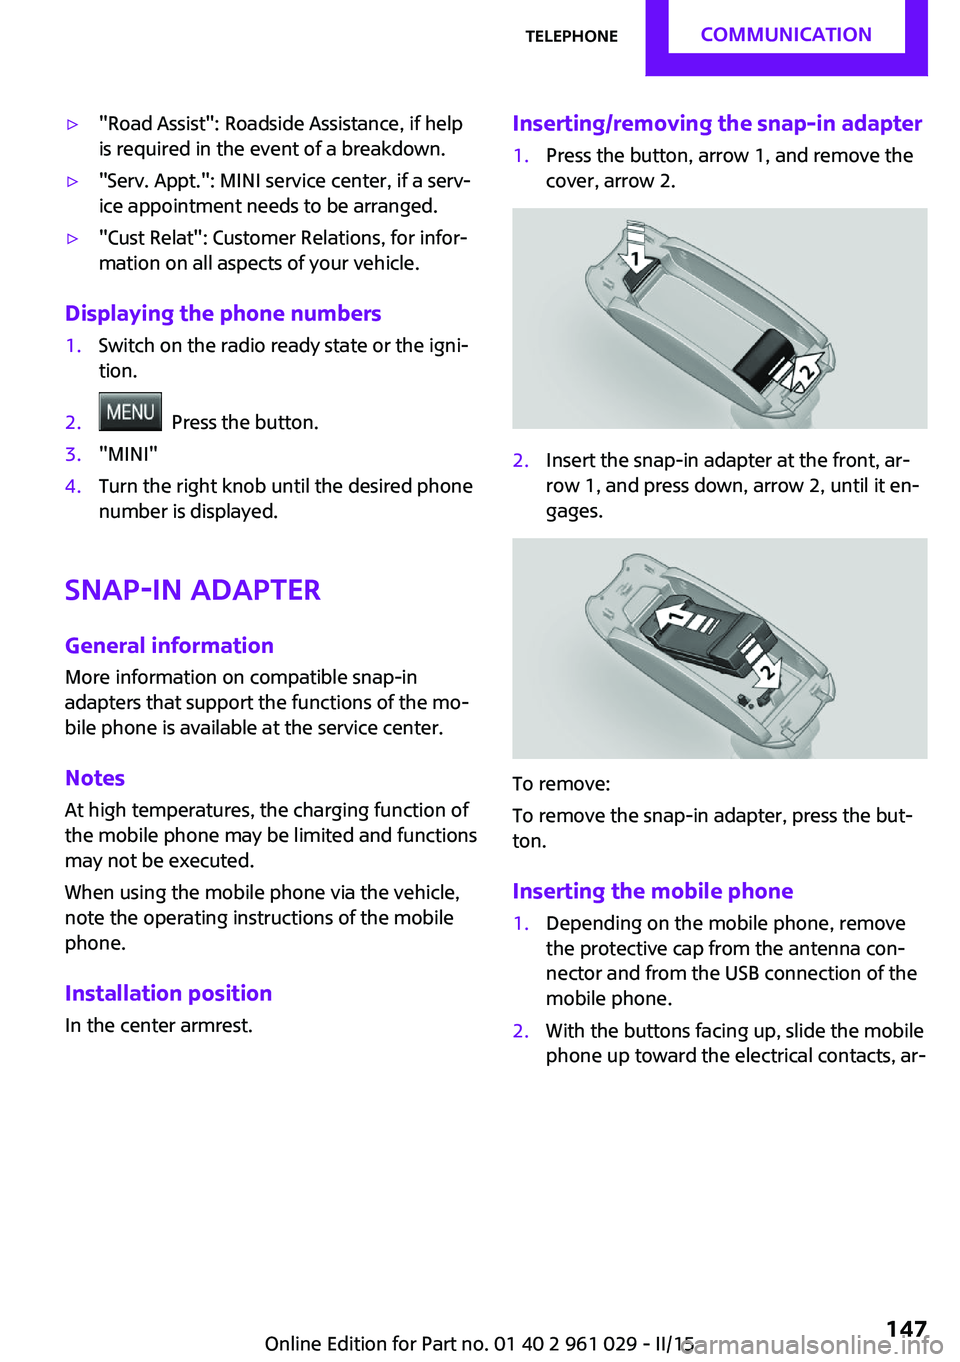
Inserting/removing the snap-in adapter1.Press the button, arrow 1, and remove the
cover, arrow 2.2.Insert the snap-in adapter at the front, ar‐
row 1, and press down, arrow 2, until it en‐
gages.
To remove:
To remove the snap-in adapter, press the but‐
ton.
Inserting the mobile phone
1.Depending on the mobile phone, remove
the protective cap from the antenna con‐
nector and from the USB connection of the
mobile phone.2.With the buttons facing up, slide the mobile
phone up toward the electrical contacts, ar‐Seite 147TelephoneCOMMUNICATION147
Online Edition for Part no. 01 40 2 961 029 - II/15
Page 173 of 231
Hood
Notes Working in the engine compartment
Never attempt to perform any service or
repair operations on your vehicle without the
necessary professional technical training.
If you are unfamiliar with the statutory guide‐
lines, have any work on the vehicle performed
only by a service center.
If this work is not carried out properly, there is
the danger of subsequent damage and related
safety hazards. ◀
To avoid damage, make sure that the
wiper arms are resting against the wind‐
shield before you open the engine compart‐
ment. Do not open the engine hood before the
engine has cooled down; otherwise, injuries
may result. ◀
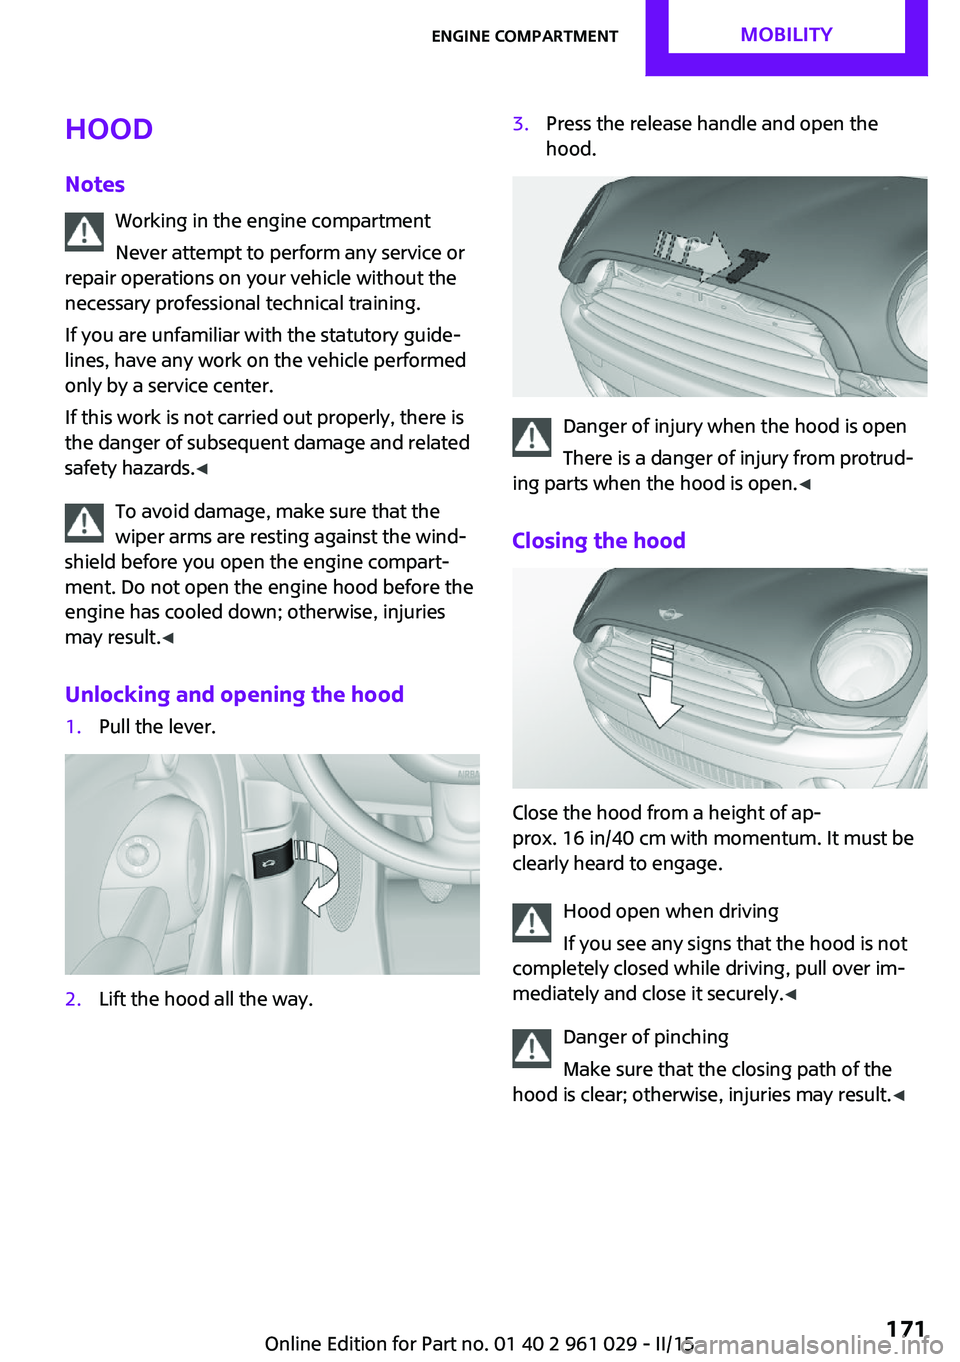
Unlocking and opening the hood1.Pull the lever.2.Lift the hood all the way.3.Press the release handle and open the
hood.
Danger of injury when the hood is open
There is a danger of injury from protrud‐
ing parts when the hood is open. ◀
Closing the hood
Close the hood from a height of ap‐
prox. 16 in/40 cm with momentum. It must be
clearly heard to engage.
Hood open when driving
If you see any signs that the hood is not
completely closed while driving, pull over im‐
mediately and close it securely. ◀
Danger of pinching
Make sure that the closing path of the
hood is clear; otherwise, injuries may result. ◀
Seite 171Engine compartmentMOBILITY171
Online Edition for Part no. 01 40 2 961 029 - II/15
Page 188 of 231
driving characteristics could result, for example
reduced track stability on braking, extended
braking distance, and altered self-steering
characteristics in the limit range. In conjunction
with winter tires, these characteristics are more
pronounced. ◀
Only mount one compact wheel
Only one compact wheel may be
mounted. Restore the wheels and tires to their
original size as quickly as possible. Failure to do
so is a safety risk. ◀
Check the tire inflation pressure at the next op‐
portunity and correct it if necessary. Replace
the defective tire as soon as possible and have
the new wheel balanced.
Preparing wheel change
Observe the safety precautions regarding flat
tires, refer to page 166.
Additional safety precautions in the event
of a wheel change
Change the wheel only on a level, firm surface
which is not slippery.
The vehicle or the jack could slip to the side if
you attempt to raise the vehicle on a soft or
slippery surface, snow, ice, tiles, etc. Do not use
a wooden block or similar object as a support
base for the jack, as this would prevent it from
extending to its full support height and reduce
its load-carrying capacity.
To avoid serious or fatal injury: never lie under
the vehicle, and never start the engine while it
is supported by the jack. ◀1.Place the folding wheel chock behind the
front wheel of the other vehicle side; if the
vehicle is on an incline, place it in front of
this wheel. If the vehicle is parked on a
steep incline, additionally secure the vehi‐
cle against rolling.2.Expose the lug bolts if necessary.3.Loosen the lug bolts a half turn.Jacking up vehicle
The vehicle jack is designed for changing
wheels only.
The vehicle jack is designed for changing
wheels only. Do not attempt to raise another
vehicle model with it or to raise any load of any
kind. To do so could cause accidents and per‐
sonal injury. ◀
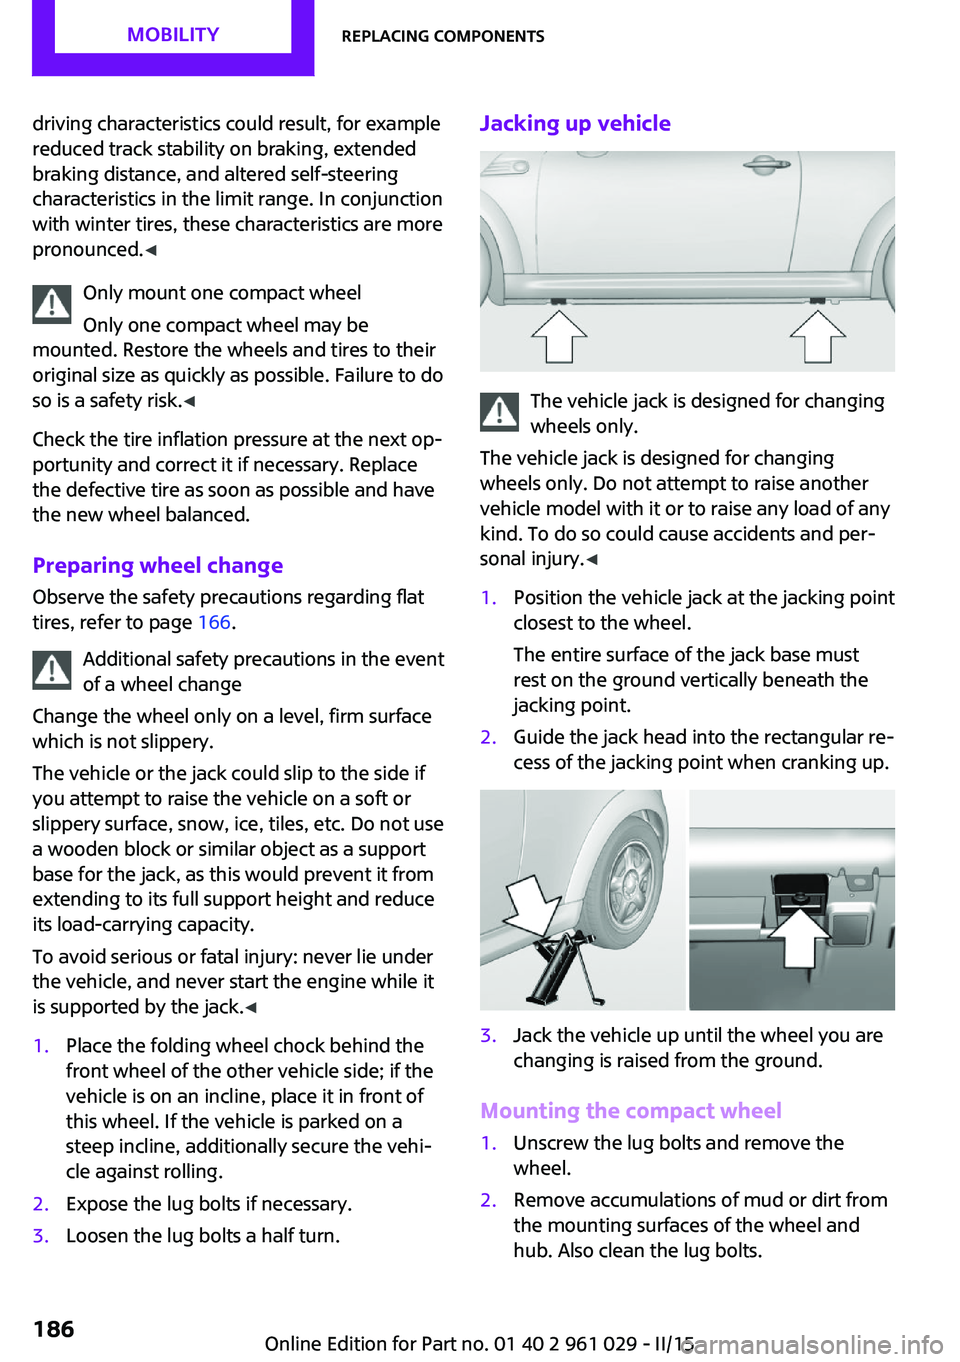
1.Position the vehicle jack at the jacking point
closest to the wheel.
The entire surface of the jack base must
rest on the ground vertically beneath the
jacking point.2.Guide the jack head into the rectangular re‐
cess of the jacking point when cranking up.3.Jack the vehicle up until the wheel you are
changing is raised from the ground.
Mounting the compact wheel
1.Unscrew the lug bolts and remove the
wheel.2.Remove accumulations of mud or dirt from
the mounting surfaces of the wheel and
hub. Also clean the lug bolts.Seite 186MOBILITYReplacing components186
Online Edition for Part no. 01 40 2 961 029 - II/15
Page 189 of 231
3.Mount the new wheel.4.Screw in at least two bolts crosswise.5.Screw in the remaining lug bolts.6.Fully tighten all lug bolts in a diagonal pat‐
tern.7.Lower the vehicle.8.Remove the jack.
Retightening the lug bolts
Retighten the lug bolts diagonally.
Checking that the lug bolts are tight
Always have the lug bolts checked with a
calibrated torque wrench as soon as possible to
ensure that they are tightened to the specified
torque. Otherwise, incorrectly tightened lug
bolts are a hidden safety risk. ◀
The tightening torque equals
103.3 lb ft/140 Nm.
Replace the defective tire as soon as possible
and have the new wheel balanced.
Vehicle battery Maintenance
The battery is maintenance-free, i.e., the elec‐
trolyte will last for the life of the battery in tem‐
perate climate conditions.
The service center will be happy to answer any
questions on the battery.
Battery replacement Use approved vehicle batteries
Only use vehicle batteries that have been
approved for your vehicle by the manufacturer;
otherwise, the vehicle could be damaged and
systems or functions may not be fully availa‐
ble. ◀
Have the vehicle battery registered by the serv‐
ice center after it is replaced to ensure that all comfort functions are available without restric‐
tions and that any associated Check Control
messages are no longer displayed.
Charging the battery
Note Do not connect the charger to the socket
Do not connect the battery charger to the
socket installed in the vehicle at the factory as
this could damage the battery. ◀
Only charge the battery in the vehicle when the
engine is switched off. Connections, refer to
page 189.
General information Ensure that the battery is sufficiently charged to
achieve the full battery life.
It may be necessary to charge the battery in
the following cases:▷When the vehicle is frequently used to
travel short distances.▷When the vehicle has not been driven for
more than one month.
Power failure
After a temporary power failure, some equip‐
ment will be restricted in its use and will need
to be reinitialized. In addition, certain individual
settings will be lost and must be updated:
▷Time and date: the values must be up‐
dated, refer to page 71.▷Radio: the stations need to be stored again,
refer to page 130.
Disposing of old batteries
Have used batteries disposed of by the
service center after they are replaced or
take them to a recycling center.
Maintain the battery in an upright position for
transport and storage. Secure the battery so
that it does not tip over during transport.
Seite 187Replacing componentsMOBILITY187
Online Edition for Part no. 01 40 2 961 029 - II/15
Page 194 of 231
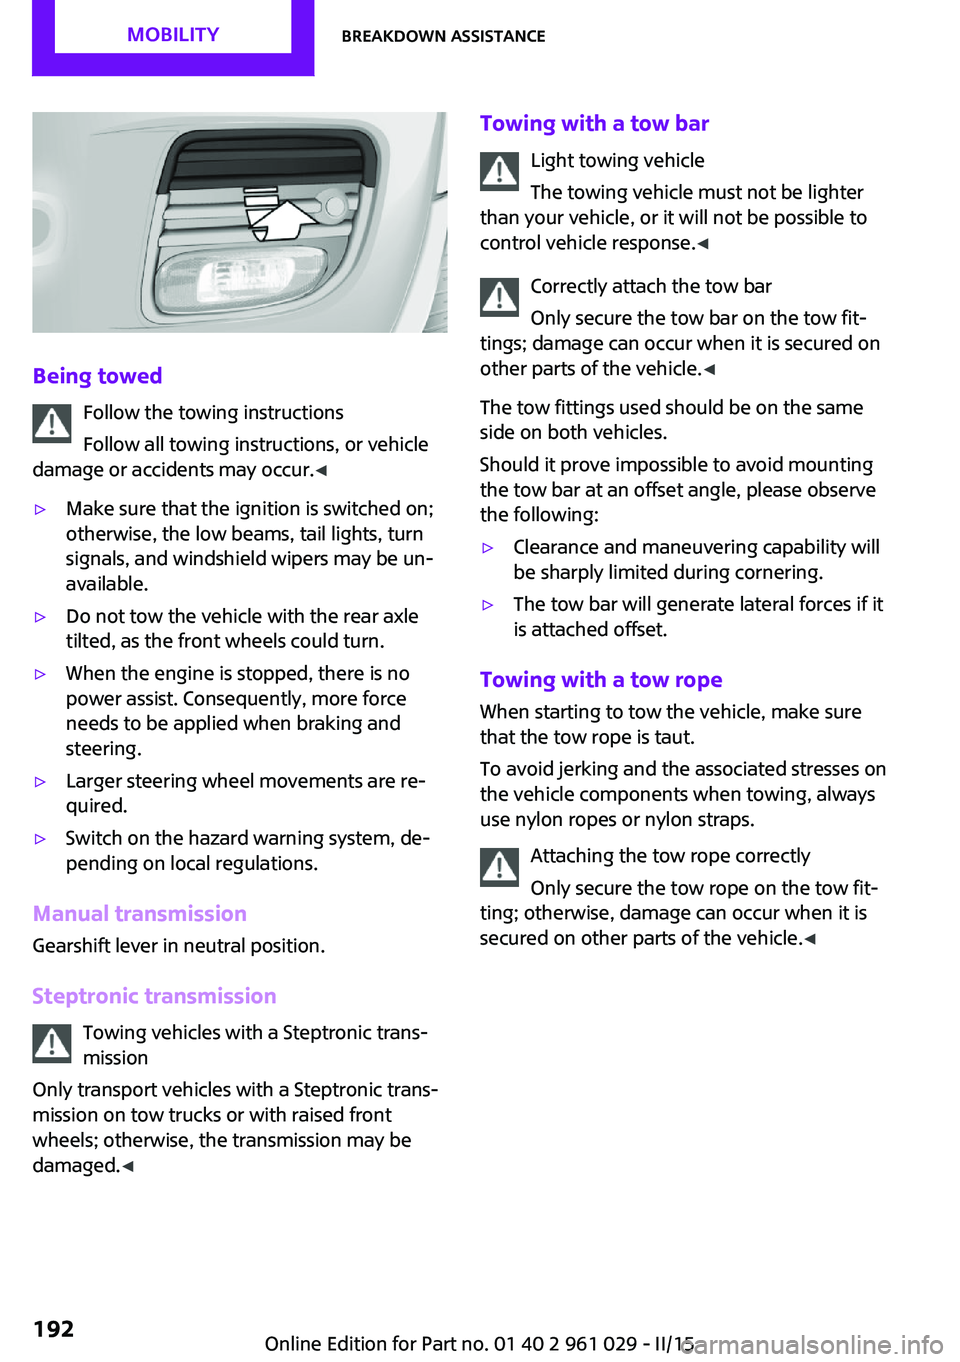
Being towedFollow the towing instructions
Follow all towing instructions, or vehicle
damage or accidents may occur. ◀
▷Make sure that the ignition is switched on;
otherwise, the low beams, tail lights, turn
signals, and windshield wipers may be un‐
available.▷Do not tow the vehicle with the rear axle
tilted, as the front wheels could turn.▷When the engine is stopped, there is no
power assist. Consequently, more force
needs to be applied when braking and
steering.▷Larger steering wheel movements are re‐
quired.▷Switch on the hazard warning system, de‐
pending on local regulations.
Manual transmission
Gearshift lever in neutral position.
Steptronic transmission Towing vehicles with a Steptronic trans‐
mission
Only transport vehicles with a Steptronic trans‐
mission on tow trucks or with raised front
wheels; otherwise, the transmission may be
damaged. ◀
Towing with a tow bar
Light towing vehicle
The towing vehicle must not be lighter
than your vehicle, or it will not be possible to
control vehicle response. ◀
Correctly attach the tow bar
Only secure the tow bar on the tow fit‐
tings; damage can occur when it is secured on
other parts of the vehicle. ◀
The tow fittings used should be on the same
side on both vehicles.
Should it prove impossible to avoid mounting
the tow bar at an offset angle, please observe
the following:▷Clearance and maneuvering capability will
be sharply limited during cornering.▷The tow bar will generate lateral forces if it
is attached offset.
Towing with a tow rope
When starting to tow the vehicle, make sure
that the tow rope is taut.
To avoid jerking and the associated stresses on
the vehicle components when towing, always
use nylon ropes or nylon straps.
Attaching the tow rope correctly
Only secure the tow rope on the tow fit‐
ting; otherwise, damage can occur when it is
secured on other parts of the vehicle. ◀
Seite 192MOBILITYBreakdown assistance192
Online Edition for Part no. 01 40 2 961 029 - II/15
Page 200 of 231
Carpets/floor matsNo objects in the area around the pedals
Keep floor mats, carpets, and any other
objects out of the area of motion of the pedals;
otherwise, the function of the pedals could be
impeded while driving
Do not place additional floor mats over existing
mats or other objects.
Only use floor mats that have been approved
for the vehicle and can be properly fixed in
place.
Ensure that the floor mats are securely fastened
again when they are returned after being re‐
moved, such as for cleaning. ◀
Floor mats can be removed for cleaning.
If they are very dirty, clean with a microfiber
cloth and water or an interior cleaner. To pre‐
vent matting of the carpet, rub back and forth
in the direction of travel only.
Displays To clean the displays, such as the radio or dis‐
play elements, use an antistatic microfiber
cloth.
Cleaning displays
Do not use chemical or household cleans‐
ers.
Keep all fluids and moisture away from the
unit.
Otherwise, they could affect or damage surfa‐
ces or electrical components.
Avoid pressing too hard when cleaning and do
not use abrasive materials; otherwise, damage
can result. ◀
CD/DVD drives No cleaning CD
Do not use cleaning CDs; otherwise, parts
of the drive may become damaged. ◀Long-term vehicle storage
Your service center can advise you on what to
consider when storing the vehicle for longer
than three months.Seite 198MOBILITYCare198
Online Edition for Part no. 01 40 2 961 029 - II/15
Page 203 of 231
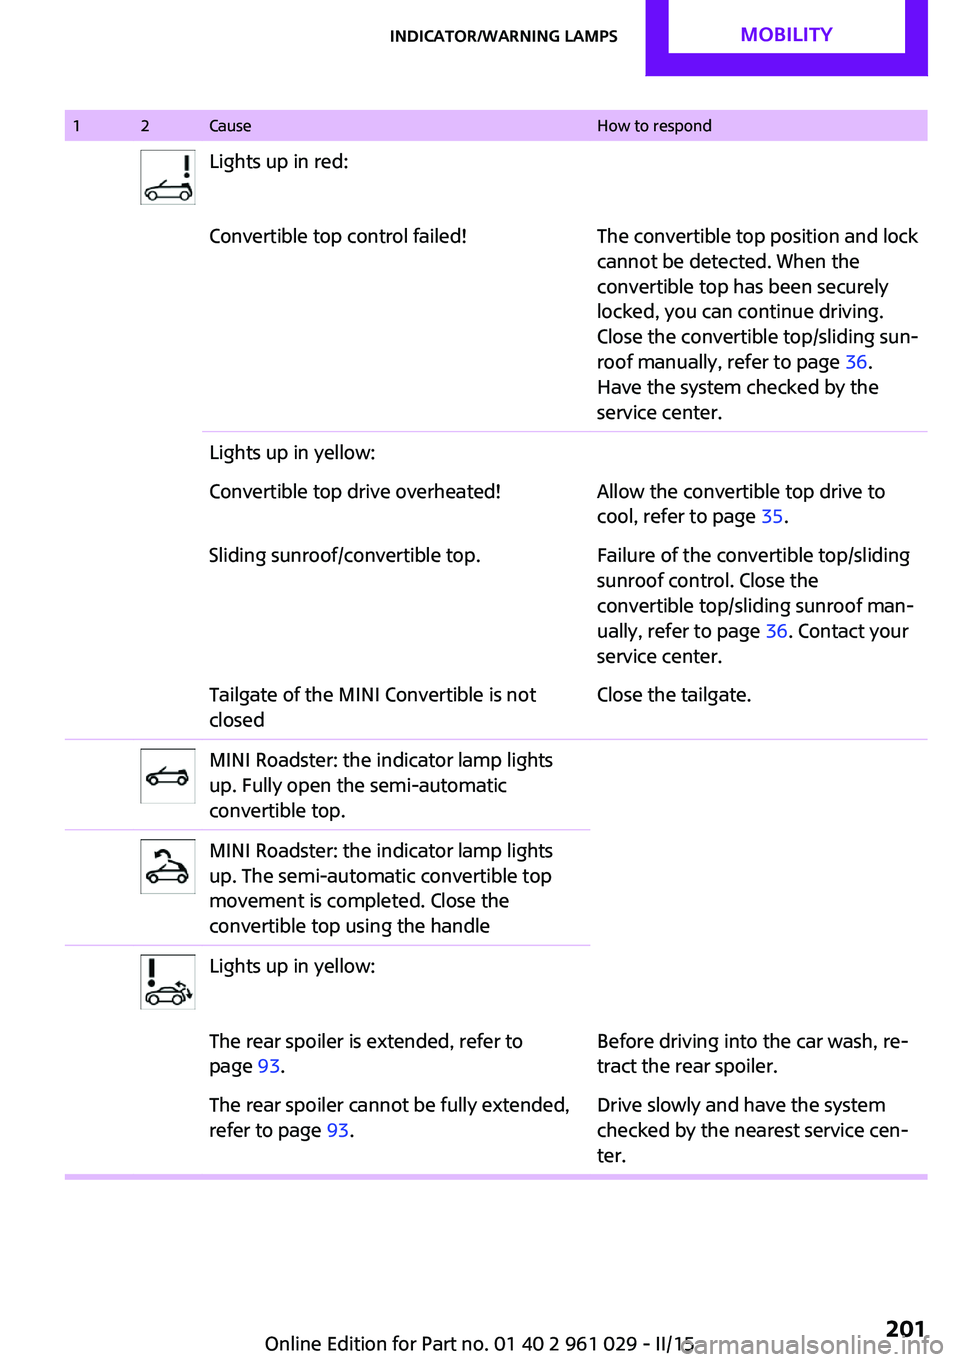
12CauseHow to respondLights up in red:Convertible top control failed!The convertible top position and lock
cannot be detected. When the
convertible top has been securely
locked, you can continue driving.
Close the convertible top/sliding sun‐
roof manually, refer to page 36.
Have the system checked by the
service center.Lights up in yellow:Convertible top drive overheated!Allow the convertible top drive to
cool, refer to page 35.Sliding sunroof/convertible top.Failure of the convertible top/sliding
sunroof control. Close the
convertible top/sliding sunroof man‐
ually, refer to page 36. Contact your
service center.Tailgate of the MINI Convertible is not
closedClose the tailgate.MINI Roadster: the indicator lamp lights
up. Fully open the semi-automatic
convertible top.MINI Roadster: the indicator lamp lights
up. The semi-automatic convertible top
movement is completed. Close the
convertible top using the handleLights up in yellow:The rear spoiler is extended, refer to
page 93.Before driving into the car wash, re‐
tract the rear spoiler.The rear spoiler cannot be fully extended,
refer to page 93.Drive slowly and have the system
checked by the nearest service cen‐
ter.Seite 201Indicator/warning lampsMOBILITY201
Online Edition for Part no. 01 40 2 961 029 - II/15
Page 206 of 231
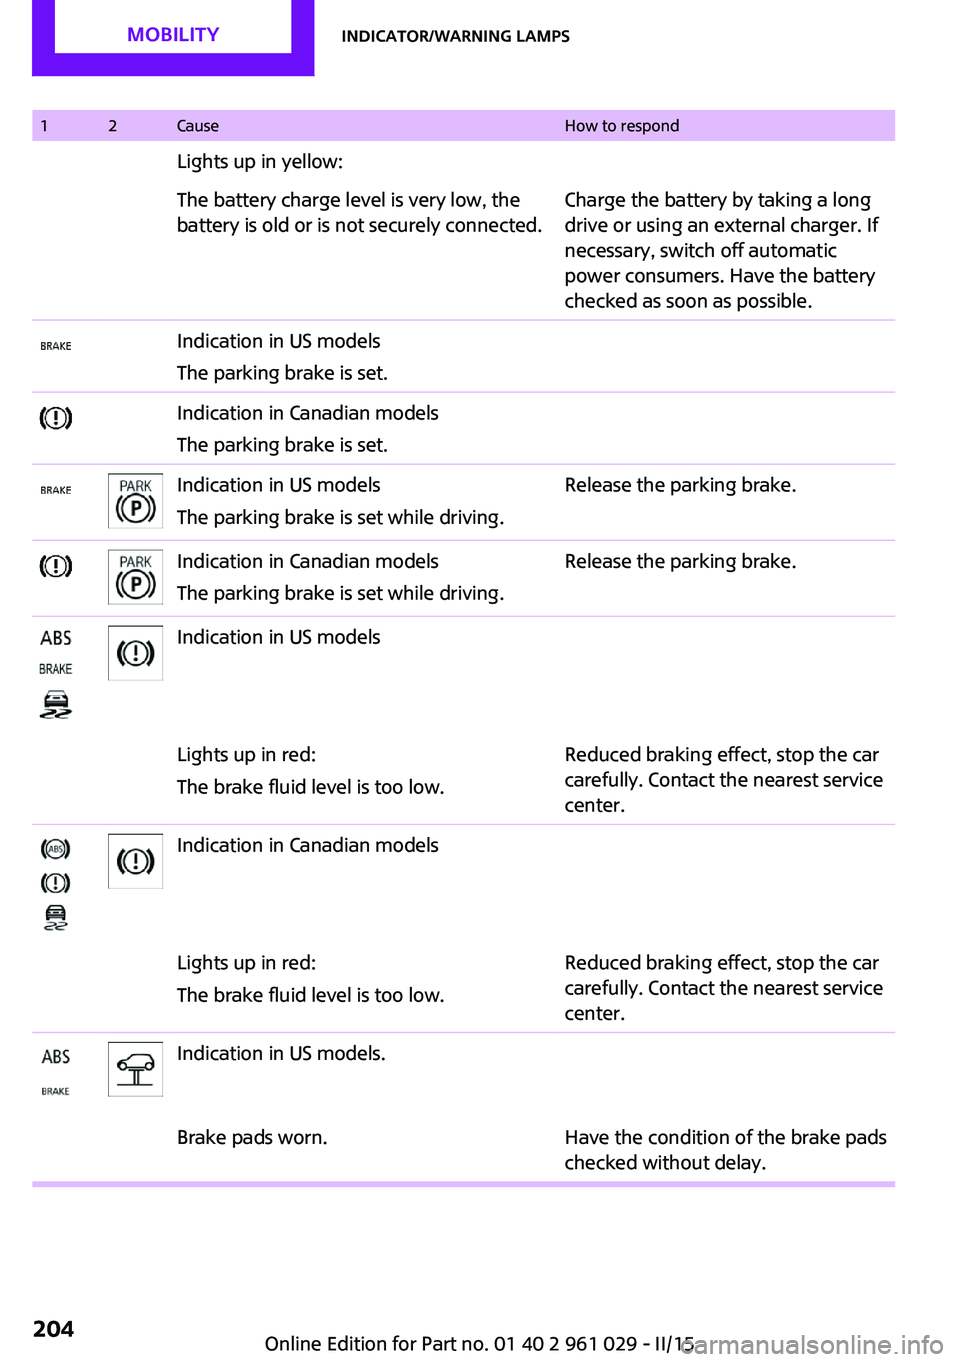
12CauseHow to respondLights up in yellow:The battery charge level is very low, the
battery is old or is not securely connected.Charge the battery by taking a long
drive or using an external charger. If
necessary, switch off automatic
power consumers. Have the battery
checked as soon as possible.Indication in US models
The parking brake is set.Indication in Canadian models
The parking brake is set.Indication in US models
The parking brake is set while driving.Release the parking brake.Indication in Canadian models
The parking brake is set while driving.Release the parking brake.Indication in US modelsLights up in red:
The brake fluid level is too low.Reduced braking effect, stop the car
carefully. Contact the nearest service
center.Indication in Canadian modelsLights up in red:
The brake fluid level is too low.Reduced braking effect, stop the car
carefully. Contact the nearest service
center.Indication in US models.Brake pads worn.Have the condition of the brake pads
checked without delay.Seite 204MOBILITYIndicator/warning lamps204
Online Edition for Part no. 01 40 2 961 029 - II/15