2015 MERCEDES-BENZ SLS AMG GT ROADSTER oil
[x] Cancel search: oilPage 231 of 290
!
Do not clean the camera lens and the area
around the rear view camera with apower
washer.
Cleaning the exhaust pipes G
WARNING
The exhaust tail pipe and tail pipe trim can
become very hot. If you come into contact
with these parts of the vehicle, you could burn
yourself. There is arisk of injury.
Alwaysbep articularlycareful around the
exhaust tail pipe and the tail pipe trim. Allow
these componentstoc ool down before touch-
ing them.
! Do not clean the exhaust pipe with acid-
based cleaning agents such as sanitary
cleansers or wheel cleaners.
Impurities combined with the effects of road
grit and corrosive environmental factors may cause flash rust to form on the surface. You
can restore the original shine of the exhaust
pipe by cleaning it regularly, especially in win- ter and after washing.
X Cleant he exhaust pipe with achrome care
product tested and approved by Mercedes-
Benz. Interior care
Cleaning the display !
For cleaning, do not use any of the fol-
lowing:
R alcohol-based thinner or gasoline
R abrasive cleaning agents
R commercially-available householdc lean-
ing agents
These may damage the displays urface. Do
not put pressure on the displays urface
when cleaning. This could lead to irrepara-
ble damage to the display. X
Before cleaning the display, make sure that
it is switched off and has cooled down.
X Cleant he displays urface using acommer-
cially available microfiber cloth and
TFT/LCD displayc leaner.
X Dry the displays urface usingadry micro-
fiber cloth.
Cleaning the plastic trim G
WARNING
Care products and cleaning agents containing solvents cause surfaces in the cockpit to
become porous. As aresult, plastic parts may
come loose in the event of air bag deploy-
ment. There is arisk of injury.
Do not use any care products and cleaning
agents to clean the cockpit.
! Do not affix the following to plastic surfa-
ces:
R stickers
R films
R scented oil bottles or similari tems
You can otherwise damage the plastic.
! Do not allowc
osmetics, insect repellent
or sunscreen to come into contact with the
plastic trim. This maintains the high-quality look of the surfaces.
X Wipe the plastic trim with adamp, lint-free
cloth, e.g. amicrofiber cloth.
X Heavy soiling: use car care and cleaning
products recommended and approved by
Mercedes-Benz.
The surface may change color temporarily.
Wait until the surface is dry again.
Cleaning the steering wheela nd selec-
tor lever X
Thoroughlyw ipe withadamp cloth or use
leather care agents that have been recom- mended and approved by Mercedes-Benz. Care
229Maintenance and care Z
Page 232 of 290
Cleaning genuine wood and trim ele-
ments !
Do no
tuse solvent-based cleanin gagents
suc hast ar remover, wheel cleaners, pol-
ishe sorw axes. Ther eisotherwise ariskof
damaging th esurface.
! Do no
tuse chrom epolis hont rimp ieces.
The trim pieces have achrom elook but are
mostly made of anodized aluminum and
can lose their shin eifchrom epolis his
used. Use adamp, lint-free cloth instead
when cleanin gthe trim pieces.
If th echrome-plated trim pieces are very
dirty, you can use achrom epolish. If you
are unsure as to whether th etrimp ieces
are chrome-plated or not, consult an
authorized Mercedes-Ben zCenter.
X Wipe th ewoode ntrima nd trim pieces with
ad amp, lint-free cloth ,e.g.am icrofiber
cloth.
X Heavy soiling: use careand cleanin gprod-
uct srecommended and approved by
Mercedes-Benz.
Cleaning th eseat covers General notes
! Do no
tuse microfiber cloth stoclean gen-
uine leather ,artificial leather or DINAMICA
covers. If used often ,the se can damag ethe
cover.
i Not
ethatregular car eisessential to
ensure that th eappearanc eand comfort of
th ec oversisr etaine dovertime.
Genuine leather seat covers
Leather is anatural product.
It exhibit snatural surface characteristics, for
example:
R differences in th etexture
R sign sofs tretching and marking
R sligh tnuances of color
Thes eare characteristic sofleather and not
material defects. !
To retain th
enatural appearanc eofthe
leather ,observ ethe followin gcleaning
instructions:
R Clean genuine leather cover scarefully
wit had amp cloth and then wipe th ecov-
ers down wit hadry cloth.
R Mak esure that th eleather does not
become soaked. It may otherwise
become roug hand cracked.
R Only use leather car eagents that have
been tested and approved by Mercedes-
Benz. You can obtain these from aquali-
fied specialist workshop.
Seat cover sofother materials
! Observ
ethe followin gwhen cleaning:
R clean artificial leather cover swithac loth
moistene dwithas olution containing 1%
detergen t(e.g. dish washin gliquid).
R clean cloth cover switham icrofiber cloth
moistene dwithas olution containing 1%
detergen t(e.g. dish washin gliquid). Rub
carefully and always wipe entir eseat sec-
tions to avoid leavin gvisible lines. Leave
th es eat to dry afterwards. Cleaning
results depen donthetype of dirt and
how lon githas been there.
R clean DINAMICA cover swithad amp
cloth .Makes ure that you wipe entire
seat sections to avoid leavin gvisible
lines.
Cleaning th eseat belts G
WARNING
Seat belt scan become severely weakened if
bleached or dyed. This coul dcaus ethe seat
belt stot earorf ail, for instance, in th eevent of
an accident. This pose sanincreased ris kof
injury or fatal injury.
Never bleac hordye theseat belts.
! Do no
tclean th eseat belt susin gchemical
cleanin gagents .Don otdry th eseat belts
by heating at temperatures abov e176 ‡
(80 †) or in direct sunlight. 230
CareMaintenance and care
Page 271 of 290
GVWR (Gross Vehicl
eWeight Rating)
The GVWR is the maximu mpermitted gross
weight of the fullyl oaded vehicle (weight of
the vehicle including all accessories, occu-
pants, fuel,l uggage and the drawbar nose-
weight if applicable).T he gross vehicle weight
rating is specified on the vehicle identification plate on the B-pilla ronthe driver's side.
Maximum loaded vehicle weight
The maximu mweight is the sum of the curb
weight of the vehicle ,the weight of the acces-
sories ,the total loadl imitand the weight of
the optional equipment installed at the fac-
tory.
Kilopascal (kPa)
Metric unit for tire pressure. 6.9 kPa is the
equivalent of 1psi.A nother unit for tire pres-
sure is bar. There are 100 kilopascals (kPa) to
1b ar.
Load index
In addition to the load-bearing index, the load index may alsobei mprinted on the sidewallof
the tire. This specifies the load-bearing capa-
city more precisely.
Curb weight
The weight of avehicle with standard equip-
ment including the maximu mcapacity of fuel,
oil and coolant. It alsoi ncludes the air-condi-
tioning system and optional equipment if
these are installed in the vehicle ,but does not
includ epassengers or luggage.
Maximum load rating
The maximu mloadr ating in kilograms or
pounds is the maximu mweight for which a
tire is approved.
Maximum permissible tire pressure
Maximu mpermissibl etire pressure for one
tire.
Maximum load on one tire
Maximu mloadono ne tire. This is calculated
by dividing the maximu maxle loadofo ne axle
by two. PSI (pounds per square inch)
As
tandard unit of measure for tire pressure.
Aspec tratio
Relationshi pbetwee ntire heigh tand tire
width in percent.
tire pressure
This is pressure inside the tire applying an
outward force to each square inch of the tire's surface. The tire pressure is specified in
pounds per square inch (psi), in kilopascal
(kPa) or in bar. The tire pressure shoul donly
be corrected when the tires are cold. For this,
the vehicle must have been stationary for at
least three hours or not have traveled more
than 1.6 km (1 mile)int his time.
Tire pressure of coldt ires
The tires are cold:
R if the vehicle has been parked without
direct sunlight on the tires for at least three
hours and
R if the vehicle has not been driven more than
1m ile (1.6 km)
Tread
The part of the tire that comes into contact
with the road.
Bead
The tire beade nsures that the tire sits
securel yonthe wheel. There are severa lsteel
wiresint he beadtop revent the tire from
coming loose from the wheelr im.
Sidewall
The part of the tire betwee nthe tread and the
bead.
Weight of optional extras
The combined weight of those optional extras
that weigh more than the replaced standard
part and more than 2.3 kilograms (5 lbs).
These optional extras, such as high-perform-
ance brakes, level control, aroof rack or a
high-performance battery, are not included in Alla
bout wheels and tires
269Wheelsand tires Z
Page 273 of 290
of hydroplaning. You will only gain these ben-
efits if the correc tdirection of rotation is
maintained.
An arrow on the sidewal lofthe tire indicates
its correc tdirection of rotation. Storing wheels
Storew heels that are not being used in acool,
dry and preferably dark place. Protec tthe
tires from oil, grease, gasoline and diesel. Cleaning the wheels
G
WARNING
The water jet from acircular jet nozzle (dirt
blasters) can cause invisible exterior damage to the tires or chassis components. Compo-
nentsd amaged in this way may fail unexpect-
edly. There is arisk of an accident.
Do not use power washers with circular jet
nozzles to clean the vehicle. Have damaged
tires or chassis components replaced imme-
diately. Mounting
awheel
Preparing the vehicle X
Stop the vehicle on solid, non-slippery and
level ground.
X Apply the electric parking brake manually.
X Bring the front wheels into the straight-
ahead position.
X Shift the transmission to position P.
X Switch off the engine.
X Open the driver's door.
The on-board electronics now have status
0.T his is the same as the SmartKey having
been removed.
X Remove Start/Stop button from ignition
lock (Y page 119). X
Take the following object sfrom the left-
hand stowage compartment and the left-
hand stowage space in the trunk:
R lug wrench
R folding wheel chock
R jack
R alignment bolt
X Secure the vehicle to prevent it from rolling
away.
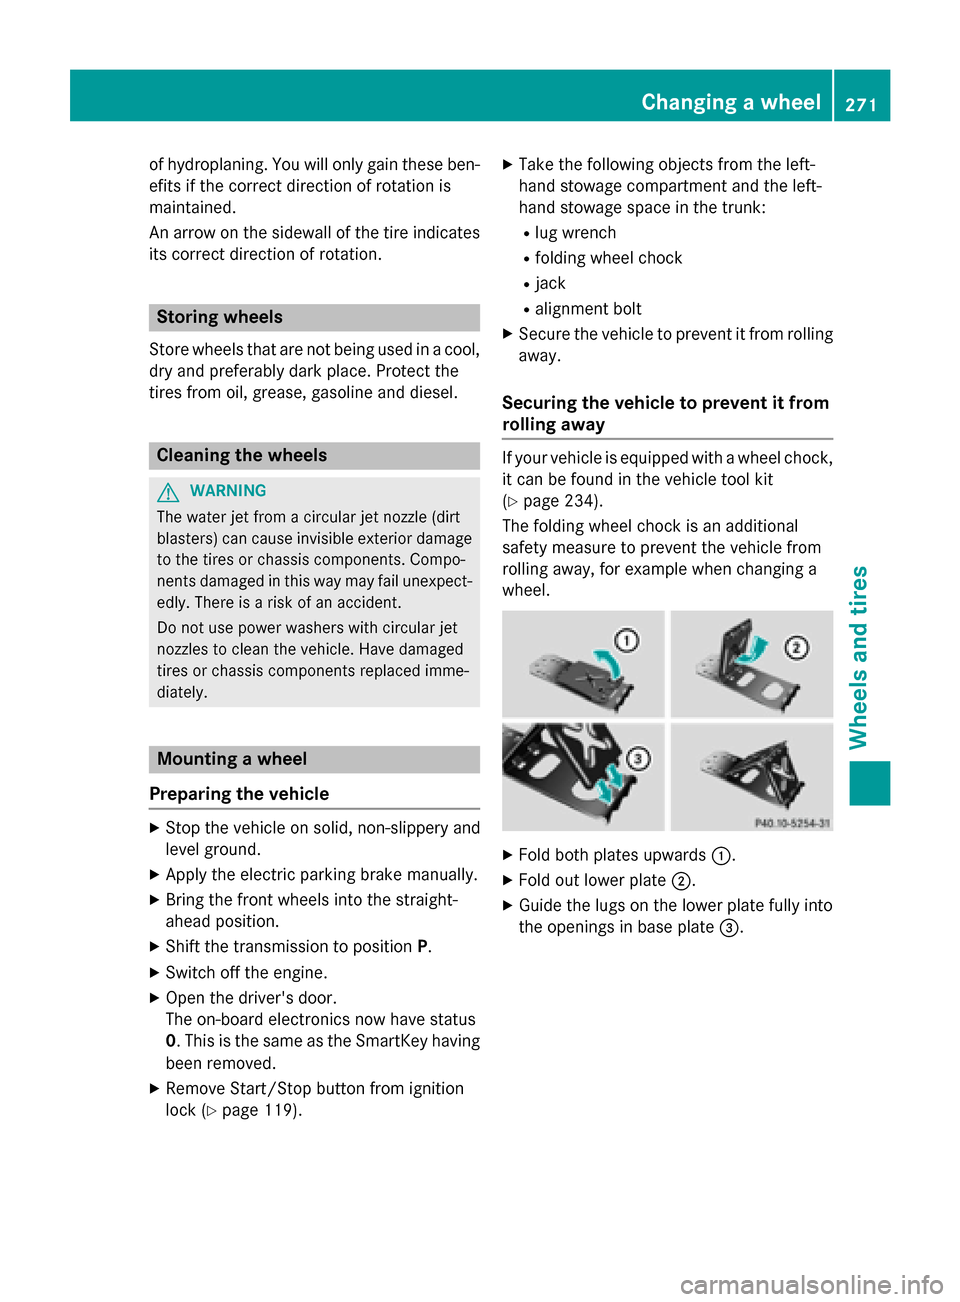
Securing the vehicle to prevent it from
rolling away If your vehicle is equipped with
awheel chock,
it can be found in the vehicle tool kit
(Y page 234).
The folding wheel chock is an additional
safety measure to prevent the vehicle from
rolling away,f or example when changing a
wheel. X
Fold both plates upwards 0043.
X Fold out lower plate 0044.
X Guide the lugs on the lower plate fully into
the openings in base plate 0087. Changing
awheel
271Wheels and tires Z
Page 276 of 290
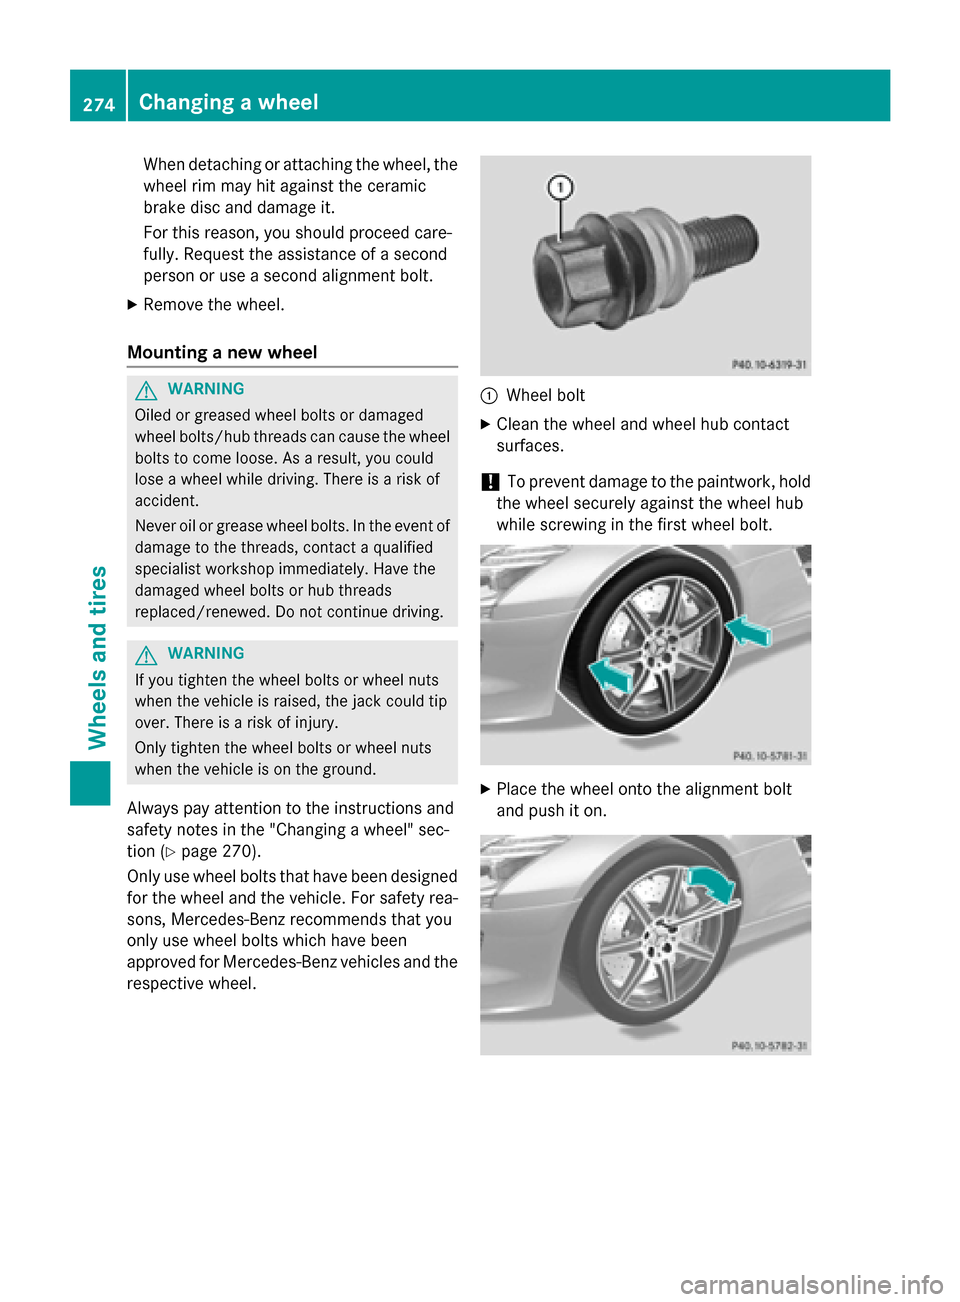
When detachin
gorattaching the wheel, the
wheel rim may hit against the ceramic
brake disc and damage it.
For this reason, you should proceed care-
fully. Request the assistanc eofasecond
person or use asecon dalignment bolt.
X Remove the wheel.
Mounting anew wheel G
WARNING
Oiled or greased wheel bolts or damaged
wheel bolts/hub threads can cause the wheel bolts to come loose. As aresult, you could
lose awheel while driving. There is arisk of
accident.
Never oil or grease wheel bolts. In the event of damage to the threads, contact aqualified
specialist workshop immediately. Have the
damaged wheel bolts or hub threads
replaced/renewed. Do not continue driving. G
WARNING
If you tighten the wheel bolts or wheel nuts
when the vehicle is raised, the jack could tip
over. There is arisk of injury.
Only tighten the wheel bolts or wheel nuts
when the vehicle is on the ground.
Always pay attention to the instructions and
safety notes in the "Changing awheel" sec-
tion (Y page 270).
Only use wheel bolts that have been designed for the wheel and the vehicle. For safety rea-
sons, Mercedes-Benz recommends that you
only use wheel bolts which have been
approved for Mercedes-Benz vehicles and the
respective wheel. 0043
Wheel bolt
X Clean the wheel and wheel hub contact
surfaces.
! To preven
tdamage to the paintwork ,hold
the wheel securely against the wheel hub
while screwin ginthe first wheel bolt. X
Place the wheel ontot he alignment bolt
and push it on. 274
Changing
awheelWheels and tires
Page 283 of 290
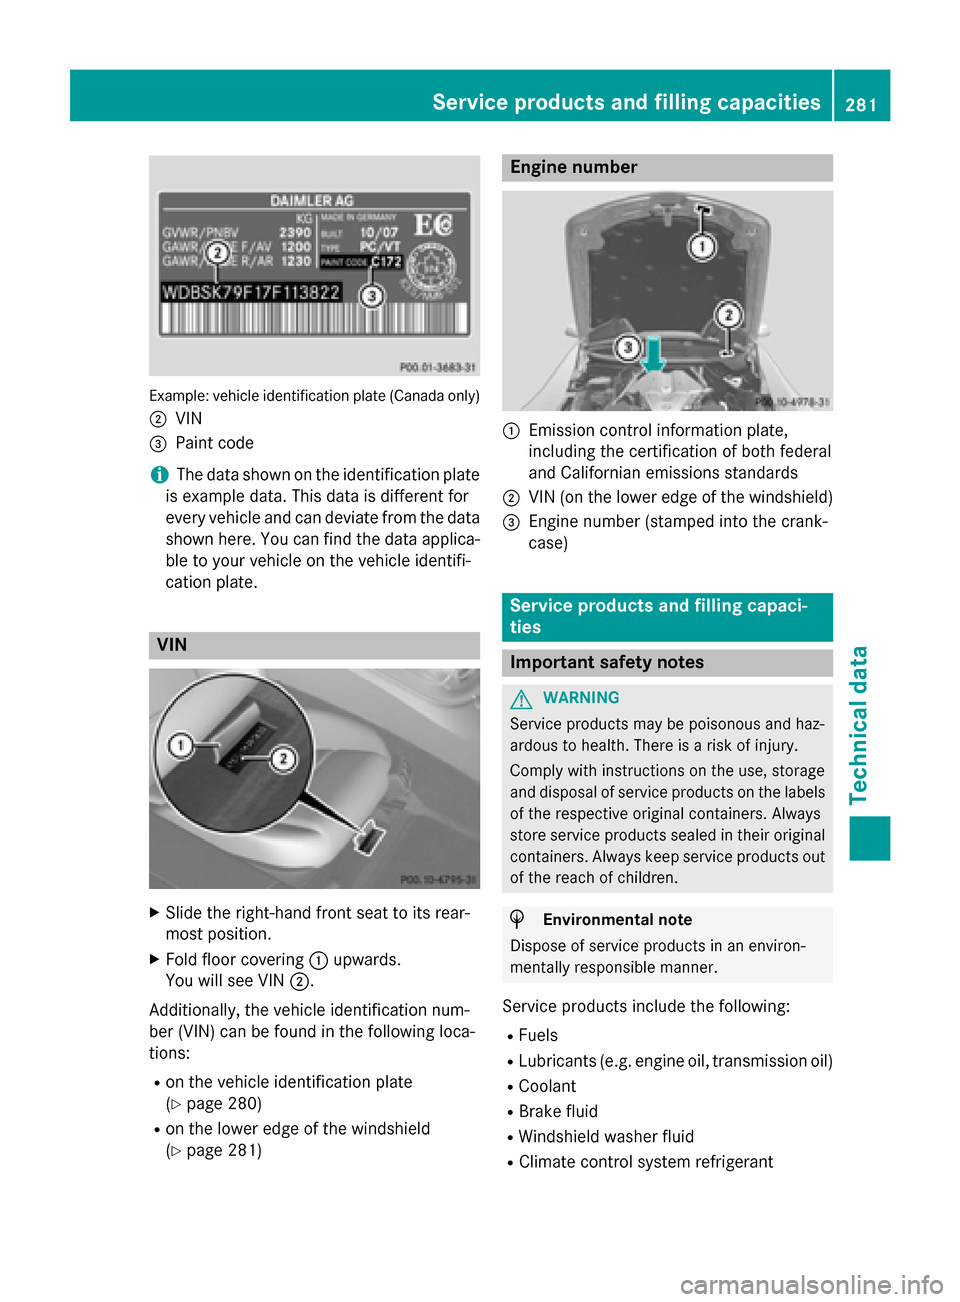
Example: vehicl
eide ntification plate (Canada only)
0044 VIN
0087 Paint code
i The data shown on the identificatio
nplate
is exampl edata. Thi sdataisd ifferent for
every vehicl eand can deviate from the data
shown here. Yo ucan find the data applica-
bl etoy ourv ehicl eont he vehicl eide ntifi-
cation plate. VIN
X
Slide the right-hand front sea ttoits rear-
mos tposit ion.
X Fol dfloor covering 0043upwards.
Yo uw ills ee VIN 0044.
Additionally, the vehicl eide ntificatio nnum-
be r(VIN) can be found in the following loca-
tions:
R on the vehicl eide ntificatio nplate
(Y page 280)
R on the lowe redgeoft he windshield
(Y page 281) Engine number
0043
Emission contro linformatio nplate,
including the certificatio nofbothf ederal
and Californian emissions standards
0044 VIN (o nthe lowe redgeoft he windshield)
0087 Engine numbe r(stamped into the crank-
case) Servic
eproducts and filling capaci-
ties Important safety notes
G
WARNING
Service products ma ybepoisonousand haz-
ardous to health .There is ariskofi njury.
Compl ywithi nstructions on the use, storage
and disposa lofservic eproducts on the labels
of the respective original containers. Always
stor eservic eproducts seale dintheiroriginal
containers. Alway skeeps ervic eproducts out
of the reach of children. H
Environmental note
Dispose of servic eproducts in an environ-
mentall yresponsibl emanner.
Service products includ ethe following:
R Fuels
R Lubricants (e.g. engine oil, transmission oil)
R Coolant
R Brake fluid
R Windshield washe rfluid
R Climate contro lsystem refrigerant Servic
eproducts and filling capacities
281Technicaldata Z
Page 285 of 290
with premium-grade unleade
dgasoline
as soon as possible.
R Do not driv eatthemaximum speed.
R Avoid sudden acceleration and engine
speed sover 3,000 rpm.
! Only use th
efuel recommended. Operat-
ing th evehicle with other fuels can lead to
engine failure.
Reformulated Gasolin e(RFG) and/or
unleade dgasolin ewith additives can be used.
The concentratio nofadditives in th efuel,
however, must not exceed 10%, e.g.:
R Ethanol
R TAME
R ETBE
R IPA
R TBA
For MTBE, th econcentratio nshould not
exceed 15%.
The concentratio nofmethano lingasoline,
including other additives ,must not exceed
3%.
Usin gmixtures of methano land ethanol is not
permitted. Gasohol, amixtur eof10% ethanol
and 90% unleade dgasolin e, maybeu sed.
All of these blend smustfulfill the fuel require-
ments ,e.g.:
R knock resistance
R boiling point
R vapo rpressure
Yo uw illu sually find information abou tthe fuel
grade on the pump. If yo ucannot find the
labe lont he pump, as kthe staff for assis-
tance.
i For furthe
rinformation, consul tan
authorized Mercedes-Benz Center or on
the Internet at http://www.mbusa.com
(USA only).
Informatio nonrefueling (Y page 129). Additives
! Operating the engine with fuel additives
adde dlater can lead to engine failure. Do
not mi xfue laddit ives with fuel .Thisd oes
not includ eaddit ives for the remova land
prevention of residue buildup. gasoline
must onl ybemixed with additives recom-
mended by Mercedes-Benz. Compl ywith
the instructions for us eonthe product
label. More information abou trecom-
mended additives can be obtained from
any authorized Mercedes-Benz Center.
Mercedes-Benz recommend sthaty ou use
fuel brands tha thavet he additives.
Th eq uali ty of the fuel availabl einsomecoun-
tries ma ynot be sufficient. Residu ecould
buil dupasar esult. In such cases ,and in
consultation with an authorized Mercedes-
Benz Center, the gasoline ma ybemixed with
the cleaning additiv erecommended by
Mercedes-Benz (par tno. A000989254512).
Yo um usto bser ve the note sand mixing ratios
specified on the container. Engine oil
General notes !
Never us
eengine oi lorano ilfilte rofa
specification other tha nisn ecessary to ful-
fill the prescribe dservice intervals .Donot
change the engine oi loroilfilte rino rder to
achieve longe rreplacement intervals than
those prescribed. Yo ucould otherwise
cause engine damage or damage to the
exhaust ga saftertreatment.
Follo wthe instructions in the service inter-
va ld isplay regarding the oi lchange .Other-
wise ,you maydamag ethe engine and the
exhaust ga saftertreatment.
When handling engine oil, observe the impor- tant safety note sonservice products
(Y page 281).
Th ee ngine oils ar ematche dtot he perform-
anc eofM ercedes-Benz engine sand service
intervals .You shoul dtherefore onl yuse Service products and fillin
gcapacities
283Technicaldata Z
Page 286 of 290
engin
eoils and oil filters that are approved for
vehicles with maintenanc esystems.
For alist of approved engin eoils and oil filters,
consult an authorized Mercedes-Benz
Center .Orvisit the website
http://bevo.mercedes-benz.com.
The table shows which engine oils have been
approved for your vehicle. MB sheet number
229.5
7 i
MB approval is indicated on the oil con-
tainers.
Filling capacities The following values refer to an oil change
including the oil filter.
Engine with oil filter
10.0USq
t(9.5l) Ad
ditives !
Do not us
eany additive sinthe engine oil.
Thi scould damag ethe engine.
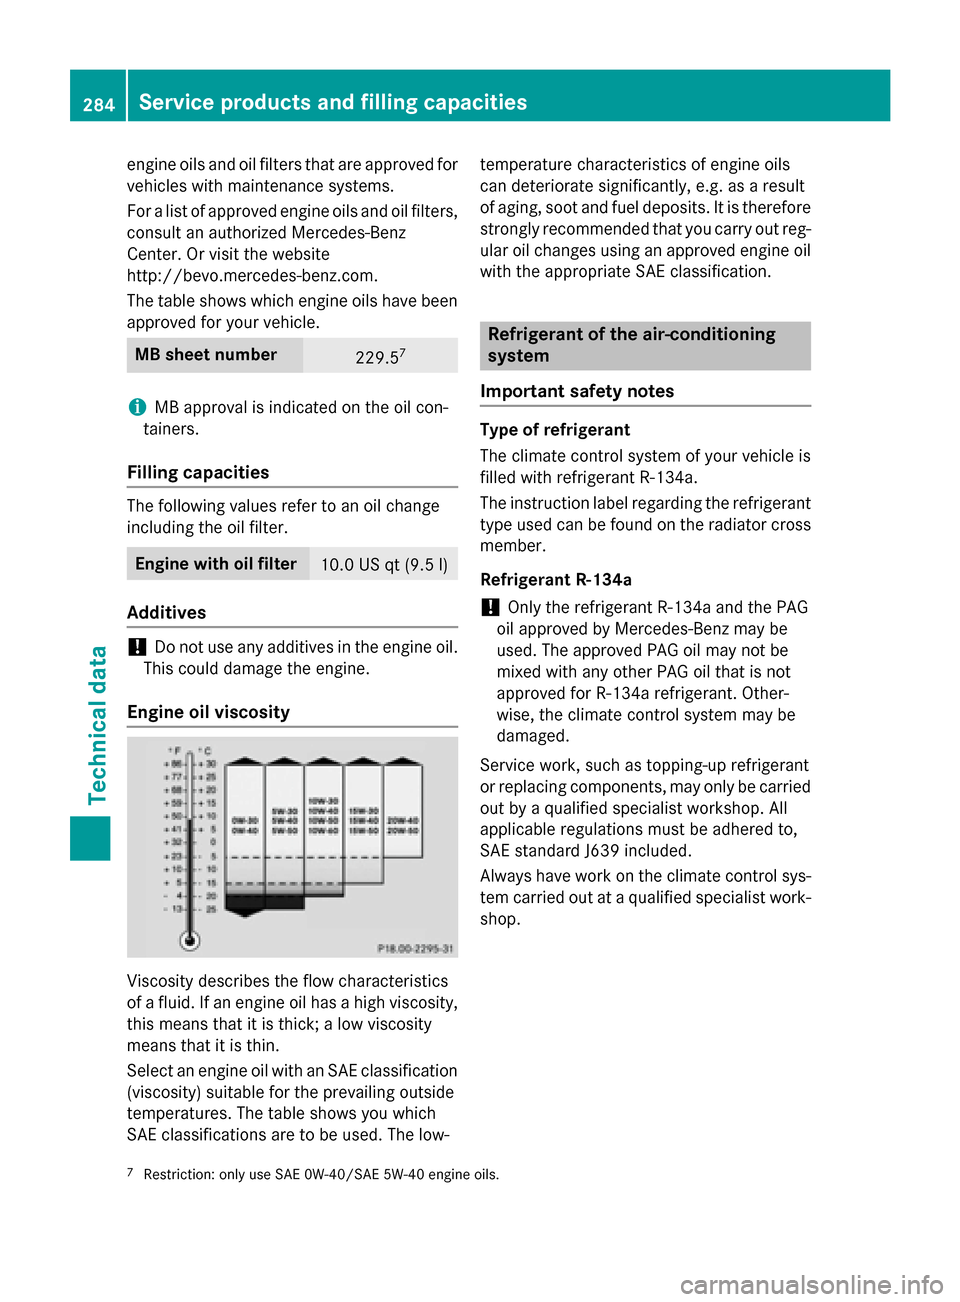
Engine oi lviscosity Viscosity describe
sthe flo wcharacteristics
of afluid .Ifane ngine oi lhas ah ighv iscosity,
this means tha titisthick; alow viscosity
means tha titisthin.
Select an engine oi lwithanS AE classification
(viscosity )suitabl efor the prevailing outside
temperatures. The table shows yo uwhich
SAE classifications are to be used .The low- temperature characteristics of engine oils
can deteriorate significantly, e.g. as
aresult
of aging, soo tand fue ldep osits. It is therefore
strongly recommended tha tyou carr youtreg-
ular oi lchanges using an approved engine oil
with the appropriate SAE classification. Refrigerant of the air-conditioning
system
Important safety notes Type of refrigerant
The climate control system of your vehicl
eis
fille dwithr efrigerant R ‑134a.
The instruction labe lregarding the refrigerant
typ eusedc an be found on the radiator cross
member.
Refrigerant R‑ 134a
! Only the refrigerant R‑134a and the PAG
oi la pp roved by Mercedes-Benz may be
used .The approved PAG oi lmay not be
mixe dwitha ny othe rPAG oi ltha tisn ot
approved for R-134a refrigerant. Other-
wise, the climate control system may be
damaged.
Service work, such as topping-u prefrigerant
or replacing components ,may only be carried
ou tb yaq ualified specialist workshop. All
applicabl eregulations mus tbea dhered to,
SAE standard J63 9included.
Alway shavew orkont he climate control sys-
tem carrie doutataq uali fied specialist work-
shop.
7 Restriction: only us eSAE 0W-40/SAE 5W-40 engine oils. 284
Servic
eproducts and filling capacitiesTechnical data