2015 MERCEDES-BENZ SLS AMG GT ROADSTER warning
[x] Cancel search: warningPage 243 of 290
Avoi
dcontact with the skin, eyes or clothing.
Do not inhal eany battery gases .Donot lean
ove rthe battery .Keepc hildren away from
batteries. Wash battery aci dimmediatel ywith
water and see kmedica lattention. G
WARNING
Ad ischarge dbattery can freeze at tempera-
ture sbelow freezing point. Whe njump-start-
ing the vehicl eorcharging the battery ,gases
can escap efrom the battery .There is ariskof
an explosion.
Allow the froze nbattery to tha woutbefore
charging it or jump-starting.
! Onl
yusebattery chargers with amaxi-
mu mc harging voltag eof14.8V.
! Only
charge the battery using the jump-
starting connection point.
The jump-starting connection point is in the
engine compartment (Y page 242).
Neve rcharge the battery if it is stil linstalled in
the vehicle ,unless yo uuseab attery charger
which ha sbeent ested and approved by
Mercedes-Benz. Abattery charge runits pe-
ciall yadapt ed for Mercedes-Benz vehicles
and tested and approved by Mercedes-Benz
is available as an accessory. It permits the
charging of the battery in its installed posi-
tion. Contact an authorized Mercedes-Benz
Center for further information and availabil-
ity .C harget he battery in accordance with the
separate instructions for the accessory bat-
tery charger.
Read the battery charger's operating instruc- tions before charging the battery.
X Ope nthe hoo d(Ypage 218).
X Connect the battery charge rtothe positive
terminal and ground point in the same
order as when connecting the dono rbat-
tery in the jump-starting procedure
(Y page 242). Battery (vehicle)
241Breakdown assistance Z
Page 244 of 290
Jump-starting
G
WARNING
Battery acid is caustic. There is arisk of injury.
Avoid contact with the skin, eyes or clothing. Do not inhale any battery gases. Do not lean over the battery. Keep children away from batteries. Wash battery acid immediately with water and seek
medical attention. G
WARNING
During charging and jump-starting, explosive gases can escape from the battery. There is arisk
of an explosion.
Particularly avoid fire, open flames, creating sparks and smoking. Ensure there is sufficient ven-
tilation while charging and jump-starting. Do not lean over abattery. G
WARNING
During the charging process, abattery produces hydrogen gas. If ashort circuit occurs or sparks
are created, the hydrogen gas can ignite. There is arisk of an explosion.
R Make sure that the positive terminal of aconnected battery does not come into contact with
vehicle parts.
R Never place metal objects or tools on abattery.
R It is important that you observe the described order of the battery terminals when connecting
and disconnecting abattery.
R When jump-starting, make sure that the battery poles with identical polarity are connected.
R It is particularly important to observe the described order when connecting and disconnecting
the jumper cables.
R Never connect or disconnectt he battery terminals while the engine is running.G
WARNING
Ad ischarged battery can freeze at temperatures below freezing point. When jump-starting the
vehicle or charging the battery, gases can escape from the battery. There is arisk of an explosion.
Allow the frozen battery to thaw out before charging it or jump-starting.
! Avoid repeated and lengthy startinga
ttempts. Otherwise, the catalytic converter could be
damaged by the non-combusted fuel.
Do not start the vehicle using arapid charging device. If your vehicle's battery is discharged,
the engine can be jump-started from another vehicle or from asecond battery using jumper
cables. Observe the following points:
R The battery is not accessible in all vehicles. If the other vehicle's battery is not accessible,
jump-start the vehicle using asecond battery or ajump-starting device.
R You may only jump-start the vehicle when the engine and exhaust system are cold.
R Do not start the engine if the battery is frozen.L et the battery thaw first.
R Only jump-start from batteries with a12Vvoltage rating.
R Only use jumper cables which have asufficient cross-section and insulated terminal clamps. 242
Jump-startingBreakdown assistance
Page 246 of 290
X
First, remove the jumper cable sfrom earth point 0085and negative terminal 0087,then from
positiv eclamp 0043and positiv eterminal 0044.Each time beginning with your vehicle' sbattery.
X Slide cover 0083of the positiv eterminal in the opposite directio ntothe arrow.
X Have the battery checke dataqualified specialist workshop.
i Jump-starting is not considered to be
anorma loperating condition.
i Jumpe
rcable sand further information regarding jump-starting can be obtained at any
qualified specialist workshop. Towing and tow-starting
Important safety notes
G
WARNING
The rea raxlel ocks when:
R the engine is not running
R the engine stalls while the vehicle is being
towed
R there is amalfunction in the power supply
or the vehicle' selectrica lsystem
There is ariskofana ccident.
In the event of abreakdown, yo ushould
always hav ethe vehicle transported. G
WARNING
If the brake system or power steering is mal-
functioning and your vehicle is then towed
away ,significantly more effort may be
required to stee rand brake than is normally
required .There is ariskofana ccident.
In such cases, use atow bar. Befor etowing,
make sur ethat the steering move sfreely. G
WARNING
If the weigh tofthe vehicle to be towe dortow-
starte disgreater than the permissible gross
weigh tofyourv ehicle:
R the towing ey ecould detach itself
R the vehicle/trailer combinatio ncould roll-
over.
There is ariskofana ccident.
Whe ntowing or tow-starting another vehicle,
its weigh tshoul dnot be greater than the per-
missible gros sweigh tofy ourv ehicle. !
Use the SmartKe
yinstead of the Start/
Stop button whe ntowing the vehicle.
Start the engine and keep it running. Turn
the SmartKe ytoposition 2in the ignition.
Set the transmission to Nusing the E-
SELECT lever. Make sure that yo uthen
leave the SmartKe yinposition 2.
Check the transmission positio ninthe
instrument cluster.
! Make sure that the electric parking brake
is released .Ifthe electric parking brake is
faulty ,visit aquali fied specialist workshop.
Mercedes-Benz recommends that yo uuse
an authorized Mercedes-Benz Center for
this purpose.
! Whe
ntowing, pull away slowl yand
smoothly .Ifthe tractive power is too high,
the vehicles could be damaged.
! Only secure the tow rope or tow ba
ratthe
towing eyes. Otherwise, the vehicle could
be damaged.
! Do not us
ethe towing eyes for recovery
purposes as this could damag ethe vehicle.
If in doubt, recover the vehicle with acrane.
! The vehicle can be towe
damaximum of
30 miles (50km). The towing speed of
30 mph (50 km/h )mustn ot be exceeded.
If the vehicle ha stobetowedmore than
30 miles (50km), the entire vehicle mus tbe
raised and transported.
! Do not tow with sling-typ
eequipment.
Thi scould damag ethe vehicle. 244
Towinga
nd tow-startingBreakdow nassistance
Page 248 of 290
X
Switch on the hazard warning lamps
(Y page 98).
X Make sure tha tthe SmartKey is in position
2 in the ignition and tha tthe engine is run-
ning throughout the towing procedure.
X Mov ethe transmissio ntoNwith the E-
SELECT lever. Check the transmissio nposi-
tion in the instrument cluster. Towin
gavehicle with both axles on
the ground
It is important tha tyou observe the safety
instructions when towing away your vehicle
(Y page 244).
X Switch on the hazard warning lamps
(Y page 98).
i Whe
ntowing with the hazard warning
flashers switche don, us ethe combination
switch as usua ltosignal in which direction
yo ua re changing. In this case, onl ythe
indicator lamps for the direction of travel
flash. Whe nyou reset the combination
switch, the hazard warning flashers start
flashing again.
X Insert the SmartKey into the ignition lock
(Y page 119).
X Start the engine and leave the SmartKey in
the ignition.
X Mov ethe transmissio ntoNwith the E-
SELECT lever.
X Check the transmissio nposition in the
instrument cluster display (Y page 123).
X Leave the engine running throughout the
entir etowing procedure Transporting the vehicle
The towing ey ecan be used to pull the vehicle
onto atraile rort ransporter for transporting
purposes.
! Yo
um ay onl ysecure the vehicl ebythe
wheels, not by parts of the vehicl esuchas axl
eors teering components .Otherwise,
the vehicl ecould be damaged.
X Start the engine.
X Make sure tha tthe SmartKey is in position
2 in the ignition and tha tthe engine is run-
ning during the entir eloadin goperation.
X Mov ethe transmissio ntoNwith the E-
SELECT lever. Check the transmissio nposi-
tion in the instrument cluster.
As soon as the vehicle has been loaded: X Prevent the vehicl efrom rolling away by
applying the electri cparking brake.
X Shift the transmissio ntoPwith the button
in the center console.
X Turn the SmartKey to position 0in the igni-
tion lock and remove the SmartKey from
the ignition lock.
X Secure the vehicle. Fuses
Important safety notes
G
WARNING
If yo umanipulate or bridge afaulty fus eorif
yo ur eplace it with afusew ithah ighe ramper-
age, the electri ccable scould be overloaded.
Thi scould resul tinafire. There is ariskofan
accident and injury.
Alway sreplace faulty fuses with the specified
new fuses having the correct amperage.
! Only us
efuses tha thaveb eena pproved
for Mercedes-Benz vehicles and which
have the correct fus erating for the system
concerned. Otherwise, components or sys-
tems could be damaged.
The fuses in your vehicl eserve to close down
faulty circuits. If afuseb lows ,allthe compo-
nents on the circuit and thei rfunctions stop
operating.
Blown fuses mus tbereplaced with fuses of
the same rating, which yo ucan recognize by 246
FusesBreakdown assistance
Page 252 of 290
Useful information
i This Operator's Manual describes all
models and all standard and optional equip- ment of your vehicle available at the time of
publication of the Operator's Manual.
Country-specific differences are possible.
Please not ethat your vehicle may not be
equipped with all feature sdescribed. This
also applies to safety-related system sand
functions.
i Please read the information on qualified
specialist workshops (Y page 23).Important safet
ynotes G
WARNING
If wheels and tires of the wrong size are used, the wheel brakes or suspensio ncomponents
may be damaged. There is arisk of an acci-
dent.
Always replace wheels and tires with those
that fulfill the specification softhe original
part.
When replacin gwheels, make sure to use the
correct:
R designation
R model
When replacin gtires ,make sure to use the
correct:
R designation
R manufacturer
R model G
Warning
Af lat tire severely impairs the driving, steer-
ing and brakin gcharacteristic softhe vehicle.
There is arisk of an accident.
do not drive with aflat tire. Immediately
replace the flat tire with your spare wheel, or
consult aqualified specialist workshop.
Accessories that are not approved for your
vehicle by Mercedes-Benz or that are not being used correctly can impair the operating
safety.
Before purchasin gand using non-approved
accessories, visit aqualified specialist work-
shop and inquire about:
R suitability
R legal stipulations
R factory recommendations
Information on dimensions and types of
wheels and tires for your vehicle can be found (Y page 275).
Information on air pressure for the tires on
your vehicle can be found:
R on the vehicle' sTire and Loading Informa-
tion placard on the B-pillar
R on the tire pressure label on the fuel filler
flap
R under "Tire pressure"
i Further information on wheels and tires
can be obtained at any qualified specialist
workshop. Operation
Information on driving
R If the vehicle is heavily loaded, chec kthe
tire pressures and correct them if neces-
sary.
R While driving, pay attention to vibrations,
noises and unusual handling characteris-
tics, e.g. pulling to one side. This may indi- cate that the wheels or tires are damaged.If you suspect that atire is defective,
reduce your speed immediately. Stop the
vehicle as soon as possible to chec kthe
wheels and tires for damage. Hidden tire
damage could also be causing the unusual
handling characteristics. If you find no
signs of damage, have the wheels and tires checked at aqualified specialist workshop.
R When parkin gyour vehicle, make sure that
the tires do not get deformed by the curb or
other obstacles. If it is necessary to drive
over curbs, speed humps or similar eleva- 250
OperationWheels and tires
Page 253 of 290
tions, try to do so slowly and at an obtuse
angle .Otherwise, the tires ,particularl ythe
sidewalls, ma ybedamaged. Note
sonh ighp erformanc etires G
WARNING
Due to the special tir etrea dinc ombination
with the optimize drubbe rcompound ,there is
an increase driskofh ydroplaning and skid-
ding on adam porw etroa dsurface. tir egripis
also noticeabl yreduced at lo woutside tem-
peratures and lo wtireo perating tempera-
tures .The re is ariskofana ccident.
Turn on ESP ®
and adap tyou rd riving style
accordingly .Whent he outside temperature
fall sbelow 10 †, us eM+S tires.
i Different driving style
smaylead to high
tir ew eara nd the tires ma yreach the min-
imum tir etrea ddepth after onl yashort
time. Regula
rcheckin gofwheelsand tires G
WARNING
Damaged tires can cause tir einflatio npres-
sure loss. As aresult, yo ucould lose control of
your vehicle. There is ariskofa ccident.
Check the tires regularly for signs of damage
and replace any damage dtires immediately.
Regularl ycheck the wheels and tires of your
vehicl efor damage at leas tonce amonth ,as
well as after driving off-roa doronrough
roads .Damaged wheels can cause alossof
tir ep ressure. Pa yparticula rattentio ntodam-
ag es ucha s:
R cuts in the tires
R punctures
R tears in the tires
R bulges on tires
R deformatio norseverec orrosio nonwheels Regularl
ycheck the tir etrea ddepth and the
condition of the trea dacros sthe whol ewidth
of the tir e(Ypage 251). If necessary ,tur nt he
front wheels to full lock in order to inspect the
inne rsideoft he tir esurface.
All wheels must have avalve cap to protect
the valv eagain st dirt and moisture. Do not
mount anything onto the valv eother tha nthe
standard valv ecap or other valv ecaps
approved by Mercedes-Benz for your vehicle.
Do not us eany other valv ecapsors ystems,
e.g .tirep ressure monitoring systems.
Regularl ycheck the pressure of al lthe tires
particularl yprior to long trips .Adjust the tire
pressure as necessary (Y page 253).
Th es ervice life of tires depends on the fol-
lowing factors amongst other things:
R driving style
R tirep ressure
R distance covered Tire tread
G
WARNING
Insufficient tir etrea dw illr educ etiret raction.
Th et ireisnol ongera bletod issipate water.
This means tha tonwetroa dsurfaces ,the risk
of hydroplaning increases, in particula rwhere
spee disn ot adapted to suit the driving con-
ditions. There is ariskofa ccident.
If the tir epressure is too high or too low, tires
ma yexhibit different level sofwearatd iffer-
ent locations on the tir etread. Thus ,you
shoul dregularly check the trea ddepth and
the condition of the trea dacros sthe entire
width of al ltires.
Minimum tir etrea ddepth for:
R Summer tires: 00CEin (3 mm)
R M+S tires: 00CFin (4 mm)
For safety reasons, replace the tires before
the legall yprescribe dlimit for the minimum
tir et rea ddepth is reached. Operation
251Wheelsand tires Z
Page 254 of 290
Bar indicator
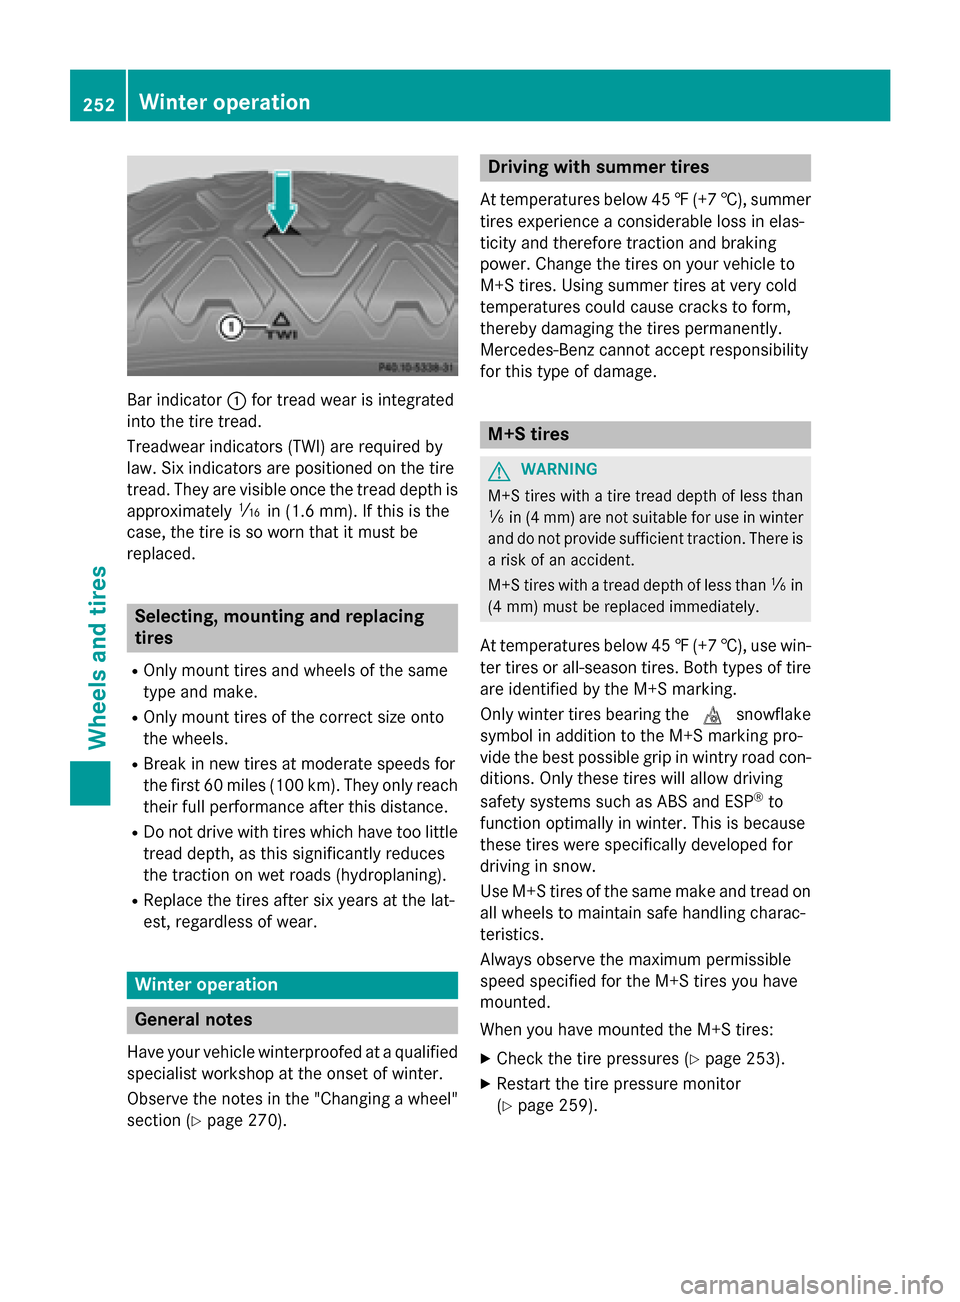
0043for trea dwearisi ntegrated
into the tire tread.
Treadwear indicator s(TWI) are required by
law. Six indicator sare positioned on the tire
tread. The yare visible once the trea ddepth is
approximately 00CDin (1.6 mm). If this is the
case ,the tire is so worn that it mus tbe
replaced. Selecting, mounting and replacing
tires
R Only mount tire sand wheel softhe same
typ eand make.
R Only mount tire softhe correct size onto
the wheels.
R Brea kinn ew tire satmoderate speeds for
the firs t60miles (100 km) .The yo nly reach
thei rfullp erformance afte rthis distance.
R Do not drive with tire swhich have too little
trea ddepth, as this significantl yreduces
the traction on we troads (hydroplaning).
R Replace the tire saftersix years at the lat-
est, regardless of wear. Winter operation
General notes
Have your vehicle winterproofe dataqualified
specialist worksho patthe onse tofwinter.
Observe the notes in the "Changing awheel"
section (Y page 270). Drivin
gwiths ummer tires
At temperatures below 45 ‡(+7† ), summer
tires experience aconsiderable loss in elas-
ticity and therefore traction and braking
power. Change the tires on you rvehicle to
M+S tires. Using summe rtires at very cold
temperatures coul dcause cracks to form,
thereb ydamaging the tires permanently.
Mercedes-Benz cannot accep tresponsibility
for this type of damage. M+S tires
G
WARNING
M+S tires with atire tread depth of less than
00CF in (4 mm )are not suitabl efor use in winter
and do not provide sufficient traction. There is
ar isk of an accident.
M+S tires with atread depth of less than 00CFin
(4 mm) must be replaced immediately.
At temperatures below 45 ‡(+7† ), use win-
ter tires or all-season tires. Both type softire
are identified by the M+S marking.
Only winter tires bearing the 004Dsnowflake
symbol in addition to the M+S marking pro-
vide the best possibl egrip in wintry road con-
ditions. Only these tires will allow driving
safety systems such as ABS and ESP ®
to
function optimally in winter. Thi sisbecause
these tires were specifically developed for
driving in snow.
Use M+S tires of the same make and tread on
allw heels to maintain safe handling charac-
teristics.
Always observe the maximu mpermissible
spee dspecified for the M+S tires you have
mounted.
When you have mounted the M+S tires:
X Check the tire pressure s(Ypag e253).
X Restart the tire pressure monitor
(Y pag e259). 252
Winte
roperationWheels and tires
Page 255 of 290
Snow chains
G
WARNING
If snow chains are installed to the front
wheels, they may drag against the vehicle
body or chassis components. This could
cause damage to the vehicle or the tires.
There is arisk of an accident.
To avoid hazardous situations:
R never install snow chains to the front
wheels
R always install snow chains in pairs to the
rear wheels.
! On some tire sizes there is not enough
space for snow chains. To avoid damage to
the vehicle or tires, observe the "Wheel and tire combinations" section under "Tires and
wheels".
For safety reasons, Mercedes-Benz recom-
mends that you only use snow chains that
have been specially approved for your vehicle by Mercedes-Benz, or are of acorresponding
standard of quality.
R You may not attach snow chains to all
wheel-tire combination ,see the informa-
tion under "Wheels and tires" in the "Tech-
nical data" section.
R Only use snow chains when driving on
roads completely covered by snow.
Remove the snow chains as soon as possi- ble when you come to aroad that is not
snow-covered.
R Local regulations may restrictt he use of
snow chains. Observe the appropriate reg- ulations if you wish to mount snow chains.
R Do not exceed the maximum permissible
speed of 30 mph (50 km/h).
i You can deactivate ESP ®
(Y page 55)
when pulling away with snow chains instal-
led. You can thereby allow the wheels to
spin in acontrolled manner, achieving an
increased driving force (cuttinga ction). Tire pressure
Tire pressures
pecifications
Important safety notes G
WARNING
Underinflated or overinflated tires pose the
following risks:
R the tires may burst, especially as the load
and vehicle speed increase.
R the tires may wear excessively and/or
unevenly, which may greatly impair tire
traction.
R the driving characteristics, as well as steer-
ing and braking, may be greatly impaired.
There is arisk of an accident.
Follow recommended tire inflation pressures
and check the pressure of all the tires includ-
ing the spare wheel:
R monthly, at least
R if the load changes
R before beginning along journey
R under different operating conditions, e.g.
off-road driving
If necessary, correct the tire pressure.
i The specifications on the sample Tire and
Loading Information placard and tire pres-
sure tables are examples. Tire pressure
specifications are vehicle-specific and may
deviate from the data shown here. The tire pressure specifications that are valid for
your vehicle can be found on the Tire and
Loading Information placard and tire pres-
sure table on the vehicle.
General notes The recommended tire pressures for the tires
mounted at the factory can be found on the
labels described here.
Further information on tire pressures can be
obtained at aqualified specialist workshop. Tire pressure
253Wheels and tires Z