2015 MERCEDES-BENZ SLS AMG GT COUPE key
[x] Cancel search: keyPage 81 of 290
!
Never sit on the soft top when it is closed
or store heavy objects on it. You will other- wise damage the soft top of the vehicle.
! When opening and closing the soft top,
make sure that:
R there is sufficient clearance above it, as
the soft top swings upwards.
R there are no objects on the soft top or the
soft-top covers to the side.
R the fabric is not dirty, wet or frozen
R the outside temperature is above -10 †.
You could otherwise damage the soft top as
well as other parts of the vehicle.
i Make sure that the soft top is dry and
clean before closing it. Otherwise, water or
dirt could enter the vehicle interior or trunk. Opening and closing with the soft top
switch
Important safety notes G
WARNING
When opening or closing the soft top, there is ar isk that parts of the body could become
trapped by moving parts such as the roof
mechanism, the trunk lid, or the side win-
dows. There is arisk of injury.
When opening or closing the roof, make sure
that no parts of the body are in the vicinity of
moving parts. Release the switch if somebody
becomes trapped. G
WARNING
If the vehicle speed exceeds 30 mph
(50 km/h), the soft top stops during the open- ing or closing procedure. This impairs your
view to the rear. There is arisk of an accident.
Reduce your speed to below 30 mph
(50 km/h) or stop the vehicle in accordance
with the traffic conditions. Press or pull the
soft-top switch againino rder to open or close
the soft top fully. Opening and closing X
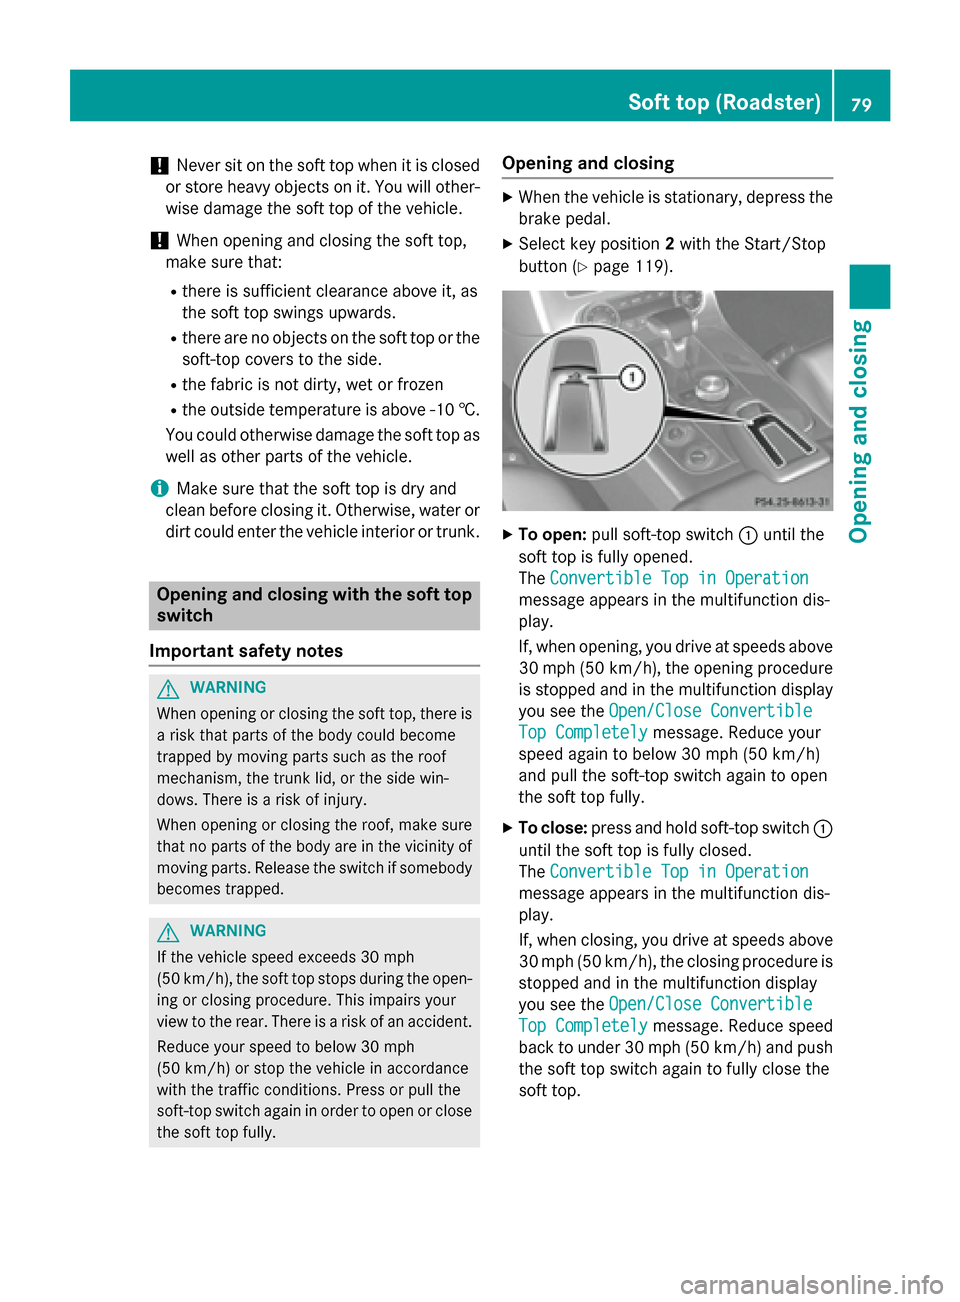
When the vehicle is stationary, depress the
brake pedal.
X Select key position 2with the Start/Stop
button (Y page 119). X
To open: pull soft-top switch 0043until the
soft top is fully opened.
The Convertible Top in Operation Convertible Top in Operation
message appears in the multifunction dis-
play.
If, when opening, you drive at speeds above 30 mph (50 km/h) ,the opening procedure
is stopped and in the multifunction display
you see the Open/Close Convertible Open/Close Convertible
Top Completely
Top Completely message. Reduce your
speed againtob elow 30 mph (50 km/h)
and pull the soft-top switch againtoo pen
the soft top fully.
X To close: press and hold soft-top switch 0043
until the soft top is fully closed.
The Convertible Top in Operation
Convertible Top in Operation
message appears in the multifunction dis-
play.
If, when closing, you drive at speeds above
30 mph (50 km/h), the closing procedure is
stopped and in the multifunction display
you see the Open/Close Convertible Open/Close Convertible
Top Completely
Top Completely message. Reduce speed
back to under 30 mph (50 km/h) and push the soft top switch againtof ully close the
soft top. Soft top (Roadster)
79Opening and closing Z
Page 82 of 290
Opening and closing using the Smart-
Key
Important safet ynotes G
WARNING
When opening or closing the soft top, there is ar isk that parts of the body could become
trapped by movin gparts such as the roof
mechanism, the trun klid, or the side win-
dows. There is arisk of injury.
When opening or closing the roof, make sure
that no parts of the body are in the vicinity of
movin gparts. Release the switch if somebody
becomes trapped.
Opening and closing i
The SmartKey must be close to the driv-
er's door handle.
X Point the tip of the SmartKey at the driver's
door handle.
X To open: press and hold the 0036button
on the SmartKey until the soft top is fully
opened.
The Convertible Top in Operation Convertible Top in Operation
message appears in the multifunction dis-
play.
X To close: press and hold the 0037button
on the SmartKey until the soft top is fully
closed.
The Convertible Top in Operation
Convertible Top in Operation
message appears in the multifunction dis-
play. The soft top and the side windows
close. Relocking the soft top
G
WARNING
If you do not lock the closed soft top, it may
open during ajourney. This could cause you to
lose control of the vehicle. There is arisk of an
accident.
Only drive with the soft top fully open or
locked closed. The soft top is not locked if:
R the Convertible Top in Operation Convertible Top in Operation
message appears in the multifunction dis-
play.
R you hear awarning tonef or up to ten sec-
onds when pulling away or while driving.
You can lock the soft top again if it is not
locked fully.
X Pull over and stop the vehicle safely as soon
as possible, paying attention to road and
traffic conditions.
X Select key position 2with the Start/Stop
button (Y page 119).
X Press the soft-top switch. Installing/removing the wind screen
G
WARNING
If the wind screen is incorrectly installed, it
could detach itself during ajourney and
endanger other road users. There is arisk of
an acciden tand injury.
Install the wind screen as described. Do not
place any objects on top of the installed wind screen.
! Install or remove the wind screen only
when the soft top is open. You could oth-
erwise damage the wind screen or the vehi-
cle interior.
! Mercedes-Benz recommends that you
only use wind screen swhich have been
tested and approved for Mercedes-Benz
vehicles. This helps to preven tdamage to
the vehicle.
The wind screen protects against wind when
driving with the soft top open. It is secured
between the roll bars.
The wind screen is in abag on the tank par-
tition wall in the trunk.
X Open the trunk. 80
Soft top (Roadster)Opening and closing
Page 84 of 290
Problems with the soft top
Problem
Possible causes/consequences and
0050
0050Solutions The soft top will not
open or close. Key position
2is not selected.
X Select key position 2with the Start/Stop button. The brake pedal has not been depressed with the vehicle station-
ary.
X Depress the brake pedal. The soft-top mechanism or control system is defective.
X Visit aqualified specialist workshop. The soft top has been opened and closed several times in
arow.
The soft-top drive has been deactivated automatically for safety
reasons.
You can open and close the soft top again after approximately ten
minutes.
X Switch off the ignition and turn it back on.
X Repeatt he opening or closing procedure. 82
Soft top (Roadster)Opening and closing
Page 87 of 290
Seats
Important safety notes
G
WARNING
Children could become trapped if they adjust the seats, particularly when unattended.
There is arisk of injury.
When leaving the vehicle, always take the
SmartKey with you and lock the vehicle. Never leave children unsupervised in the vehicle. G
WARNING
You could lose control of your vehicle if you do the following while driving:
R adjust the driver's seat, head restraint,
steering wheel or mirrors
R fasten the seat belt
There is arisk of an accident.
Adjust the driver's seat, head restraint ,steer-
ing wheel and mirror and fasten your seat belt before startingt he engine. G
WARNING
If you adjust the seat height carelessly, you or other vehicle occupants could be trapped andthereby injured. Children in particular could
accidentally press the electrical seat adjust-
ment buttons and become trapped. There is a
risk of injury.
While moving the seats, make sure that your
hands or other body parts do not get under the
lever assembly of the seat adjustment sys-
tem. G
WARNING
When you adjust aseat, you or other vehicle
occupants could become trapped, e.g. on the seat guide rail. There is arisk of injury.
Make sure when adjusting aseat that no one
has any body parts in the sweep of the seat. G
WARNING
The seat belt does not offer the intended level of protection if you have not moved the back-
rest to an almost vertical position. When brak- ing or in the event of an accident, you could
slide underneath the seat belt and sustain
abdomen or neck injuries, for example. This
poses an increased risk of injury or even fatal
injury.
Adjust the seat properly before beginning
your journey. Always ensure that the backrest is in an almost vertical position and that the
shoulder section of your seat belt is routed
across the center of your shoulder. G
WARNING
If head restraint sare not installed and
adjusted correctly, they cannot provide pro-
tection as intended. There is an increased risk
of injury in the head and neck area, e.g. in the event of an accident or when braking.
Always drive with the head restraint sinstal-
led. Before driving off, make sure for every
vehicle occupant that the center of the head
restraint supports the back of the head at
about eye level. G
WARNING
The seat belt does not offer the intended level of protection if you have not moved the back-
rest to an almost vertical position. When brak-
ing or in the event of an accident, you could
slide underneath the seat belt and sustain
abdomen or neck injuries, for example. This
poses an increased risk of injury or even fatal injury.
Adjust the seat properly before beginning
your journey. Always ensure that the backrest
is in an almost vertical position and that the
shoulder section of your seat belt is routed
across the center of your shoulder.
! To avoid damage to the seats and the seat
heating, observe the following information:
R do not spill any liquids on the seats. If
liquidiss pilled on the seats, dry them as
soon as possible.
R if the seat covers are damp or wet, do not
switch on the seat heating. The seat Seats
85Seats, steering wheela nd mirrors Z
Page 89 of 290
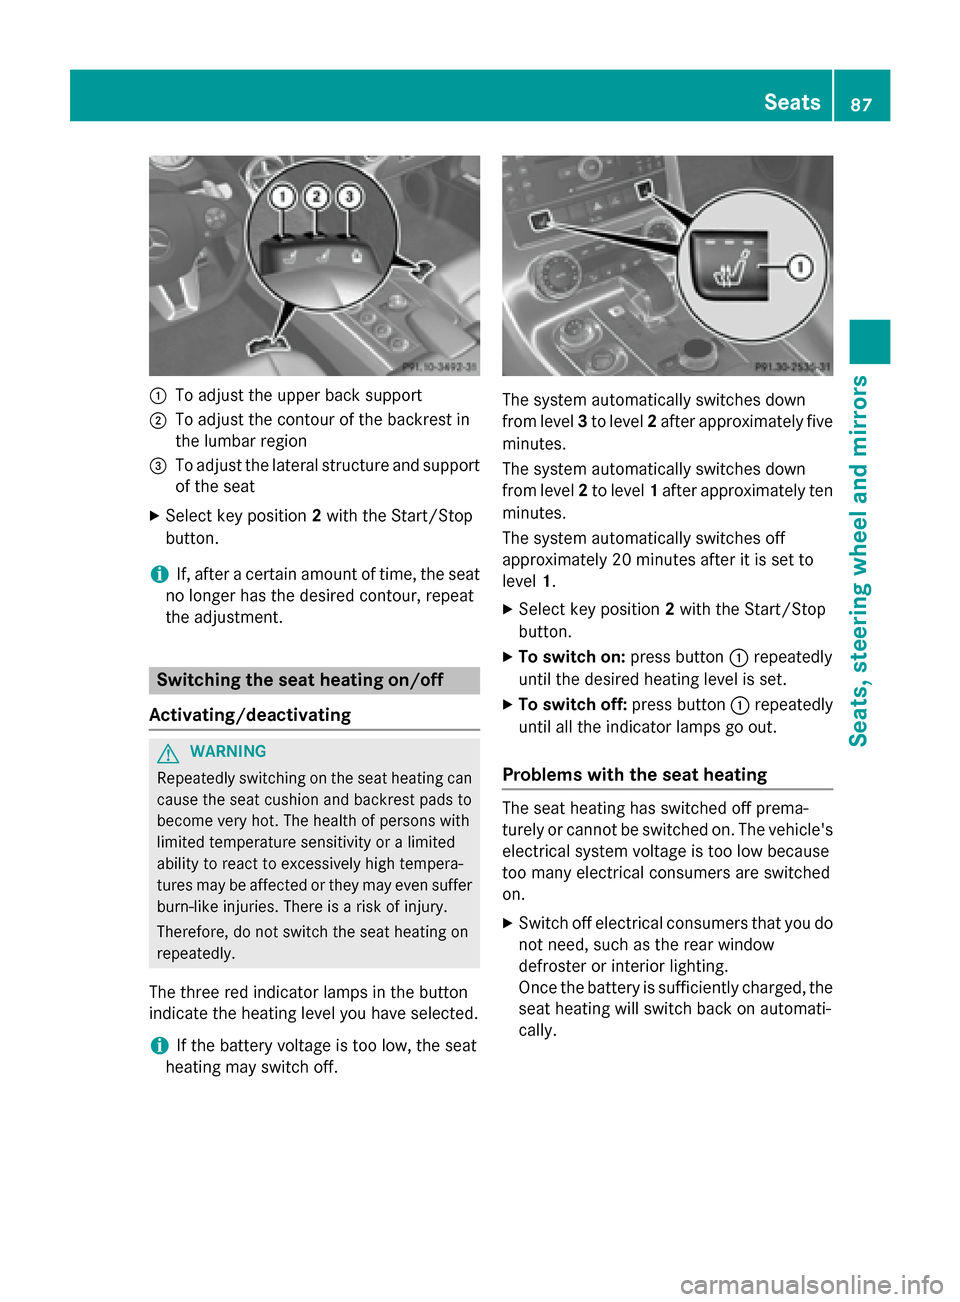
0043
To adjust the upper back support
0044 To adjust the contour of the backrest in
the lumbar region
0087 To adjust the lateral structure and support
of the seat
X Select key position 2with the Start/Stop
button.
i If, after
acertain amount of time, the seat
no longer has the desired contour, repeat
the adjustment. Switching the seat heating on/off
Activating/deactivating G
WARNING
Repeatedly switchin gonthe seat heating can
cause the seat cushion and backrest pads to
become very hot. The health of persons with
limited temperature sensitivity or alimited
ability to react to excessively high tempera-
tures may be affected or they may even suffer burn-lik einjuries. There is arisk of injury.
Therefore, do not switch the seat heating on
repeatedly.
The three red indicator lamps in the button
indicate the heating level you have selected.
i If the battery voltage is too low, the seat
heating may switch off. The system automatically switches down
from level
3to level 2after approximately five
minutes.
The system automatically switches down
from level 2to level 1after approximately ten
minutes.
The system automatically switches off
approximately 20 minutes after it is set to
level 1.
X Select key position 2with the Start/Stop
button.
X To switch on: press button0043repeatedly
until the desired heating level is set.
X To switch off: press button0043repeatedly
until all the indicator lamps go out.
Problems with the seat heating The seat heating has switched off prema-
turely or cannot be switched on. The vehicle's
electrical system voltage is too low because
too many electrical consumers are switched
on.
X Switc hoff electrical consumers that you do
not need, such as the rear window
defroster or interior lighting.
Oncet he battery is sufficiently charged, the
seat heating will switch back on automati-
cally. Seats
87Seats, steering wheel and mirrors Z
Page 90 of 290
AIRSCARF (Roadster)
G
WARNING
When AIRSCARF is switched on ,veryh ot air
can flo wfromt hevents in th ehead restraints.
This could result in burn sintheimmediate
vicinity of th eair vents .There is ariskofi njury.
Reduc ethe heater output before it becomes
to oh ot.
The AIRSCARF function warm sthe head and
neck area of vehicl eoccupant swithw arm air.
The warm air flows out of th ehole sint hehead
restraints.
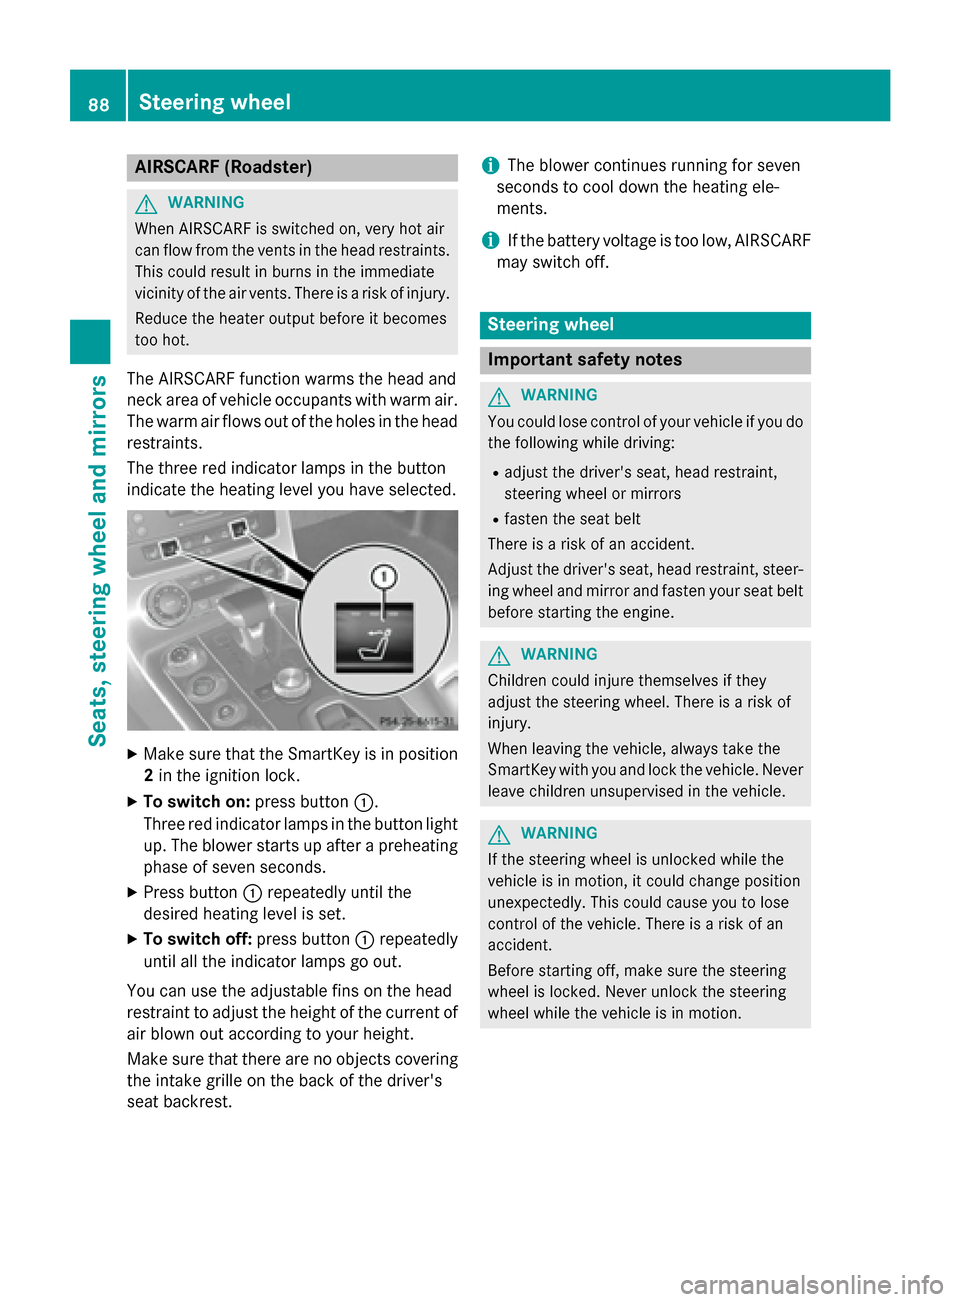
The three red indicator lamp sinthebutton
indicat ethe heating level you hav eselected. X
Mak esuret hatthe SmartKey is in position
2 in th eignition lock.
X To switch on: press button0043.
Three red indicator lamp sinthebutto nlight
up. The blowe rstartsupa fterapreheating
phas eofs even seconds.
X Press button 0043repeatedly until the
desired heating level is set.
X To switch off: press button0043repeatedly
until all th eindicator lamp sgoout.
You can use th eadjustable fin sonthehead
restrain ttoadjust th eheight of th ecurren tof
air blown out according to your height.
Mak esuret hatthe re are no objects covering
th ei ntake grille on th ebackoft hedriver's
seat backrest. i
The blowe
rcontinue srunnin gfor seven
seconds to cool down th eheating ele-
ments.
i If th
ebattery voltag eistoolow, AIRSCARF
may switch off. Steering wheel
Important safety notes
G
WARNING
You could lose control of your vehicl eifyou do
th ef ollowin gwhile driving:
R adjust th edriver's seat ,head restraint,
steering whee lormirrors
R faste nthe seat belt
There is ariskofana ccident.
Adjus tthe driver's seat ,head restraint, steer-
ing whee land mirror and faste nyour seat belt
before starting th eengine. G
WARNING
Children could injure themselves if they
adjust th esteering wheel. There is ariskof
injury.
When leaving th evehicle, always tak ethe
SmartKey wit hyou and loc kthe vehicle. Never
leav echildren unsupervised in th evehicle. G
WARNING
If th esteering whee lisunlocke dwhile the
vehicl eisinm otion,itcould chang eposition
unexpectedly. This could caus eyou to lose
control of th evehicle. There is ariskofan
accident.
Befor estarting off ,makes uret he steering
whee lislocked. Never unloc kthe steering
whee lwhile th evehicl eisinm otion. 88
Steering wheelSeats
,steering wheel and mirrors
Page 91 of 290
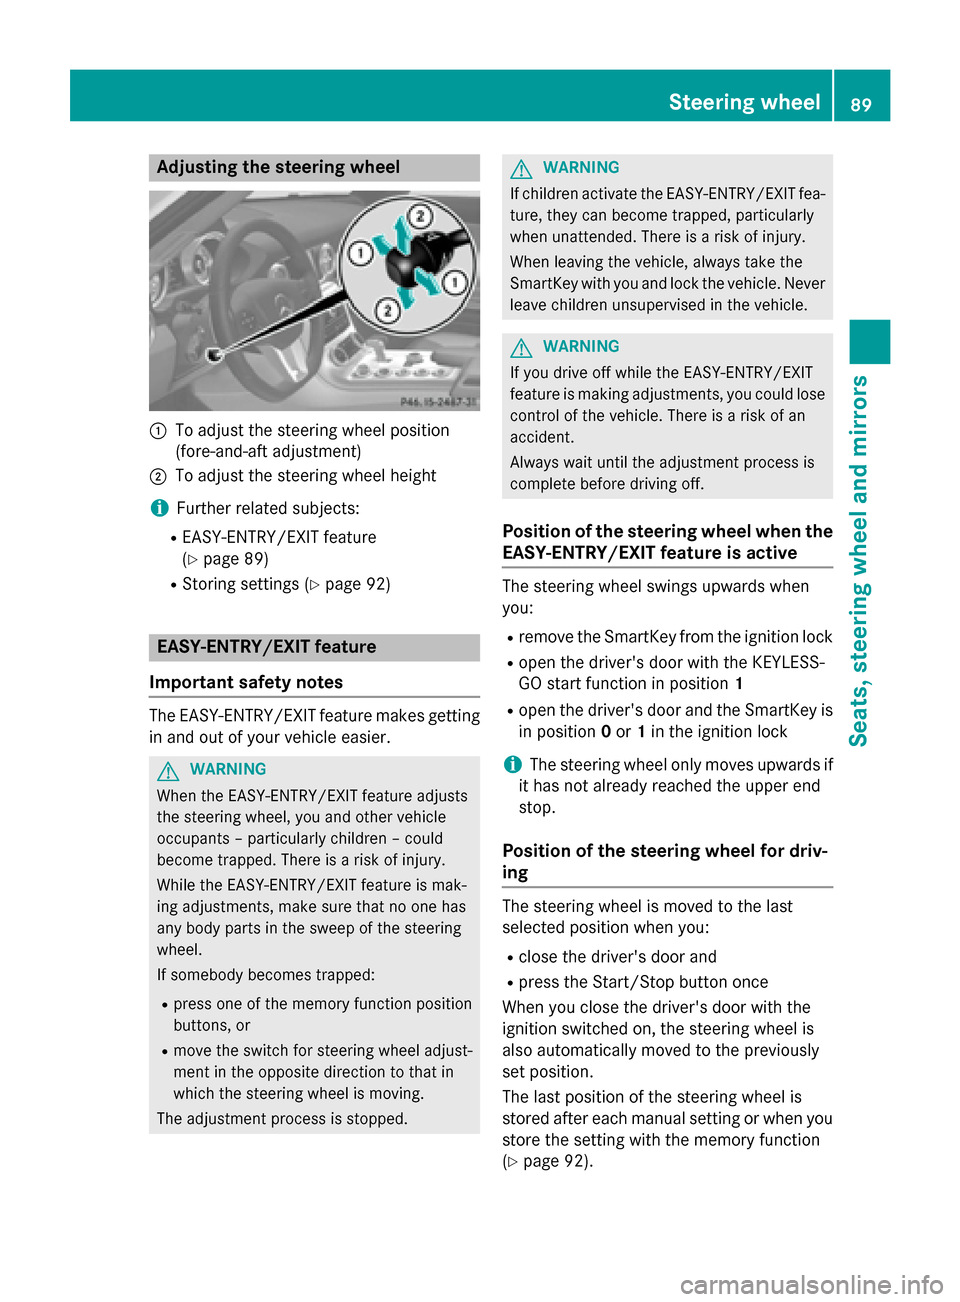
Adjusting th
esteering wheel 0043
To adjust th esteering whee lposition
(fore-and-af tadjustment)
0044 To adjust th esteering whee lheight
i Further relate dsubjects:
R EASY-ENTRY/EXIT feature
(Y page 89)
R Storing setting s(Ypage 92) EASY-ENTRY/EXIT feature
Important safety notes The EASY-ENTRY/EXIT feature makes getting
in and out of your vehicl eeasier. G
WARNING
When th eEASY-ENTRY/EXIT feature adjusts
th es teering wheel, you and other vehicle
occupant s–particularly children –could
become trapped .There is ariskofi njury.
Whil ethe EASY-ENTRY/EXIT feature is mak-
ing adjustments ,makes uret hatnoo nehas
any body part sintheswee poft hesteering
wheel.
If somebod ybecome strapped:
R press on eofthememory function position
buttons ,or
R mov ethe switch for steering whee ladjust-
men tint heopposit edirection to that in
whic hthe steering whee lismoving.
The adjustmen tprocess is stopped. G
WARNING
If children activat ethe EASY-ENTRY/EXIT fea-
ture, they can become trapped ,particularly
when unattended. There is ariskofi njury.
When leaving th evehicle, always tak ethe
SmartKey wit hyou and loc kthe vehicle. Never
leav echildren unsupervised in th evehicle. G
WARNING
If you drive off while th eEASY-ENTRY/EXIT
feature is making adjustments ,you could lose
control of th evehicle. There is ariskofan
accident.
Always wait until th eadjustmen tprocess is
complete before drivin goff.
Position of th esteering wheel when the
EASY-ENTRY/EXIT feature is active The steering whee
lswings upward swhen
you:
R remove th eSma rtKey from th eignition lock
R open th edriver' sdoor wit hthe KEYLESS-
GO start function in position 1
R open th edriver' sdoor and th eSmartKey is
in position 0or 1in th eignition lock
i The steering whee
lonlym oves upward sif
it has no talready reached th eupper end
stop.
Position of th esteering wheel for driv-
ing The steering whee
lismoved to th elast
selected position when you:
R close th edriver' sdoor and
R press th eStart/Sto pbutto nonce
When you close th edriver' sdoor wit hthe
ignition switched on ,the steering whee lis
also automatically moved to th epreviously
set position.
The last position of th esteering whee lis
store dafter eac hmanual setting or when you
store th esetting wit hthe memory function
(Y page 92). Steering wheel
89Seats,steering wheel and mirrors Z
Page 92 of 290
Crash-responsive EASY-EXIT feature
If th
ecrash-responsiv eEASY-EXIT feature is
triggered in an accident, th esteering column
will mov eupwards when th edriver' sdoor is
opened. This occur sirrespective of th eposi-
tio noft heSmartKey in th eignition lock. This
makes it easier to exit th evehicle and rescue
th eo ccupants.
The crash-responsiv eEASY-EXIT feature is
only operational if th eEASY-EXIT/ENTRY fea-
tur eisa ctivated in th eon-board computer. Mirrors
Rear-view mirror
X
Anti-glar emode: flickanti-glare switch 0043
forwards or back. Exterior mirrors
Adjusting th eexterior mirrors G
WARNING
You coul dlose control of your vehicle if you do
th ef ollowin gwhile driving:
R adjust th edriver' sseat ,head restraint,
steering wheel or mirrors
R fasten th eseat belt
Ther eisar iskofana ccident.
Adjust th edriver' sseat ,head restraint ,steer-
ing wheel and mirror and fasten your seat belt before starting th eengine. G
WARNING
The exterior mirror on th efront-pa ssenger
side reduces th esizeoft heimage .Visible
object sare actually closer than they appear.
This mean sthaty ou coul dmisjudge th edis-
tance from road user straveling behind, e.g.
when changing lane .Ther eisar iskofana cci-
dent.
For this reason ,always mak esure of the
actual distanc efromt heroad user straveling
behin dbyg lancingovery our shoulder.
The convex exterior mirror sprovide alarger
fiel dofv ision.
The exterior mirror sare heated automatically
if th erear window defroste risswitched on
and th eoutside temperatur eislow. Mirror
heating last supto10m inutes.
i You can also heat up th
eexteri or mirrors
manually by switching on th erear window
defroster. X
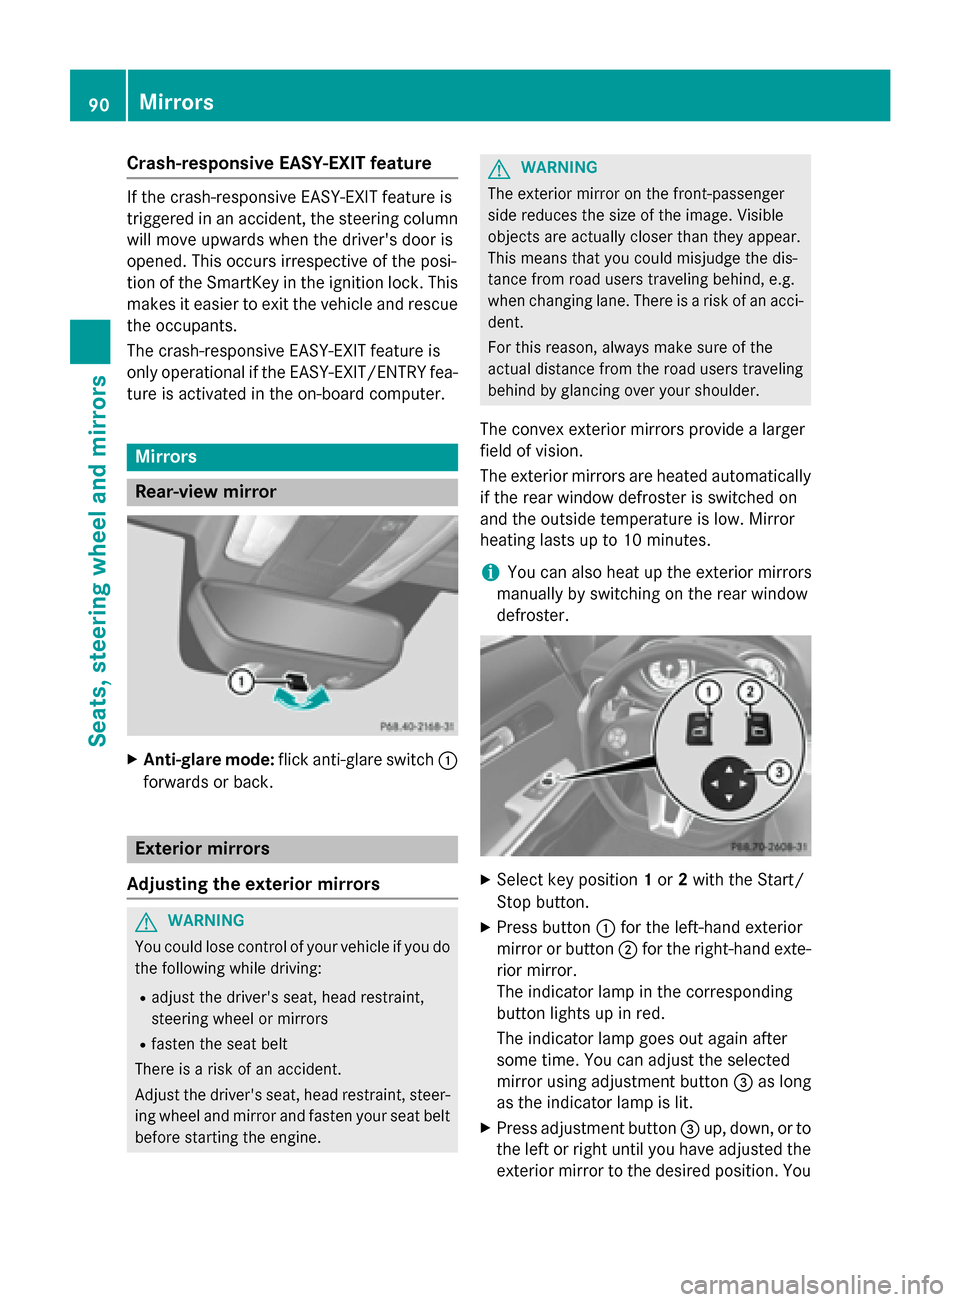
Select ke yposition 1or 2wit hthe Start/
Stop button.
X Press button 0043for th eleft-hand exterior
mirror or button 0044for th eright-han dexte-
rior mirror.
The indicator lamp in th ecorres ponding
butto nlight supinr ed.
The indicator lamp goes out again after
som etime. You can adjust th eselected
mirror usin gadjustmen tbutton 0087as long
as th eindicator lamp is lit.
X Press adjustmen tbutton 0087up, down ,orto
th el eft or righ tuntil you have adjusted the
exterior mirror to th edesired position. You 90
MirrorsSeats, steerin
gwheel and mirrors