2015 MERCEDES-BENZ SLS AMG GT COUPE maintenance
[x] Cancel search: maintenancePage 230 of 290
!
Do not clean wiper blades too often and
do not rub them too hard. Otherwise, the
graphite coating could be damaged. This
could cause wiper noise.
X Switch off the engine.
X Remove your foot from the brake pedal.
X Set the windshieldw iper to the00AAposi-
tion on the combination switch.
X Press the Start/Stop button repeatedly
until the windshieldw iper starts.
X When the wiper arms have reached aver-
tical position, press the Start/Stop button.
X Fold the wiper arm awayf rom the wind-
shield until it engages.
X Set the wiper bladeatr ight angles to the
wiper arm.
X Carefully clean the wiper blades with a
damp cloth.
X Fold the windshieldw iper arms back again
before switching on the ignition.
! Hold the wiper arm securely when folding
back. The windshieldc ould be damagedif
the wiper arm smacks against it suddenly.
Cleaning the exterior lighting X
Cleant he plastic lenses of the exterior
lighting using awet sponge and amild
cleaning agent, e.g. Mercedes-Benz car
shampoo or cleaning cloths.
! Only use cleaning agents or cleaning
cloths which are suitablef or plastic light
lenses. Unsuitable cleaning agents or
cleaning cloths could scratch or damage
the plastic light lenses.
Cleaning the mirror turns ignals!
Only use cleaning agents or cleaning
cloths that are suitablef or plastic lenses.
Unsuitable cleaning agents or cleaning
cloths could scratch or damage the plastic
lenses of the mirror turn signals.
X Cleant he plastic lenses of the mirror turn
signals in the exterior mirror housing using aw
et sponge and amild cleaning agent,
e.g. Mercedes-Benz car shampoo or clean-
ing cloths.
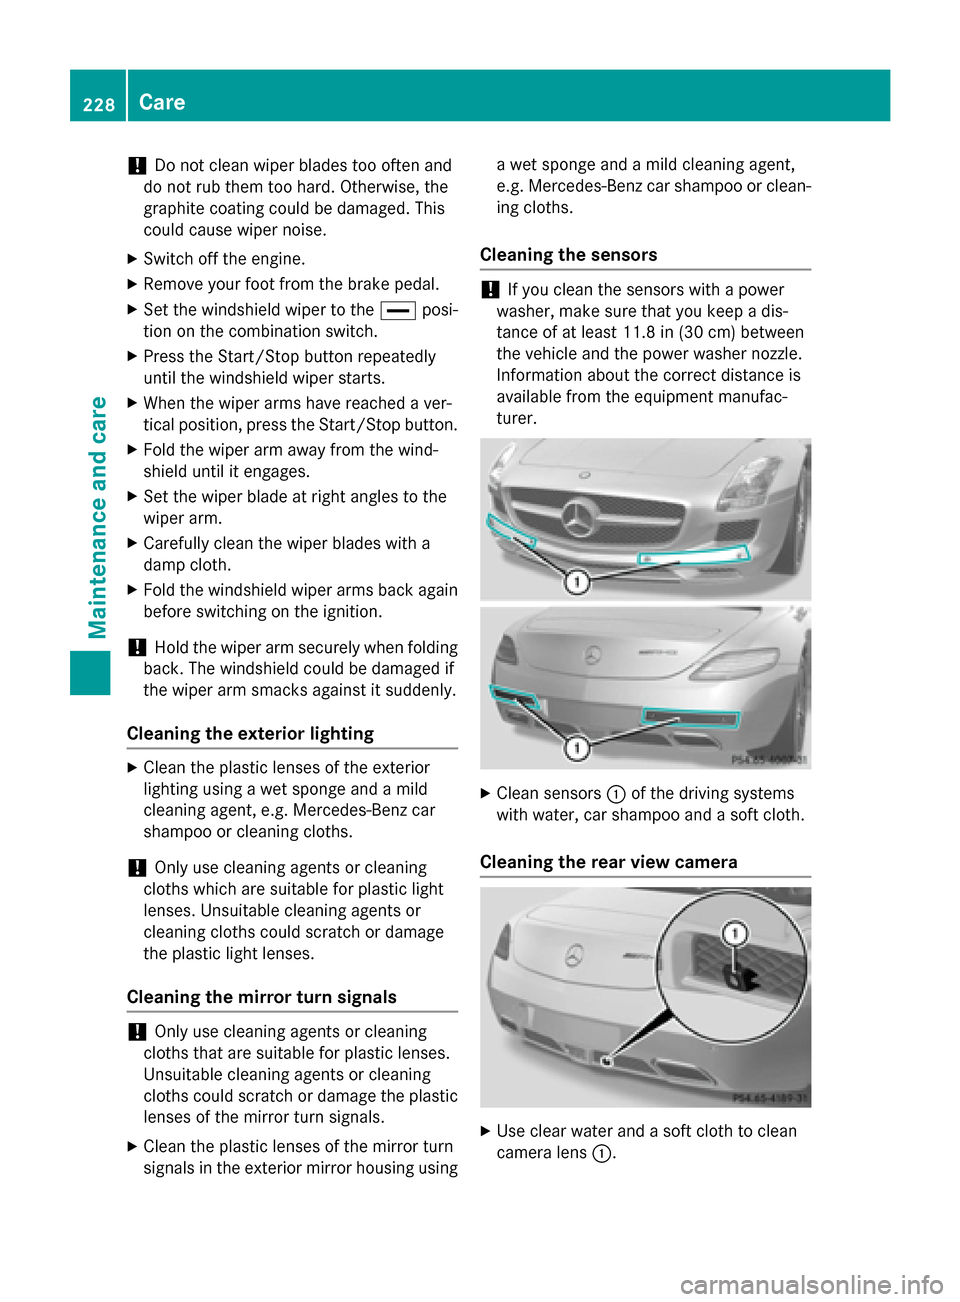
Cleaning the sensors !
If you clean the sensors with
apower
washer, make sure that you keep adis-
tance of at least 11.8 in (30 cm) between
the vehicle and the power washer nozzle.
Information aboutt he correct distance is
available from the equipment manufac-
turer. X
Cleans ensors0043of the driving systems
with water, car shampoo and asoft cloth.
Cleaning the rear view camera X
Use clear water and asoft cloth to clean
camera lens 0043.228
CareMaintenance and care
Page 231 of 290
!
Do not clean the camera lens and the area
around the rear view camera with apower
washer.
Cleaning the exhaust pipes G
WARNING
The exhaust tail pipe and tail pipe trim can
become very hot. If you come into contact
with these parts of the vehicle, you could burn
yourself. There is arisk of injury.
Alwaysbep articularlycareful around the
exhaust tail pipe and the tail pipe trim. Allow
these componentstoc ool down before touch-
ing them.
! Do not clean the exhaust pipe with acid-
based cleaning agents such as sanitary
cleansers or wheel cleaners.
Impurities combined with the effects of road
grit and corrosive environmental factors may cause flash rust to form on the surface. You
can restore the original shine of the exhaust
pipe by cleaning it regularly, especially in win- ter and after washing.
X Cleant he exhaust pipe with achrome care
product tested and approved by Mercedes-
Benz. Interior care
Cleaning the display !
For cleaning, do not use any of the fol-
lowing:
R alcohol-based thinner or gasoline
R abrasive cleaning agents
R commercially-available householdc lean-
ing agents
These may damage the displays urface. Do
not put pressure on the displays urface
when cleaning. This could lead to irrepara-
ble damage to the display. X
Before cleaning the display, make sure that
it is switched off and has cooled down.
X Cleant he displays urface using acommer-
cially available microfiber cloth and
TFT/LCD displayc leaner.
X Dry the displays urface usingadry micro-
fiber cloth.
Cleaning the plastic trim G
WARNING
Care products and cleaning agents containing solvents cause surfaces in the cockpit to
become porous. As aresult, plastic parts may
come loose in the event of air bag deploy-
ment. There is arisk of injury.
Do not use any care products and cleaning
agents to clean the cockpit.
! Do not affix the following to plastic surfa-
ces:
R stickers
R films
R scented oil bottles or similari tems
You can otherwise damage the plastic.
! Do not allowc
osmetics, insect repellent
or sunscreen to come into contact with the
plastic trim. This maintains the high-quality look of the surfaces.
X Wipe the plastic trim with adamp, lint-free
cloth, e.g. amicrofiber cloth.
X Heavy soiling: use car care and cleaning
products recommended and approved by
Mercedes-Benz.
The surface may change color temporarily.
Wait until the surface is dry again.
Cleaning the steering wheela nd selec-
tor lever X
Thoroughlyw ipe withadamp cloth or use
leather care agents that have been recom- mended and approved by Mercedes-Benz. Care
229Maintenance and care Z
Page 232 of 290
Cleaning genuine wood and trim ele-
ments !
Do no
tuse solvent-based cleanin gagents
suc hast ar remover, wheel cleaners, pol-
ishe sorw axes. Ther eisotherwise ariskof
damaging th esurface.
! Do no
tuse chrom epolis hont rimp ieces.
The trim pieces have achrom elook but are
mostly made of anodized aluminum and
can lose their shin eifchrom epolis his
used. Use adamp, lint-free cloth instead
when cleanin gthe trim pieces.
If th echrome-plated trim pieces are very
dirty, you can use achrom epolish. If you
are unsure as to whether th etrimp ieces
are chrome-plated or not, consult an
authorized Mercedes-Ben zCenter.
X Wipe th ewoode ntrima nd trim pieces with
ad amp, lint-free cloth ,e.g.am icrofiber
cloth.
X Heavy soiling: use careand cleanin gprod-
uct srecommended and approved by
Mercedes-Benz.
Cleaning th eseat covers General notes
! Do no
tuse microfiber cloth stoclean gen-
uine leather ,artificial leather or DINAMICA
covers. If used often ,the se can damag ethe
cover.
i Not
ethatregular car eisessential to
ensure that th eappearanc eand comfort of
th ec oversisr etaine dovertime.
Genuine leather seat covers
Leather is anatural product.
It exhibit snatural surface characteristics, for
example:
R differences in th etexture
R sign sofs tretching and marking
R sligh tnuances of color
Thes eare characteristic sofleather and not
material defects. !
To retain th
enatural appearanc eofthe
leather ,observ ethe followin gcleaning
instructions:
R Clean genuine leather cover scarefully
wit had amp cloth and then wipe th ecov-
ers down wit hadry cloth.
R Mak esure that th eleather does not
become soaked. It may otherwise
become roug hand cracked.
R Only use leather car eagents that have
been tested and approved by Mercedes-
Benz. You can obtain these from aquali-
fied specialist workshop.
Seat cover sofother materials
! Observ
ethe followin gwhen cleaning:
R clean artificial leather cover swithac loth
moistene dwithas olution containing 1%
detergen t(e.g. dish washin gliquid).
R clean cloth cover switham icrofiber cloth
moistene dwithas olution containing 1%
detergen t(e.g. dish washin gliquid). Rub
carefully and always wipe entir eseat sec-
tions to avoid leavin gvisible lines. Leave
th es eat to dry afterwards. Cleaning
results depen donthetype of dirt and
how lon githas been there.
R clean DINAMICA cover swithad amp
cloth .Makes ure that you wipe entire
seat sections to avoid leavin gvisible
lines.
Cleaning th eseat belts G
WARNING
Seat belt scan become severely weakened if
bleached or dyed. This coul dcaus ethe seat
belt stot earorf ail, for instance, in th eevent of
an accident. This pose sanincreased ris kof
injury or fatal injury.
Never bleac hordye theseat belts.
! Do no
tclean th eseat belt susin gchemical
cleanin gagents .Don otdry th eseat belts
by heating at temperatures abov e176 ‡
(80 †) or in direct sunlight. 230
CareMaintenance and care
Page 233 of 290
X
Use clean, lukewarm water and soap solu-
tion. Care
231Maintenance and care Z
Page 259 of 290
monitor only functions if the correct sensors
are installed on all wheels.
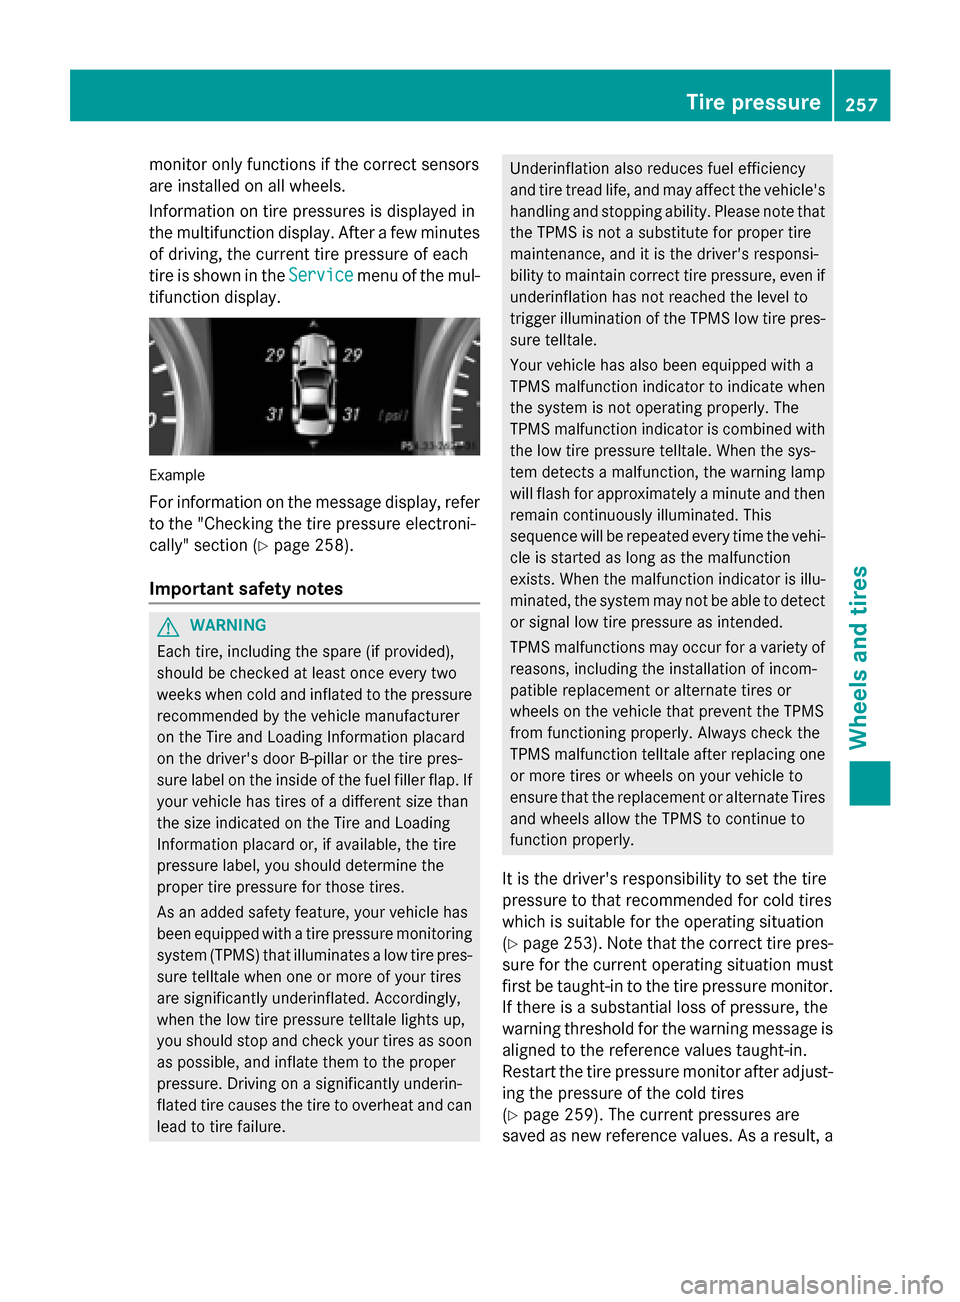
Information on tire pressures is displayed in
the multifunction display.A fterafew minutes
of driving, the current tire pressure of each
tire is show nintheService Service menu of the mul-
tifunction display. Example
For informatio nonthe message display,r efer
to the "Checking the tire pressure electroni-
cally" section (Y page258).
Important safety notes G
WARNING
Each tire, including the spare (if provided),
should be checked at least once every two
weeks when cold and inflated to the pressure recommended by the vehicl emanufacturer
on the Tire and Loading Information placard
on the driver' sdoor B-pillar or the tire pres-
sure label on the inside of the fuel filler flap .If
yourv ehiclehas tires of adifferent size than
the size indicated on the Tire and Loading
Information placard or, if available, the tire
pressure label, you should determine the
prope rtire pressure for those tires.
As an added safety feature ,you rv ehicl ehas
been equippe dwithatire pressure monitoring
system (TPMS) that illuminates alow tire pres-
sure telltal ewhen one or more of yourt ires
are significantly underinflated. Accordingly,
when the low tire pressure telltal elights up,
you should stop and check yourt ires as soon
as possible, and inflate them to the proper
pressure. Driving on asignificantly underin-
flated tire cause sthe tire to overhea tand can
leadtot ire failure. Underinflation alsor
educes fuel efficiency
and tire tread life ,and may affect the vehicle's
handling and stopping ability .Please note that
the TPMS is not asubstitute for prope rtire
maintenance, and it is the driver' sresponsi-
bility to maintai ncorrect tire pressure, even if
underinflation has not reache dthe level to
trigger illumination of the TPMS low tire pres-
sure telltale.
Yourv ehiclehas alsob een equippe dwith a
TPMS malfunction indicator to indicate when
the system is not operating properly. The
TPMS malfunction indicator is combined with
the low tire pressure telltale. When the sys-
tem detects amalfunction, the warning lamp
willf lashf or approximatel yaminute and then
remai ncontinuously illuminated. This
sequence willber epeated every time the vehi-
cle is started as long as the malfunction
exists. When the malfunction indicator is illu-
minated, the system may not be abletod etect
or signa llow tire pressure as intended.
TPMS malfunctions may occur for avariety of
reasons, including the installation of incom-
patible replacement or alternate tires or
wheels on the vehicl ethat prevent the TPMS
from functioning properly. Always check the
TPMS malfunction telltal eafter replacing one
or more tires or wheels on yourv ehicleto
ensure that the replacement or alternate Tires
and wheels allow the TPMS to continue to
function properly.
It is the driver' sresponsibility to set the tire
pressure to that recommended for cold tires
which is suitable for the operating situation
(Y page2 53).Note that the correct tire pres-
sure for the current operating situation must
first be taught-in to the tire pressure monitor.
If there is asubstantial loss of pressure, the
warning threshol dfor the warning message is
aligned to the reference values taught-in.
Restart the tire pressure monitor after adjust-
ing the pressure of the cold tires
(Y page2 59).The current pressures are
saved as new reference values. As aresult, a Tire pressure
257Wheelsand tires Z
Page 274 of 290
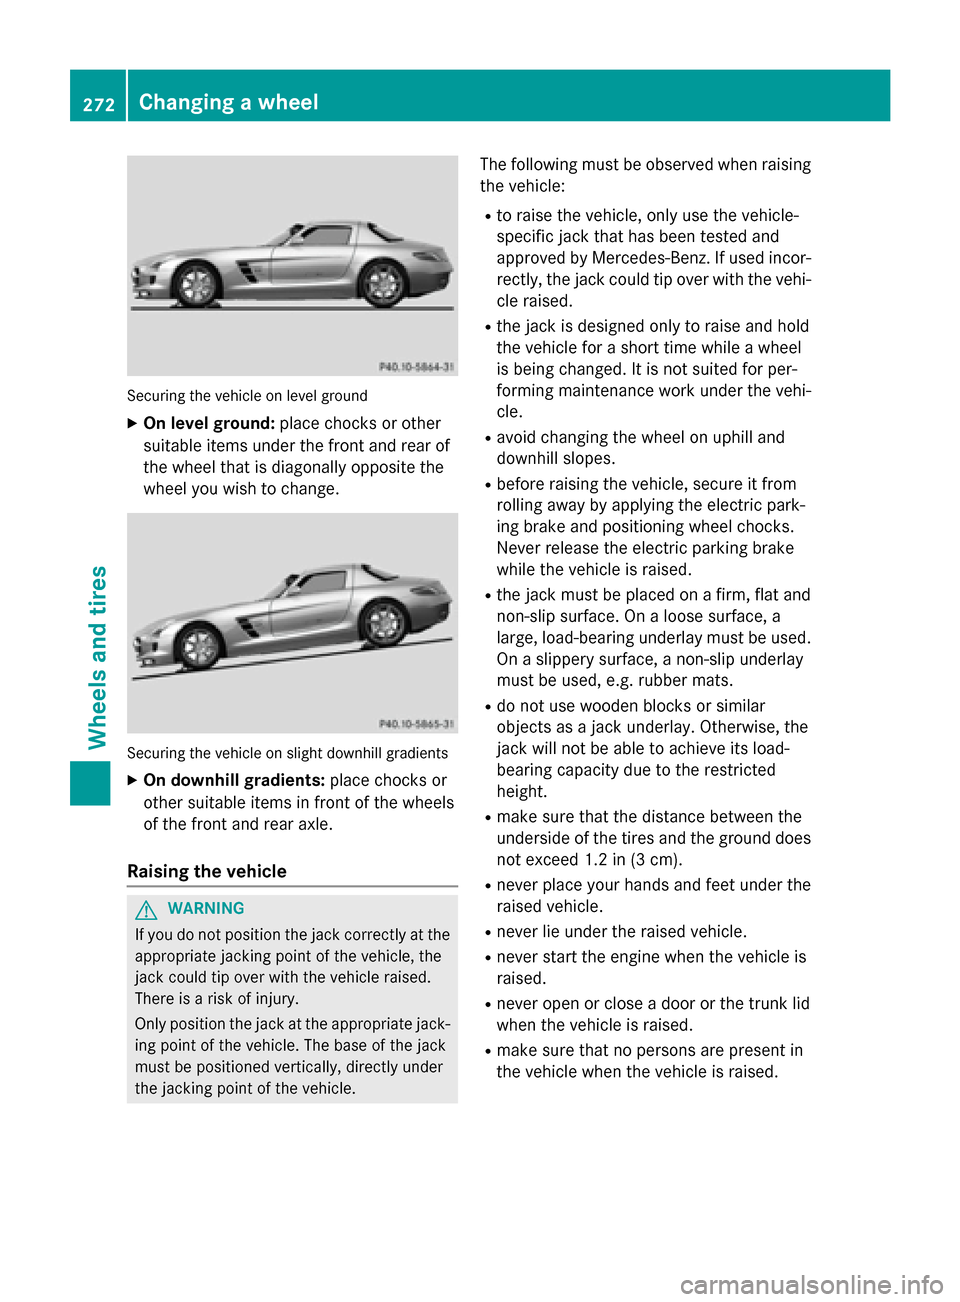
Securing the vehicle on level ground
X On level ground: place chocks or other
suitabl eitem sunder the front and rea rof
the wheel that is diagonall yopposite the
wheel yo uwishtoc hange. Securing the vehicle on slight downhil
lgradients
X On downhill gradients: place chocks or
othe rsuitabl eitem sinf ront of the wheels
of the front and rea raxle.
Raisin gthe vehicle G
WARNING
If yo udon ot position the jack correctly at the
appropriate jacking point of the vehicle ,the
jack could tip ove rwitht he vehicle raised.
There is ariskofi njury.
Only position the jack at the appropriate jack-
ing point of the vehicle .The base of the jack
mus tbep ositioned vertically ,directl yunder
the jacking point of the vehicle. The following mus
tbeo bserve dwhenr aising
the vehicle:
R to raise the vehicle ,only us ethe vehicle-
specifi cjack that ha sbeent ested and
approved by Mercedes-Benz. If used incor-
rectly, the jack could tip ove rwitht he vehi-
cle raised.
R the jack is designe donly to raise and hold
the vehicle for ashort time whil eawheel
is being changed .Itisnot suited for per-
forming maintenance work under the vehi-
cle.
R avoid changing the wheel on uphil land
downhil lslopes.
R before raising the vehicle ,secure it from
rolling away by applying the electri cpark-
ing brake and positioning wheel chocks.
Neve rrelease the electri cparking brake
whil ethe vehicle is raised.
R the jack mus tbep lace donaf irm,flata nd
non-slip surface. On aloose surface, a
large ,load-bearing underlay mus tbeu sed.
On aslippery surface, anon-slip underlay
mus tbeu sed, e.g. rubber mats.
R do not us ewoodenb locks or similar
objects as ajack underlay .Otherwise, the
jack will not be able to achieve its load-
bearing capacity du etothe restricted
height.
R make sure that the distance between the
underside of the tire sand the ground does
not excee d1.2 in (3 cm).
R never place your hands and fee tunder the
raised vehicle.
R never li eunder the raised vehicle.
R never star tthe engine when the vehicle is
raised.
R never ope norclosead oorort he trunk lid
when the vehicle is raised.
R make sure that no persons are present in
the vehicle when the vehicle is raised. 272
Changing
awheelWheels and tires
Page 277 of 290
X
Tighten the wheel bolts until they are fin-
ger-tight.
X Unscrew the alignment bolt.
X Tighten the last wheel bolt until it is finger-
tight.
Lowering the vehicle G
WARNING
The wheels could work loose if the wheel nuts and bolts are not tightened to the specified
tightening torque. There is arisk of accident.
Have the tightening torque immediately
checked at aqualified specialist workshop
after awheel is changed.
X Turn the crank of the jack counter-clock-
wise until the vehicle is once again standing
firmly on the ground.
X Place the jack to one side. X
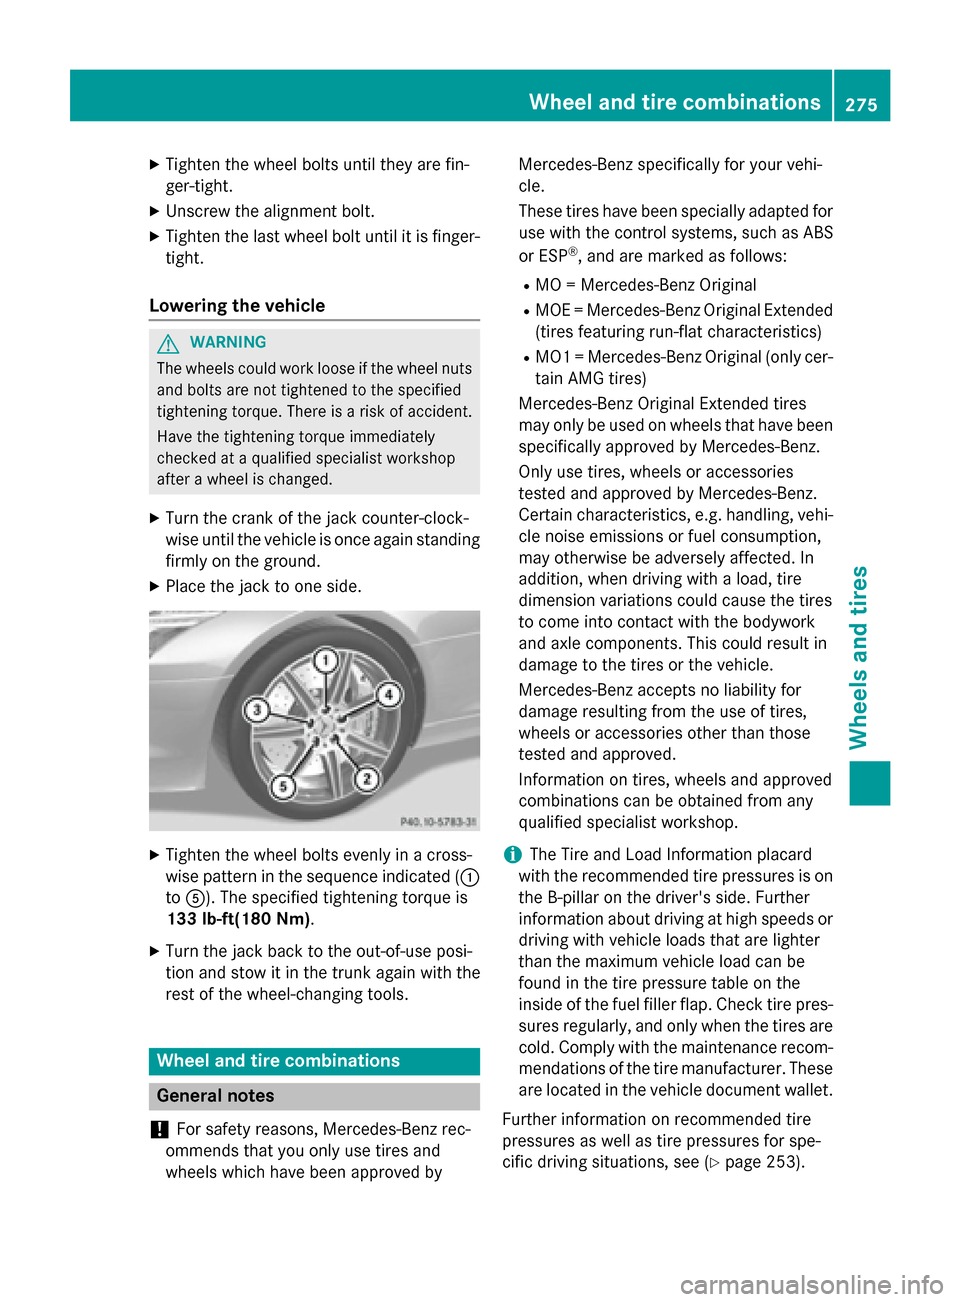
Tighten the wheel bolts evenly in across-
wise pattern in the sequence indicated ( 0043
to 0083). The specified tightening torque is
133 lb-ft(180 Nm).
X Turn the jack back to the out-of-use posi-
tion and stow it in the trunk again with the
rest of the wheel-changin gtools. Wheel and tire combinations
General notes
! For safety reasons, Mercedes-Benz rec-
ommends that you only use tires and
wheels which have been approved by Mercedes-Benz specifically for your vehi-
cle.
These tires have been specially adapted for
use with the control systems, such as ABS
or ESP ®
,a nd are marked as follows:
R MO =Mercedes-Benz Original
R MOE =Mercedes-Benz Original Extended
(tires featuring run-flat characteristics)
R MO1 =Mercedes-Benz Original (only cer-
tain AMG tires)
Mercedes-Benz Original Extended tires
may only be used on wheels that have been
specifically approved by Mercedes-Benz.
Only use tires, wheels or accessories
tested and approved by Mercedes-Benz.
Certain characteristics, e.g. handling, vehi-
cle noise emissions or fuel consumption,
may otherwise be adversely affected. In
addition, when driving with aload, tire
dimension variations could cause the tires
to come into contact with the bodywork
and axle components. This could result in
damage to the tires or the vehicle.
Mercedes-Benz accepts no liability for
damage resulting from the use of tires,
wheels or accessories other than those
tested and approved.
Information on tires, wheels and approved
combinations can be obtained from any
qualified specialist workshop.
i The Tire and Load Information placard
with the recommended tire pressures is on the B-pillar on the driver's side. Further
information about driving at high speeds or driving with vehicle loads that are lighter
than the maximum vehicle load can be
found in the tire pressure table on the
inside of the fuel filler flap. Check tire pres- sures regularly, and only when the tires arecold. Comply with the maintenance recom-
mendation softhe tire manufacturer. These
are located in the vehicle document wallet.
Further information on recommended tire
pressures as well as tire pressures for spe-
cific driving situations, see (Y page 253). Wheel and tirec
ombinations
275Wheels and tires Z
Page 287 of 290
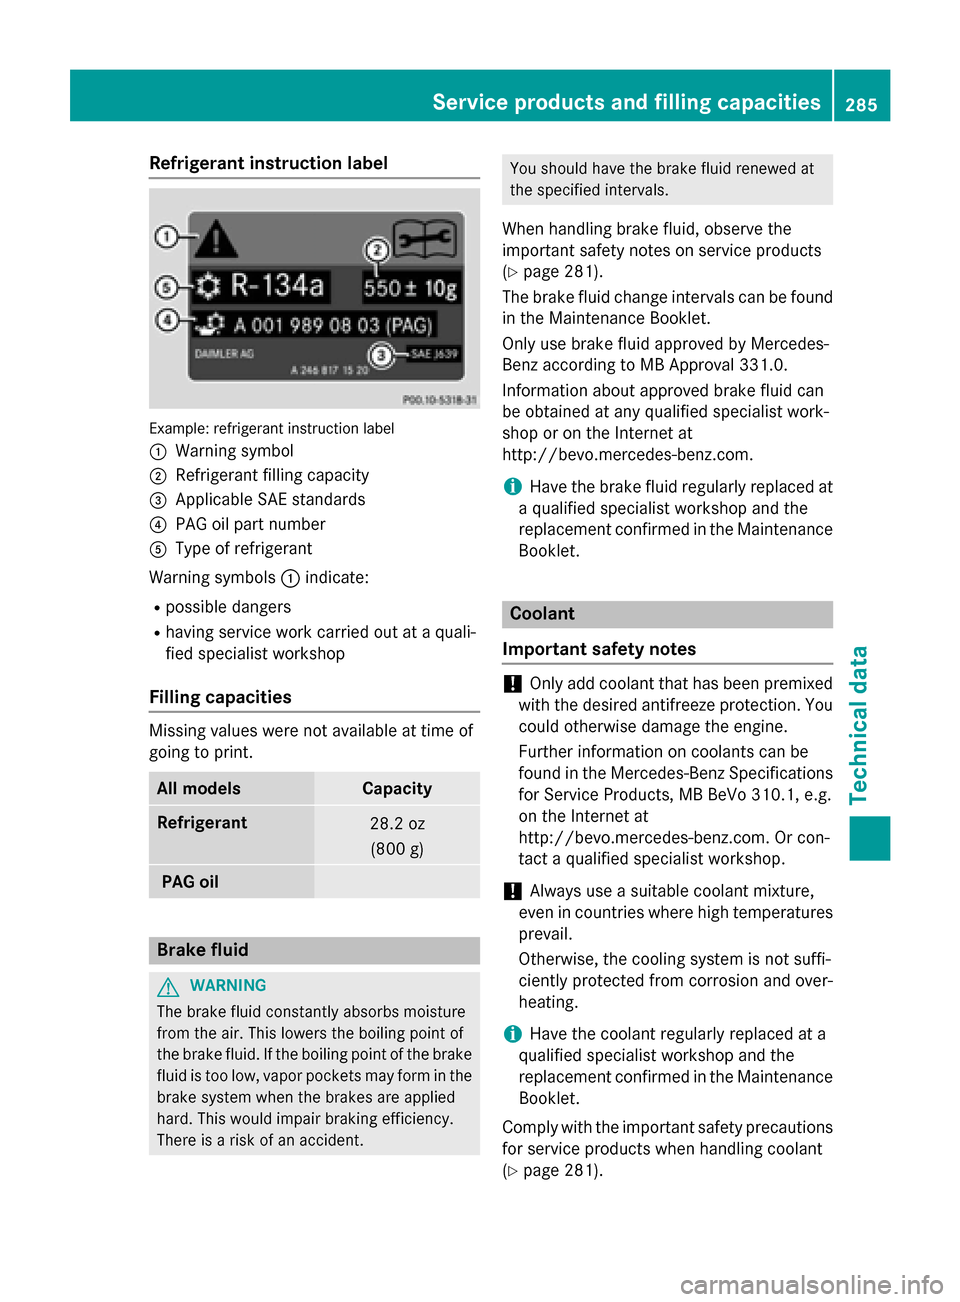
Refrigerant instructio
nlabel Example
:refrigerant instruction label
0043 Warning symbol
0044 Refrigerant filling capacity
0087 Applicabl eSAE standards
0085 PAG oi lpartn umber
0083 Type of refrigerant
Warning symbols 0043indicate:
R possible dangers
R having service work carrie doutataq uali-
fie ds pecialist workshop
Fillin gcapacities Missing value
sweren ot available at time of
going to print. Al
lm odels Capacity
Refrigerant
28.2 oz
(800 g) PA
Go il Brake fluid
G
WARNING
The brake fluidc onstantly absorbs moisture
from the air. This lowers the boiling point of
the brake fluid. If the boiling point of the brake fluidist oo low, vapor pockets may form in the
brake system when the brakes are applied
hard. This would impair braking efficiency.
There is arisk of an accident. You shoul
dhave the brake fluidr enewed at
the specified intervals.
When handling brake fluid, observe the
important safety notes on service products
(Y page 281).
The brake fluidc hange intervals can be found
in the Maintenance Booklet.
Only use brake fluida pproved by Mercedes-
Benz according to MB Approval 331.0.
Information abouta pproved brake fluidc an
be obtained at any qualified specialist work-
shop or on the Internet at
http://bevo.mercedes-benz.com.
i Have the brake fluidr
egularly replaced at
aq ualified specialist workshop and the
replacement confirmed in the Maintenance Booklet. Coolant
Important safety notes !
Only add coolant that has been premixed
with the desired antifreeze protection. You
could otherwise damage the engine.
Further information on coolants can be
found in the Mercedes-Benz Specifications for Service Products, MB BeVo 310.1, e.g.
on the Internet at
http://bevo.mercedes-benz.com .Orcon-
tact aqualified specialist workshop.
! Always use
asuitable coolant mixture,
even in countries where high temperatures
prevail.
Otherwise, the cooling system is not suffi-
ciently protected from corrosion and over-
heating.
i Have the coolant regularly replaced at a
qualified specialist workshop and the
replacement confirmed in the Maintenance Booklet.
Compl ywith the important safety precautions
for service products when handling coolant
(Y page 281). Servic
eproducts and filling capacities
285Technical data Z