2015 MERCEDES-BENZ SLS AMG GT COUPE radio
[x] Cancel search: radioPage 215 of 290

i
Usually, you now have 30 seconds to ini-
tiate the next step.
X Press previouslyp rogramed button0044,0087
or 0085 of the integrated garage door opener
until the door closes.
The rolling code synchronization is then
complete.
Notes on programing the remote control
Canadian radio frequency lawsr equire a
"break" (or interruption) of the transmission
signals after broadcasting for afew seconds.
Therefore, these signals may not last long
enough for the integrated garage door
opener. The signal is not recognized during
programing. Comparable with Canadian law,
some U.S. garage door openers also feature a
"break".
Proceed as follows:
R if you live in Canada
R if you have difficulties programing the
garage door opener (regardless of where
you live) when using the programing steps
X Press and hold one of buttons 0044to0085 on
the integrated garage door opener.
After ashort time, indicator lamp 0043lights
up yellow.
X Release the button.
Indicator lamp 0043flashes yellow.
X Press button 0084of garage door remote
control 0083for two seconds, then release it
for two seconds.
X Press button 0084againf or two seconds.
X Repeatt his sequence on button 0084of
remote control 0083until indicator lamp 0043
lights up green.
If indicator lamp 0043turns red, repeat the
process.
X Continue with the other programing steps
(see above). Problems when programing
If you are experiencing problems programing
the integrated garage door opener on the
rear-view mirror, take note of the following
instructions:
R Check the transmitter frequency of garage
door drive remote control 0083.This can usu-
ally be found on the back of the remote
control.
The integrated garage door opener is com-
patible with devices that have units which
operate in the frequency range of 280 to
433 MHz .
R Replace the batteries in garage door
remote control 0083.This increases the like-
lihood that garage door remote control 0083
will transmit astrong and precise signal to
the integrated garage door opener in the
rear-view mirror.
R When programing, hold remote control 0083
at varying distances and angles from the
button that you are programing. Try various angles at adistance between 2and
12 inches (5to 30 cm) or at the same angle
but at varying distances.
R If another remote control for the same
garage door drive is available,r epeat the
same programing steps with this remote
control. Before performing these steps,
make sure that new batteries have been
installed in garage door drive remote
control 0083.
R Note that some remote controls only trans-
mit for alimited amount of time (the indi-
cator lamp on the remote control goes out). Press button 0084on remote control 0083again
before transmission ends.
R Align the antennac able of the garage door
opener unit. This can improve signal recep- tion/transmission.
Opening/closing the garage door Once programed, the integrated garage door
opener 0083will assume the function of the
garage door system's remote control. Please Features
213Stowage and features Z
Page 245 of 290

R
If the battery is fullyd ischarged, leave the battery that is being used to jump-start connected
for afew minutes before attempting to start. This charges the battery slightly.
R Make sure that the two vehicle sdonot touch.
Make sure that:
R the jumper cablesa re not damaged.
R when the jumper cablesa re connected to the battery, uninsulated sections of the terminal
clamp do not come into contact with other metal sections.
R the jumper cablesc annot come into contact with parts such as the V-belt pulley or the fan.
These parts move when the engine is started and whileitisr unning.
X Press the electric parking brake handle.
X Shift the transmission to Pwith the button in the center console.
X Remove the SmartKey from the ignition lock.
X Switch off all electrical consumers (e.g. radio, blower, etc.).
X Open the hood (Y page 218). Positio
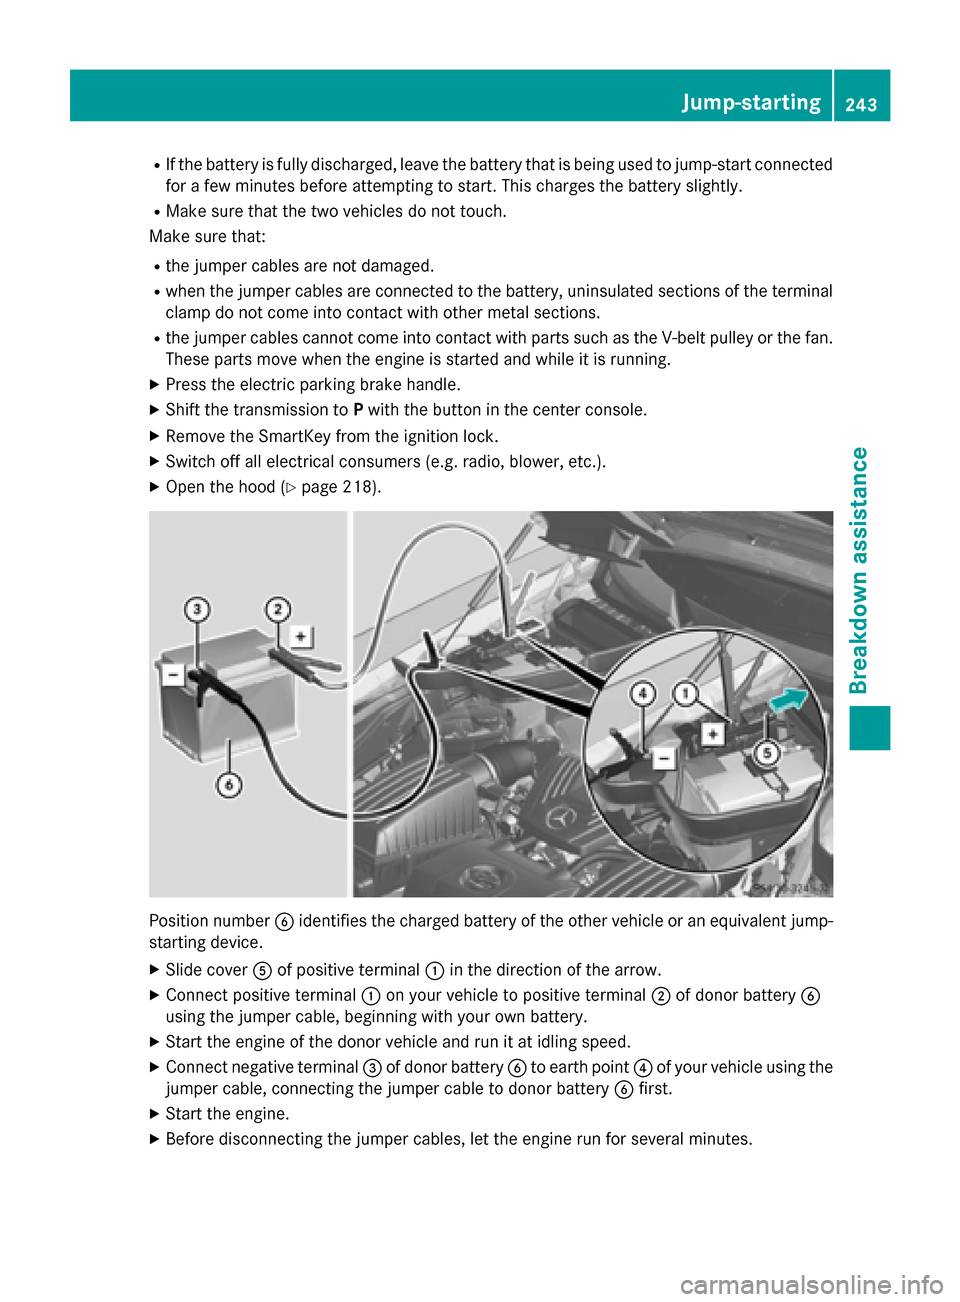
nnumber 0084identifie sthe charged battery of the other vehicle or an equivalent jump-
starting device.
X Slide cover 0083of positive terminal 0043in the direction of the arrow.
X Connect positive terminal 0043on yourv ehicle to positive terminal 0044of donor battery 0084
using the jumper cable,b eginning with yourown battery.
X Start the engine of the donor vehicle and run it at idling speed.
X Connect negative terminal 0087of donor battery 0084to earth point 0085of yourv ehicle using the
jumper cable,c onnecting the jumper cable to donor battery 0084first.
X Start the engine.
X Before disconnecting the jumper cables, let the engine run for several minutes. Jump-starting
243Breakdown assistance Z
Page 260 of 290

warning message will appear if th
etirep res-
sure drop ssignificantly.
The tir epressure monito rdoes not warn you
of an incorrectly set tir epressure. Observe
th en otes on th erecommended tir epressure
(Y page 253).
The tir epressure monito risnot able to warn
you of asudden loss of pressure, e.g .ifthe
tir eisp enetrated by aforeign object .Inthe
even tofas udden loss of pressure, brin gthe
vehicle to ahalt by braking carefully. Avoid
abrupt steerin gmaneuvers.
The tir epressure monito rhas ay ellow warn-
ing lamp in th einstrumen tcluster for indicat-
ing apressure loss or malfunction .Whether
th ew arning lamp flashes or light supindi-
cates whether atirep ressure is to olow or the
tir ep ressure monito rismalfunctioning:
R if th ewarning lamp is lit continuously, the
tir ep ressure on one or mor etires is signif-
icantly to olow. The tir epressure monito ris
not malfunctioning.
R if th ewarning lamp flashes for aroun da
minute and then remains lit constantly, the tir ep ressure monito rismalfunctioning.
i In addition to th
ewarning lamp, ames-
sage appears in th emultifunction display.
Further informatio ncan be foun don
( Ypage 182).
If th etirep ressure monito rismalfunctioning,
it may tak emoret hant en minutes for th etire
pressure warning lamp to inform you of the
malfunction by flashing for approximately one
minute and then remainin glit. When th emal-
function has been rectified, th etirep ressure
warning lamp goes out after afew minutes of
driving.
The tir epressure values indicated by th eon-
board compute rmay differ fro mthose meas-
ured at agas statio nwithapressure gauge.
The tir epressures shown by th eon-board
compute rrefer to those measured at sea
level. At high altitudes, th etirep ressure val-
ues indicated by apressure gauge are higher than those shown by th
eon-board computer.
In this case ,donot reduc ethe tirep ressures.
The operatio nofthetirep ressure monito rcan
be affected by interference fro mradio trans-
mittin gequipment (e.g .radio headphones,
two-way radios )tha tm ay be bein goperated
in or near th evehicle.
Checkin gthe tirep ressur eelectroni-
cally X
Make sure that th eSmartKey is in position
2 in th eignitio nlock (Y page 119).
X Pres sthe 0059 or0065 button on th esteer-
ing wheel to selec tthe Serv. Serv. menu.
X Pres sthe 0063 or0064 button to select
Tir eP ressure
Tir eP ressure.
X Pres sthe 0076 button.
The curren ttirep ressure of each tir eis
shown in th emultifunction display.
If th evehicle has been parked for over
20 minutes ,the Tir ep ressure wil lbe
Tir ep ressure wil lbe
displayed after drivin gafew
displayed after drivin gafew
minutes
minutes message appears.
After ateach-in process, th etirep ressure
monito rautomatically detect snew wheels or
new sensors. As lon gasaclear allocation of
th et irep ressure value to th eindividual
wheels is not possible, the TireP ressure
Tir eP ressure
Monito rActive
Monito rActive display message is shown
instead of th etirep ressure display. The tire
pressures are already bein gmonitored.
i If an emergency spare wheel is mounted,
th es ystem may continue to show th etire
pressure of th ewheel that has been
removed for afew minutes .Ifthiso ccurs,
not ethatthe value displayed for th eposi-
tio nw here th espare wheel is mounted is
not th esame as th ecurren ttirep ressure of
th ee mergency spare wheel. 258
Tir
ep ressureWheels and tires