2015 MERCEDES-BENZ SLK-CLASS ROADSTER tow
[x] Cancel search: towPage 82 of 358
You could therefore lock yourself out if:
R the vehicle is being pushed.
R the vehicle is being towed.
R the vehicle is on a roller dynamometer.
You can also switch the automatic locking
function on and off using the on-board com-
puter ( Ypage 206).
Unlocking the driver's door (mechan-
ical key)
If the vehicle can no longer be unlocked with
the SmartKey, use the mechanical key.
If you use the mechanical key to unlock and
open the driver's door, the anti-theft alarm
system will be triggered ( Ypage 69).
X Take the mechanical key out of the Smart-
Key ( Ypage 74).
X Insert the mechanical key into the lock of
the driver's door as far as it will go.
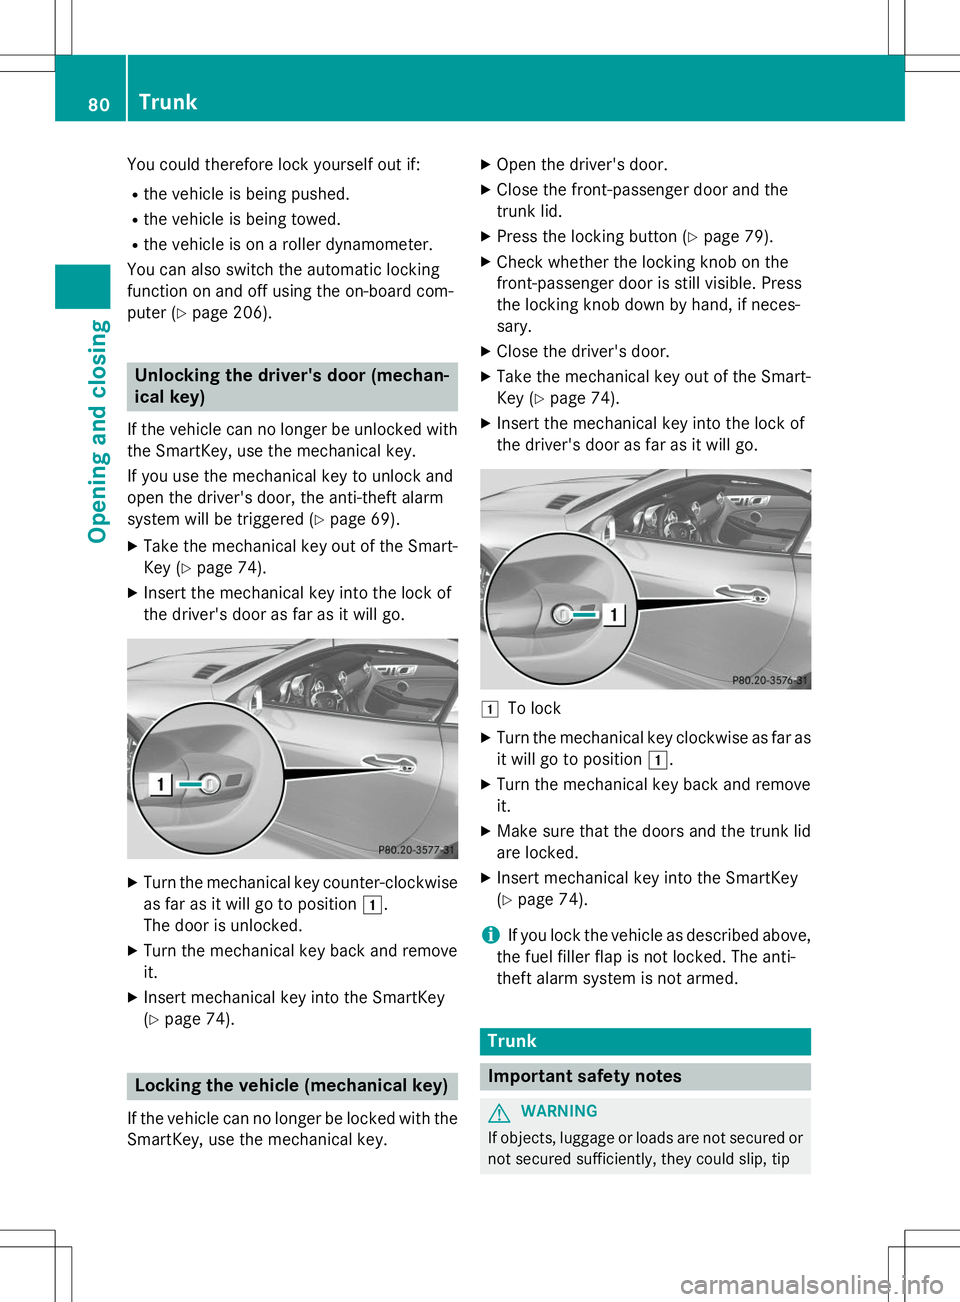
XTurn the mechanical key counter-clockwise
as far as it will go to position 1.
The door is unlocked.
X Turn the mechanical key back and remove it.
X Insert mechanical key into the SmartKey(Y page 74).
Locking the vehicle (mechanical key)
If the vehicle can no longer be locked with the
SmartKey, use the mechanical key. X
Open the driver's door.
X Close the front-passenger door and the
trunk lid.
X Press the locking button ( Ypage 79).
X Check whether the locking knob on the
front-passenger door is still visible. Press
the locking knob down by hand, if neces-sary.
X Close the driver's door.
X Take the mechanical key out of the Smart-
Key ( Ypage 74).
X Insert the mechanical key into the lock of
the driver's door as far as it will go.
1To lock
X Turn the mechanical key clockwise as far as
it will go to position 1.
X Turn the mechanical key back and remove it.
X Make sure that the doors and the trunk lid
are locked.
X Insert mechanical key into the SmartKey(Y page 74).
iIf you lock the vehicle as described above,
the fuel filler flap is not locked. The anti-
theft alarm system is not armed.
Trunk
Important safety notes
GWARNING
If objects, luggage or loads are not secured or not secured sufficiently, they could slip, tip
80Trunk
Opening and closing
Page 90 of 358
Rthere is sufficient clearance, as the roof
swings upwards.
R there is sufficient clearance behind the
vehicle, as the trunk lid swings back-
wards beyond the bumper.
R the trunk is only loaded to below the
trunk partition.
R the trunk partition is not pushed up by
the load.
R the trunk partition is closed.
R the trunk lid is closed.
R the outside temperature is above 5 ‡(Ò 15 †).
You could otherwise damage the roof,
trunk and other parts of the vehicle.
iVehicle dimensions when opening/clos-
ing the roof ( Ypage 355).
iMake sure that the roof and rear window
are clean and dry before opening the roof.
Otherwise, water or dirt could enter the
vehicle interior or trunk.
Opening and closing using the roof
switch
Important safety notes
GWARNING
When opening or closing the roof, body parts could be trapped by, for example, the roof
mechanism, trunk lid or side windows. There
is a risk of injury.
When raising or lowering the roof, make sure
that no body parts are in the vicinity of moving
components. If someone becomes trapped,
release the button.
Opening and closing
X Secure the vehicle against rolling away (Y page 161).
X Close the trunk partition ( Ypage 90).
X Close the trunk lid.
X Turn the SmartKey to position 2in the igni-
tion lock.
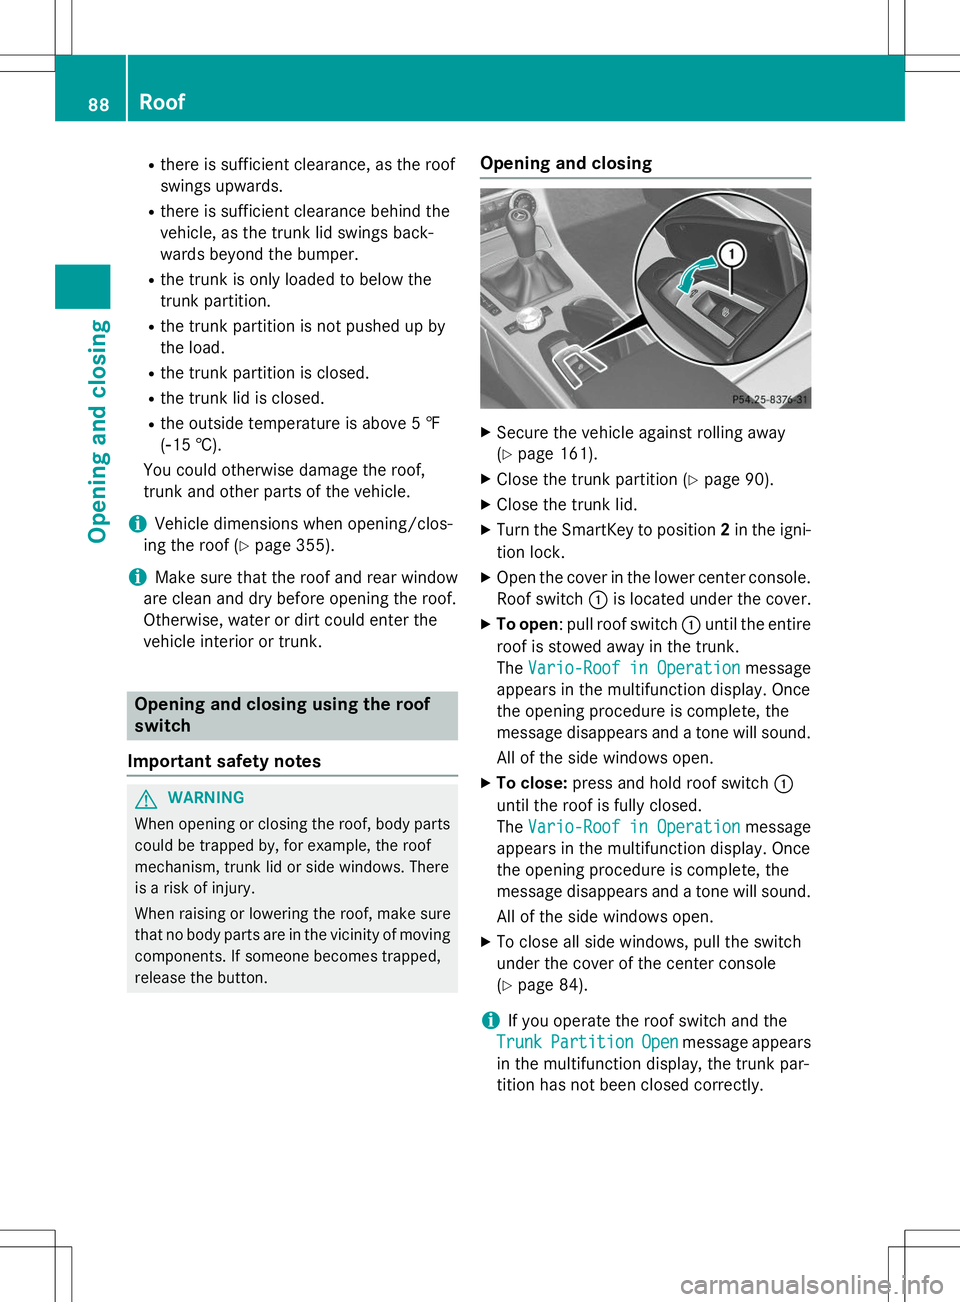
X Open the cover in the lower center console.
Roof switch :is located under the cover.
X To open : pull roof switch :until the entire
roof is stowed away in the trunk.
The
Vario-Roof in Operationmessage
appears in the multifunction display. Once
the opening procedure is complete, the
message disappears and a tone will sound.
All of the side windows open.
X To close: press and hold roof switch :
until the roof is fully closed.
The
Vario-Roof in Operationmessage
appears in the multifunction display. Once
the opening procedure is complete, the
message disappears and a tone will sound.
All of the side windows open.
X To close all side windows, pull the switch
under the cover of the center console(Y page 84).
iIf you operate the roof switch and the
TrunkPartitionOpenmessage appears
in the multifunction display, the trunk par-
tition has not been closed correctly.
88Roof
Opening and closing
Page 94 of 358
Only fold AIRGUIDE in/out while the vehicle isstationary.
!AIRGUIDE can only be positioned cor-
rectly by folding it in or out. AIRGUIDE can-
not be dismantled. Do not try to remove
AIRGUIDE from its anchorage. Otherwise,
you could damage AIRGUIDE or the vehicle.
AIRGUIDE can be folded out or back in from
the driver's side or passenger side.
When operating AIRGUIDE, preferably stand
on the side of the vehicle away from the traf-
fic, after you have stopped the vehicle in
accordance with road and traffic conditions.
Operating AIRGUIDE
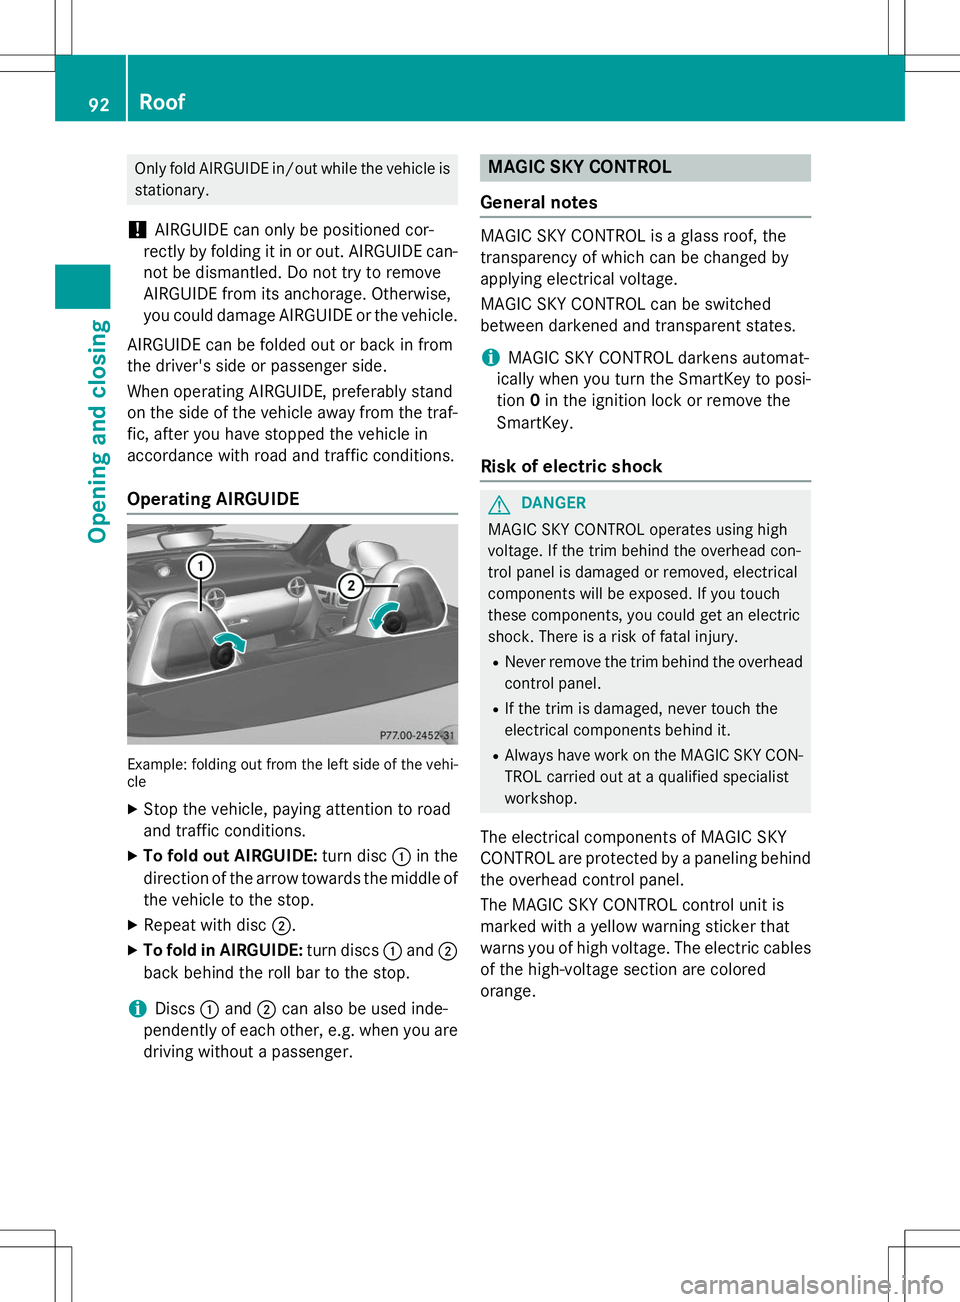
Example: folding out from the left side of the vehi-
cle
X Stop the vehicle, paying attention to road
and traffic conditions.
X To fold out AIRGUIDE: turn disc:in the
direction of the arrow towards the middle of
the vehicle to the stop.
X Repeat with disc ;.
X To fold in AIRGUIDE: turn discs:and ;
back behind the roll bar to the stop.
iDiscs :and ;can also be used inde-
pendently of each other, e.g. when you are driving without a passenger.
MAGIC SKY CONTROL
General notes
MAGIC SKY CONTROL is a glass roof, the
transparency of which can be changed by
applying electrical voltage.
MAGIC SKY CONTROL can be switched
between darkened and transparent states.
iMAGIC SKY CONTROL darkens automat-
ically when you turn the SmartKey to posi- tion 0in the ignition lock or remove the
SmartKey.
Risk of electric shock
GDANGER
MAGIC SKY CONTROL operates using high
voltage. If the trim behind the overhead con-
trol panel is damaged or removed, electrical
components will be exposed. If you touch
these components, you could get an electric
shock. There is a risk of fatal injury.
R Never remove the trim behind the overhead
control panel.
R If the trim is damaged, never touch the
electrical components behind it.
R Always have work on the MAGIC SKY CON-
TROL carried out at a qualified specialistworkshop.
The electrical components of MAGIC SKY
CONTROL are protected by a paneling behind the overhead control panel.
The MAGIC SKY CONTROL control unit is
marked with a yellow warning sticker that
warns you of high voltage. The electric cables
of the high-voltage section are coloredorange.
92Roof
Opening and closing
Page 141 of 358
Driving
Important safety notes
GWARNING
Objects in the driver's footwell can restrict thepedal travel or obstruct a depressed pedal.
The operating and road safety of the vehicle is
jeopardized. There is a risk of an accident.
Make sure that all objects in the vehicle are
stowed correctly, and that they cannot enter
the driver's footwell. Install the floormats
securely and as specified in order to ensure
sufficient clearance for the pedals. Do not use loose floormats and do not place floormats on
top of one another.
GWARNING
Unsuitable footwear can hinder correct usage of the pedals, e.g.:
R shoes with thick soles
R shoes with high heels
R slippers
There is a risk of an accident.
Wear suitable footwear to ensure correct
usage of the pedals.
GWARNING
If you switch off the ignition while driving,
safety-relevant functions are only available
with limitations, or not at all. This could affect, for example, the power steering and the brake
boosting effect. You will require considerably
more effort to steer and brake. There is a risk
of an accident.
Do not switch off the ignition while driving.
GWARNING
If the parking brake has not been fully
released when driving, the parking brake can:
R overheat and cause a fire
R lose its hold function.
There is a risk of fire and an accident. Release
the parking brake fully before driving off.
!Do not warm up the engine with the vehi-
cle stationary. Drive off immediately. Avoid high engine speeds and driving at full throt-
tle until the engine has reached its operat-
ing temperature.
Only shift the automatic transmission to
the desired drive position when the vehicle is stationary.
Where possible, avoid spinning the drive
wheels when pulling away on slippery
roads. You could otherwise damage the
drive train.
!AMG vehicles: at low engine oil temper-
atures below 68 ‡ (+20 †), the maximum
engine speed is restricted in order to pro-
tect the engine. To protect the engine and
maintain smooth engine operation, avoid
driving at full throttle when the engine iscold.
Key positions
SmartKey
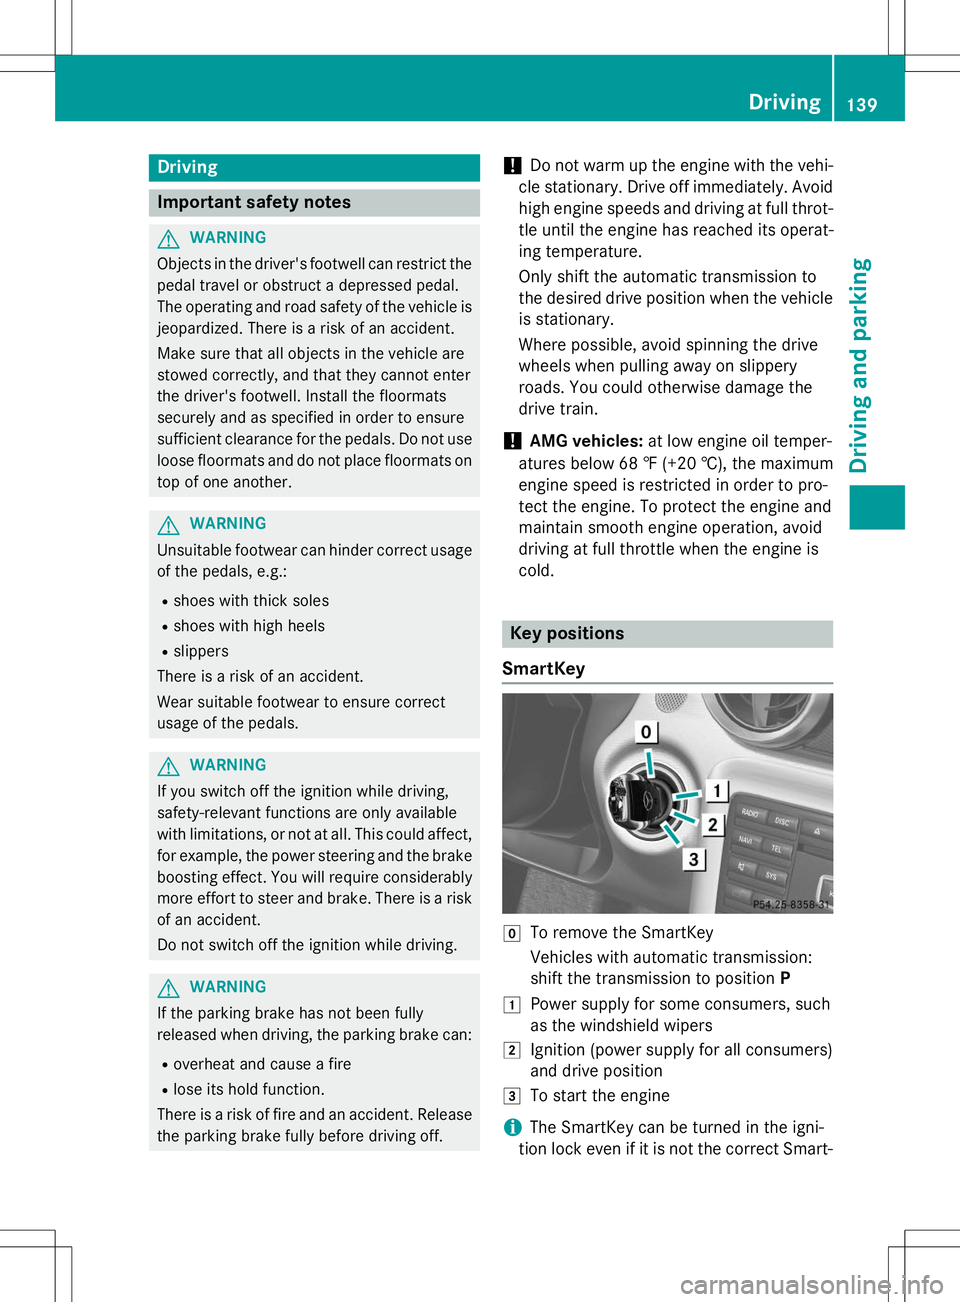
gTo remove the SmartKey
Vehicles with automatic transmission:
shift the transmission to position P
1Power supply for some consumers, such
as the windshield wipers
2Ignition (power supply for all consumers)
and drive position
3To start the engine
iThe SmartKey can be turned in the igni-
tion lock even if it is not the correct Smart-
Driving139
Driving and parking
Z
Page 154 of 358
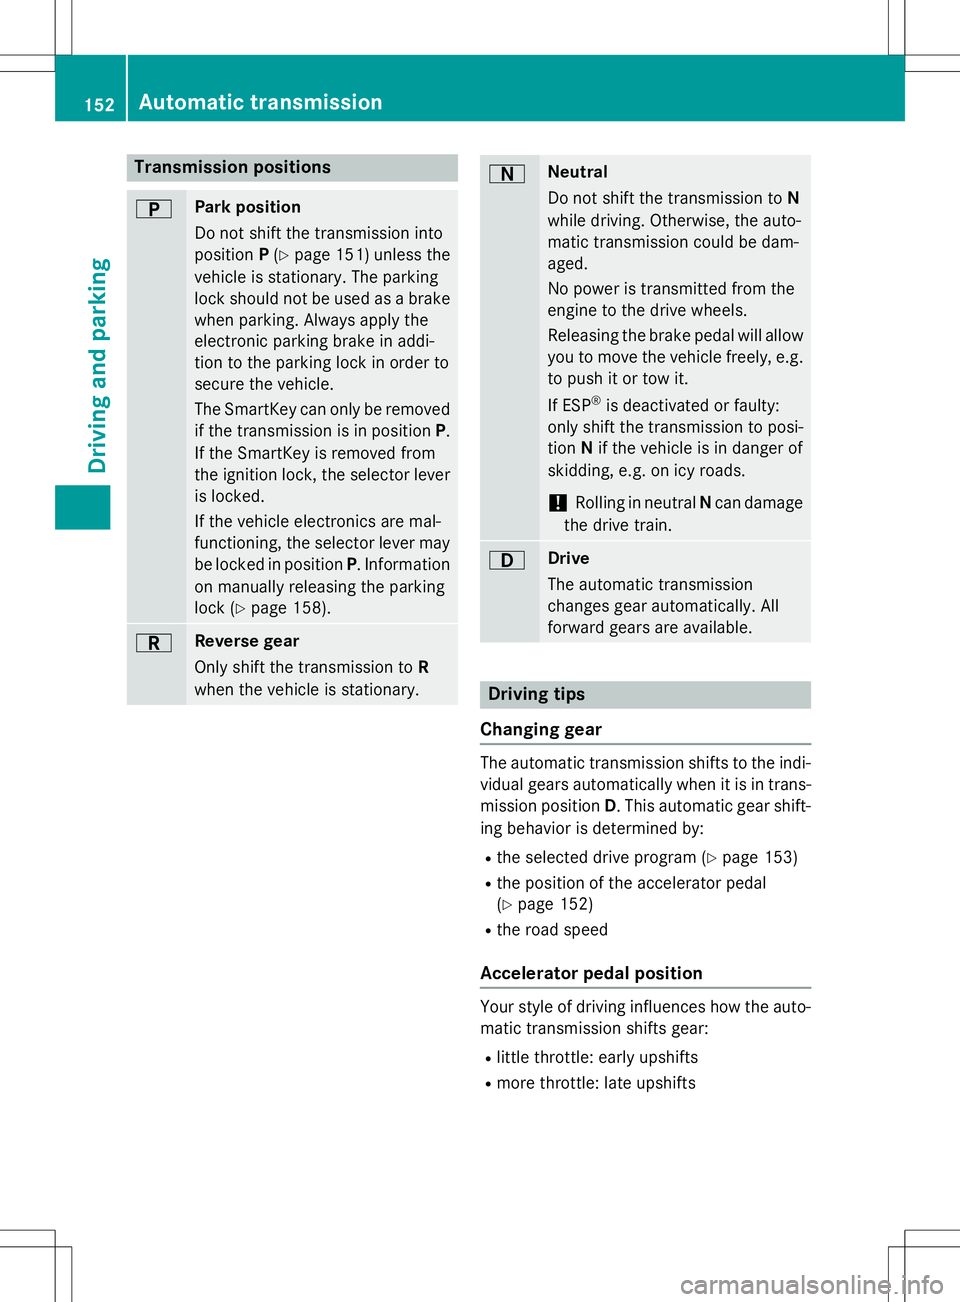
Transmission positions
BPark position
Do not shift the transmission into
positionP(Y page 151) unless the
vehicle is stationary. The parking
lock should not be used as a brake when parking. Always apply the
electronic parking brake in addi-
tion to the parking lock in order to
secure the vehicle.
The SmartKey can only be removedif the transmission is in position P.
If the SmartKey is removed from
the ignition lock, the selector lever
is locked.
If the vehicle electronics are mal-
functioning, the selector lever may be locked in position P. Information
on manually releasing the parking
lock ( Ypage 158).
CReverse gear
Only shift the transmission to R
when the vehicle is stationary.
ANeutral
Do not shift the transmission to N
while driving. Otherwise, the auto-
matic transmission could be dam-
aged.
No power is transmitted from the
engine to the drive wheels.
Releasing the brake pedal will allow
you to move the vehicle freely, e.g. to push it or tow it.
If ESP ®
is deactivated or faulty:
only shift the transmission to posi-
tion Nif the vehicle is in danger of
skidding, e.g. on icy roads.
!Rolling in neutral Ncan damage
the drive train.
7Drive
The automatic transmission
changes gear automatically. All
forward gears are available.
Driving tips
Changing gear
The automatic transmission shifts to the indi- vidual gears automatically when it is in trans-
mission position D. This automatic gear shift-
ing behavior is determined by:
R the selected drive program ( Ypage 153)
R the position of the accelerator pedal (Y page 152)
R the road speed
Accelerator pedal position
Your style of driving influences how the auto-
matic transmission shifts gear:
R little throttle: early upshifts
R more throttle: late upshifts
152Automatic transmission
Driving an d parking
Page 157 of 358
UpshiftingX Briefly press the selector lever to the right towards D+.
or X Pull the right-hand steering wheel paddle
shifter ( Ypage 154).
In cases where it is permissible, the auto-
matic transmission shifts up to the nextgear.
iIf the maximum engine speed on the cur-
rently engaged gear is reached and you
continue to accelerate, the automatic
transmission automatically shifts up in
order to prevent engine damage.
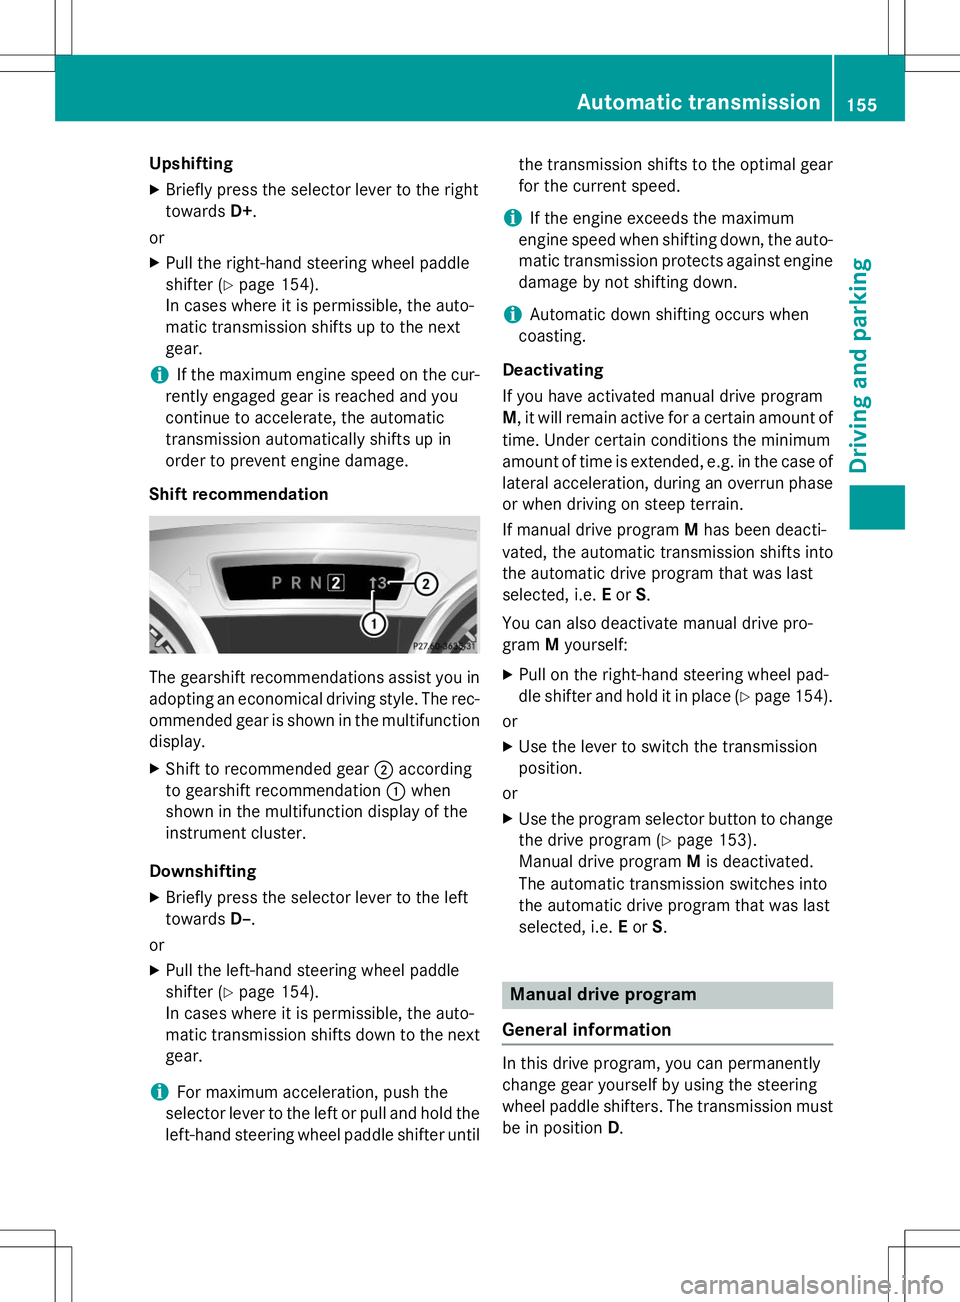
Shift recommendation
The gearshift recommendations assist you in
adopting an economical driving style. The rec- ommended gear is shown in the multifunction
display.
X Shift to recommended gear ;according
to gearshift recommendation :when
shown in the multifunction display of the
instrument cluster.
Downshifting X Briefly press the selector lever to the lefttowards D–.
or
X Pull the left-hand steering wheel paddle
shifter ( Ypage 154).
In cases where it is permissible, the auto-
matic transmission shifts down to the next
gear.
iFor maximum acceleration, push the
selector lever to the left or pull and hold the
left-hand steering wheel paddle shifter until the transmission shifts to the optimal gear
for the current speed.
iIf the engine exceeds the maximum
engine speed when shifting down, the auto-
matic transmission protects against engine damage by not shifting down.
iAutomatic down shifting occurs when
coasting.
Deactivating
If you have activated manual drive program M , it will remain active for a certain amount of
time. Under certain conditions the minimum
amount of time is extended, e.g. in the case of lateral acceleration, during an overrun phase
or when driving on steep terrain.
If manual drive program Mhas been deacti-
vated, the automatic transmission shifts into
the automatic drive program that was last
selected, i.e. Eor S.
You can also deactivate manual drive pro-gram Myourself:
X Pull on the right-hand steering wheel pad-
dle shifter and hold it in place ( Ypage 154).
or
X Use the lever to switch the transmission
position.
or
X Use the program selector button to change
the drive program ( Ypage 153).
Manual drive program Mis deactivated.
The automatic transmission switches into
the automatic drive program that was last
selected, i.e. Eor S.
Manual drive program
General information
In this drive program, you can permanently
change gear yourself by using the steering
wheel paddle shifters. The transmission must be in position D.
Automatic transmission155
Driving and parking
Z
Page 158 of 358
iAs well as this permanent drive program
M , you can also activate temporary drive
program M(Y page 154).
Switching on the manual drive program
Manual drive program Mis different from
drive program Swith regard to spontaneity,
responsiveness and smoothness of gear
changes.
Manual drive program Mcan be selected
using the program selector button. You can
change gear using the steering wheel paddle
shifters or the selector lever in manual drive
program Mif the transmission is in position D.
The selected gear appears in the multifunc-
tion display.
X Press the program selector button(Y page 153) repeatedly until Mappears in
the multifunction display.
Upshifting
X Briefly press the selector lever to the right
towards D+.
or X Pull the right-hand steering wheel paddle
shifter ( Ypage 154).
The automatic transmission shifts up to the
next gear.
Shift recommendation
The gearshift recommendations assist you in
adopting an economical driving style. The rec- ommended gear is shown in the multifunction
display.
X Shift to recommended gear ;according
to gearshift recommendation :when shown in the multifunction display of the
instrument cluster.
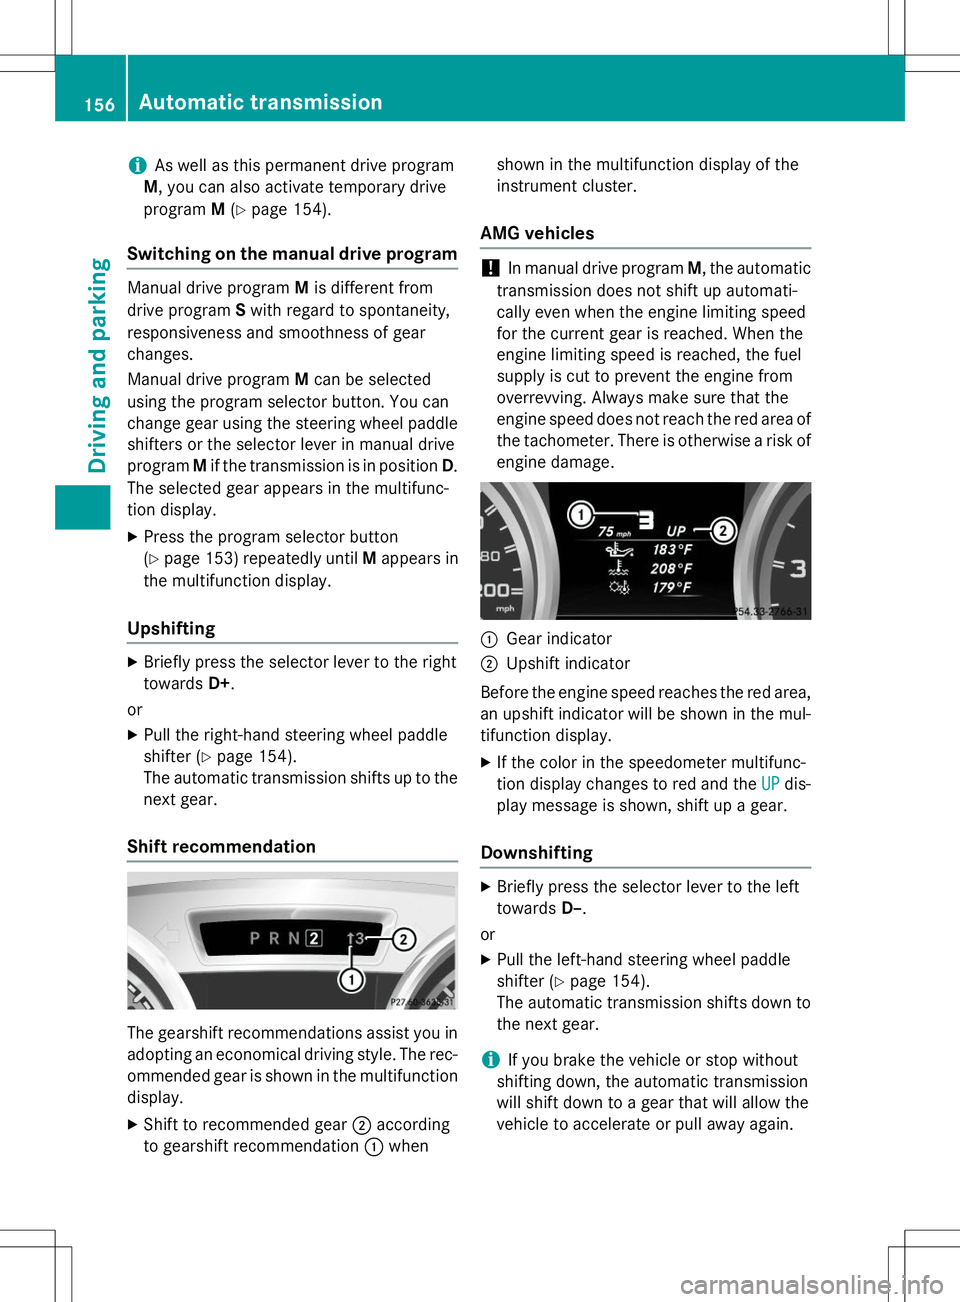
AMG vehicles
!In manual drive program
M, the automatic
transmission does not shift up automati-
cally even when the engine limiting speed
for the current gear is reached. When the
engine limiting speed is reached, the fuel
supply is cut to prevent the engine from
overrevving. Always make sure that the
engine speed does not reach the red area of
the tachometer. There is otherwise a risk of
engine damage.
:Gear indicator
;Upshift indicator
Before the engine speed reaches the red area, an upshift indicator will be shown in the mul-
tifunction display. X If the color in the speedometer multifunc-
tion display changes to red and the
UPdis-
play message is shown, shift up a gear.
Downshifting
X Briefly press the selector lever to the left
towards D–.
or X Pull the left-hand steering wheel paddle
shifter ( Ypage 154).
The automatic transmission shifts down to
the next gear.
iIf you brake the vehicle or stop without
shifting down, the automatic transmission
will shift down to a gear that will allow the
vehicle to accelerate or pull away again.
156Automatic transmission
Driving an d parking
Page 160 of 358
Problems with the transmission
ProblemPossible causes/consequences andMSolutions
The transmission has
problems shifting gear.The transmission is losing oil.
X Have the transmission checked at a qualified specialist work-
shop immediately.
The acceleration ability
is deteriorating.
The transmission no
longer changes gear.The transmission is in emergency mode.
It is only possible to shift into secondgear and reverse gear.
X Stop the vehicle.
X Shift the transmission to position P.
X Switch off the engine.
X Wait at least ten seconds before restarting the engine.
X Shift the transmission to position Dor R.
If D is selected, the transmission shifts into secondgear; ifRis
selected, the transmission shifts into reverse gear.
X Have the transmission checked at a qualified specialist work-
shop, e.g. an authorized Mercedes-Benz Center, immediately.
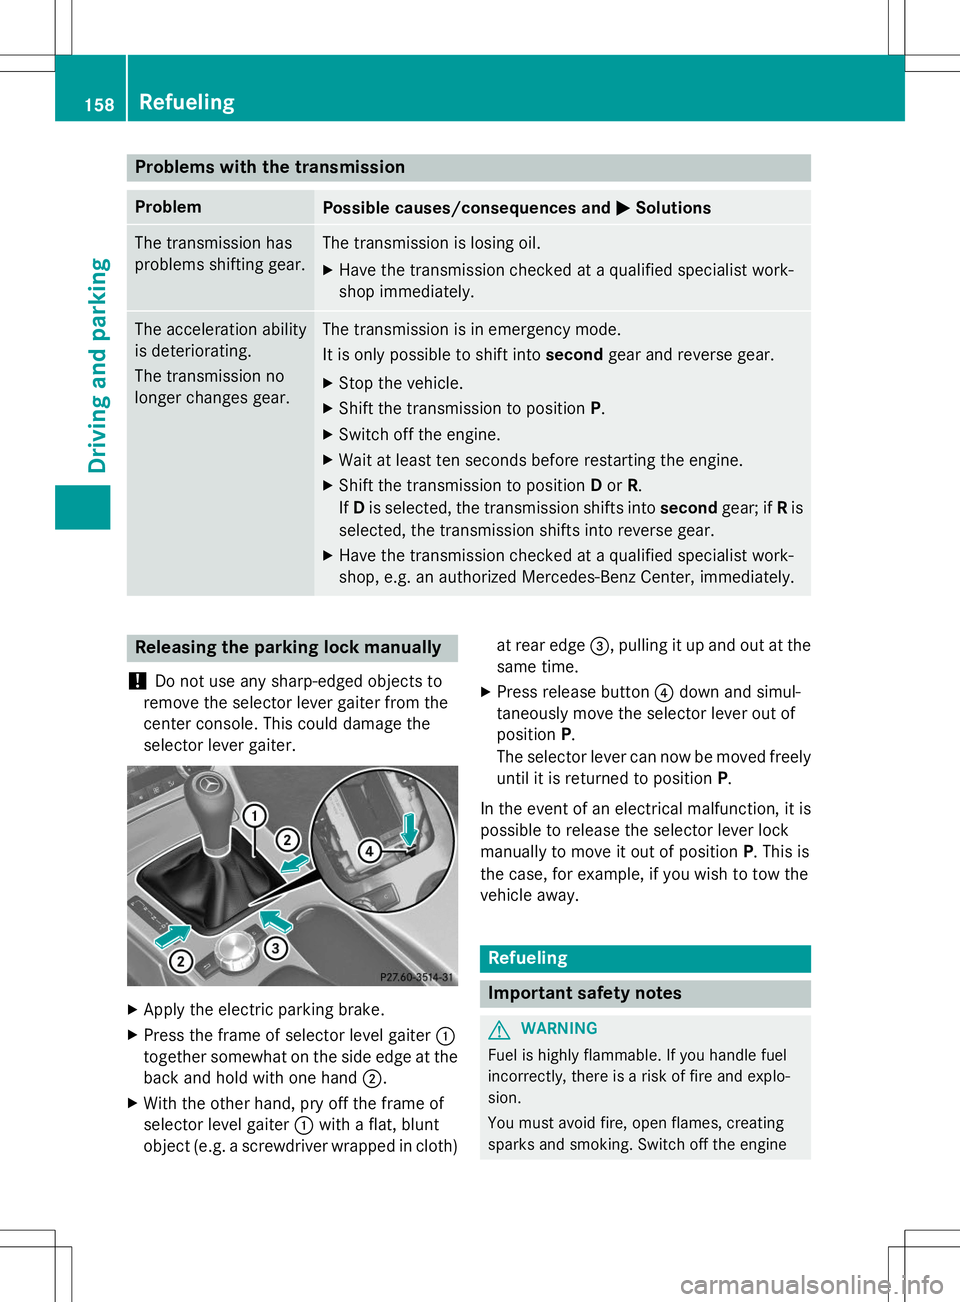
Releasing the parking lock manually
!
Do not use any sharp-edged objects to
remove the selector lever gaiter from the
center console. This could damage the
selector lever gaiter.
X Apply the electric parking brake.
X Press the frame of selector level gaiter :
together somewhat on the side edge at the back and hold with one hand ;.
X With the other hand, pry off the frame of
selector level gaiter :with a flat, blunt
object (e.g. a screwdriver wrapped in cloth) at rear edge
=, pulling it up and out at the
same time.
X Press release button ?down and simul-
taneously move the selector lever out ofposition P.
The selector lever can now be moved freely
until it is returned to position P.
In the event of an electrical malfunction, it is
possible to release the selector lever lock
manually to move it out of position P. This is
the case, for example, if you wish to tow the
vehicle away.
Refueling
Important safety notes
GWARNING
Fuel is highly flammable. If you handle fuel
incorrectly, there is a risk of fire and explo-sion.
You must avoid fire, open flames, creating
sparks and smoking. Switch off the engine
158Refueling
Driving and parking