2015 MERCEDES-BENZ SLK-Class tow
[x] Cancel search: towPage 46 of 358
Proper use of the seat belts
Observe the safety notes on the seat belt
(Y page 42).
All vehicle occupants must be wearing the
seat belt correctly before beginning the jour- ney. Also make sure that all vehicle occu-
pants are always wearing the seat belt cor-
rectly while the vehicle is in motion.
When fastening the seat belt, always make
sure that:
R the seat belt tongue is only inserted to the
belt buckle belonging to that seat.
R the seat belt is tight across your body.
Avoid wearing bulky clothing, e.g. a winter
coat.
R the seat belt is not twisted.
Only then can the forces which occur be
distributed over the area of the belt.
R the shoulder section of the belt is always
routed across the center of your shoulder.
The shoulder section of the belt must not
come into contact with your neck or be
routed under your arm.
R the lap belt passes tightly and as low down
as possible across your lap.
The lap belt must always be routed across
your hip joints and not across your abdo-
men. This applies particularly to pregnant
women. If necessary, push the lap belt
down to your hip joint and pull it tight using the shoulder section of the belt.
R the seat belt is not routed across sharp,
pointed or fragile objects.
If you have such items located on or in your
clothing, e.g. pens, keys or eyeglasses,
store these in a suitable place.
R only one person is using a seat belt at a
time.
Infants and children must never travel sit-
ting on the lap of a vehicle occupant. In the
event of an accident, they could be crushed between the vehicle occupant and seat
belt.
R objects are never secured with a seat belt if
the seat belt is also being used by one of the
vehicle's occupants.
Seat belts are only intended to secure and
restrain vehicle occupants. Always observe
the notes in the "Stowage options/compart-
ments" section for securing objects, luggage
or loads (Y page 256).
Fastening seat belts Please take note of the safety notes on seat
belts (Y
page 42) and the notes on their cor-
rect use (Y page 44). X
Adjust the seat (Y page 96).
The seat backrest must be in an almost
upright position.
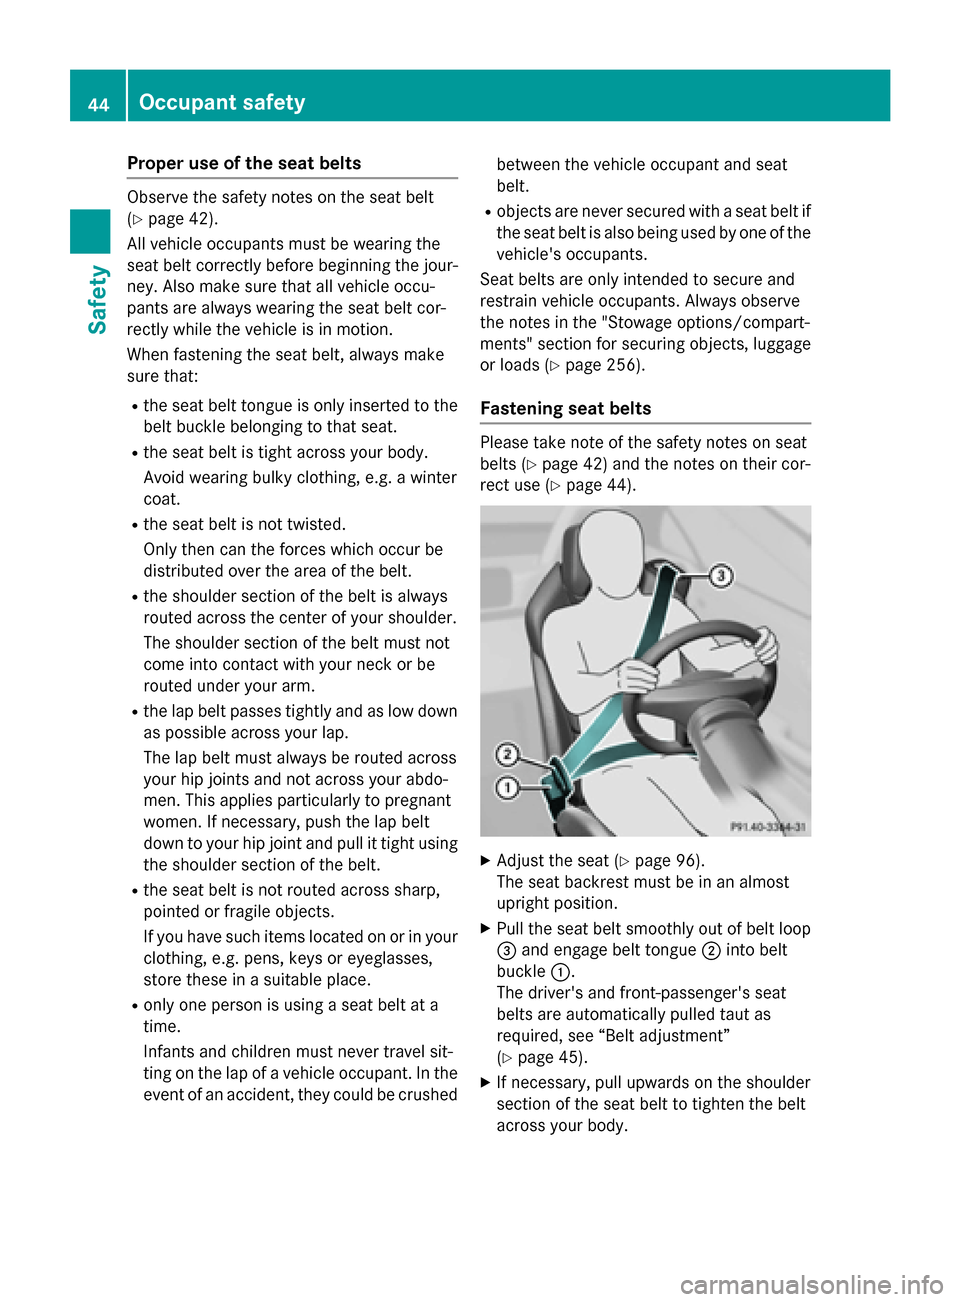
X Pull the seat belt smoothly out of belt loop
0087 and engage belt tongue 0044into belt
buckle 0043.
The driver's and front-passenger's seat
belts are automatically pulled taut as
required, see “Belt adjustment”
(Y page 45).
X If necessary, pull upwards on the shoulder
section of the seat belt to tighten the belt
across your body. 44
Occupant safetySafety
Page 47 of 358

In order to attach the child restraint system
securely in the vehicle, the seat belt on the co-
driver's seat is equipped with a child seat
lock. Further information on the "Child seat
lock" (Y page 58).
Releasing seat belts !
Make sure that the seat belt is fully rolled
up. Otherwise, the seat belt or belt tongue
will be trapped in the door or in the seat
mechanism. This could damage the door,
the door trim panel and the seat belt. Dam- aged seat belts can no longer fulfill their
protective function and must be replaced.
Visit a qualified specialist workshop. X
Press release button 0043, hold belt
tongue 0044and guide it back towards belt
loop 0087.
Seat belt adjustment AMG vehicles:
the "seat-belt adjustment"
function is not available.
The seat-belt adjustment is an integral part of
the PRE-SAFE ®
convenience function. This
function adjusts the driver's and front-
passenger seat belt to the upper body of the
occupants. The belt strap is tightened slightly when:
R the belt tongue is engaged in the buckle
and
R the ignition is switched on
The seat-belt adjustment will apply a certain
tightening force if any slack is detected
between the vehicle occupant and the seat
belt. Do not hold on to the seat belt tightly
while it is adjusting.
You can switch the seat-belt adjustment on
and off in the on-board computer
(Y page 208).
Belt warning for the driver and front
passenger The
0076 seat belt warning lamp in the instru-
ment cluster is a reminder that all occupants
must fasten their seat belts. It may light up
continuously or flash. In addition, there may
be a warning tone.
Regardless of whether the driver's seat belt
has already been fastened, the 0076seat belt
warning lamp lights up for six seconds each
time the engine is started. If, after
six seconds, the driver or front-passenger
seat belt has not been fastened and the doors are closed, the 0076seat belt warning lamp
lights up again. As soon as the driver's and
front-passenger seat belts are fastened or a
front door is opened again, the 0076seat belt
warning lamp goes out.
If the driver's seat belt is not fastened after
the engine is started, an additional warning
tone will sound. This warning tone stops after six seconds or when the driver's seat belt is
fastened.
If the vehicle's speed exceeds 15 mph
(25 km/h) once and the driver's and front-
passenger seat belts are not fastened, a
warning tone sounds. The warning tone
sounds with increasing intensity for
60 seconds or until the driver or front
passenger have fastened their seat belts. Occupant safety
45Safety Z
Page 56 of 358
Deployment of Emergency Tensioning
Devices and air bags
Important safety notes G
WARNING
The air bag parts are hot after an air bag has
been deployed. There is a risk of injury.
Do not touch the air bag parts. Have a
deployed air bag replaced at a qualified spe-
cialist workshop as soon as possible. G
WARNING
A deployed air bag no longer offers any pro-
tection and cannot provide the intended pro-
tection in an accident. There is an increased
risk of injury.
Have the vehicle towed to a qualified special- ist workshop in order to have a deployed air
bag replaced.
It is important for your safety and that of your
passenger to have deployed air bags replaced and to have any malfunctioning air bags
repaired. This will help to make sure the air
bags continue to perform their protective
function for the vehicle occupants in the
event of a crash. G
WARNING
Pyrotechnic Emergency Tensioning Devices
that have been deployed are no longer opera- tional and are unable to perform their inten-
ded protective function. This poses an
increased risk of injury or even fatal injury.
Therefore, have pyrotechnic Emergency Ten-
sioning Devices which have been triggered
immediately replaced at a qualified specialist workshop.
An electric motor is used by PRE-SAFE ®
to
trigger the tightening of the seat belt in haz-
ardous situations. This procedure is reversi-
ble.
If the Emergency Tensioning Devices or air
bags are deployed, you will hear a bang and a small amount of powder may also be released. The
0075restraint system warning
lamp will light up.
Only in rare cases will the bang affect your
hearing. The powder released is generally not hazardous to health, it could however cause
short-term breathing difficulties in people
with asthma or other respiratory problems. In
order to prevent breathing difficulties, you
should leave the vehicle as soon as it is safe to
do so, or open the window.
Air bags and pyrotechnic seat belt tensioners
contain perchlorate material, which may
require special handling or environmental
protection measures. Check with your local
government’s disposal guidelines. California
residents, see www.dtsc.ca.gov/
HazardousWaste/Perchlorate/
index.cfm.
Method of operation During the first stage of a collision, the
restraint system control unit evaluates impor-
tant physical data relating to vehicle deceler- ation or acceleration, such as:
R Duration
R Direction
R Intensity
Based on the evaluation of this data, the
restraint system control unit triggers the belt
tensioners in the event of a frontal or rear
collision.
If the restraint system control unit detects a
high accident severity, additional compo-
nents of the restraint system are activated
independently of one another in certain fron- tal collision situations:
R Front air bags as well as driver's and front-
passenger kneebag
Depending on the person occupying the front-
passenger seat, the front-passenger air bag is activated or deactivated. The front-passenger front air bag can only be deployed in an acci-
dent if the PASSENGER AIR BAG OFF indica-
tor lamp is off. Observe the information on the 54
Occupant safetySafety
Page 61 of 358
Removing a child restraint system/deactivat-
ing the special seat belt retractor:
X Make sure you observe the child restraint
system manufacturer's installation instruc- tions.
X Press the belt buckle release button, hold
the belt tongue and guide it back towards
the belt loop.
The special seat belt retractor is deactiva-
ted. Child restraint system
The use of seat belts and child restraint sys-
tems is required by law in:
R all 50 states
R the U.S. territories
R the District of Columbia
R all Canadian provinces
You can obtain further information about the correct child restraint system from any
authorized Mercedes-Benz Center. G
WARNING
If the child restraint system is installed incor- rectly on a suitable seat, it cannot protect as
intended. The child cannot then be restrained in the event of an accident, heavy braking or
sudden changes of direction. There is an
increased risk of injury, possibly even fatal.
Make sure that you observe the child restraint
system manufacturer's installation instruc-
tions and the notes on use. Please ensure,
that the base of the child restraint system is
always resting completely on the seat cush-
ion. Never place objects, e.g. cushions, under or behind the child restraint system. Only use
child restraint systems with the original cover
designed for them. Only replace damaged
covers with genuine covers. G
WARNING
If the child restraint system is installed incor- rectly or is not secured, it can come loose in
the event of an accident, heavy braking or a sudden change in direction. The child
restraint system could be thrown about, strik-
ing vehicle occupants. There is an increased
risk of injury, possibly even fatal.
Always install child restraint systems prop-
erly, even if they are not being used. Make
sure that you observe the child restraint sys-
tem manufacturer's installation instructions.
Further information on stowing objects, lug-
gage and loads securely can be found under
“Stowing options/stowage compartments”
(Y page 256). G
WARNING
Child restraint systems or their securing sys-
tems which have been damaged or subjected to a load in an accident can no longer protect
as intended. The child cannot then be
restrained in the event of an accident, heavy
braking or sudden changes of direction. There is an increased risk of injury, possibly even
fatal.
Replace child restraint systems which have
been damaged or subjected to a load in an
accident as soon as possible. Have the secur-
ing systems on the child restraint system
checked at a qualified specialist workshop,
before you install a child restraint system
again.
If a child is carried on the front-passenger
seat, be sure to observe the information on
the "Occupant Classification System (OCS)"
(Y page 49). There you will also find informa-
tion on deactivating the front-passenger front
air bag.
All child restraint systems must meet the fol- lowing standards:
R U.S. Federal Motor Vehicle Safety Stand-
ards 213 and 225
R Canadian Motor Vehicle Safety Standards
213 and 210.2
Confirmation that the child restraint system
corresponds to the standards can be found
on an instruction label on the child restraint
system. This confirmation can also be found Child
ren in the vehi cle
59Safety Z
Page 66 of 358
ETS remains active when you deactivate
ESP ®
.
i AMG vehicles:
your vehicle may be
equipped with 20-inch tires on the rear
axle. If replaced with a 19-inch tire, ETS
may intervene noticeably sooner for the
first few kilometers. After approximately
10 km ETS will function as usual again.
Information on the dimensions and types of
wheels and tires for your vehicle can be
found in the "Wheel/tire combinations"
section (Y page 337).
Important safety notes G
WARNING
If ESP ®
is malfunctioning, ESP ®
is unable to
stabilize the vehicle. Additionally, further driv- ing safety systems are deactivated. This
increases the risk of skidding and an accident.
Drive on carefully. Have ESP ®
checked at a
qualified specialist workshop.
! When testing the electric parking brake
on a braking dynamometer, switch off the
ignition. Application of the brakes by ESP ®
may otherwise destroy the brake system.
When towing the vehicle with the rear axle
raised, observe the notes on
ESP ®
(Y page 305).
ESP ®
is deactivated if the 00BBwarning lamp
in the instrument cluster lights up continu-
ously when the engine is running.
If the 00E5 warning lamp and the 00BBwarn-
ing lamp are lit continuously, ESP ®
is not
available due to a malfunction.
Observe the information on warning lamps
(Y page 247) and display messages which
may be shown in the instrument cluster
(Y page 213).
i Only use wheels with the recommended
tire sizes. Only then will ESP ®
function
properly. Characteristics of ESP
® General information
If the 00E5 ESP warning lamp goes out before
beginning the journey, ESP ®
is automatically
active.
If ESP ®
intervenes, the 00E5ESP®
warning
lamp flashes in the instrument cluster.
If ESP ®
intervenes:
X Do not deactivate ESP ®
under any circum-
stances.
X Only depress the accelerator pedal as far as
necessary when pulling away.
X Adapt your driving style to suit the prevail-
ing road and weather conditions.
ECO start/stop function
The ECO start/stop function switches the
engine off automatically when the vehicle
stops moving. The engine starts automati-
cally when the driver wants to pull away again.
ESP ®
remains in its previously selected sta-
tus. Example: if ESP®
was deactivated before
the engine was switched off, ESP ®
remains
deactivated when the engine is switched on
again.
Deactivating/activating ESP ®
(except
AMG vehicles) Important safety notes
i Observe the "Important safety notes" sec-
tion (Y page 61).
You can select between the following states
of ESP ®
:
R ESP ®
is activated.
R ESP ®
is deactivated. G
WARNING
If you deactivate ESP ®
, ESP ®
no longer sta-
bilizes the vehicle. There is an increased risk
of skidding and an accident.
Only deactivate ESP ®
in the situations descri-
bed in the following. 64
Driving safety systemsSafety
Page 71 of 358

Protection against theft
Immobilizer
X To activate with the SmartKey: remove
the SmartKey from the ignition lock.
X To activate with KEYLESS-GO: switch the
ignition off and open the driver's door.
X To deactivate: switch on the ignition.
The immobilizer prevents your vehicle from
being started without the correct SmartKey.
When leaving the vehicle, always take the
SmartKey with you and lock the vehicle. The
engine can be started by anyone with a valid
SmartKey that is left inside the vehicle.
i The immobilizer is always deactivated
when you start the engine.
In the event that the engine cannot be star-
ted (yet the vehicle's battery is charged),
the system is not operational. Contact an
authorized Mercedes-Benz Center or call
1-800-FOR-MERCedes (in the USA) or
1-800-387-0100 (in Canada). ATA (anti-theft alarm system)
X
To arm: lock the vehicle with the SmartKey
or KEYLESS-GO.
Indicator lamp 0043flashes. The alarm sys-
tem is armed after approximately
15 seconds.
X To deactivate: unlock the vehicle with the
SmartKey or KEYLESS-GO. A visual and audible alarm is triggered if the
alarm system is armed and you open:
R a door
R the vehicle with the mechanical key
R the trunk lid
R the hood
R the glove box
R the stowage space under the armrest
X To turn the alarm off with the SmartKey:
press the 0036or0037 button on the
SmartKey.
The alarm is switched off.
or X Insert the SmartKey into the ignition lock.
The alarm is switched off.
X To stop the alarm using KEYLESS-GO:
grasp the outside door handle. The Smart-
Key must be outside the vehicle.
The alarm is switched off.
or X Press the Start/Stop button on the dash-
board. The SmartKey must be inside the
vehicle.
The alarm is switched off.
The alarm is not switched off, even if you
close the open door that triggered it, for
example.
i If the alarm continues for more than
30 seconds, the mbrace emergency call
system automatically notifies the Cus-
tomer Assistance Center. This is done
either by text message or data connection.
The emergency call system sends the mes- sage or data provided that:
R you have subscribed to the mbrace ser-
vice.
R the mbrace service has been activated
properly.
R the necessary mobile phone network is
available. Protection against theft
69Safety Z
Page 75 of 358

The SmartKey centrally locks/unlocks:
R the doors
R the trunk lid
R the stowage compartment in the center
console
R the fuel filler flap
The turn signals flash once when unlocking
and three times when locking.
You can also set an audible signal to confirm that the vehicle has been locked. The audible
signal can be activated and deactivated using the on-board computer (Y page 207).
When it is dark, the surround lighting also
comes on if it is activated in the on-board
computer (Y page 206). KEYLESS-GO
General notes Bear in mind that the engine can be started by
any of the vehicle occupants if there is a KEY- LESS-GO key in the vehicle.
Locking/unlocking centrally You can start, lock or unlock the vehicle using
KEYLESS-GO. To do this, you only need carry
the SmartKey with you. You can combine the functions of KEYLESS-GO with those of a con-
ventional SmartKey. Unlock the vehicle by
using KEYLESS-GO, for instance, and lock it
using the 0037button on the SmartKey.
When locking or unlocking with KEYLESS-GO,
the distance between the key and the corre-
sponding door handle must not be greater
than 3 ft (1 m).
A check which periodically establishes a radio
connection between the vehicle and the
SmartKey determines whether a valid Smart- Key is in the vehicle. This occurs, for example:
R when the external door handles are
touched
R when starting the engine
R while the vehicle is in motion X
To unlock the vehicle: touch the inner
surface of the door handle.
X To lock the vehicle: touch sensor sur-
face 0043.
X Convenience closing feature: touch
recessed sensor surface 0044for an exten-
ded period.
Further information on the convenience
closing feature (Y page 85).
X To unlock the trunk lid: pull the handle on
the trunk lid.
The vehicle only unlocks the trunk lid. Changing the settings of the locking
system
You can change the settings of the locking
system. This means only the driver's door, the
lockable stowage compartments in the vehi-
cle interior and the fuel filler flap are unlocked when the vehicle is unlocked. This is useful if
you frequently travel on your own.
X To change the setting: press and hold
down the 0036and0037 buttons simulta-
neously for approximately six seconds until the battery check lamp flashes twice
(Y page 75).
i If the setting of the locking system is
changed within the signal range of the vehi- cle, pressing the 0037or0036 button:
R locks or
R unlocks the vehicle SmartKey
73Opening and closing Z
Page 81 of 358
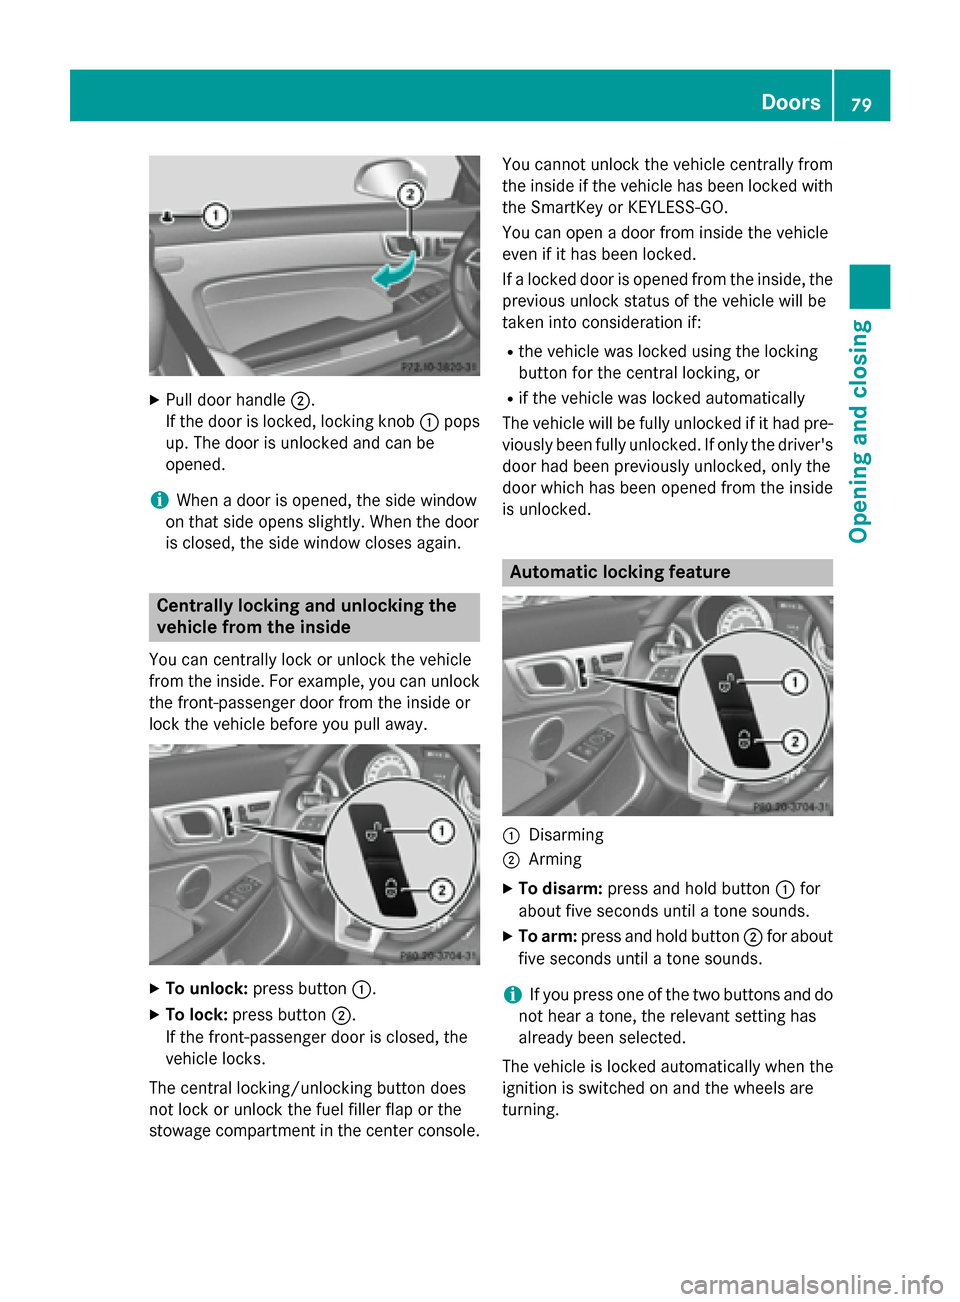
X
Pull door handle 0044.
If the door is locked, locking knob 0043pops
up. The door is unlocked and can be
opened.
i When a door is opened, the side window
on that side opens slightly. When the door
is closed, the side window closes again. Centrally locking and unlocking the
vehicle from the inside
You can centrally lock or unlock the vehicle
from the inside. For example, you can unlock
the front-passenger door from the inside or
lock the vehicle before you pull away. X
To unlock: press button 0043.
X To lock: press button 0044.
If the front-passenger door is closed, the
vehicle locks.
The central locking/unlocking button does
not lock or unlock the fuel filler flap or the
stowage compartment in the center console. You cannot unlock the vehicle centrally from
the inside if the vehicle has been locked with
the SmartKey or KEYLESS-GO.
You can open a door from inside the vehicle
even if it has been locked.
If a locked door is opened from the inside, the
previous unlock status of the vehicle will be
taken into consideration if:
R the vehicle was locked using the locking
button for the central locking, or
R if the vehicle was locked automatically
The vehicle will be fully unlocked if it had pre- viously been fully unlocked. If only the driver's
door had been previously unlocked, only the
door which has been opened from the inside
is unlocked. Automatic locking feature
0043
Disarming
0044 Arming
X To disarm: press and hold button 0043for
about five seconds until a tone sounds.
X To arm: press and hold button 0044for about
five seconds until a tone sounds.
i If you press one of the two buttons and do
not hear a tone, the relevant setting has
already been selected.
The vehicle is locked automatically when the
ignition is switched on and the wheels are
turning. Doors
79Opening and closing Z