2015 MERCEDES-BENZ SLK-Class buttons
[x] Cancel search: buttonsPage 99 of 358
Seats
Important safety notes
G
WARNING
Children could become trapped if they adjust the seats, particularly when unattended.
There is a risk of injury.
When leaving the vehicle, always take the
SmartKey with you and lock the vehicle. Never leave children unsupervised in the vehicle.
The seats can still be adjusted when there is
no SmartKey in the ignition lock. G
WARNING
When you adjust a seat, you or other vehicle
occupants could become trapped, e.g. on the seat guide rail. There is a risk of injury.
Make sure when adjusting a seat that no one
has any body parts in the sweep of the seat.
Observe the safety notes on "Air bags"
(Y page 46) and "Children in the Vehicle"
(Y page 57). G
WARNING
If the driver's seat is not engaged, it could
move unexpectedly while the vehicle is in
motion. This could cause you to lose control of the vehicle. There is a risk of an accident.
Always make sure that the driver's seat is
engaged before starting the engine. G
WARNING
If you adjust the seat height carelessly, you or other vehicle occupants could be trapped andthereby injured. Children in particular could
accidentally press the electrical seat adjust-
ment buttons and become trapped. There is a
risk of injury.
While moving the seats, make sure that your
hands or other body parts do not get under the
lever assembly of the seat adjustment sys-
tem. G
WARNING
If head restraints are not installed and adjus-
ted correctly, they cannot provide protection
as intended. There is an increased risk of
injury in the head and neck area, e.g. in the
event of an accident or when braking.
Always drive with the head restraints instal-
led. Before driving off, make sure for every
vehicle occupant that the center of the head
restraint supports the back of the head at
about eye level. G
WARNING
You could lose control of your vehicle if you do the following while driving:
R adjust the driver's seat, steering wheel or
mirrors
R fasten the seat belt
There is a risk of an accident.
Adjust the driver's seat, steering wheel or
mirrors and fasten your seat belt before start- ing the engine.
! To avoid damage to the seats and the seat
heating, observe the following information:
R keep liquids from spilling on the seats. If
liquid is spilled on the seats, dry them as soon as possible.
R if the seat covers are damp or wet, do not
switch on the seat heating. The seat
heating should also not be used to dry
the seats.
R clean the seat covers as recommended;
see the "Interior care" section.
R do not transport heavy loads on the
seats. Do not place sharp objects on the
seat cushions, e.g. knives, nails or tools. The seats should only be occupied by
passengers, if possible.
R when the seat heating is in operation, do
not cover the seats with insulating mate- rials, e.g. blankets, coats, bags, seat cov-
ers, child seats or booster seats.
! Make sure that there are no objects in the
footwell under or behind the seats when Seats
97Seats, steering wheel and mirrors Z
Page 103 of 358
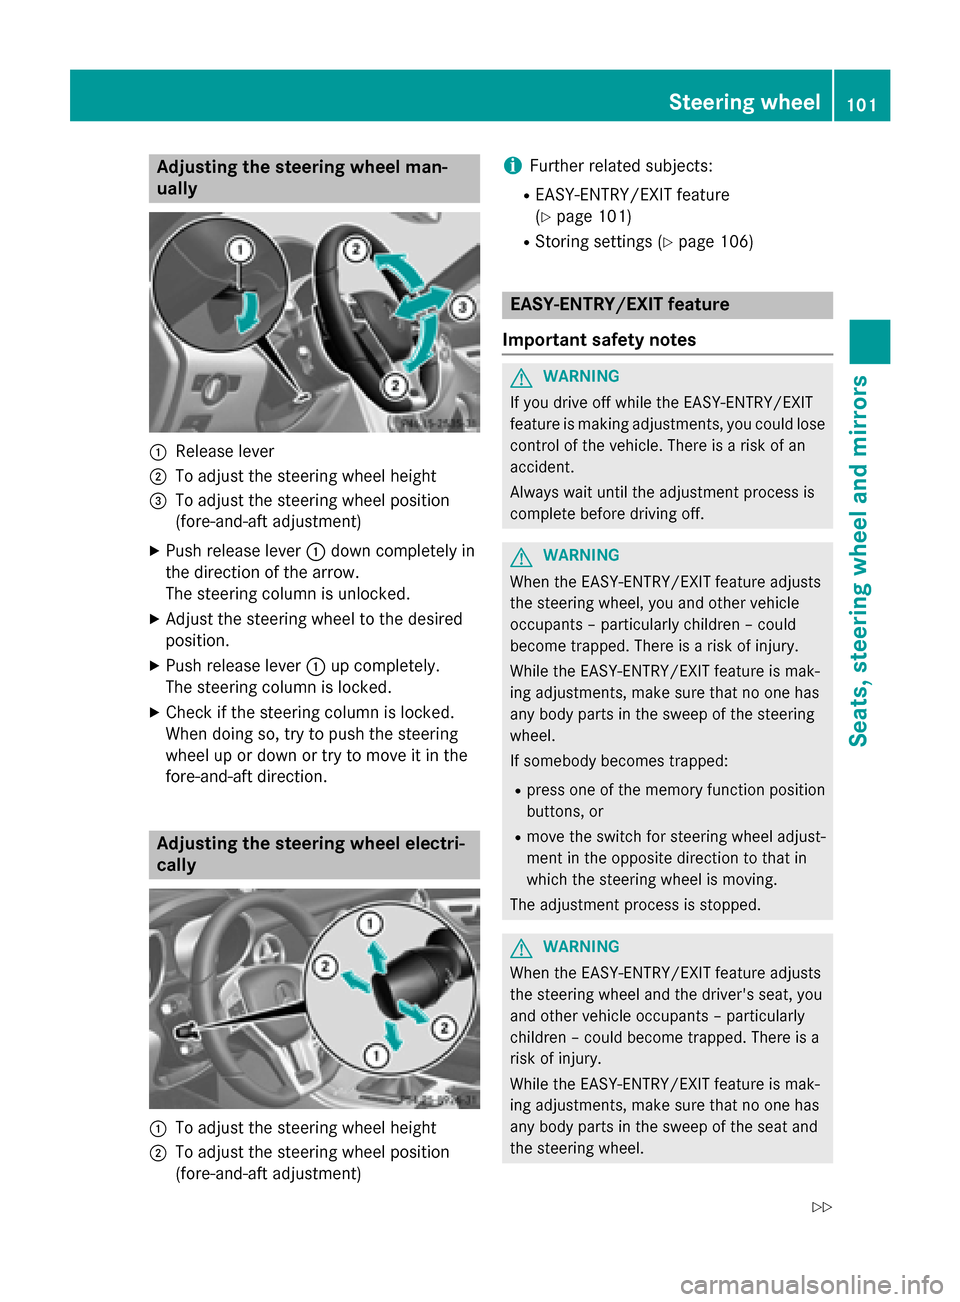
Adjusting the steering wheel man-
ually
0043
Release lever
0044 To adjust the steering wheel height
0087 To adjust the steering wheel position
(fore-and-aft adjustment)
X Push release lever 0043down completely in
the direction of the arrow.
The steering column is unlocked.
X Adjust the steering wheel to the desired
position.
X Push release lever 0043up completely.
The steering column is locked.
X Check if the steering column is locked.
When doing so, try to push the steering
wheel up or down or try to move it in the
fore-and-aft direction. Adjusting the steering wheel electri-
cally 0043
To adjust the steering wheel height
0044 To adjust the steering wheel position
(fore-and-aft adjustment) i
Further related subjects:
R EASY-ENTRY/EXIT feature
(Y page 101)
R Storing settings (Y page 106) EASY-ENTRY/EXIT feature
Important safety notes G
WARNING
If you drive off while the EASY-ENTRY/EXIT
feature is making adjustments, you could lose
control of the vehicle. There is a risk of an
accident.
Always wait until the adjustment process is
complete before driving off. G
WARNING
When the EASY-ENTRY/EXIT feature adjusts
the steering wheel, you and other vehicle
occupants – particularly children – could
become trapped. There is a risk of injury.
While the EASY-ENTRY/EXIT feature is mak-
ing adjustments, make sure that no one has
any body parts in the sweep of the steering
wheel.
If somebody becomes trapped:
R press one of the memory function position
buttons, or
R move the switch for steering wheel adjust-
ment in the opposite direction to that in
which the steering wheel is moving.
The adjustment process is stopped. G
WARNING
When the EASY-ENTRY/EXIT feature adjusts
the steering wheel and the driver's seat, you
and other vehicle occupants – particularly
children – could become trapped. There is a
risk of injury.
While the EASY-ENTRY/EXIT feature is mak-
ing adjustments, make sure that no one has
any body parts in the sweep of the seat and
the steering wheel. Steering wheel
101Seats, steering wheel and mirrors
Z
Page 104 of 358
If somebody becomes trapped:
R press one of the memory function position
buttons, or
R press one of the memory function memory
buttons, or
R move the switch for steering wheel adjust-
ment in the opposite direction to that in
which the steering wheel is moving
The adjustment process is stopped. G
WARNING
If you use openings in the bodywork or
detachable parts as steps, you could:
R slip and/or fall
R damage the vehicle and cause yourself to
fall.
There is a risk of injury.
Always use secure climbing aids, e.g. a suita-
ble ladder.
The EASY-ENTRY/EXIT feature makes getting
in and out of your vehicle easier.
You can activate and deactivate the EASY-
ENTRY/EXIT feature in the on-board com-
puter (Y page 207).
Position of the steering wheel when the EASY-ENTRY/EXIT feature is active The steering wheel swings upwards when
you:
R remove the SmartKey from the ignition lock
R open the driver's door with KEYLESS-GO in
position 1
R open the driver's door and the SmartKey is
in position 0or 1in the ignition lock
i The steering wheel only moves upwards if
it has not already reached the upper end
stop. Position of the steering wheel for driv-
ing The steering wheel is moved to the last selec-
ted position when:
R the driver's door is closed
R you insert the SmartKey into the ignition
lock
or
R you press the Start/Stop button once on
vehicles with KEYLESS-GO
When you close the driver's door with the
ignition switched on, the steering wheel is
also automatically moved to the previously
set position.
The last position of the steering wheel is
stored when you switch off the ignition or
when you store the setting with the memory
function (Y page 106).
Crash-responsive EASY-EXIT feature If the crash-responsive EASY-EXIT feature is
triggered in an accident, the steering column
will move upwards when the driver's door is
opened. This occurs irrespective of the posi-
tion of the SmartKey in the ignition lock. This
makes it easier to exit the vehicle and rescue the occupants.
The crash-responsive EASY-EXIT feature is
only operational if the EASY-EXIT/ENTRY fea-
ture is activated in the on-board computer
(Y page 207). 102
Steering wheelSeats, steering wheel and mirrors
Page 108 of 358
X
Turn the SmartKey to position 2in the igni-
tion lock.
X Adjust the exterior mirror on the front-
passenger side using button 0044.
X Engage reverse gear.
The exterior mirror on the front-passenger
side moves to the stored parking position.
The exterior mirror on the front-passenger
side moves back to its original position:
R as soon as you exceed a speed of 9 mph
(15 km/h)
R if you press button 0043for the exterior mir-
ror on the driver's side Memory function
Storing settings
G
WARNING
If you use the memory function on the driver's side while driving, you could lose control of
the vehicle as a result of the adjustments
being made. There is a risk of an accident.
Only use the memory function on the driver's
side when the vehicle is stationary. G
WARNING
When the memory function adjusts the seat or steering wheel, you and other vehicle occu-
pants – particularly children – could become
trapped. There is a risk of injury.
While the memory function is making adjust-
ments, make sure that no one has any body
parts in the sweep of the seat or steering
wheel. If somebody becomes trapped, imme-
diately release the memory function position
button. The adjustment process is stopped. G
WARNING
When the memory function adjusts the seat,
you and other vehicle occupants – particularly children – could become trapped. There is a
risk of injury.
While the memory function is making adjust-
ments, make sure that no one has any body parts in the sweep of the seat. If somebody
becomes trapped, immediately release the
memory function position button. The adjust- ment process is stopped. G
WARNING
Children could become trapped if they acti-
vate the memory function, particularly when
unattended. There is a risk of injury.
When leaving the vehicle, always take the
SmartKey with you and lock the vehicle. Never leave children unsupervised in the vehicle. X
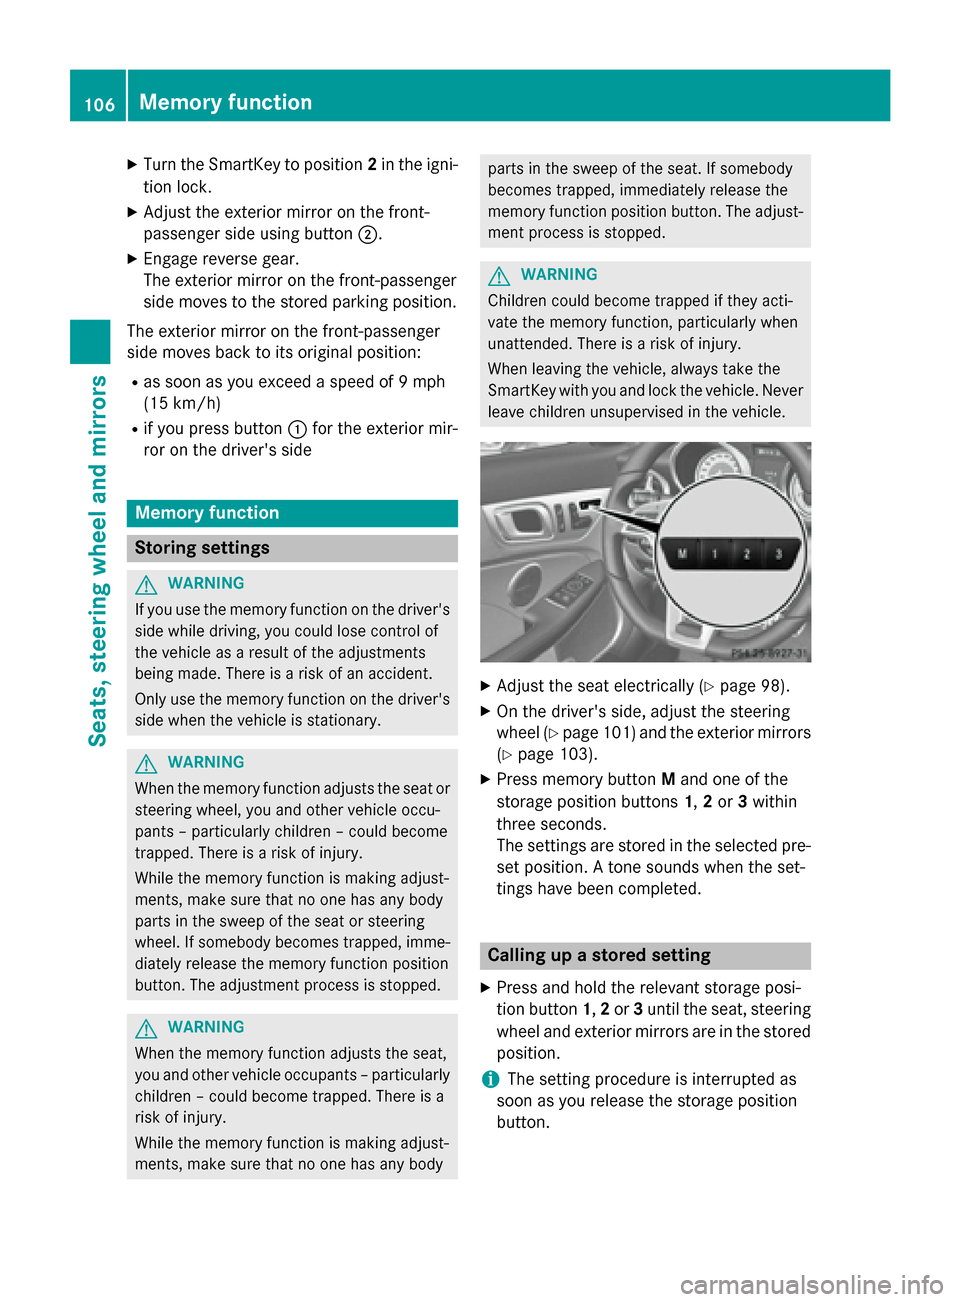
Adjust the seat electrically (Y page 98).
X On the driver's side, adjust the steering
wheel (Y page 101) and the exterior mirrors
(Y page 103).
X Press memory button Mand one of the
storage position buttons 1,2or 3within
three seconds.
The settings are stored in the selected pre- set position. A tone sounds when the set-
tings have been completed. Calling up a stored setting
X Press and hold the relevant storage posi-
tion button 1,2or 3until the seat, steering
wheel and exterior mirrors are in the stored position.
i The setting procedure is interrupted as
soon as you release the storage position
button. 106
Memory functionSeats, steering wheel and mirrors
Page 128 of 358
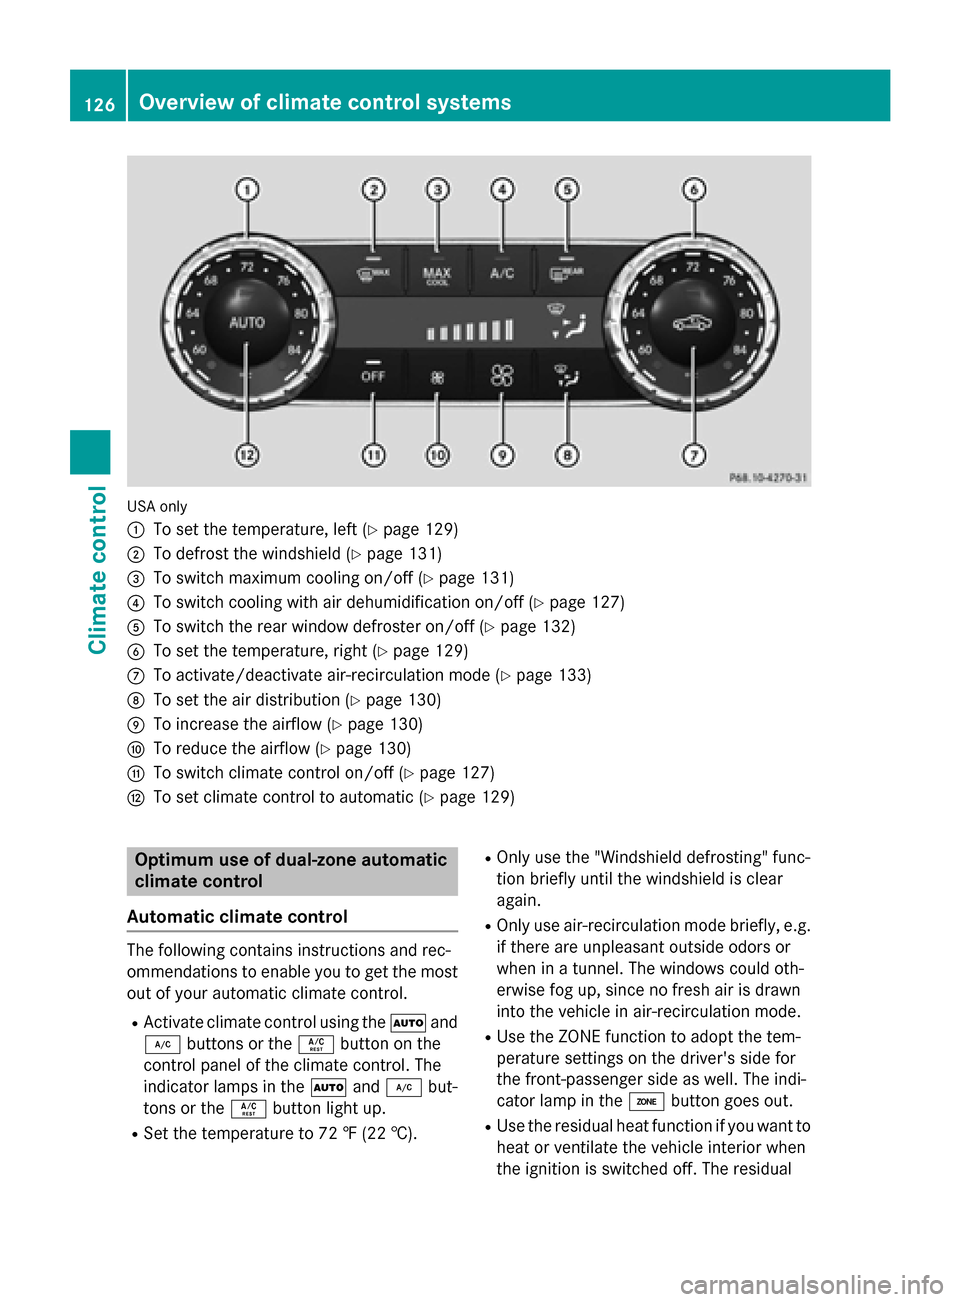
USA only
0043
To set the temperature, left (Y page 129)
0044 To defrost the windshield (Y page 131)
0087 To switch maximum cooling on/off (Y page 131)
0085 To switch cooling with air dehumidification on/off (Y page 127)
0083 To switch the rear window defroster on/off (Y page 132)
0084 To set the temperature, right (Y page 129)
006B To activate/deactivate air-recirculation mode (Y page 133)
006C To set the air distribution (Y page 130)
006D To increase the airflow (Y page 130)
006E To reduce the airflow (Y page 130)
006F To switch climate control on/off (Y page 127)
0070 To set climate control to automatic (Y page 129)Optimum use of dual-zone automatic
climate control
Automatic climate control The following contains instructions and rec-
ommendations to enable you to get the most
out of your automatic climate control.
R Activate climate control using the 0058and
005A buttons or the 0056button on the
control panel of the climate control. The
indicator lamps in the 0058and005A but-
tons or the 0056button light up.
R Set the temperature to 72 ‡ (22 †). R
Only use the "Windshield defrosting" func-
tion briefly until the windshield is clear
again.
R Only use air-recirculation mode briefly, e.g.
if there are unpleasant outside odors or
when in a tunnel. The windows could oth-
erwise fog up, since no fresh air is drawn
into the vehicle in air-recirculation mode.
R Use the ZONE function to adopt the tem-
perature settings on the driver's side for
the front-passenger side as well. The indi-
cator lamp in the 00D6button goes out.
R Use the residual heat function if you want to
heat or ventilate the vehicle interior when
the ignition is switched off. The residual 126
Overview of climate control systemsClimate control
Page 132 of 358

Only change the temperature setting in
small increments. Start at 72 ‡ (22 †).
i If you turn controls
0043and 0084counter-
clockwise to the lowest temperature set-
ting, air-recirculation mode may activate
automatically, depending on the outside
temperature. Setting the air distribution
Air-conditioning system X
Turn the SmartKey to position 2in the igni-
tion lock (Y page 139).
X Press one or more of the 009C,009B,0061
buttons.
The corresponding indicator lamp lights up
briefly.
The following air distribution settings can be
selected:
0061 Directs air through the defroster vents
009B Directs air through the footwell air
vents
009C Directs air through the center and side
air vents
i You can also activate several air distribu-
tion settings simultaneously. To do this,
press multiple air distribution buttons. The air is then directed through various vents.
2-zone automatic climate control X
Turn the SmartKey to position 2in the igni-
tion lock (Y page 139).
X Press the 008Fbutton repeatedly until the
desired symbol appears in the display.
The following air distribution settings can be
selected:
009C Directs air through the center and side
air vents
009B Directs air through the footwell air
vents 009F
Directs air through the center, side and
footwell vents
0061 Directs air through the defroster vents
0087 Directs the airflow through the
defroster, center and side air vents 1
0086 Directs air through the defroster and
footwell vents
008F Directs the airflow through the
defroster, center, side and footwell air
vents 2
i Regardless of the air distribution setting,
airflow is always directed through the side
air vents. You can only close the side air
vents, by fully closing the adjuster on the
side air vents (Y page 135). Setting the airflow
Air-conditioning system X
Turn the SmartKey to position 2in the igni-
tion lock (Y page 139).
X To increase/reduce: turn control006B
clockwise or counter-clockwise
(Y page 123).
Dual-zone automatic climate control X
Turn the SmartKey to position 2in the igni-
tion lock (Y page 139).
X To increase/reduce: press the0097or
0095 button. Switching the ZONE function on/off
This function is only available with 2-zone
automatic climate control on vehicles for
Canada.
X To switch on: press the00D6button.
The indicator lamp in the 00D6button lights
up. The temperature setting for the driver's
1 Canada only.
2 Canada only. 130
Operating the climate control systemsClimate control
Page 197 of 358
If the coolant temperature is over 248 ‡
(120 †), do not continue driving. The
engine will otherwise be damaged.
The coolant temperature gauge is in the
instrument cluster on the right-hand side
(Y page 31).
Under normal operating conditions and with
the specified coolant level, the coolant tem-
perature may rise to 248 ‡ (120 †). Tachometer
! Do not drive in the overrevving range, as
this could damage the engine.
The red band in the tachometer indicates the
engine's overrevving range.
The fuel supply is interrupted to protect the
engine when the red band is reached. Outside temperature display
You should pay special attention to road con-
ditions when temperatures are around freez-
ing point.
Bear in mind that the outside temperature
display indicates the temperature measured
and does not record the road temperature.
The outside temperature display is in the mul- tifunction display (Y page 196).
Changes in the outside temperature are dis-
played after a short delay. Speedometer with segments
The segments in the speedometer indicate
which speed range is available.
R Cruise control activated (Y page 169):
The segments light up from the stored
speed to the maximum speed.
R DISTRONIC PLUS activated (Y page 171):
One or two segments in the set speed
range light up.
R DISTRONIC PLUS detects a vehicle in front: The segments between the speed of the
vehicle in front and the stored speed light
up. Operating the on-board computer
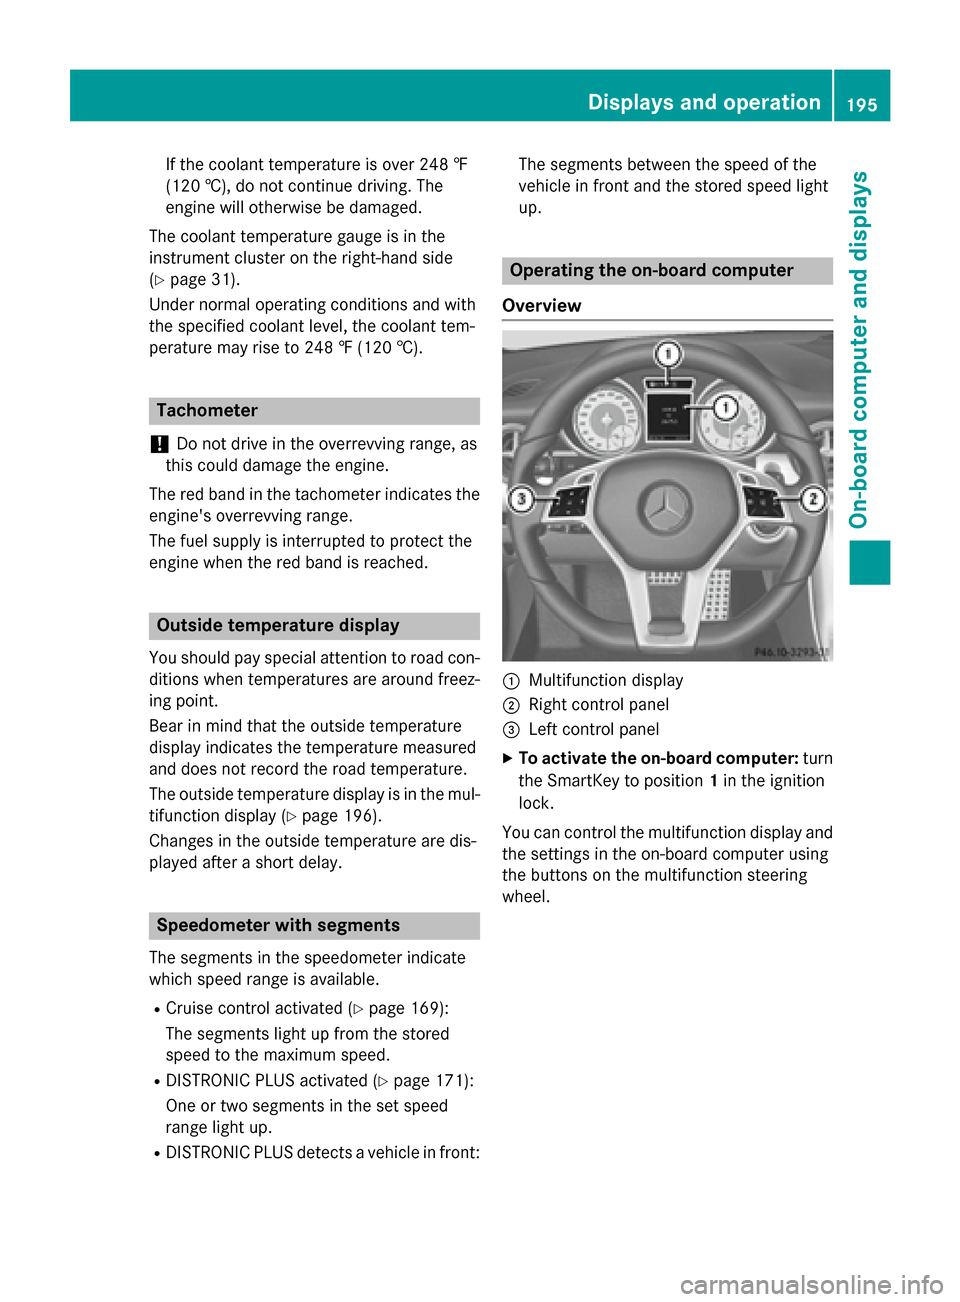
Overview 0043
Multifunction display
0044 Right control panel
0087 Left control panel
X To activate the on-board computer: turn
the SmartKey to position 1in the ignition
lock.
You can control the multifunction display and
the settings in the on-board computer using
the buttons on the multifunction steering
wheel. Displays and operation
195On-board computer and displays Z
Page 209 of 358

Vehicle
Activating/deactivating the automatic
door locking mechanism
X Press the 0059or0065 button on the steer-
ing wheel to select the Sett Settmenu.
X Press the 0064or0063 button to select the
Vehicle
Vehicle submenu.
X Press 0076to confirm.
X Press the 0064or0063 button to select the
Automatic Door Lock
Automatic Door Lock function.
When the Automatic
Automatic Door
DoorLock
Lockfunction
is activated, the left-hand vehicle door is
displayed in orange in the multifunction
display.
X Press the 0076button to save the setting.
If you activate the Automatic Door Lock
Automatic Door Lock
function, the vehicle is centrally locked above
a speed of around 9 mph (15 km/h).
For further information on the automatic lock- ing feature, see (Y page 79).
Activating/deactivating the acoustic
locking verification signal
If you switch on the Acoustic AcousticLock
Lockfunction,
an acoustic signal sounds when you lock the
vehicle.
X Press the 0059or0065 button on the steer-
ing wheel to select the Sett
Sett menu.
X Press the 0064or0063 button to select the
Vehicle
Vehicle submenu.
X Press 0076to confirm.
X Press the 0064or0063 button to select the
Acoustic Lock
Acoustic Lock function.
If the Acoustic
Acoustic Lock
Lockfunction is activated,
the 0037 symbol in the multifunction dis-
play lights up orange.
X Press the 0076button to save the setting.
Activating/deactivating the radar sensor
system
X Press the 0059or0065 button on the steer-
ing wheel to select the Settings
Settings menu.
X Press the 0064or0063 button to select the
Vehicle
Vehicle submenu. X
Press 0076to confirm.
X Press the 0063or0064 button to select
Radar Sensor (See Oper. Manual):
Radar Sensor (See Oper. Manual):.
You will see the selected setting: Enabled Enabled
or Disabled
Disabled.
X Press the 0076button to save the setting.
The following systems are switched off when
the radar sensor system is deactivated:
R DISTRONIC PLUS (Y page 171)
R BAS PLUS (Y page 62)
R PRE-SAFE ®
Brake (Y page 67)
Convenience Activating/deactivating the EASY-
ENTRY/EXIT feature G
WARNING
When the EASY-ENTRY/EXIT feature adjusts
the steering wheel, you and other vehicle
occupants – particularly children – could
become trapped. There is a risk of injury.
While the EASY-ENTRY/EXIT feature is mak-
ing adjustments, make sure that no one has
any body parts in the sweep of the steering
wheel.
If somebody becomes trapped:
R press one of the memory function position
buttons, or
R move the switch for steering wheel adjust-
ment in the opposite direction to that in
which the steering wheel is moving.
The adjustment process is stopped.
X Press the 0059or0065 button on the steer-
ing wheel to select the Sett Settmenu.
X Press the 0064or0063 button to select the
Convenience
Convenience submenu.
X Press 0076to confirm.
X Press the 0064or0063 button to select the
Easy Entry/Exit
Easy Entry/Exit function.
If the Easy Entry/Exit
Easy Entry/Exit function is activa-
ted, the vehicle steering wheel is displayed
in orange in the multifunction display.
X Press the 0076button to save the setting. Menus and submenus
207On-board computer and displays Z