2015 MERCEDES-BENZ SL-Class warning light
[x] Cancel search: warning lightPage 320 of 610

For further information on the rear view cam-
era, see the vehicle Operator's Manual.
X Press the 0066button.
The system menu appears.
X Select Settings
Settings by turning 00790052007Athe
COMAND controller and press 0098to con-
firm.
X Select Rear
Rear View
ViewCamera
Camera and press 0098to
confirm.
X Select Activation by R gear
Activation by R gear and press
0098 to confirm.
The function is switched on 0073or off 0053,
depending on the previous status. Night View Assist Plus
On vehicles with Night View Assist Plus you
can have the image from Night View Assist
Plus shown on the COMAND display. X Switch on COMAND (Y page 295).
X Activate Night View Assist Plus, see the
separate operating instructions.
The image from Night View Assist Plus
appears in the COMAND display.
X To adjust the brightness: selectBright‐
Bright‐
ness
ness by turning 00790052007Athe COMAND con-
troller and press 0098to confirm.
X Turn 00790052007A the COMAND controller and
press 0098to confirm.
X Switching automatic activation on/off:
select Night Night View
ViewAssist
Assist Auto.
Auto.Acti‐
Acti‐
vation
vation and press 0098to confirm.
Switch the option on 0073or off 0053.
Option switched on: while using other func-
tions e.g. the navigation system, Night View Assist Plus is active in the background. In
the dark, in unlit surroundings and at
speeds in excess of 37 mph (60 km/h), the
Night View image is automatically dis-
played as soon as pedestrians or animals
are detected. X
To switch off the display: selectBack Backand
press 0098to confirm or press the 003Dbut-
ton. Navigation
Your COMAND equipment
These operating instructions describe all the
standard and optional equipment for your
COMAND system, as available at the time of
going to print. Country-specific differences
are possible. Please note that your
COMAND system may not be equipped with
all the features described. Introduction
Important safety notes G
WARNING
If you operate information systems and com-
munication equipment integrated in the vehi- cle while driving, you will be distracted from
traffic conditions. You could also lose control of the vehicle. There is a risk of an accident.
Only operate the equipment when the traffic
situation permits. If you are not sure that this
is possible, park the vehicle paying attention
to traffic conditions and operate the equip-
ment when the vehicle is stationary.
You must observe the legal requirements for
the country in which you are currently driving when operating COMAND.
COMAND calculates the route to the destina-
tion without taking account of the following,
for example:
R traffic lights
R stop and yield signs
R merging lanes
R parking or stopping in a no parking/no
stopping zone
R other road and traffic rules and regulations
R narrow bridges 318
NavigationCOMAND
Page 342 of 610

Selection Explanation
0053
Not Clas‐
Not Clas‐
sified
sified Standard entry for per-
sonal POIs
0053
COMAND COMAND Personal POIs (destina-
tions, routes) that you
have imported via the
online function
(Y
page 422). If you have created your own categories (e.g.
"Fishing", "Hotels"), they are also displayed
(Y page 340).
X Select a category and press 0098to confirm.
The icon display is switched on 0073or off 0053,
depending on the previous status.
i The icons will be displayed in the following
map scales:
R 1/16 mile (50 m)
R 1/8 mile (100 m)
R 1/4 mile (200 m)
R 1/2 mile (500 m)
Visual warning for personal POIs If the vehicle is approaching a personal POI,
this is highlighted on the map. The display for
the corresponding category must be activa-
ted for this.
X Call up the "Personal POIs" menu
(Y page 339).
X In the "Personal POIs" menu, select Vis‐
Vis‐
ual Warning For Personal POIs ual Warning For Personal POIs and
press 0098to confirm.
The menu displays the available categories. X
Select a category and press 0098to confirm.
This will switch the visual warning for all
personal POIs of this category on 0073or off
0053, depending on the previous setting.
Acoustic notification for personal POIs
A gong sounds when the vehicle is approach-
ing a personal POI. The function for the cor-
responding category must be activated for
this.
X Call up the "Personal POIs" menu
(Y page 339).
X In the "Personal POIs" menu, select Acous‐ Acous‐
tic Notification for Personal POIs tic Notification for Personal POIs
and press 0098to confirm.
The menu displays the available categories.
X Select a category and press 0098to confirm.
This will switch the acoustic notification for all personal POIs of this category on 0073or
off 0053, depending on the previous setting.
Managing categories for personal points
of interest X
Call up the "Personal POIs" menu
(Y page 339).
X In the "Personal POIs" menu, select Man‐ Man‐
age Categories For Personal POIs age Categories For Personal POIs
and press 0098to confirm. 340
NavigationCOMAND
Page 517 of 610

!
Only close the trunk once the roof is low-
ered completely. Otherwise, you could
damage the roof.
If you close the trunk lid before the roof is
lowered completely, the loading aid switch lights up and a warning tone sounds. To make it easier to load your luggage, you
can raise the stowed roof after you have
opened the trunk lid.
You can only raise roof 0044if trunk partition 0087
is closed and the trunk lid is opened com-
pletely.
X To raise the roof: press switch0043.
The roof is raised slightly. Switch 0043lights
up brightly.
X Slide trunk partition 0087back (Y page 103).
You can only lower roof 0044if trunk partition
0087 is closed and the trunk lid is opened com-
pletely.
X To lower the roof: close the trunk partition
(Y page 103).
X Press switch 0043.
The roof is lowered slightly. Switch 0043
lights up dimly.
Vehicles with trunk lid remote closing
feature: when the trunk lid is opened, the
loading aid raises automatically. It lowers
automatically when the trunk lid is closed. Stowage areas
515Stowage and features Z
Page 519 of 610

X
To re-install the insert: place the insert in
stowage compartment 0087.
X Slide catches 0043outwards in the direction
of the arrow until they engage.
You can remove the cup holder's rubber mat
for cleaning. Clean with clear, lukewarm
water only.
Reducer 0044can be removed. Large and small
containers can then be placed in the cup
holder.
X To remove: grasp reducer 0044and pull
upwards in the direction of the arrow.
X To insert: insert reducer 0044into the cup
holder in the opposite direction of the
arrow and press it down firmly. Bottle holder
Observe the "Important safety notes" in the
"Stowage compartments" section
(Y page 512). X
To open: open the stowage compartment
(Y page 514).
X To remove the insert: slide catches0043
inwards in the direction of the arrow.
X Lift bottle holder insert 0044up and remove.
X To re-install the insert: place insert0044in
the stowage compartment.
X Slide catches 0043outwards in the direction
of the arrow until they engage.
The bottle holder does not secure the bottles;
it merely prevents them from tipping over. Sun visors
Overview G
WARNING
If the mirror cover of the vanity mirror is folded up when the vehicle is in motion, you could be
blinded by incident light. There is a risk of an
accident.
Always keep the mirror cover folded down
while driving. 0043
Mirror light
0044 Bracket
0087 Retaining strip, e.g. for a parking lot ticket
0085 Vanity mirror
0083 Mirror cover
Vanity mirror in the sun visor Mirror light
0043only functions if the sun visor
is clipped into bracket 0044and mirror cover 0083
has been folded up.
Glare from the side Features
517Stowage an d features Z
Page 520 of 610
X
Fold down sun visor 0043.
X Pull sun visor 0043out of retainer 0044.
X Swing sun visor 0043to the side.
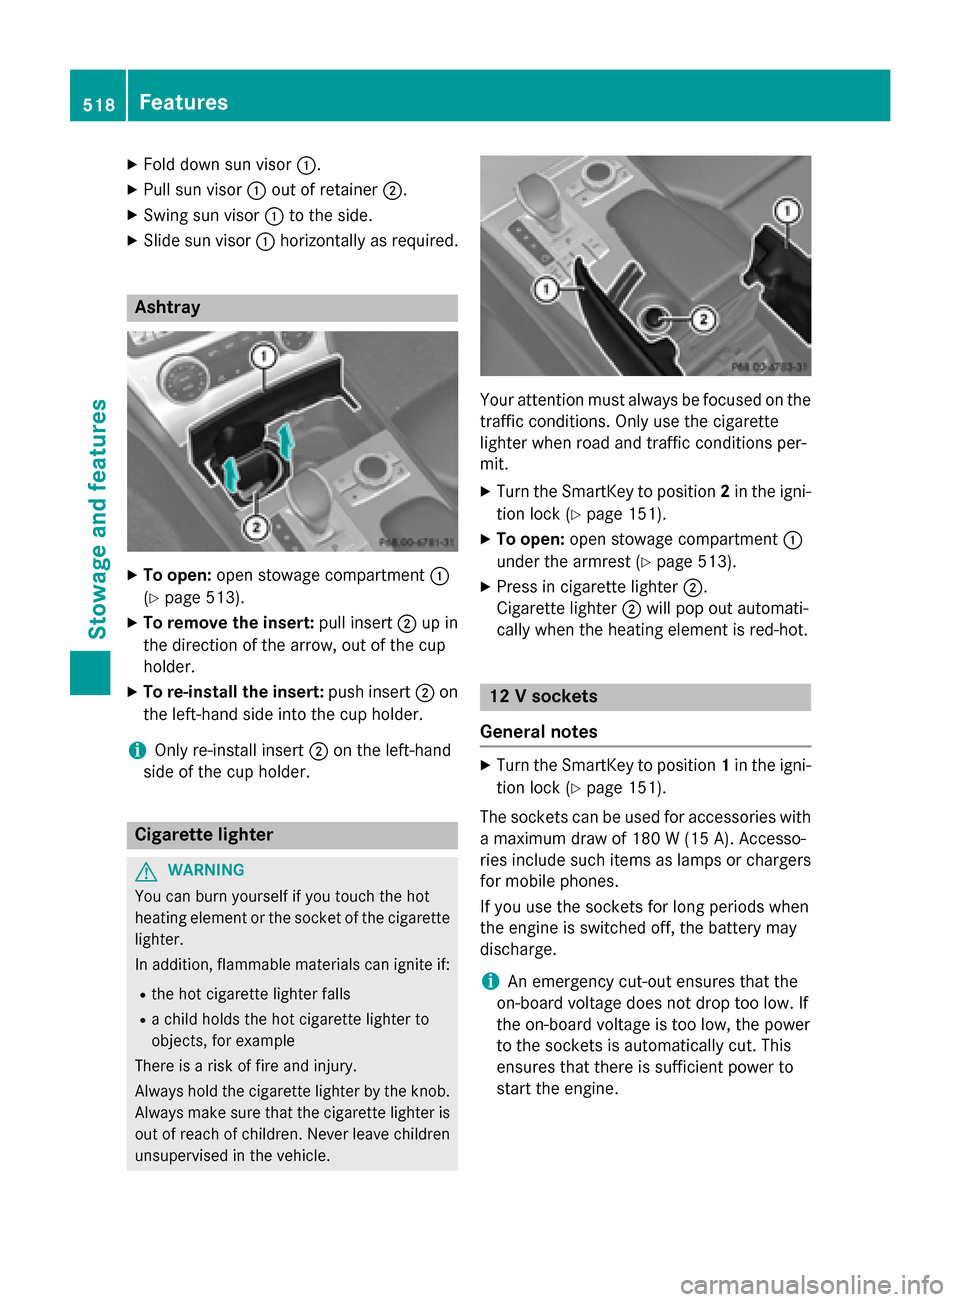
X Slide sun visor 0043horizontally as required. Ashtray
X
To open: open stowage compartment 0043
(Y page 513).
X To remove the insert: pull insert0044up in
the direction of the arrow, out of the cup
holder.
X To re-install the insert: push insert0044on
the left-hand side into the cup holder.
i Only re-install insert
0044on the left-hand
side of the cup holder. Cigarette lighter
G
WARNING
You can burn yourself if you touch the hot
heating element or the socket of the cigarette lighter.
In addition, flammable materials can ignite if:
R the hot cigarette lighter falls
R a child holds the hot cigarette lighter to
objects, for example
There is a risk of fire and injury.
Always hold the cigarette lighter by the knob.
Always make sure that the cigarette lighter is
out of reach of children. Never leave children unsupervised in the vehicle. Your attention must always be focused on the
traffic conditions. Only use the cigarette
lighter when road and traffic conditions per-
mit.
X Turn the SmartKey to position 2in the igni-
tion lock (Y page 151).
X To open: open stowage compartment 0043
under the armrest (Y page 513).
X Press in cigarette lighter 0044.
Cigarette lighter 0044will pop out automati-
cally when the heating element is red-hot. 12 V sockets
General notes X
Turn the SmartKey to position 1in the igni-
tion lock (Y page 151).
The sockets can be used for accessories with a maximum draw of 180 W(15 A). Accesso-
ries include such items as lamps or chargers
for mobile phones.
If you use the sockets for long periods when
the engine is switched off, the battery may
discharge.
i An emergency cut-out ensures that the
on-board voltage does not drop too low. If
the on-board voltage is too low, the power
to the sockets is automatically cut. This
ensures that there is sufficient power to
start the engine. 518
FeaturesStowage and fea
tures
Page 522 of 610

The mbrace system
To adjust the volume during a call, proceed as
follows:
X Press the 0081or0082 button on the mul-
tifunction steering wheel.
or
X Use the volume controller of COMAND.
The system offers various services, e.g.:
R Automatic and manual emergency call
R Roadside Assistance call
R MB Info call
USA only: you can find information and a
description of all available features under
"Owners Online" at http://www.mbusa.com.
System self-test After you have switched on the ignition, the
system carries out a self-diagnosis.
A malfunction in the system has been detec-
ted if one of the following occurs:
R The indicator lamp in the SOS button does
not come on during the system self-test.
R The indicator lamp in the 0052Roadside
Assistance button does not light up during
self-diagnosis of the system.
R The indicator lamp in the 00D9MB Info call
button does not light up during self-diag-
nosis of the system.
R The indicator lamp in one or more of the
following buttons continues to light up red
after the system self-diagnosis:
- SOS button
- 0052 Roadside Assistance call button
- 00D9 MB Info call button
R After the system self-diagnosis, the Inop‐
Inop‐
erative
erative orService Not Activated Service Not Activated
message appears in the multifunction dis-
play.
If a malfunction is indicated as outlined
above, the system may not operate as expec-
ted. In the event of an emergency, help will
have to be summoned by other means. Have the system checked at the nearest
authorized Mercedes-Benz Center or contact
the following service hotlines:
R USA: Mercedes-Benz Customer Assistance
Center at 1-800-FOR-MERCedes
(1-800-367-6372) or 1-866-990-9007
R Canada: Customer Service at
1-888-923-8367
Emergency call Important safety notes
G
WARNING
It can be dangerous to remain in the vehicle,
even if you have pressed the SOS button in an emergency if:
R you see smoke inside or outside of the vehi-
cle, e.g. if there is a fire after an accident
R the vehicle is on a dangerous section of
road
R the vehicle is not visible or cannot easily be
seen by other road users, particularly whendark or in poor visibility conditions
There is a risk of an accident and injury.
Leave the vehicle immediately in this or simi-
lar situations as soon as it is safe to do so.
Move to a safe location along with other vehi-
cle occupants. In such situations, secure the
vehicle in accordance with national regula-
tions, e. g. with a warning triangle.
You must have a license agreement to acti-
vate the mbrace service. Make sure that your
system is activated and operational. To reg-
ister, press the 00D9MB Info call button. If
any of the steps mentioned are not carried
out, the system may not be activated.
If you have questions about the activation,
contact one of the following telephone hot-
lines:
R USA: Mercedes-Benz Customer Assistance
Center at 1-800-FOR-MERCedes
(1-800-367-6372) or 1-866-990-9007
R Canada: Customer Service at
1-888-923-8367 520
FeaturesSto
wage an d features
Page 530 of 610

When programing a garage door opener, park
the vehicle outside the garage. Do not run the
engine while programing.
Certain garage door drives are incompatible
with the integrated garage door opener. If you have difficulty programing the integrated
garage door opener, contact an authorized
Mercedes-Benz Center.
Alternatively, you can call the following tele-
phone assistance services:
R USA: Mercedes-Benz Customer Assistance
Center at 1-800-FOR-MERCedes
R Canada: Customer Service at
1-800-387-0100
R HomeLink ®
hotline 1-800-355-3515 (free
of charge)
More information on HomeLink ®
and/or
compatible products is also available online
at http://www.homelink.com.
Notes on the declaration of conformity
(Y page 34).
USA: FCC ID: CB2HMIHL4
Canada: IC: 279B-HMIHL4
Important safety notes G
WARNING
When you operate or program the garage door with the integrated garage door opener, per-
sons in the range of movement of the garage
door can become trapped or struck by the
garage door. There is a risk of injury.
When using the integrated garage door
opener, always make sure that nobody is
within the range of movement of the garage
door. G
WARNING
Combustion engines emit poisonous exhaust
gases such as carbon monoxide. Inhaling
these exhaust gases leads to poisoning. There is a risk of fatal injury. Therefore never leave
the engine running in enclosed spaces with-
out sufficient ventilation. Programming Programing buttons
Pay attention to the "Important safety notes"
(Y page 528). Garage door remote control
0083is not inclu-
ded with the integrated garage door opener.
X Turn the SmartKey to position 2in the igni-
tion lock (Y page 151).
X Select one of buttons 0044to0085 to use to
control the garage door drive.
X To start programing mode: press and
hold one of buttons 0044to0085 on the inte-
grated garage door opener.
The garage door opener is now in program-
ing mode. After a short time, indicator
lamp 0043lights up yellow.
Indicator lamp 0043lights up yellow as soon
as button 0044,0087or0085 is programed for the
first time. If the selected button has already been programed, indicator lamp 0043will
only light up yellow after ten seconds have elapsed.
X Release button 0044,0087or0085. Indicator
lamp 0043flashes yellow.
X To program the remote control: point
garage door remote control 0083towards
buttons 0044to0085 on the rear-view mirror at
a distance of 2 to 8 inches (5 to 20 cm).
X Press and hold button 0084on remote control
0083 until indicator lamp 0043lights up green.
When indicator lamp 0043lights up green:
programing is finished. 528
FeaturesStowage and features
Page 537 of 610

X
Make sure that the windshield wipers are
turned off.
X Pull release lever 0043on the hood.
The hood is released. X
Reach into the gap, pull hood catch han-
dle 0044up and lift the hood.
If you lift the hood by approximately 15 in
(40 cm), the hood is opened and held open automatically by the gas-filled strut.
Closing the hood X
Lower the hood and let it fall from a height
of approximately 8 in (20 cm).
X Check that the hood has engaged properly.
If the hood can be raised slightly, it is not
properly engaged. Open it again and close
it with a little more force. Engine oil
Notes on the oil level Depending on your driving style, the vehicle
consumes up to 0.9 US qt (0.8 liters) of oil per
600 miles (1,000 km). The oil consumption
may be higher than this when the vehicle is
new or if you frequently drive at high engine
speeds.
Depending on the engine, the oil dipstick may be in a different location.
When checking the oil level:
R park the vehicle on a level surface.
R the engine should be switched off for
approximately five minutes if the engine is
at normal operating temperature.
R if the engine is not at normal operating
temperature, e.g. if the engine was only
started briefly, wait about 30 minutes
before carrying out the measurement.
Checking the oil level using the oil dip-
stick G
WARNING
Certain components in the engine compart-
ment, such as the engine, radiator and parts
of the exhaust system, can become very hot.
Working in the engine compartment poses a
risk of injury.
Where possible, let the engine cool down and touch only the components described in the
following. Engine compartment
535Maintenance and care Z