2015 MERCEDES-BENZ S-COUPE warning light
[x] Cancel search: warning lightPage 17 of 286
General notes ................................ 118
Hill start assist ...............................118
Q
QR code
Rescue card ..................................... 29
Qualified specialist workshop ........... 27
R
Radio
Selecting a station ......................... 164
see separate operating instructions
Radio mode
see also Digital Operator's Man-
ual ................................................. .188
Radio-wave reception/transmis-
sion in the vehicle
Declaration of conformity ................ 27
Reading lamp ..................................... 105
Rear compartment
Stowage compartment .................. 197
Rear fog lamp
Display message ............................ 165
Rear lamps
see Lights
Rear seats
Overview .......................................... 40
Rear view camera
Cleaning instructions ..................... 217
Function/notes ............................ .144
Switching on/off ........................... 145
Rear window blind ............................ 198
Rear window defroster
Problem (malfunction) ................... 111
Switching on/off ........................... 111
Rear-view mirror
Anti-glare (manual) .......................... 99
Dipping (automatic) ......................... 99
Refrigerant (air-conditioning sys-tem)
Important safety notes .................. 280
Refueling
Fuel gauge ....................................... 33
Important safety notes .................. 122
Refueling process .......................... 123
see Fuel Remote control
Garage door opener ....................... 203
Programming (garage door
opener) .......................................... 204
Replacing bulbs
General notes ................................ 105
Reporting safety defects .................... 28
Rescue card ......................................... 29
Reserve (fuel tank)
see Fuel
Reserve fuel
Display message ............................ 165
Warning lamp ................................. 176
Residual heat (climate control) ........111
Restraint system
Display message ............................ 170
Introduction ..................................... 42
Warning lamp ................................. 182
Warning lamp (function) ................... 43
Reversing feature
Roller sunblind ................................. 91
Side windows ................................... 90
Trunk lid .......................................... .84
Reversing lamps (display mes-
sage) ................................................... 165
ROAD SURFACE SCAN ....................... 140
Roadside Assistance (breakdown) .... 25
Roller sunblind
Panorama roof ................................. 91
Rear window .................................. 198
Roller sunblind for the panorama
roof
Opening and closing ........................ 92
Operating ......................................... 91
Resetting ......................................... 92
Roof
Display message ............................ 165
Roof lining and carpets (cleaning
guidelines) ......................................... 218
Roof load (maximum) ........................ 281
Route (navigation)
see Route guidance (navigation)
Route guidance
see also Digital Operator's Man-
ual .................................................. 188
Route guidance (navigation) ............ 164
Index15
Page 19 of 286
Mechanical key ................................ 80
Overview .......................................... 78
Positions (ignition lock) ................. 115
Problem (malfunction) ..................... 82
Starting the engine ........................ 118
SMS
see also Digital Operator's Man-
ual .................................................. 188
Snow chains ...................................... 242
Sockets
Center console .............................. 198
General notes ................................ 198
Rear compartment ........................ .198
Trunk ............................................. 198
Special seat belt retractor .................. 61
Specialist workshop ............................ 27
Speed, controlling
see Cruise control
Speedometer
In the Instrument cluster ................. 33
Selecting the unit of measure-
ment .............................................. 164
see Instrument cluster
Standing lamps
Display message ............................ 165
Switching on/off ........................... 103
Start/Stop button
Removing ....................................... 117
Starting the engine ........................ 118
Start/stop function
see ECO start/stop function
Starting (engine) ................................ 117
STEER CONTROL .................................. 75
Steering
Warning lamps ............................... 186
Steering (display message) .............. 176
Steering Assist (DISTRONIC PLUS)
Display message ............................ 165
Steering assistant STEER CON-TROL
see STEER CONTROL
Steering wheel
Adjusting (electrically) ..................... 99
Button overview ............................... 35
Buttons (on-board computer) ......... 161
Important safety notes .................... 99
Paddle shifters ............................... 121 Steering wheel heating .................... 99
Storing settings (memory func-
tion) ................................................. 99
Steering wheel (cleaning instruc-
tions) ................................................. .218
Steering wheel heating
Switching on/off .............................. 99
Steering wheel paddle shifters ........121
Stowage areas ................................... 196
Stowage compartments
Armrest (under) ............................ .197
Center console .............................. 197
Center console in rear compart-
ment .............................................. 197
Cup holders ................................... 198
Door ............................................... 197
Eyeglasses compartment .............. .197
Glove box ....................................... 197
Important safety information ......... 196
Rear ............................................... 197
Rear seat backrest ......................... 197
Stowage net ................................... 197
Stowage net ....................................... 197
Stowage space
Parcel net retainers ....................... 197
Securing a load .............................. 197
Stowage well beneath the trunk
floor .................................................... 197
Summer tires
In winter ........................................ 242
Sun visor ............................................ 198
Suspension tuning
Active Body Control ABC .............. .140
AIRMATIC ...................................... 141
Switching air-recirculation mode
on/off ................................................. 111
T
Tachometer ........................................ 160
Tail lamps
Display message ............................ 165
see Lights
Tank content
Fuel gauge ....................................... 33
Technical data
Capacities ...................................... 275
Information ................................... .274
Index17
Page 36 of 286
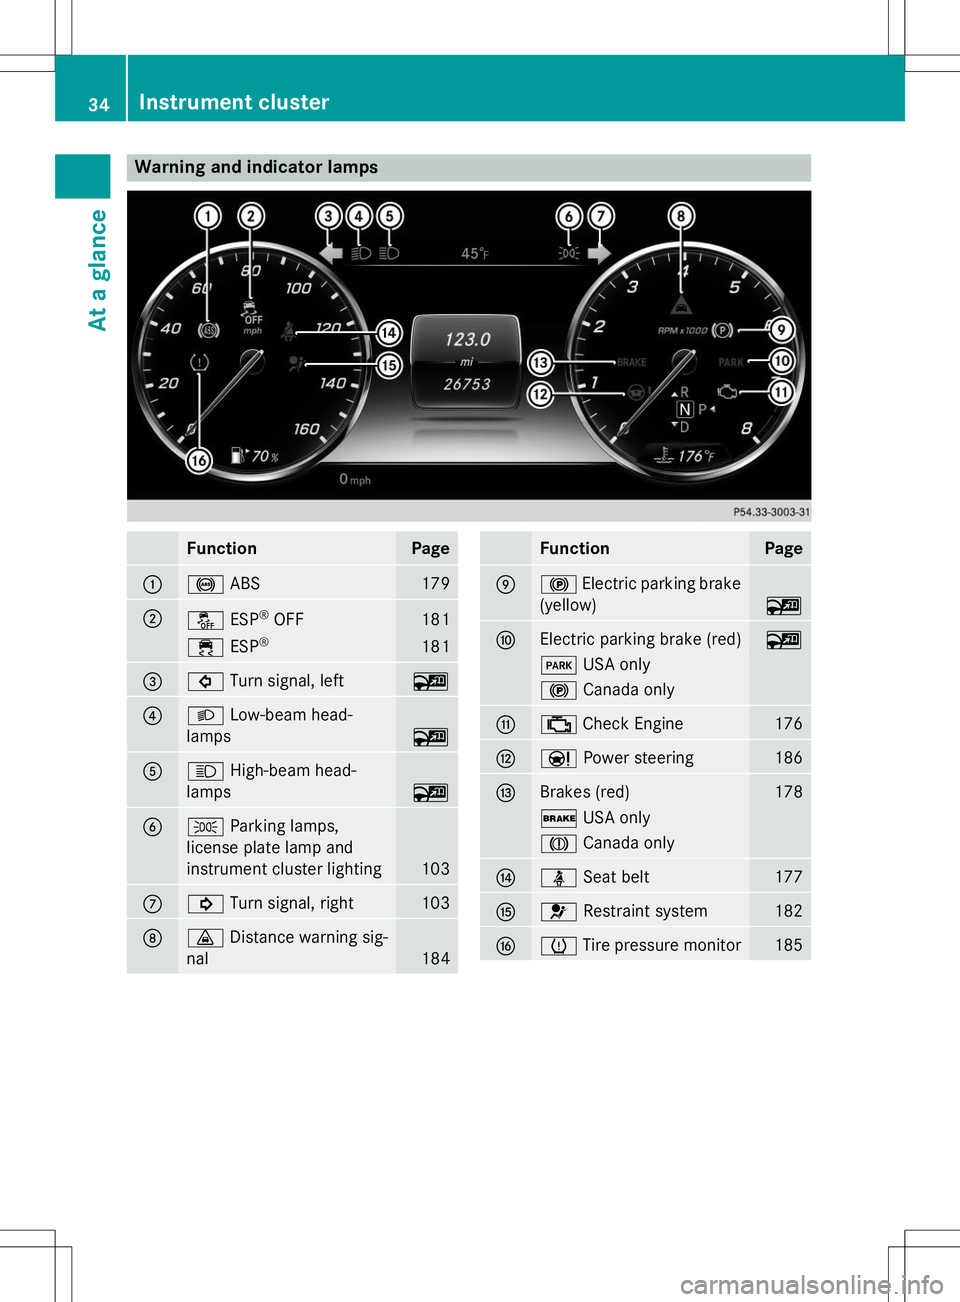
Warning and indicator lamps
FunctionPage
:!ABS179
;åESP®
OFF181
÷ ESP®181
=#
Turn signal, left~
?LLow-beam head-
lamps
~
AK High-beam head-
lamps
~
BT Parking lamps,
license plate lamp and
instrument cluster lighting
103
C! Turn signal, right103
D·Distance warning sig-
nal
184
FunctionPage
E! Electric parking brake
(yellow)
~
FElectric parking brake (red)~
F USA only
!Canada only
G;Check Engine176
HÐ Power steering186
IBrakes (red)178
$USA only
JCanada only
JüSeat belt177
K6Restraint system182
LhTire pressure monitor185
34Instrument cluster
At a glance
Page 50 of 286
You can switch the seat-belt adjustment on
and off using COMAND. Information on
switching the belt adjustment function on and
off can be found in the Digital Operator's
Manual or in the separate COMAND operating instructions.
Belt warning for the driver and front
passenger
The 7 seat belt warning lamp in the instru-
ment cluster is a reminder that all occupants
must fasten their seat belts. It may light up
continuously or flash. In addition, there may
be a warning tone.
Regardless of whether the driver's seat belt
has already been fastened, the 7seat belt
warning lamp lights up for six seconds each
time the engine is started. If, after
six seconds, the driver or front-passenger
seat belt has not been fastened and the doors are closed, the 7seat belt warning lamp
lights up. As soon as the driver's and front-
passenger seat belts are fastened or a front
door is opened again, the 7seat belt
warning lamp goes out.
If the driver's seat belt is not fastened after
the engine is started, an additional warning
tone will sound. This warning tone stops after six seconds or when the driver's seat belt is
fastened.
If the vehicle's speed exceeds 15 mph
(25 km/h) once and the driver's and front-
passenger seat belts are not fastened, a
warning tone sounds. A warning tone also
sounds with increasing intensity for
60 seconds or until the driver or front
passenger have fastened their seat belts.
If the driver or front passenger unfasten their seat belts during the journey, the seat belt
warning is activated again.
iFor more information on the 7seat
belt warning lamp, see "Warning and indi-
cator lamps in the instrument cluster, seat
belts" ( Ypage 177).
Air bags
Introduction
The installation point of an air bag can be rec- ognized by the AIR BAG symbol.
An air bag complements the correctly fas-
tened seat belt. It is no substitute for the seat
belt. The air bag provides additional protec-
tion in applicable accident situations.
Not all air bags are deployed in an accident.
The different air bag systems function inde-
pendently from one another ( Ypage 57).
However, no system available today can com- pletely eliminate injuries and fatalities.
It is also not possible to rule out a risk of injury
caused by an air bag due to the high speed at which the air bag must be deployed.
Important safety notes
GWARNING
If you do not sit in the correct seat position,
the air bag cannot protect as intended and
could even cause additional injury when
deployed. This poses an increased risk of
injury or even fatal injury.
To avoid hazardous situations, always make
sure that all of the vehicle's occupants:
R have fastened their seat belts correctly,
including pregnant women
R are sitting correctly and maintain the great-
est possible distance to the air bags
R follow the following instructions
Always make sure that there are no objects
between the air bag and the vehicle's occu-
pants.
R Adjust the seats properly before beginning
your journey. Always make sure that the
seat is in an almost upright position. The
center of the head restraint must support
the head at about eye level.
R Move the driver's and front-passenger
seats as far back as possible. The driver's
seat position must allow the vehicle to be
driven safely.
48Occupant safety
Safety
Page 54 of 286
rest and the head restraint position accord-
ingly.
Only then can OCS be guaranteed to functioncorrectly. Always observe the child restraint
system manufacturer's installation instruc-tions.
Occupant Classification System opera-
tion (OCS)
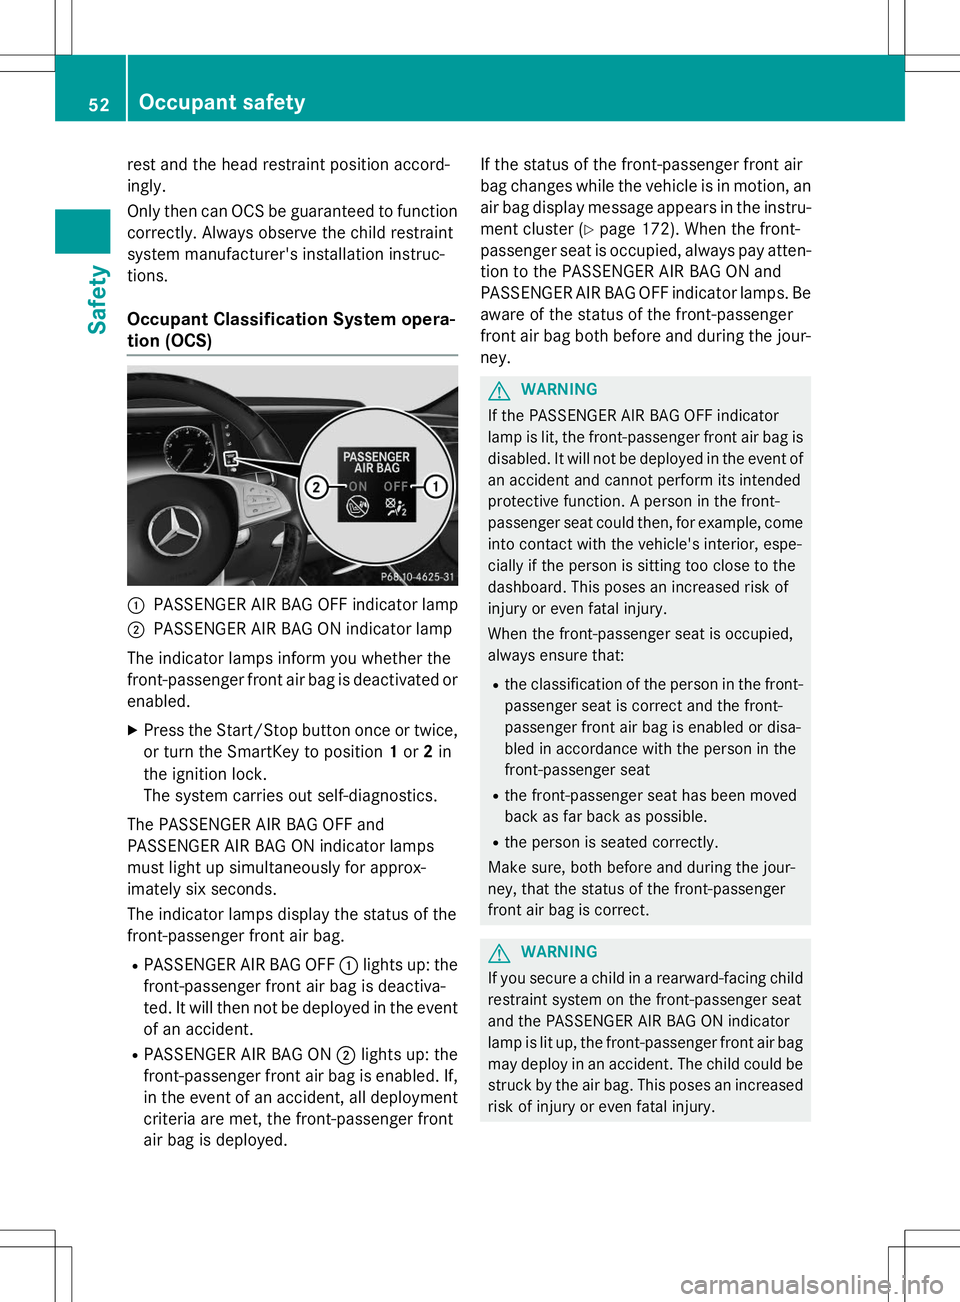
:PASSENGER AIR BAG OFF indicator lamp
;PASSENGER AIR BAG ON indicator lamp
The indicator lamps inform you whether the
front-passenger front air bag is deactivated or
enabled.
X Press the Start/Stop button once or twice,
or turn the SmartKey to position 1or 2in
the ignition lock.
The system carries out self-diagnostics.
The PASSENGER AIR BAG OFF and
PASSENGER AIR BAG ON indicator lamps
must light up simultaneously for approx-
imately six seconds.
The indicator lamps display the status of the
front-passenger front air bag. R PASSENGER AIR BAG OFF :lights up: the
front-passenger front air bag is deactiva-
ted. It will then not be deployed in the event
of an accident.
R PASSENGER AIR BAG ON ;lights up: the
front-passenger front air bag is enabled. If,
in the event of an accident, all deployment criteria are met, the front-passenger front
air bag is deployed. If the status of the front-passenger front air
bag changes while the vehicle is in motion, an
air bag display message appears in the instru-
ment cluster ( Ypage 172). When the front-
passenger seat is occupied, always pay atten-
tion to the PASSENGER AIR BAG ON and
PASSENGER AIR BAG OFF indicator lamps. Be aware of the status of the front-passenger
front air bag both before and during the jour- ney.
GWARNING
If the PASSENGER AIR BAG OFF indicator
lamp is lit, the front-passenger front air bag is disabled. It will not be deployed in the event of
an accident and cannot perform its intended
protective function. A person in the front-
passenger seat could then, for example, come
into contact with the vehicle's interior, espe-
cially if the person is sitting too close to the
dashboard. This poses an increased risk of
injury or even fatal injury.
When the front-passenger seat is occupied,
always ensure that:
R the classification of the person in the front-
passenger seat is correct and the front-
passenger front air bag is enabled or disa-
bled in accordance with the person in the
front-passenger seat
R the front-passenger seat has been moved
back as far back as possible.
R the person is seated correctly.
Make sure, both before and during the jour-
ney, that the status of the front-passenger
front air bag is correct.
GWARNING
If you secure a child in a rearward-facing child
restraint system on the front-passenger seat
and the PASSENGER AIR BAG ON indicator
lamp is lit up, the front-passenger front air bag may deploy in an accident. The child could be
struck by the air bag. This poses an increased risk of injury or even fatal injury.
52Occupant safety
Safety
Page 55 of 286
Make sure that the front-passenger front air
bag has been disabled. The PASSENGER AIR
BAG OFF indicator lamp must be lit.
If the PASSENGER AIR BAG OFF indicator
lamp remains off and/or the PASSENGER AIR BAG ON indicator lamp lights up, do not install a rearward-facing child restraint system on
the front-passenger seat. You can find more
information on OCS under "Problems with the Occupant Classification System"( Y page 56).
GWARNING
If you secure a child in a forward-facing child
restraint system on the front-passenger seat
and you position the front-passenger seat too
close to the dashboard, in the event of an
accident, the child could:
R come into contact with the vehicle's inte-
rior if the PASSENGER AIR BAG OFF indi-
cator lamp is lit, for example
R be struck by the air bag if the PASSENGER
AIR BAG ON is lit up
This poses an increased risk of injury or even fatal injury.
Always move the front-passenger seat as far
back as possible and fully retract the seat
cushion length. Always make sure that the
shoulder belt strap is correctly routed from
the vehicle seat-belt extender to the shoulder
belt guide on the child restraint system. The
shoulder belt strap must be routed forwards
and downwards from the retracted seat-belt
extender. If necessary, adjust the front-
passenger seat accordingly. Always observe
the child restraint system manufacturer's
installation instructions.
If OCS determines that: R the front-passenger seat is unoccupied, the
PASSENGER AIR BAG OFF indicator lamp
lights up after the system self-test and
remains lit. This indicates that the front-
passenger front air bag is deactivated.
R the front-passenger seat is occupied by a
child of up to 12 months old in a standard child restraint system, the PASSENGER AIR
BAG OFF indicator lamp lights up after the
system self-test and remains lit. This indi-
cates that the front-passenger front air bag
is deactivated.
But in the case of a 12-month-old child in a
standard child restraint system, the
PASSENGER AIR BAG ON can light up per-
manently after the system self-test. This
indicates that the front-passenger front air
bag is activated. The result of the classifi-
cation is dependent on, among other fac-
tors, the child restraint system and the
child's stature. It is recommended that you
install the child restraint system on a suit-
able rear seat.
R the front-passenger seat is occupied by a
person of smaller stature (e.g. a teenager
or small adult), either the PASSENGER AIR
BAG ON or PASSENGER AIR BAG OFF indi-
cator lamp lights up and remains lit after
the system self-test depending on the
result of the classification. - If the PASSENGER AIR BAG ON indicator
lamp lights up, move the front-passenger
seat as far back as possible. Alterna-
tively, a person of smaller stature can sit on a rear seat.
- If the PASSENGER AIR BAG OFF indicator
lamp is lit, a person of smaller stature
should not use the front-passenger seat.
R the front-passenger seat is occupied by an
adult or a person of a stature correspond-
ing to that of an adult, the PASSENGER AIR
BAG ON indicator lamp lights up after the
system self-test and remains lit. This indi-
cates that the front-passenger front air bag
is activated.
If children are traveling in the vehicle, be sure to observe the notes on "Children in the vehi-
cle" ( Ypage 60).
When OCS is malfunctioning, the red 6
restraint system warning lamp in the instru-
ment cluster and the PASSENGER AIR BAG
OFF indicator lamp light up simultaneously.
The front-passenger front air bag is deactiva-
Occupant safety53
Safety
Z
Page 56 of 286
ted in this case and does not deploy during an
accident. Have the system checked by quali-
fied technicians as soon as possible. Consult an authorized Mercedes-Benz Center. The
front-passenger seat should only be repaired
at an authorized Mercedes-Benz Center.
If the front-passenger seat, the seat cover orthe seat cushion is damaged, have the nec-
essary repair work carried out at an author-
ized Mercedes-Benz Center.
For safety reasons, Mercedes-Benz recom-
mends that you only use seat accessories
that have been approved by Mercedes-Benz.
If the driver's air bag deploys, this does not
mean that the front-passenger front air bag
will also deploy. The Occupant Classification
System (OCS) categorizes the occupant in the
front-passenger seat. Depending on that
result, the front-passenger front air bag is
either enabled or deactivated.
System self-test
GDANGER
If both the PASSENGER AIR BAG OFF and
PASSENGER AIR BAG ON indicator lamps do
not light up during the system self-test, the
system is malfunctioning. The front-
passenger front air bag might be triggered
unintentionally or might not be triggered at all in the event of an accident with high deceler-
ation. This poses an increased risk of injury or even fatal injury.
In this case the front-passenger seat may notbe used. Do not install a child restraint system
on the front-passenger seat. Have the Occu-
pant Classification System (OCS) checked
and repaired immediately at a qualified spe-
cialist workshop.
GDANGER
If the PASSENGER AIR BAG OFF indicator
lamp remains lit after the system self-test, the front-passenger front air bag is disabled. It willnot be deployed in the event of an accident. In
this case, the front-passenger front air bag
cannot perform its intended protective func-
tion, e.g. when a person is seated in the front- passenger seat.
That person could, for example, come into
contact with the vehicle's interior, especially
if the person is sitting too close to the dash-
board. This poses an increased risk of injury oreven fatal injury.
When the front-passenger seat is occupied,
always ensure that:
R the classification of the person in the front-
passenger seat is correct and the front-
passenger front air bag is enabled or disa-
bled in accordance with the person in the
front-passenger seat
R the person is seated properly with a cor-
rectly fastened seatbelt
R the front-passenger seat has been moved
back as far back as possible
If the PASSENGER AIR BAG OFF indicator
lamp remains lit when it should not, the front- passenger seat may not be used. Do not
install a child restraint system on the front-
passenger seat. Have the Occupant Classifi-
cation System (OCS) checked and repaired
immediately at a qualified specialist work-
shop.
GWARNING
Objects between the seat surface and the
child restraint system could affect OCS oper- ation. This could result in the front-passengerair bag not functioning as intended during an
accident. This poses an increased risk of
injury or even fatal injury.
Do not place any objects between the seat
surface and the child restraint system. The
entire base of the child restraint system must
always rest on the seat cushion of the front-
passenger seat. The backrest of the forward-
facing child restraint system must, as far as
possible, be resting on the backrest of the
front-passenger seat. Always comply with the child restraint system manufacturer's instal-
lation instructions.
54Occupant safety
Safety
Page 59 of 286
Deployment of Emergency TensioningDevices and air bags
Important safety notes
GWARNING
The air bag parts are hot after an air bag has
been deployed. There is a risk of injury.
Do not touch the air bag parts. Have a
deployed air bag replaced at a qualified spe-
cialist workshop as soon as possible.
GWARNING
A deployed air bag no longer offers any pro-
tection and cannot provide the intended pro-
tection in an accident. There is an increased
risk of injury.
Have the vehicle towed to a qualified special- ist workshop in order to have a deployed air
bag replaced.
It is important for your safety and that of your
passenger to have deployed air bags replaced and to have any malfunctioning air bags
repaired. This will help to make sure the air
bags continue to perform their protective
function for the vehicle occupants in the
event of a crash.
GWARNING
Pyrotechnic Emergency Tensioning Devices
that have been deployed are no longer opera-
tional and are unable to perform their inten-
ded protective function. This poses an
increased risk of injury or even fatal injury.
Therefore, have pyrotechnic Emergency Ten-
sioning Devices which have been triggered
immediately replaced at a qualified specialistworkshop.
An electric motor is used by PRE-SAFE ®
to
trigger the tightening of the seat belt in haz-
ardous situations. This procedure is reversi-ble.
If Emergency Tensioning Devices are trig-
gered or air bags are deployed, you will hear a bang, and a small amount of powder may also be released. The
6restraint system warn-
ing lamp lights up.
Only in rare cases will the bang affect your
hearing. The powder that is released gener-
ally does not constitute a health hazard, but it may cause short-term breathing difficulties in
people with asthma or other respiratory prob-
lems. To avoid this, you may wish to get out of
the vehicle or open the windows as soon as it is safe to do so.
Air bags and pyrotechnic Emergency Tension-
ing Devices (ETDs) contain perchlorate mate-
rial, which may require special handling and
regard for the environment. National guide-
lines must be observed during disposal. In
California, see www.dtsc.ca.gov/
HazardousWaste/Perchlorate/
index.cfm .
Method of operation
During the first stage of a collision, the
restraint system control unit evaluates impor-
tant physical data relating to vehicle deceler-
ation or acceleration, such as:
R duration
R direction
R intensity
Based on the evaluation of this data, the
restraint system control unit triggers the
Emergency Tensioning Devices during a fron-
tal or rear collision.
An Emergency Tensioning Device can only be triggered, if: R the ignition is switched on
R the components of the restraint system are
operational; see "Restraint system warning lamp" ( Ypage 43)
R the belt tongue is engaged in the buckle on
the respective front-passenger seat
The Emergency Tensioning Devices in the
rear compartment are triggered independ-
ently of the lock status of the seat belts.
Occupant safety57
Safety
Z