2015 MERCEDES-BENZ S-COUPE fuel
[x] Cancel search: fuelPage 62 of 286
ous situations, PRE-SAFE®
PLUS takes pre-
emptive measures to protect the vehicle
occupants.
Important safety notes
The intervention of PRE-SAFE ®
PLUS cannot
prevent an imminent collision.
The driver is not warned when PRE-SAFE ®
PLUS intervenes.
PRE-SAFE ®
PLUS does not intervene if the
vehicle is backing up.
PRE-SAFE ®
PLUS does not perform braking
actions while the vehicle is in motion or when
Parking Guidance is active.
Function
PRE-SAFE ®
PLUS intervenes in certain situa-
tions if the radar sensor system detects an
imminent head-on or rear-end collision.
PRE-SAFE ®
PLUS takes the following meas-
ures depending on the hazardous situation
detected:
R if the radar sensor system detects that a
head-on collision is imminent, the seat
belts are pre-tensioned.
R if the radar sensor system detects that a
rear-end collision is imminent:
- the brake pressure is increased if the
driver applies the brakes when the vehi-
cle is stationary.
- the seat belts are pre-tensioned.
The PRE-SAFE ®
PLUS braking application is
canceled:
R if the accelerator pedal is depressed when
a gear is engaged
R if the risk of a collision passes or is no lon-
ger detected
R if DISTRONIC PLUS indicates an intention
to pull away
If the hazardous situation passes without
resulting in an accident, the original settings
are restored.
Automatic measures after an acci- dent
Immediately after an accident, the following
measures are implemented, depending on
the type and severity of the impact:
R the hazard warning lamps are activated
R the emergency lighting is activated
R the vehicle doors are unlocked
R the front side windows are lowered
R the electrically adjustable steering wheel is
raised
R the engine is switched off and the fuel sup-
ply is cut off
R vehicles with mbrace: automatic emer-
gency call
Children in the vehicle
Important safety notes
Accident statistics show that children
secured in the rear seats are safer than chil-
dren secured in the front-passenger seat. For
this reason, Mercedes-Benz strongly advises
that you install a child restraint system on a
rear seat. Children are generally better pro-
tected there.
If a child younger than 12 years and under 5 ft
(1.50 m) in height is traveling in the vehicle:
R always secure the child in a child restraint
system suitable for Mercedes-Benz vehi-
cles. The child restraint system must be
appropriate to the age, weight and size of
the child
R be sure to observe the instructions and
safety notes in this section in addition to
the child restraint system manufacturer's
installation instructions
R be sure to observe the instructions and
safety notes on the "Occupant classifica-
tion system (OCS)" ( Ypage 51)
60Children in the vehicle
Safety
Page 81 of 286
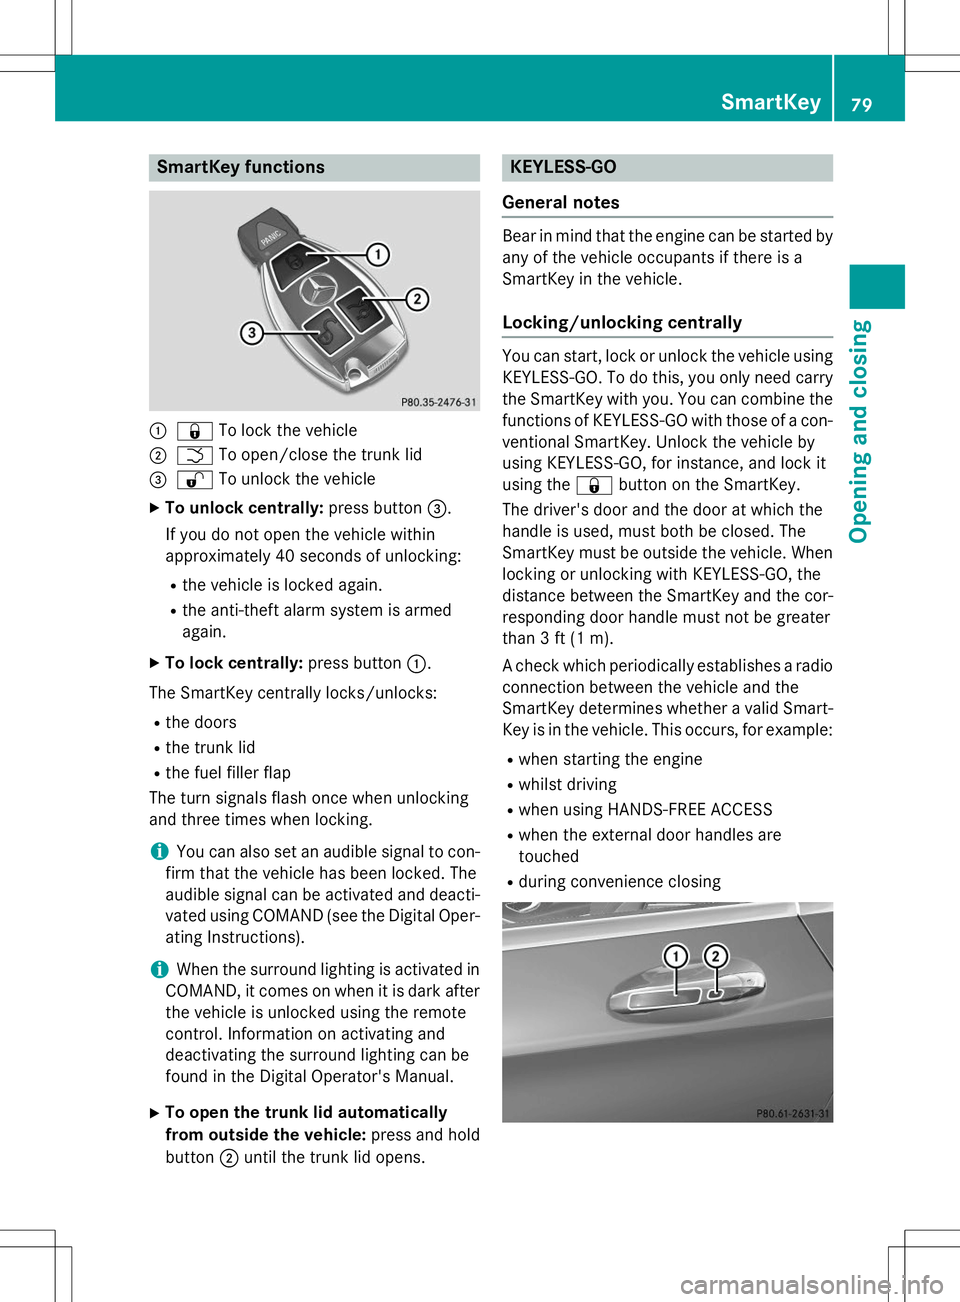
SmartKey functions
:&To lock the vehicle
;FTo open/close the trunk lid
=%To unlock the vehicle
X To unlock centrally: press button=.
If you do not open the vehicle within
approximately 40 seconds of unlocking:
R the vehicle is locked again.
R the anti-theft alarm system is armedagain.
X To lock centrally: press button:.
The SmartKey centrally locks/unlocks:
R the doors
R the trunk lid
R the fuel filler flap
The turn signals flash once when unlocking
and three times when locking.
iYou can also set an audible signal to con-
firm that the vehicle has been locked. The
audible signal can be activated and deacti-
vated using COMAND (see the Digital Oper- ating Instructions).
iWhen the surround lighting is activated in
COMAND, it comes on when it is dark after
the vehicle is unlocked using the remote
control. Information on activating and
deactivating the surround lighting can be
found in the Digital Operator's Manual.
X To open the trunk lid automatically
from outside the vehicle: press and hold
button ;until the trunk lid opens.
KEYLESS-GO
General notes
Bear in mind that the engine can be started by any of the vehicle occupants if there is a
SmartKey in the vehicle.
Locking/unlocking centrally
You can start, lock or unlock the vehicle using KEYLESS-GO. To do this, you only need carry
the SmartKey with you. You can combine the
functions of KEYLESS-GO with those of a con- ventional SmartKey. Unlock the vehicle by
using KEYLESS-GO, for instance, and lock it
using the &button on the SmartKey.
The driver's door and the door at which the
handle is used, must both be closed. The
SmartKey must be outside the vehicle. When
locking or unlocking with KEYLESS-GO, the
distance between the SmartKey and the cor-
responding door handle must not be greater
than 3 ft (1 m).
A check which periodically establishes a radio
connection between the vehicle and the
SmartKey determines whether a valid Smart- Key is in the vehicle. This occurs, for example:
R when starting the engine
R whilst driving
R when using HANDS-FREE ACCESS
R when the external door handles aretouched
R during convenience closing
SmartKey79
Opening and closing
Z
Page 82 of 286
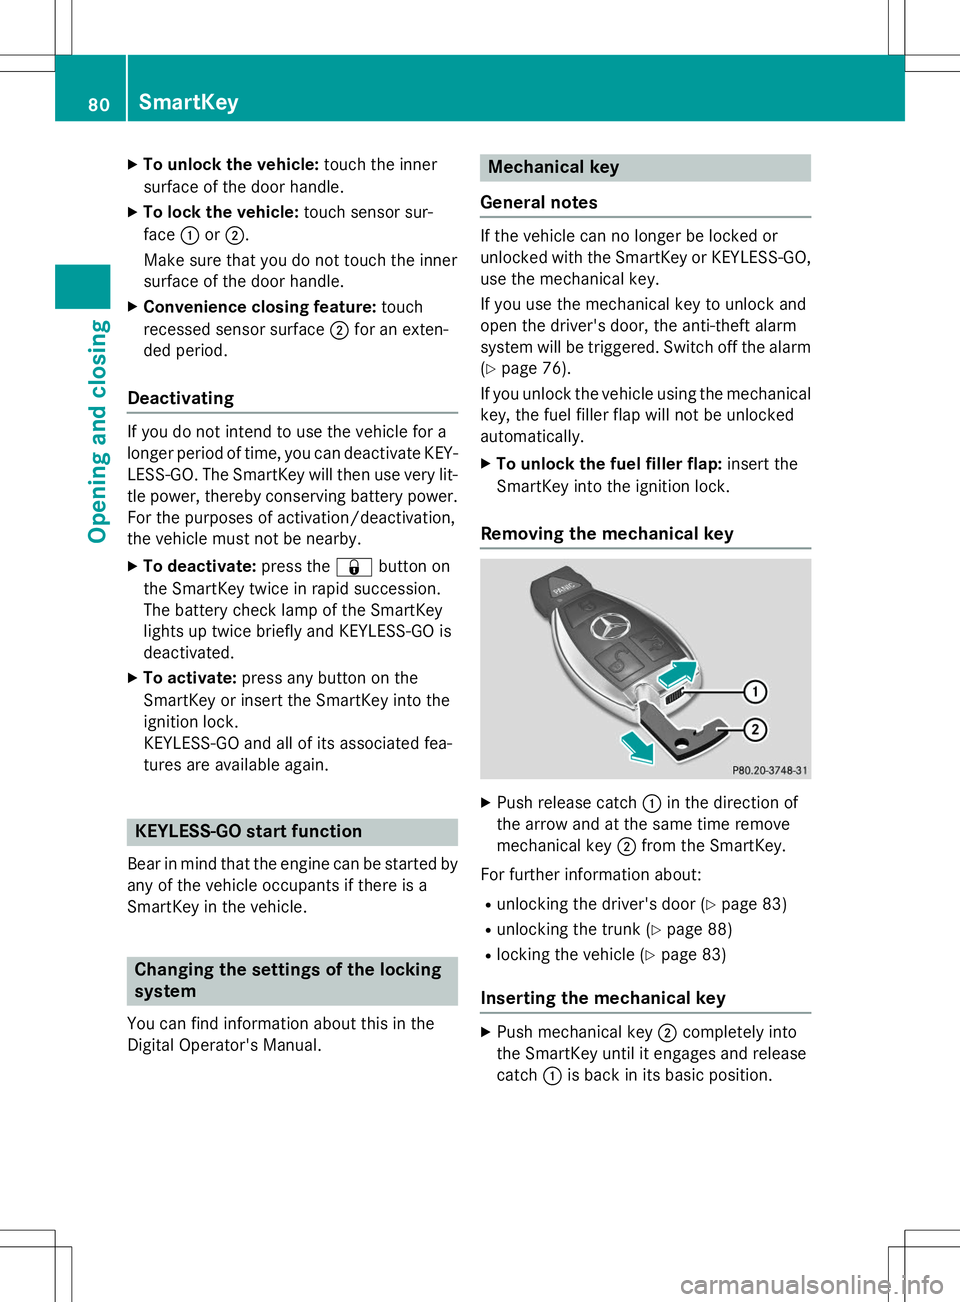
XTo unlock the vehicle: touch the inner
surface of the door handle.
X To lock the vehicle: touch sensor sur-
face :or; .
Make sure that you do not touch the inner
surface of the door handle.
X Convenience closing feature: touch
recessed sensor surface ;for an exten-
ded period.
Deactivating
If you do not intend to use the vehicle for a
longer period of time, you can deactivate KEY-
LESS-GO. The SmartKey will then use very lit-
tle power, thereby conserving battery power.
For the purposes of activation/deactivation,
the vehicle must not be nearby. X To deactivate: press the&button on
the SmartKey twice in rapid succession.
The battery check lamp of the SmartKey
lights up twice briefly and KEYLESS-GO is
deactivated.
X To activate: press any button on the
SmartKey or insert the SmartKey into the
ignition lock.
KEYLESS-GO and all of its associated fea-
tures are available again.
KEYLESS-GO start function
Bear in mind that the engine can be started by any of the vehicle occupants if there is a
SmartKey in the vehicle.
Changing the settings of the locking
system
You can find information about this in the
Digital Operator's Manual.
Mechanical key
General notes
If the vehicle can no longer be locked or
unlocked with the SmartKey or KEYLESS-GO, use the mechanical key.
If you use the mechanical key to unlock and
open the driver's door, the anti-theft alarm
system will be triggered. Switch off the alarm
( Y page 76).
If you unlock the vehicle using the mechanical key, the fuel filler flap will not be unlocked
automatically.
X To unlock the fuel filler flap: insert the
SmartKey into the ignition lock.
Removing the mechanical key
X Push release catch :in the direction of
the arrow and at the same time remove
mechanical key ;from the SmartKey.
For further information about: R unlocking the driver's door ( Ypage 83)
R unlocking the trunk ( Ypage 88)
R locking the vehicle ( Ypage 83)
Inserting the mechanical key
X
Push mechanical key ;completely into
the SmartKey until it engages and release catch :is back in its basic position.
80SmartKey
Opening and closing
Page 86 of 286
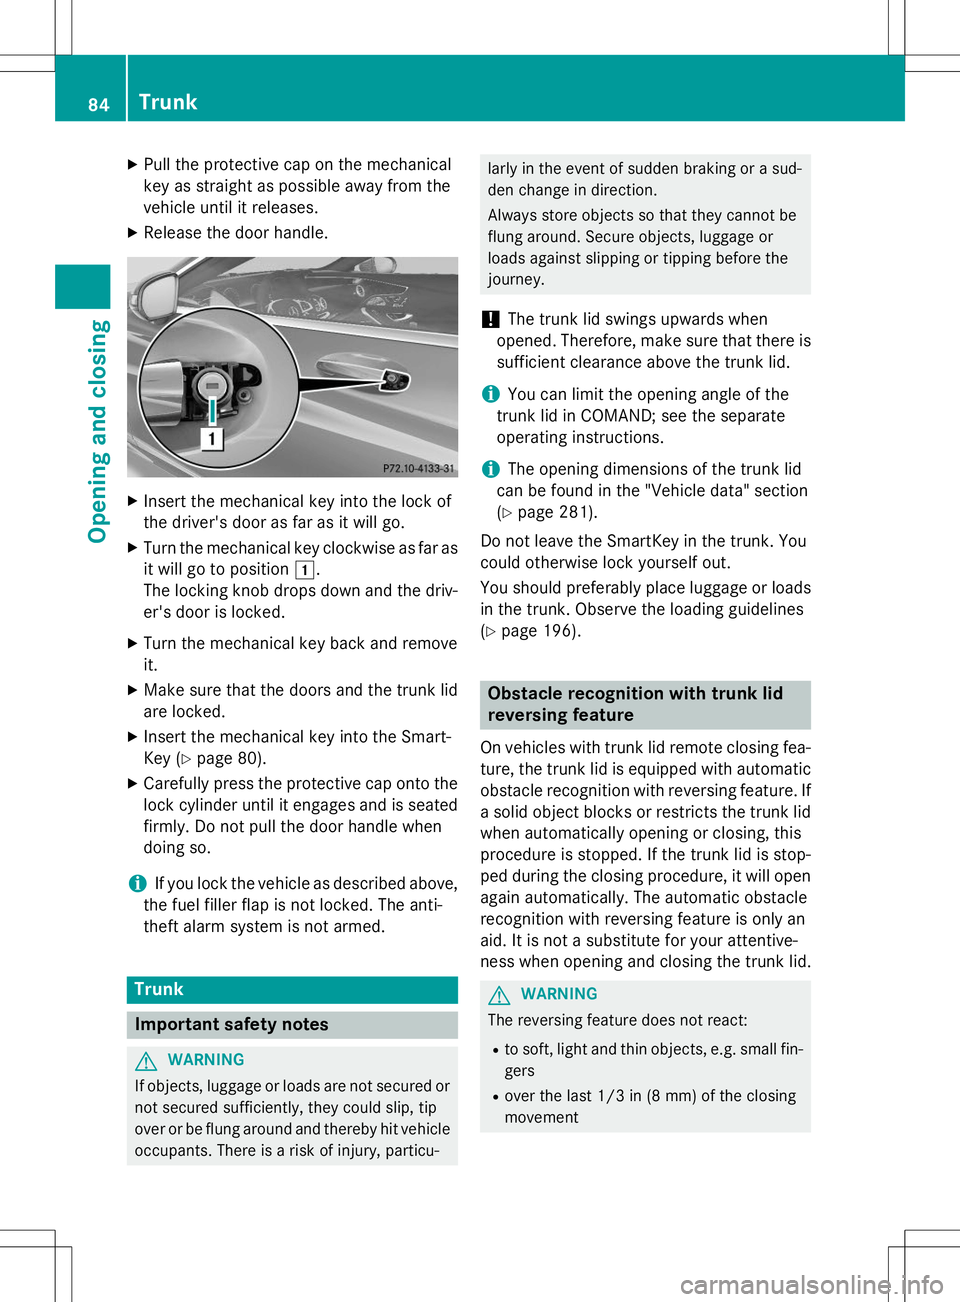
XPull the protective cap on the mechanical
key as straight as possible away from the
vehicle until it releases.
X Release the door handle.
XInsert the mechanical key into the lock of
the driver's door as far as it will go.
X Turn the mechanical key clockwise as far as
it will go to position 1.
The locking knob drops down and the driv- er's door is locked.
X Turn the mechanical key back and removeit.
X Make sure that the doors and the trunk lid
are locked.
X Insert the mechanical key into the Smart-
Key ( Ypage 80).
X Carefully press the protective cap onto the
lock cylinder until it engages and is seated
firmly. Do not pull the door handle when
doing so.
iIf you lock the vehicle as described above,
the fuel filler flap is not locked. The anti-
theft alarm system is not armed.
Trunk
Important safety notes
GWARNING
If objects, luggage or loads are not secured or not secured sufficiently, they could slip, tip
over or be flung around and thereby hit vehicle
occupants. There is a risk of injury, particu-
larly in the event of sudden braking or a sud-
den change in direction.
Always store objects so that they cannot be
flung around. Secure objects, luggage or
loads against slipping or tipping before the
journey.
!The trunk lid swings upwards when
opened. Therefore, make sure that there is
sufficient clearance above the trunk lid.
iYou can limit the opening angle of the
trunk lid in COMAND; see the separate
operating instructions.
iThe opening dimensions of the trunk lid
can be found in the "Vehicle data" section ( Y page 281).
Do not leave the SmartKey in the trunk. You
could otherwise lock yourself out.
You should preferably place luggage or loads
in the trunk. Observe the loading guidelines ( Y page 196).
Obstacle recognition with trunk lid
reversing feature
On vehicles with trunk lid remote closing fea-
ture, the trunk lid is equipped with automatic obstacle recognition with reversing feature. If a solid object blocks or restricts the trunk lid
when automatically opening or closing, this
procedure is stopped. If the trunk lid is stop-
ped during the closing procedure, it will open
again automatically. The automatic obstacle
recognition with reversing feature is only an
aid. It is not a substitute for your attentive-
ness when opening and closing the trunk lid.
GWARNING
The reversing feature does not react:
R to soft, light and thin objects, e.g. small fin-
gers
R over the last 1/3 in (8 mm) of the closing
movement
84Trunk
Opening and closing
Page 115 of 286
Useful information............................114
Notes on breaking-in a new vehi- cle ....................................................... 114
Driving ............................................... 114
Automatic transmission ...................120
Refueling ............................................ 122
Parking ............................................... 125
Driving tips ........................................ 127
Driving systems ................................ 129
113
Driving and parking
Page 121 of 286
GWARNING
After a short time, hill start assist will no lon-
ger brake your vehicle and it could roll away.
There is a risk of an accident and injury.
Therefore, quickly move your foot from the
brake pedal to the accelerator pedal. Never
leave the vehicle when it is held by hill start
assist.
Hill start assist is not active if: R you are pulling away on a level road or on a
downhill gradient.
R the transmission is in position N.
R the electric parking brake is applied.
R ESP ®
is malfunctioning.
ECO start/stop function
Introduction
The ECO start/stop function switches the
engine off automatically if the vehicle is stop- ped under certain conditions.
The engine starts automatically when the
driver wants to pull away again. The ECO
start/stop function thereby helps you to
reduce the fuel consumption and emissions
of your vehicle.
Important safety notes
GWARNING
If the engine is switched off automatically andyou exit the vehicle, the engine is restarted
automatically. The vehicle may begin moving. There is a risk of accident and injury.
If you wish to exit the vehicle, always turn off
the ignition and secure the vehicle against
rolling away.
General notes
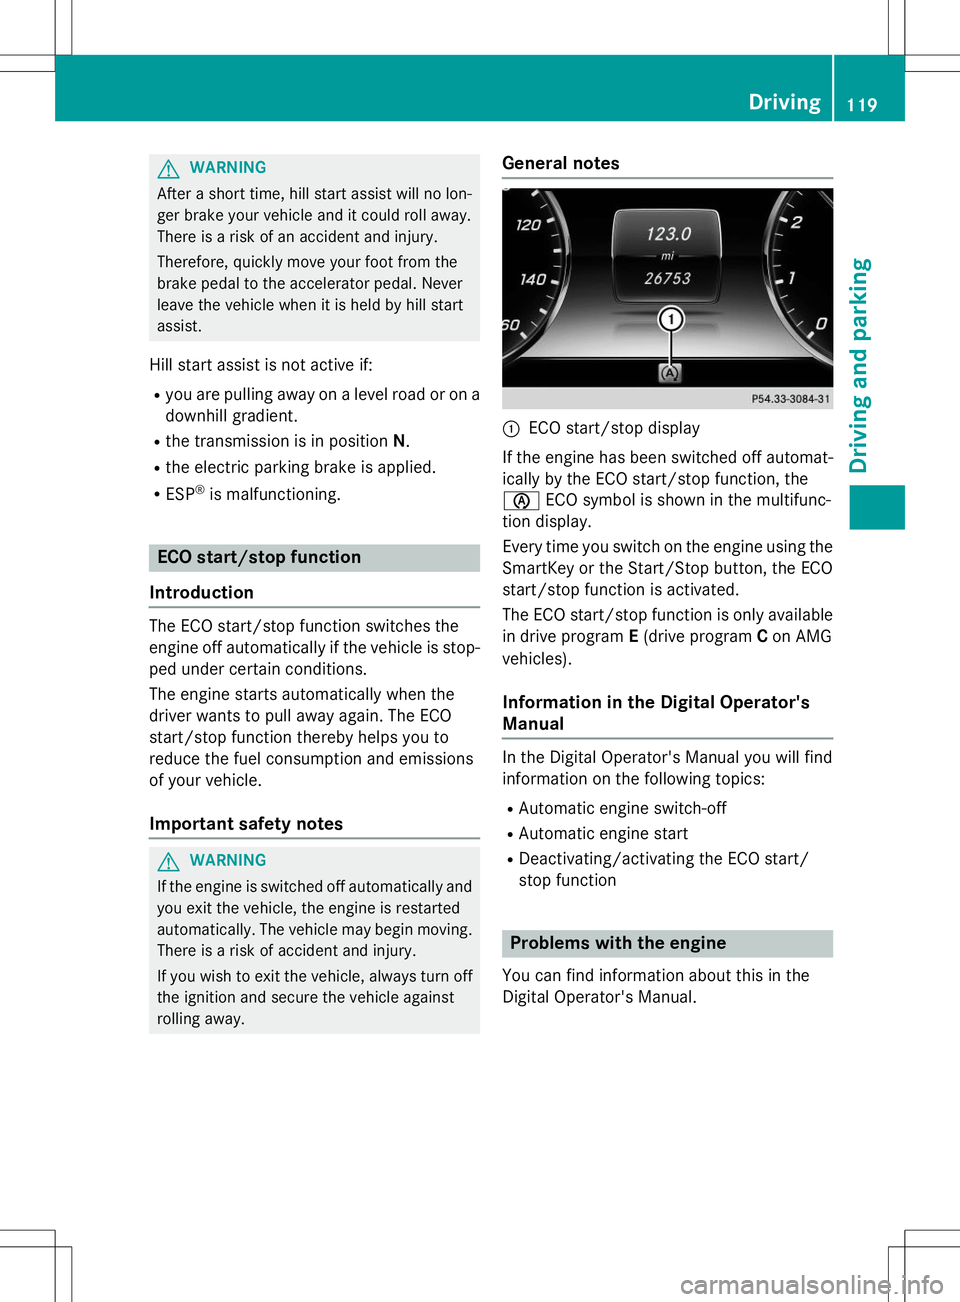
:ECO start/stop display
If the engine has been switched off automat-
ically by the ECO start/stop function, the è ECO symbol is shown in the multifunc-
tion display.
Every time you switch on the engine using the SmartKey or the Start/Stop button, the ECO
start/stop function is activated.
The ECO start/stop function is only available in drive program E(drive program Con AMG
vehicles).
Information in the Digital Operator's Manual
In the Digital Operator's Manual you will find
information on the following topics: R Automatic engine switch-off
R Automatic engine start
R Deactivating/activating the ECO start/
stop function
Problems with the engine
You can find information about this in the
Digital Operator's Manual.
Driving119
Driving and parking
Z
Page 123 of 286
If the engine has been switched off, the auto-
matic transmission automatically shifts to N.
If the automatic transmission is to remain in neutral N, e.g. for washing the vehicle in car
washes with a towing device, please observe the following instructions:
Using the SmartKey:
R Make sure that the ignition is switched on.
R When the vehicle is stationary, depress the
brake pedal and keep it depressed.
R Shift to neutral N.
R Release the brake pedal.
R If the electric parking brake is engaged,
release it.
R Switch off the ignition and leave the Smart-
Key in the ignition lock.
With the Start/Stop button:
R Make sure that the ignition is switched on.
R When the vehicle is stationary, depress the
brake pedal and keep it depressed.
R Engage park position P.
R Release the brake pedal.
R Pull the Start/Stop button out of the igni-tion.
R Insert the SmartKey into the ignition lock.
R Switch on the ignition.
R Depress the brake pedal and keep it
depressed.
R Shift to neutral N.
R Release the brake pedal.
R If the electric parking brake is engaged,
release it.
R Switch off the ignition and leave the Smart-
Key in the ignition lock.
Information in the Digital Operator's Manual
In the Digital Operator's Manual you will find
information on the following topics:
R Transmission position display
R Transmission positions R
Driving tips
R Program selector button
R Steering wheel paddle shifters
R Automatic drive program
R Problems with the transmission
Manual drive program (AMG vehicles)
General information
In this drive program, you can permanently
change gear yourself by using the steering
wheel paddle shifters. The transmission must be in position D.
Manual drive program Mis different from
drive program Swith regard to spontaneity,
responsiveness and smoothness of gearchanges.
In addition to permanent drive program M,
you can also activate temporary drive pro- gram M; see the Digital Operator's Manual.
Switching on the manual drive program
In manual drive program M, you can change
gear using the steering wheel paddle shifters
if the transmission is in position D. You can
see the currently selected drive program and
which gear is engaged in the multifunction
display.
X Press the program selector button until M
appears in the multifunction display; see
the Digital Operator's Manual.
Upshifting
!In manual drive program M, the automatic
transmission does not shift up automati-
cally even when the engine limiting speed
for the current gear is reached. When the
engine limiting speed is reached, the fuel
supply is cut to prevent the engine from
overrevving. Always make sure that the
engine speed does not reach the red area of
the tachometer. There is otherwise a risk of
engine damage.
Automatic transmission121
Driving and parking
Z
Page 124 of 286
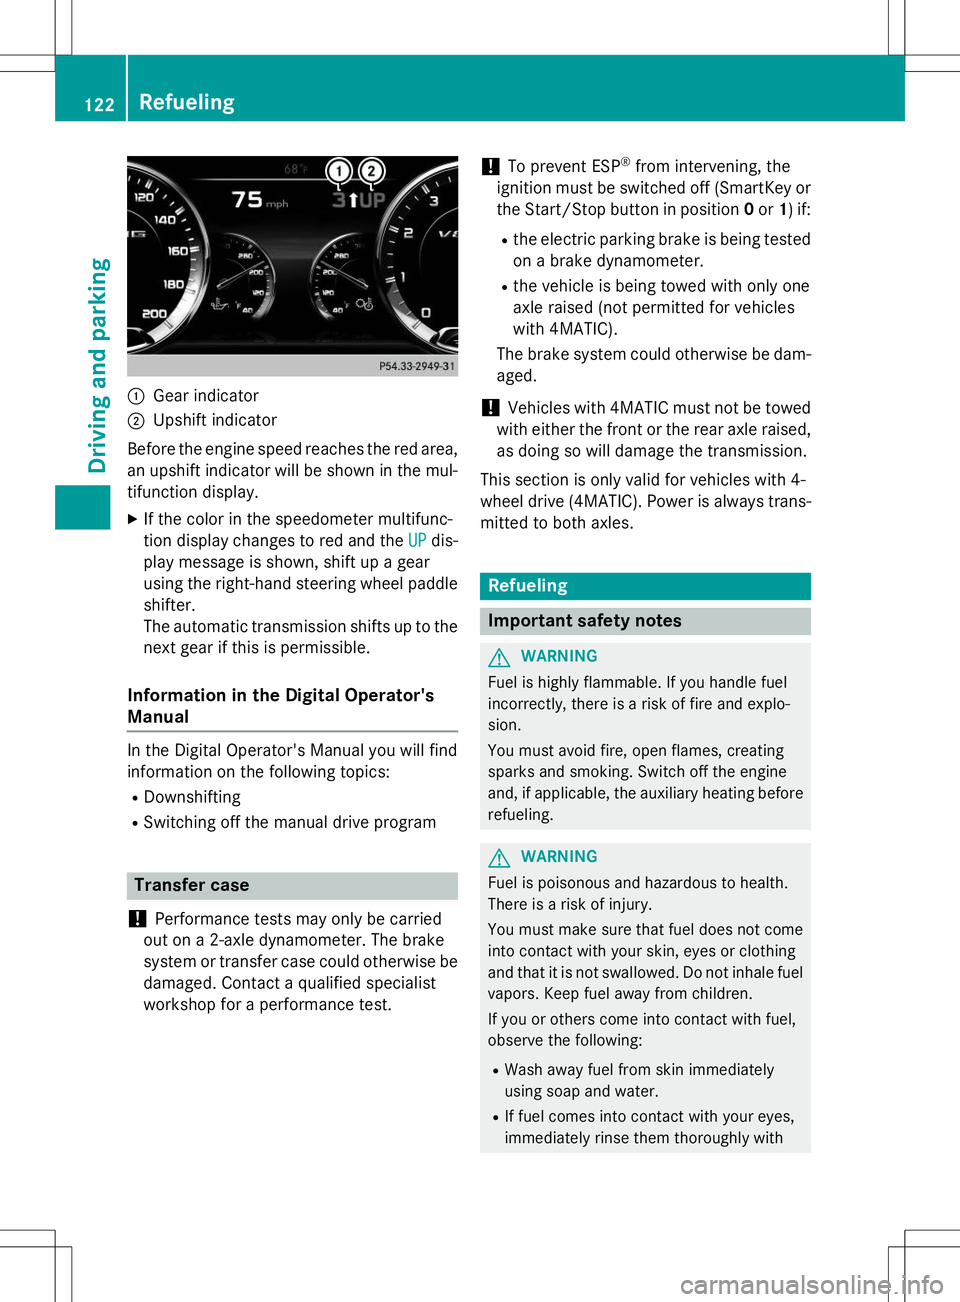
:Gear indicator
;Upshift indicator
Before the engine speed reaches the red area, an upshift indicator will be shown in the mul-
tifunction display. X If the color in the speedometer multifunc-
tion display changes to red and the
UPdis-
play message is shown, shift up a gear
using the right-hand steering wheel paddle
shifter.
The automatic transmission shifts up to the
next gear if this is permissible.
Information in the Digital Operator's
Manual
In the Digital Operator's Manual you will find
information on the following topics: R Downshifting
R Switching off the manual drive program
Transfer case
!
Performance tests may only be carried
out on a 2-axle dynamometer. The brake
system or transfer case could otherwise be
damaged. Contact a qualified specialist
workshop for a performance test.
!To prevent ESP ®
from intervening, the
ignition must be switched off (SmartKey or
the Start/Stop button in position 0or 1) if:
R the electric parking brake is being tested
on a brake dynamometer.
R the vehicle is being towed with only one
axle raised (not permitted for vehicles
with 4MATIC).
The brake system could otherwise be dam-aged.
!Vehicles with 4MATIC must not be towed
with either the front or the rear axle raised,
as doing so will damage the transmission.
This section is only valid for vehicles with 4-
wheel drive (4MATIC). Power is always trans- mitted to both axles.
Refueling
Important safety notes
GWARNING
Fuel is highly flammable. If you handle fuel
incorrectly, there is a risk of fire and explo-
sion.
You must avoid fire, open flames, creating
sparks and smoking. Switch off the engine
and, if applicable, the auxiliary heating before refueling.
GWARNING
Fuel is poisonous and hazardous to health.
There is a risk of injury.
You must make sure that fuel does not comeinto contact with your skin, eyes or clothing
and that it is not swallowed. Do not inhale fuel
vapors. Keep fuel away from children.
If you or others come into contact with fuel,
observe the following:
R Wash away fuel from skin immediately
using soap and water.
R If fuel comes into contact with your eyes,
immediately rinse them thoroughly with
122Refueling
Driving and pa rking