2015 MERCEDES-BENZ S-Class Reading
[x] Cancel search: ReadingPage 14 of 502

Charging (mains socket) ................ 212
Charging (wallbox) ........................
.215
Charging cable warming ................ 211
Cruise range .................................. 211
Energy consumption ..................... .211
General notes .................................. 48
Method of operation ..................... .210
Outside temperatures .................... 211
Overvoltage protection .................. 212
Problems with the charging proc-
ess ................................................. 218
Terms of use .................................. 211
Vehicle fire ....................................... 48
Hill start assist .................................. 192
HOLD function
Activating ....................................... 243
Deactivating ................................... 243
Display message ............................ 346
Function/notes ............................ .242
Hood
Closing .......................................... .405
Display message ............................ 352
Important safety notes .................. 404
Opening ......................................... 404
Horn ...................................................... 34
Hybrid drive
Hybrid menu (on-board com-
puter) ............................................. 310
Hybrid system
Automatic deactivation .................... 46
Danger of electric shock .................. 46
Display message ............................ 340
High-voltage battery ........................ 48
Important safety notes .................... 46
Manual deactivatio n .........................47
Opening the hood ............................48
Warning lamp ................................. 366
Hybrid vehicles
Important safety notes .................... 46
Hydroplaning .....................................2 28I
Ignition lock see Key positions
Immobilizer .......................................... 86 Indicator and warning lamps
COLLISION PREVENTION ASSIST
PLUS .............................................. 367
Indicator lamps
see Warning and indicator lamps
Indicators
see Turn signals
Instrument cluster
Overview .......................................... 35
Warning and indicator lamps ........... 36
Instrument cluster lighting ................ 37
Interior lighting
Control .......................................... .155
Emergency lighting ........................ 156
Overview ........................................ 155
Reading lamp ................................. 155 J
Jack Using ............................................. 467
Jump starting (engine) ......................432 K
Key positions SmartKey ....................................... 189
Start/Stop button .......................... 189
KEYLESS-GO
Convenience closing feature .......... 108
Deactivation ..................................... 91
Locking ............................................ 91
Unlocking ......................................... 91
Kickdown
Driving tips ................................... .200
Knee bag .............................................. 58 L
Lamps see Warning and indicator lamps
Lane Keeping Assist
see Active Lane Keeping Assist
LATCH-type (ISOFIX) child seat
anchors ................................................ 71
License plate lamp (display mes-
sage) ................................................... 334
Light function, active
Display message ............................ 335 12
Index
Page 19 of 502

RBS (Recuperative Brake System)
Warning lamp ................................. 366
Reading lamp ..................................... 155
Rear compartment
Activating/deactivating climate
control ........................................... 169
Setting the air distribution ............. 174
Setting the air vents ...................... 185
Setting the airflow ......................... 174
Setting the temperature ................ 173
Stowage compartment .................. 374
Rear lamps
see Lights
Rear seats
Adjusting ....................................... 123
Adjusting a rear reclining seat ....... 123
Overview .......................................... 43
Setting the reclined position .......... 123
Rear view camera
Cleaning instructions ..................... 416
Function/notes ............................ .256
Switching on/off ........................... 257
Rear window blind ............................ 381
Rear window defroster
Problem (malfunction) ................... 177
Switching on/off ........................... 176
Rear-view mirror
Anti-glare (manual) ........................ 140
Dipping (automatic) ....................... 142
Recuperation display ........................ 299
Recuperative Brake System
Driving safety systems ..................... 48
Important safety notes .................... 48
Refrigerant (air-conditioning sys-
tem)
Important safety notes .................. 494
Refueling
Fuel gauge ....................................... 35
Important safety notes .................. 205
Refueling process .......................... 206
see Fuel
Remote control
Garage door opene r....................... 397
Programming (garage door
opener) .......................................... 398
Replacing bulbs
General notes ................................ 157
Reporting safety defects .................... 30Rescue card
......................................... 30
Reserve (fuel tank)
see Fuel
Reserve fuel
Display message ............................ 339
Warning lamp ................................. 363
Residual heat (climate control) ........ 177
Restraint system
Display message ............................ 328
Introduction ..................................... 49
Warning lamp ................................. 362
Warning lamp (function) ................... 50
Reversing feature
Panorama sliding sunroo f.............. 111
Roller sunblind s............................. 112
Side windows ................................. 106
Trunk lid ......................................... 100
Reversing lamps (display mes-
sage) ................................................... 335
ROAD SURFACE SCAN ....................... 245
Roadside Assistance (breakdown) .... 26
Roller sunblind
Panorama roof with power tilt/
sliding panel .................................. 112
Rear side window s......................... 381
Rear window .................................. 381
Roller sunblind of the panorama
roof with power tilt/sliding panel
Operating (front roller sunblind) .... 113
Operating (rear roller sunblind )...... 113
Roof carrier ........................................ 377
Roof lining and carpets (cleaning
guidelines) ......................................... 419
Roof load (maximum) ........................ 495 S
Safety Occupant Classification System
(OCS) ............................................... 59
see Operating safety
Safety notes
Hybrid vehicles ................................ 46
Safety system
see Driving safety systems
Seat
Multicontour seat in the rear com-partment ........................................ 134 Index
17
Page 43 of 502

Overhead control panel
Function Page
:
p
Switches the left-
hand reading lamp on/off 155
;
|
Switches the auto-
matic interior lighting con-
trol on/off 155
=
G
SOS button (mbrace
system) 391
?
c
Switches the front
interior lighting on/off 155
A
u
Switches the rear
interior lighting on/off 155
B
p
Switches the right-
hand reading lamp on/off 155
C
ï
MB Info call button
(mbrace system) 393
D
Eyeglasses compartment 373
E
3
Opens/closes the
panorama roof with power
tilt/sliding panel 111
Opens/closes the front
roller sunblinds
113 Function Page
F
µ
Operates MAGIC SKY
CONTROL 114
Opens/closes the rear
roller sunblind
113
G
Buttons for the garage door
opener 398
H
Microphone for mbrace
(emergency call system),
telephone and the Voice
Control System; see the
separate operating instruc-
tions
I
F
Roadside Assistance
call button (mbrace sys-
tem) 392Overhead control panel
41At a glance
Page 60 of 502

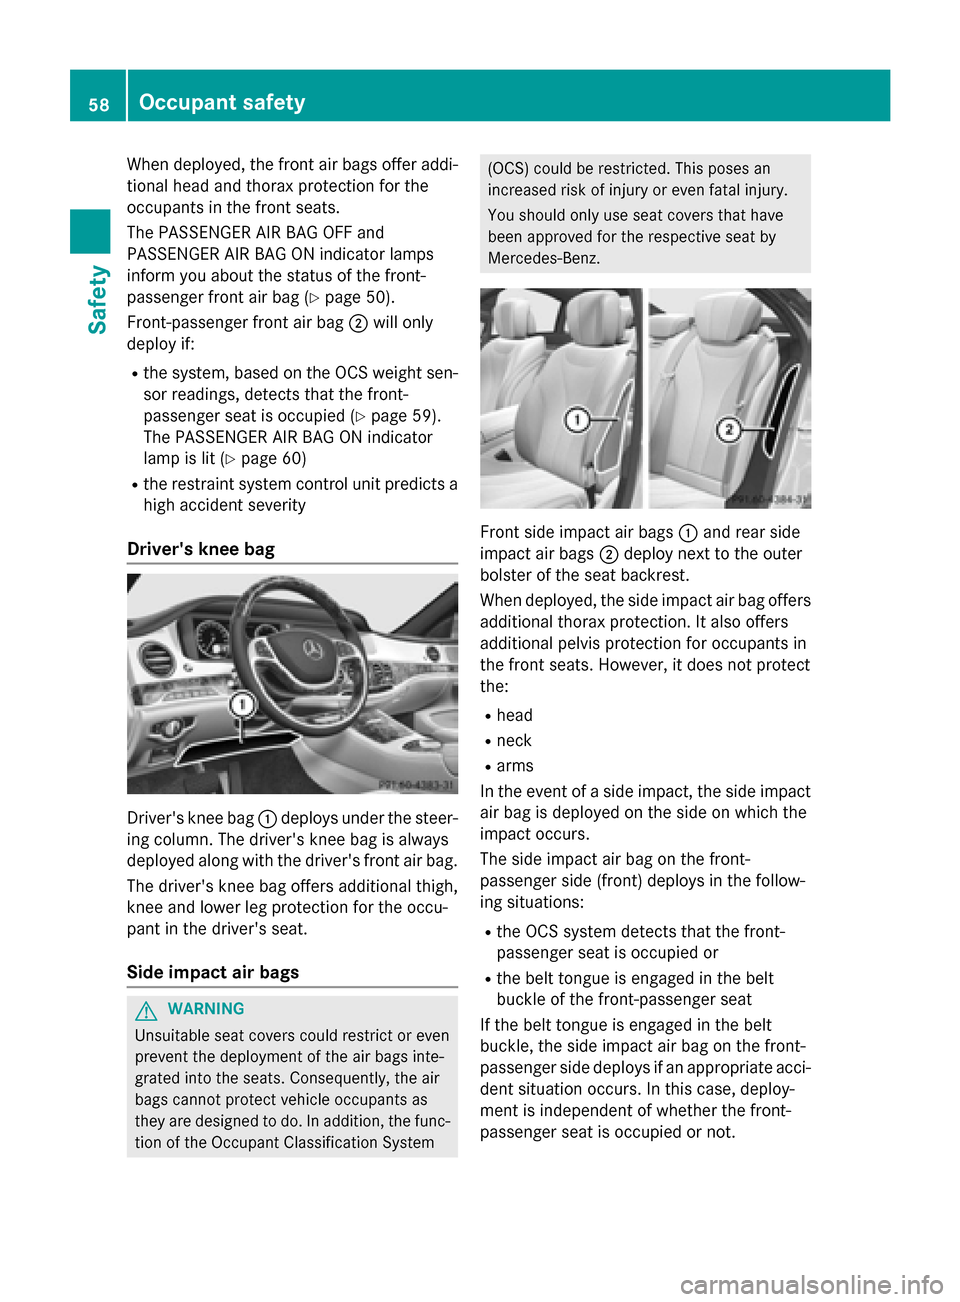
When deployed, the front air bags offer addi-
tional head and thorax protection for the
occupants in the front seats.
The PASSENGER AIR BAG OFF and
PASSENGER AIR BAG ON indicator lamps
inform you about the status of the front-
passenger front air bag (Y page 50).
Front-passenger front air bag ;will only
deploy if:
R the system, based on the OCS weight sen-
sor readings, detects that the front-
passenger seat is occupied (Y page 59).
The PASSENGER AIR BAG ON indicator
lamp is lit (Y page 60)
R the restraint system control unit predicts a
high accident severity
Driver's knee bag Driver's knee bag
:deploys under the steer-
ing column. The driver's knee bag is always
deployed along with the driver's front air bag.
The driver's knee bag offers additional thigh,
knee and lower leg protection for the occu-
pant in the driver's seat.
Side impact air bags G
WARNING
Unsuitable seat covers could restrict or even
prevent the deployment of the air bags inte-
grated into the seats. Consequently, the air
bags cannot protect vehicle occupants as
they are designed to do. In addition, the func- tion of the Occupant Classification System (OCS) could be restricted. This poses an
increased risk of injury or even fatal injury.
You should only use seat covers that have
been approved for the respective seat by
Mercedes-Benz.
Front side impact air bags
:and rear side
impact air bags ;deploy next to the outer
bolster of the seat backrest.
When deployed, the side impact air bag offers additional thorax protection. It also offers
additional pelvis protection for occupants in
the front seats. However, it does not protect
the:
R head
R neck
R arms
In the event of a side impact, the side impact
air bag is deployed on the side on which the
impact occurs.
The side impact air bag on the front-
passenger side (front) deploys in the follow-
ing situations:
R the OCS system detects that the front-
passenger seat is occupied or
R the belt tongue is engaged in the belt
buckle of the front-passenger seat
If the belt tongue is engaged in the belt
buckle, the side impact air bag on the front-
passenger side deploys if an appropriate acci- dent situation occurs. In this case, deploy-
ment is independent of whether the front-
passenger seat is occupied or not. 58
Occupant safetySafety
Page 157 of 502

users are recognize, the high-beam head-
lamps are switched on.
If you are driving at speeds below approx-
imately 16 mph (25 km/h) or the roads are
adequately illuminated:
The high-beam headlamps are switched off automatically. The Kindicator lamp in
the instrument cluster goes out. The _
indicator lamp in the multifunction display
remains lit.
X To switch off: move the combination
switch back to its normal position or move the light switch to another position.
The _ indicator lamp in the multifunc-
tion display goes out. Headlamps fogged up on the inside
Certain climatic and physical conditions may
cause moisture to form in the headlamp. This moisture does not affect the functionality of
the headlamp. Interior lighting
Overview of interior lighting
Front overhead control panel :
p To switch the left-hand front reading
lamp on/off
; | To switch the automatic interior
lighting control on/off
= c To switch the front interior lighting
on/off ?
u To switch the rear interior lighting
on/off
A p To switch the right-hand front read-
ing lamp on/off
Control panel in the grab handle (rear
compartment) X
To switch on on the corresponding side
of the vehicle: press button;.
Reading lamp :and the make-up lamp
light up.
X To switch off: press button;.
Press once: the make-up lamp goes out.
Press twice: reading lamp :goes out.
X To switch on on both sides of the vehi-
cle: press button =.
Reading lamp :and the make-up lamp
light up.
X To switch off: press button=.
Reading lamp :and the make-up lamp go
out. Interior lighting control
General notes In order to prevent the vehicle's battery from
discharging, the interior lighting functions are
automatically deactivated after some time
unless the SmartKey is in position 2in the
ignition lock.
The color, brightness, zone and display lamp
for the ambient lighting can be set using Interior lighting
155Lights and windshield wipers Z
Page 158 of 502

COMAND (see the separate operating
instructions for COMAND).
The interior lighting control can be operated
using the front overhead control panel.
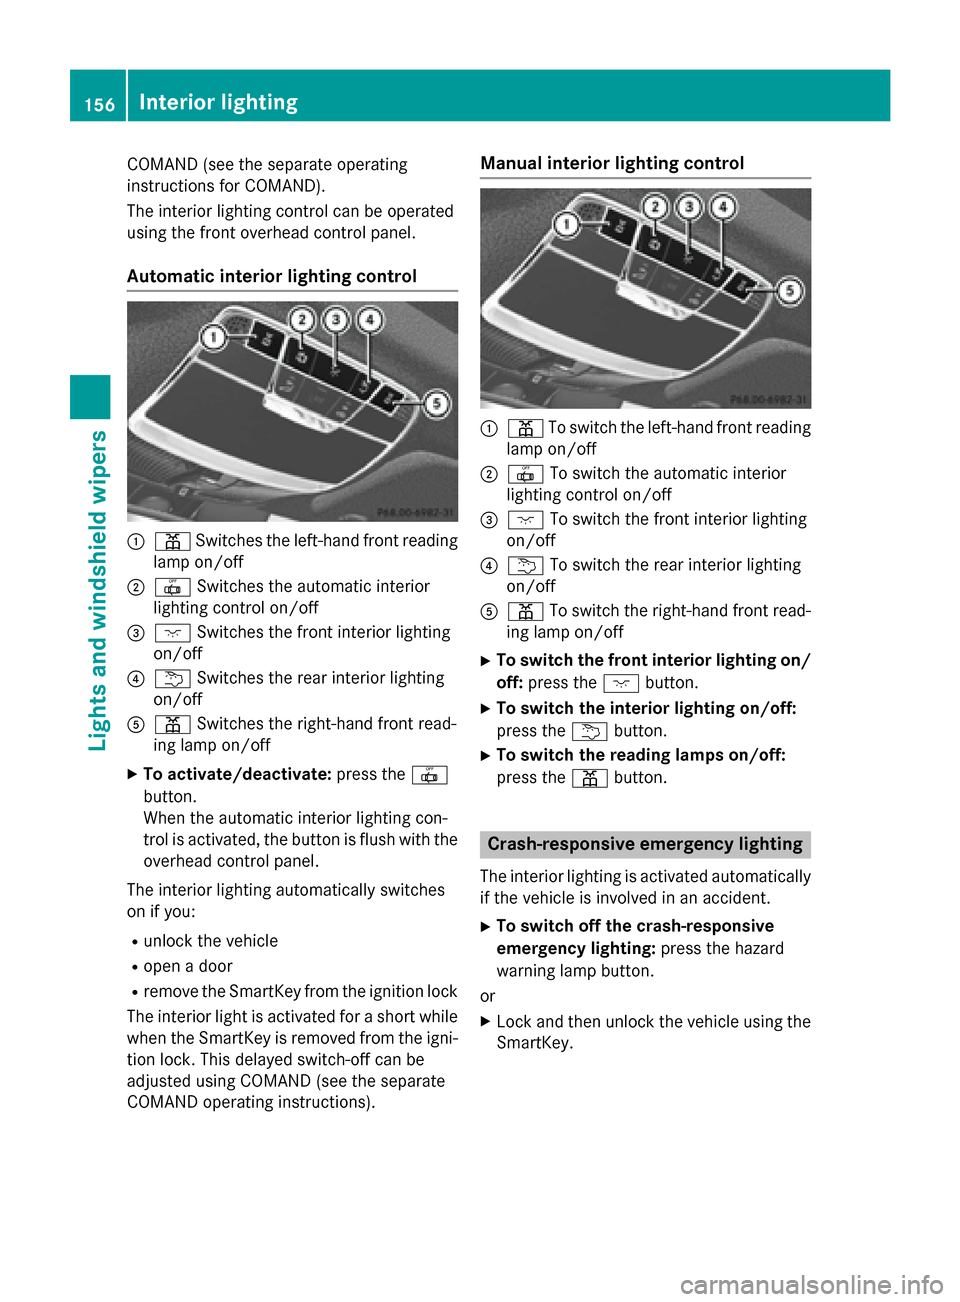
Automatic interior lighting control :
p Switches the left-hand front reading
lamp on/off
; | Switches the automatic interior
lighting control on/off
= c Switches the front interior lighting
on/off
? u Switches the rear interior lighting
on/off
A p Switches the right-hand front read-
ing lamp on/off
X To activate/deactivate: press the|
button.
When the automatic interior lighting con-
trol is activated, the button is flush with the overhead control panel.
The interior lighting automatically switches
on if you:
R unlock the vehicle
R open a door
R remove the SmartKey from the ignition lock
The interior light is activated for a short while when the SmartKey is removed from the igni-
tion lock. This delayed switch-off can be
adjusted using COMAND (see the separate
COMAND operating instructions). Manual interior lighting control
:
p To switch the left-hand front reading
lamp on/off
; | To switch the automatic interior
lighting control on/off
= c To switch the front interior lighting
on/off
? u To switch the rear interior lighting
on/off
A p To switch the right-hand front read-
ing lamp on/off
X To switch the front interior lighting on/
off: press the cbutton.
X To switch the interior lighting on/off:
press the ubutton.
X To switch the reading lamps on/off:
press the pbutton. Crash-responsive emergency lighting
The interior lighting is activated automatically
if the vehicle is involved in an accident.
X To switch off the crash-responsive
emergency lighting: press the hazard
warning lamp button.
or X Lock and then unlock the vehicle using the
SmartKey. 156
Interior lightingLights and windshield wipers
Page 179 of 502

Problems with the rear window defroster
Problem
Possible causes/consequences and
M
MSolutions The rear window
defroster has deactiva-
ted prematurely or can-
not be activated. The battery has not been sufficiently charged.
X Switch off any consumers that are not required, e.g. reading
lamps, interior lighting or the seat heating.
When the battery is sufficiently charged, the rear window
defroster can be activated again. Activating/deactivating air-recircula-
tion mode
General notes You can also temporarily deactivate the flow
of fresh air manually if unpleasant odors are
entering the vehicle from outside. The air
already inside the vehicle will then be recir-
culated.
If you switch on air-recirculation mode, the
windows can fog up more quickly, in particu-
lar at low temperatures. Only use air-recircu-
lation mode briefly to prevent the windows
from fogging up.
Activating/deactivating X
Turn the SmartKey to position 2in the igni-
tion lock (Y page 189).
X To activate: press thegrocker switch
up or down.
The indicator lamp in the grocker
switch lights up.
Air-recirculation mode is automatically acti-
vated at high levels of pollution or at high out- side temperatures. The indicator lamp in the
g rocker switch is not lit when automatic
air-recirculation mode is activated. Outside
air is added after about 30 minutes.
X To deactivate: press thegrocker
switch up or down.
The indicator lamp in the grocker
switch goes out. Air-recirculation mode deactivates automati-
cally:
R after approximately five minutes at outside
temperatures below approximately 41 ‡
(5 †)
R after approximately five minutes if cooling
with air dehumidification is deactivated
R after approximately 30 minutes at outside
temperatures above approximately 41 ‡
(5 †) if the "Cooling with air dehumidifica-
tion" function is activated Activating/deactivating the residual
heat function
General notes Vehicles with rear-compartment climate
control:
once the engine is switched off, it is
possible to make use of the residual heat of
the engine to continue heating or ventilating
the rear and front compartment of the vehicle
for approximately 15 minutes. If the "Residual
heat" function is set for only the front or only
the rear compartment, it is possible to con-
tinue heating or ventilating for approximately
30 minutes.
Vehicles without rear-compartment cli-
mate control: once the engine is switched
off, it is possible to make use of the residual
heat of the engine to continue heating or ven- tilating the front compartment of the vehicle
for approximately 30 minutes.
The heating or ventilation time depends on
the temperature that has been set. Operating the climate control systems
177Climate control
Page 463 of 502

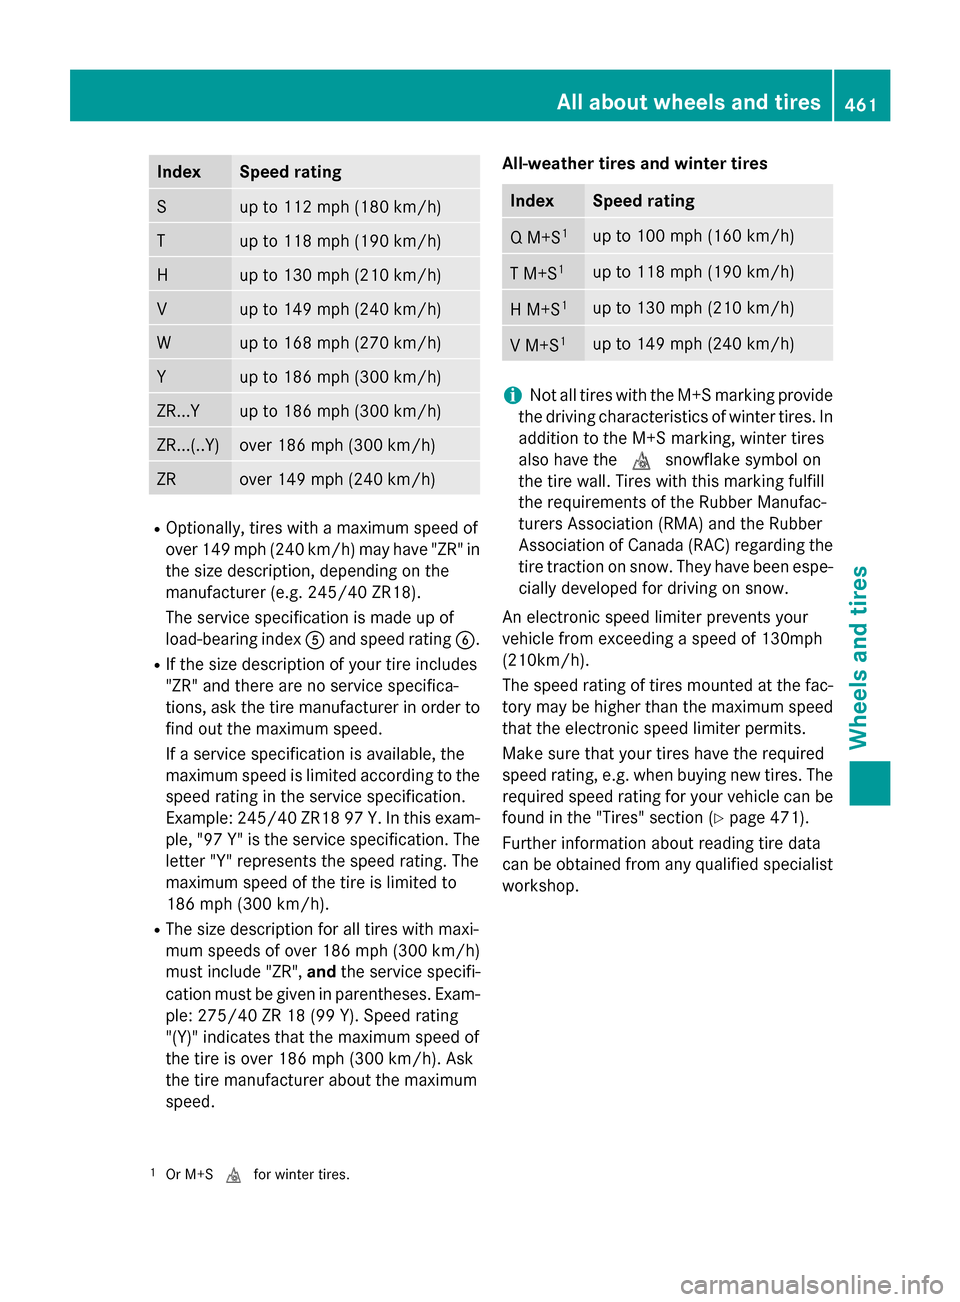
Index Speed rating
S up to 112 mph (180 km/h)
T up to 118 mph (190 km/h)
H up to 130 mph (210 km/h)
V up to 149 mph (240 km/h)
W up to 168 mph (270 km/h)
Y up to 186 mph (300 km/h)
ZR...Y up to 186 mph (300 km/h)
ZR...(..Y) over 186 mph
(300 km/h) ZR over 149 mph
(240 km/h) R
Optionally, tires with a maximum speed of
over 149 mph (240 km/h) may have "ZR" in the size description, depending on the
manufacturer (e.g. 245/40 ZR18).
The service specification is made up of
load-bearing index Aand speed rating B.
R If the size description of your tire includes
"ZR" and there are no service specifica-
tions, ask the tire manufacturer in order to
find out the maximum speed.
If a service specification is available, the
maximum speed is limited according to the
speed rating in the service specification.
Example: 245/40 ZR18 97 Y.In this exam-
ple, "97 Y" is the service specification. The letter "Y" represents the speed rating. The
maximum speed of the tire is limited to
186 mph (300 km/h).
R The size description for all tires with maxi-
mum speeds of over 186 mph (300 km/h)
must include "ZR", andthe service specifi-
cation must be given in parentheses. Exam- ple: 275/40 ZR 18 (99 Y). Speed rating
"(Y)" indicates that the maximum speed of
the tire is over 186 mph (300 km/h). Ask
the tire manufacturer about the maximum
speed. All-weather tires and winter tires Index Speed rating
Q M+S
1 up to 100 mph (160 km/h)
T M+S
1 up to 118 mph (190 km/h)
H M+S
1 up to 130 mph (210 km/h)
V M+S
1 up to 149 mph (240 km/h)
i
Not all tires with the M+S marking provide
the driving characteristics of winter tires. In
addition to the M+S marking, winter tires
also have the isnowflake symbol on
the tire wall. Tires with this marking fulfill
the requirements of the Rubber Manufac-
turers Association (RMA) and the Rubber
Association of Canada (RAC) regarding the
tire traction on snow. They have been espe- cially developed for driving on snow.
An electronic speed limiter prevents your
vehicle from exceeding a speed of 130mph
(210km/h).
The speed rating of tires mounted at the fac-
tory may be higher than the maximum speed
that the electronic speed limiter permits.
Make sure that your tires have the required
speed rating, e.g. when buying new tires. The required speed rating for your vehicle can be
found in the "Tires" section (Y page 471).
Further information about reading tire data
can be obtained from any qualified specialist workshop.
1 Or M+S ifor winter tires. All about wheels and tires
461Wheels and tires Z