2015 MERCEDES-BENZ S-Class trunk
[x] Cancel search: trunkPage 376 of 502
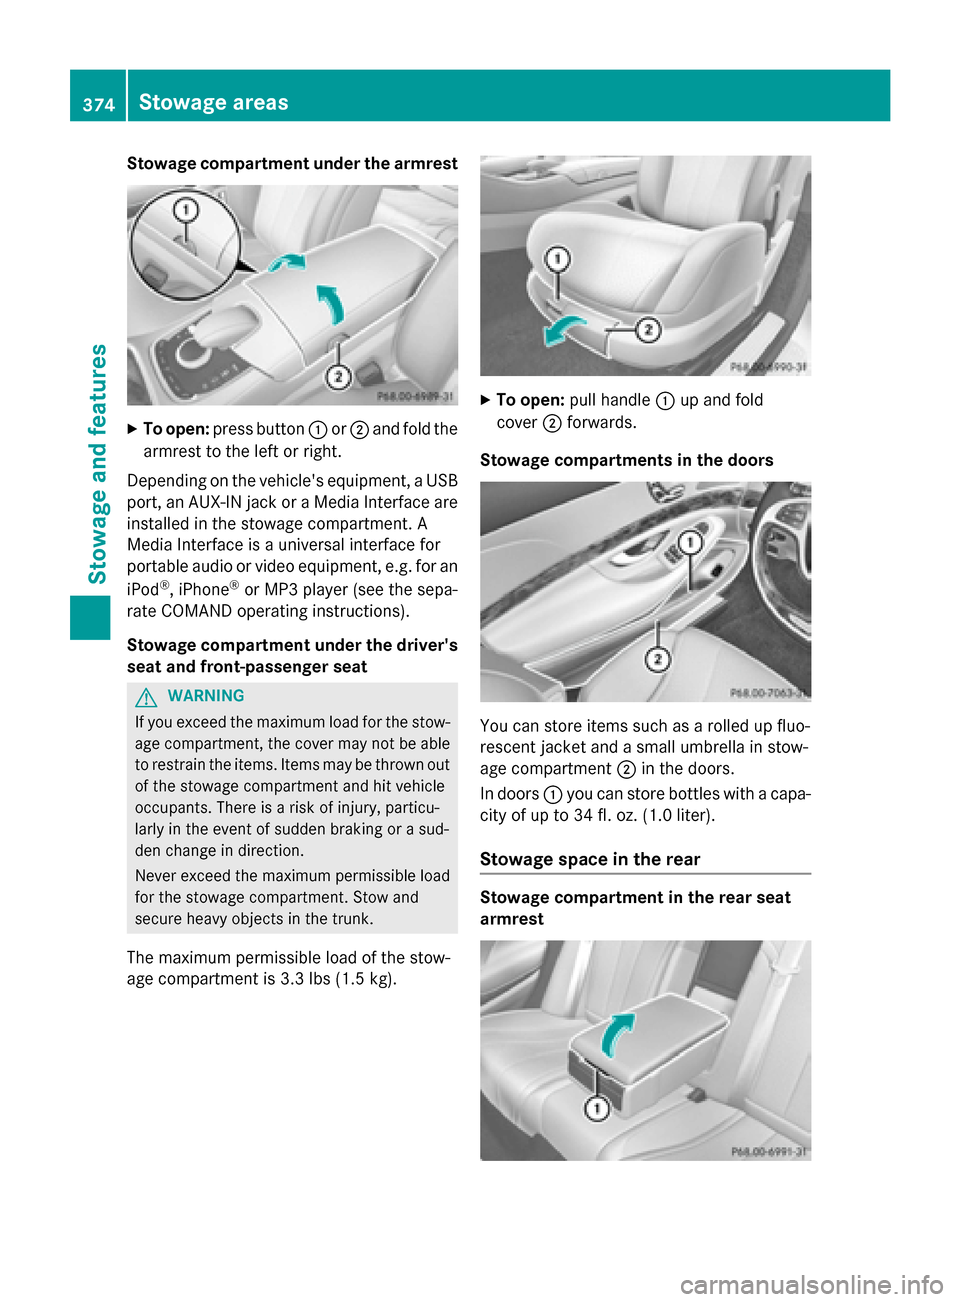
Stowage compartment under the armrest
X
To open: press button :or; and fold the
armrest to the left or right.
Depending on the vehicle's equipment, a USB port, an AUX-IN jack or a Media Interface areinstalled in the stowage compartment. A
Media Interface is a universal interface for
portable audio or video equipment, e.g. for an
iPod ®
, iPhone ®
or MP3 player (see the sepa-
rate COMAND operating instructions).
Stowage compartment under the driver's seat and front-passenger seat G
WARNING
If you exceed the maximum load for the stow- age compartment, the cover may not be ableto restrain the items. Items may be thrown out
of the stowage compartment and hit vehicle
occupants. There is a risk of injury, particu-
larly in the event of sudden braking or a sud-
den change in direction.
Never exceed the maximum permissible load
for the stowage compartment. Stow and
secure heavy objects in the trunk.
The maximum permissible load of the stow-
age compartment is 3.3 lbs (1.5 kg). X
To open: pull handle :up and fold
cover ;forwards.
Stowage compartments in the doors You can store items such as a rolled up fluo-
rescent jacket and a small umbrella in stow-
age compartment
;in the doors.
In doors :you can store bottles with a capa-
city of up to 34 fl. oz. (1.0 liter).
Stowage space in the rear Stowage compartment in the rear seat
armrest374
Stowage areasStowage and features
Page 378 of 502
Vehicles with individual seats and center con-
sole in the rear:
X To open: fold down the rear armrest.
X Pull handle :and fold down cover ;.
Depending on the vehicle's equipment, a DVD player is installed instead of a stowage com-
partment.
Folding table G
WARNING
If the folding table is folded out while the vehi- cle is in motion, passengers can be thrown
against it, particularly in the event of an acci- dent, heavy braking or a sudden change of
direction. There is a risk of injury.
Fold the folding table away before each jour-
ney. X
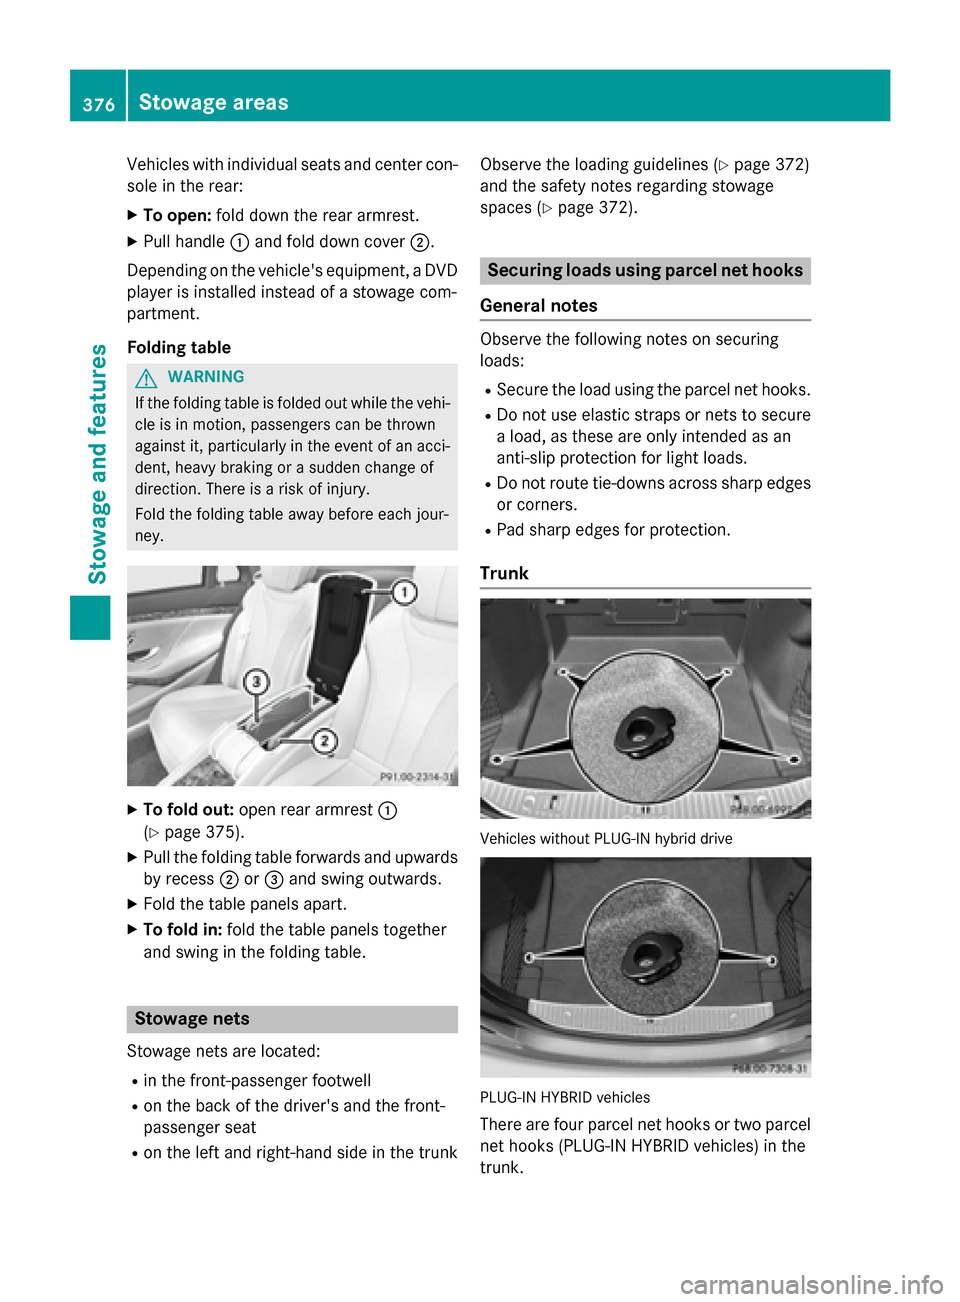
To fold out: open rear armrest :
(Y page 375).
X Pull the folding table forwards and upwards
by recess ;or= and swing outwards.
X Fold the table panels apart.
X To fold in: fold the table panels together
and swing in the folding table. Stowage nets
Stowage nets are located: R in the front-passenger footwell
R on the back of the driver's and the front-
passenger seat
R on the left and right-hand side in the trunk Observe the loading guidelines (Y
page 372)
and the safety notes regarding stowage
spaces (Y page 372). Securing loads using parcel net hooks
General notes Observe the following notes on securing
loads:
R Secure the load using the parcel net hooks.
R Do not use elastic straps or nets to secure
a load, as these are only intended as an
anti-slip protection for light loads.
R Do not route tie-downs across sharp edges
or corners.
R Pad sharp edges for protection.
Trunk Vehicles without PLUG-IN hybrid drive
PLUG-IN HYBRID vehicles
There are four parcel net hooks or two parcel net hooks (PLUG-IN HYBRID vehicles) in the
trunk. 376
Stowage areasStowage and features
Page 379 of 502

Stowage well under the trunk floor
Under the trunk floor you can find a multi-
purpose recess, e.g. for TIREFIT. X
To open: open the trunk lid.
X Holding the ribbing, press handle ;down-
wards.
Handle ;folds upwards.
X Swing trunk floor :upwards using han-
dle ;until it rests against the trunk parti-
tion. X
Fold out hook =on the underside of the
trunk floor. X
Clip hook =into groove ?.
X To close: unclip hook =from groove ?.
X Fasten hook =to the bracket on the
underside of the trunk floor.
X Fold the trunk floor down. Roof carrier
Important safety notes G
WARNING
When you load the roof, the center of gravity
of the vehicle rises and the driving character- istics change. If you exceed the maximum roof
load, the driving characteristics, as well as
steering and braking, will be greatly impaired.There is a risk of an accident.
Never exceed the maximum roof load and
adjust your driving style.
You will find information on the maximum roof
load in the "Technical data" section
(Y page 495).
! Mercedes-Benz recommends that you
only use roof carriers that have been tested
and approved for Mercedes-Benz vehicles.
This helps to avoid damage to the vehicle.
Position the load on the roof carrier in such
a way that the vehicle will not sustain dam-
age even when it is in motion.
Ensure that, depending on the vehicle's
equipment, you can raise the panorama
roof with power tilt/sliding panel fully and
open the trunk lid fully when the roof carrier is installed.
! To avoid damaging or scratching the cov-
ers, do not use metallic or hard objects to
open them.
An incorrectly secured roof carrier or roof
load may become detached from the vehicle.
You must therefore ensure that you observe
the roof carrier manufacturer's installation
instructions. Stowage areas
377Stowage and features Z
Page 380 of 502
Vehicles with a panorama roof with
power tilt/sliding panel: the panorama roof
with power tilt/sliding panel cannot be
opened if a roof carrier is installed. The pan-
orama roof with power tilt/sliding panel can
still be raised to allow ventilation of the vehi-
cle interior.
If the panorama roof with power tilt/sliding
panel makes contact with a roof carrier
approved by Mercedes-Benz, the sunroof will lower slightly but remain raised at the rear.
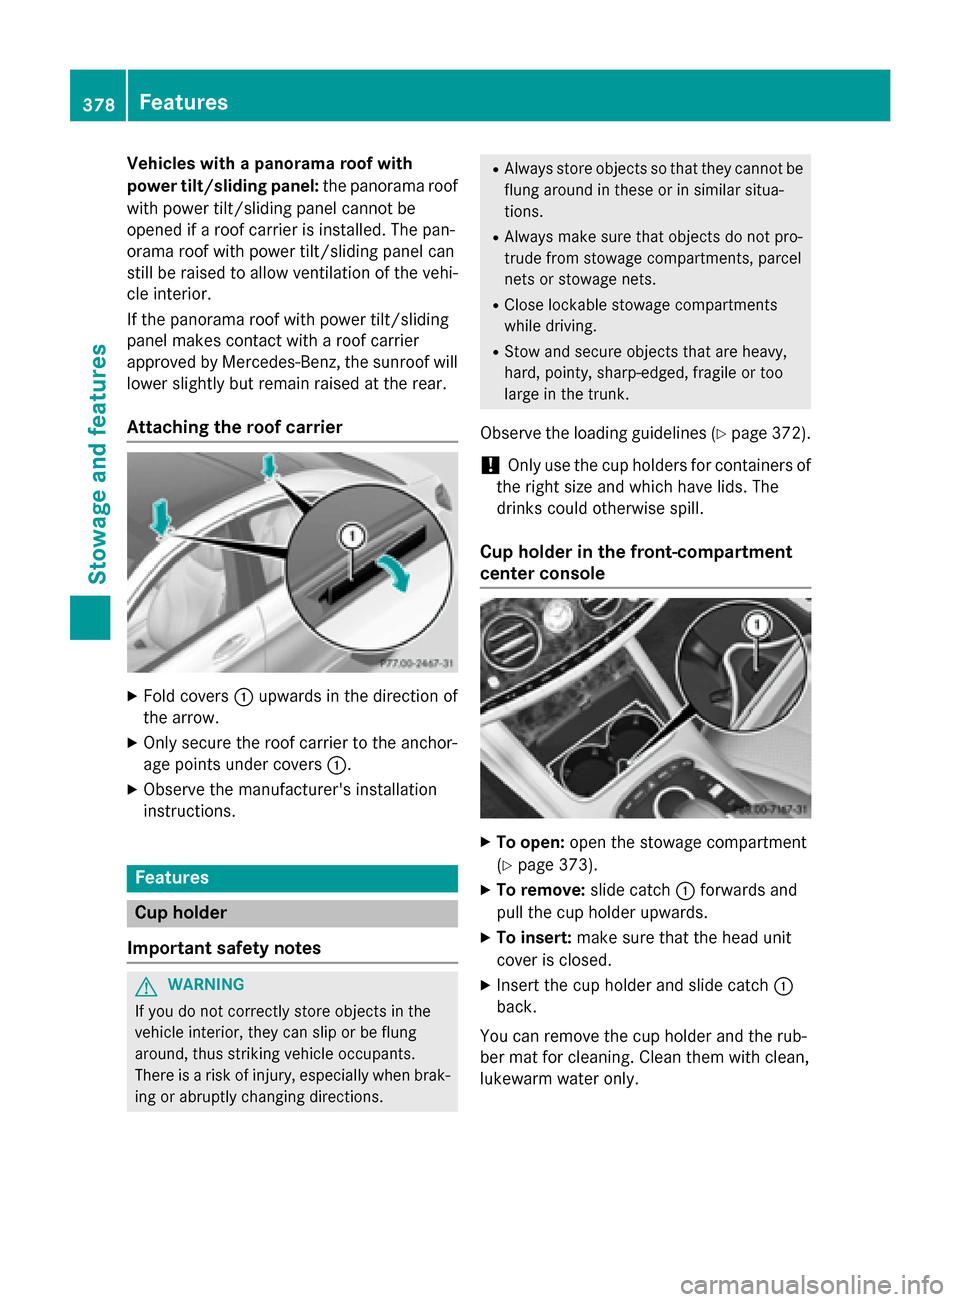
Attaching the roof carrier X
Fold covers :upwards in the direction of
the arrow.
X Only secure the roof carrier to the anchor-
age points under covers :.
X Observe the manufacturer's installation
instructions. Features
Cup holder
Important safety notes G
WARNING
If you do not correctly store objects in the
vehicle interior, they can slip or be flung
around, thus striking vehicle occupants.
There is a risk of injury, especially when brak- ing or abruptly changing directions. R
Always store objects so that they cannot be
flung around in these or in similar situa-
tions.
R Always make sure that objects do not pro-
trude from stowage compartments, parcel
nets or stowage nets.
R Close lockable stowage compartments
while driving.
R Stow and secure objects that are heavy,
hard, pointy, sharp-edged, fragile or too
large in the trunk.
Observe the loading guidelines (Y page 372).
! Only use the cup holders for containers of
the right size and which have lids. The
drinks could otherwise spill.
Cup holder in the front-compartment
center console X
To open: open the stowage compartment
(Y page 373).
X To remove: slide catch:forwards and
pull the cup holder upwards.
X To insert: make sure that the head unit
cover is closed.
X Insert the cup holder and slide catch :
back.
You can remove the cup holder and the rub-
ber mat for cleaning. Clean them with clean,
lukewarm water only. 378
FeaturesStowage and features
Page 387 of 502
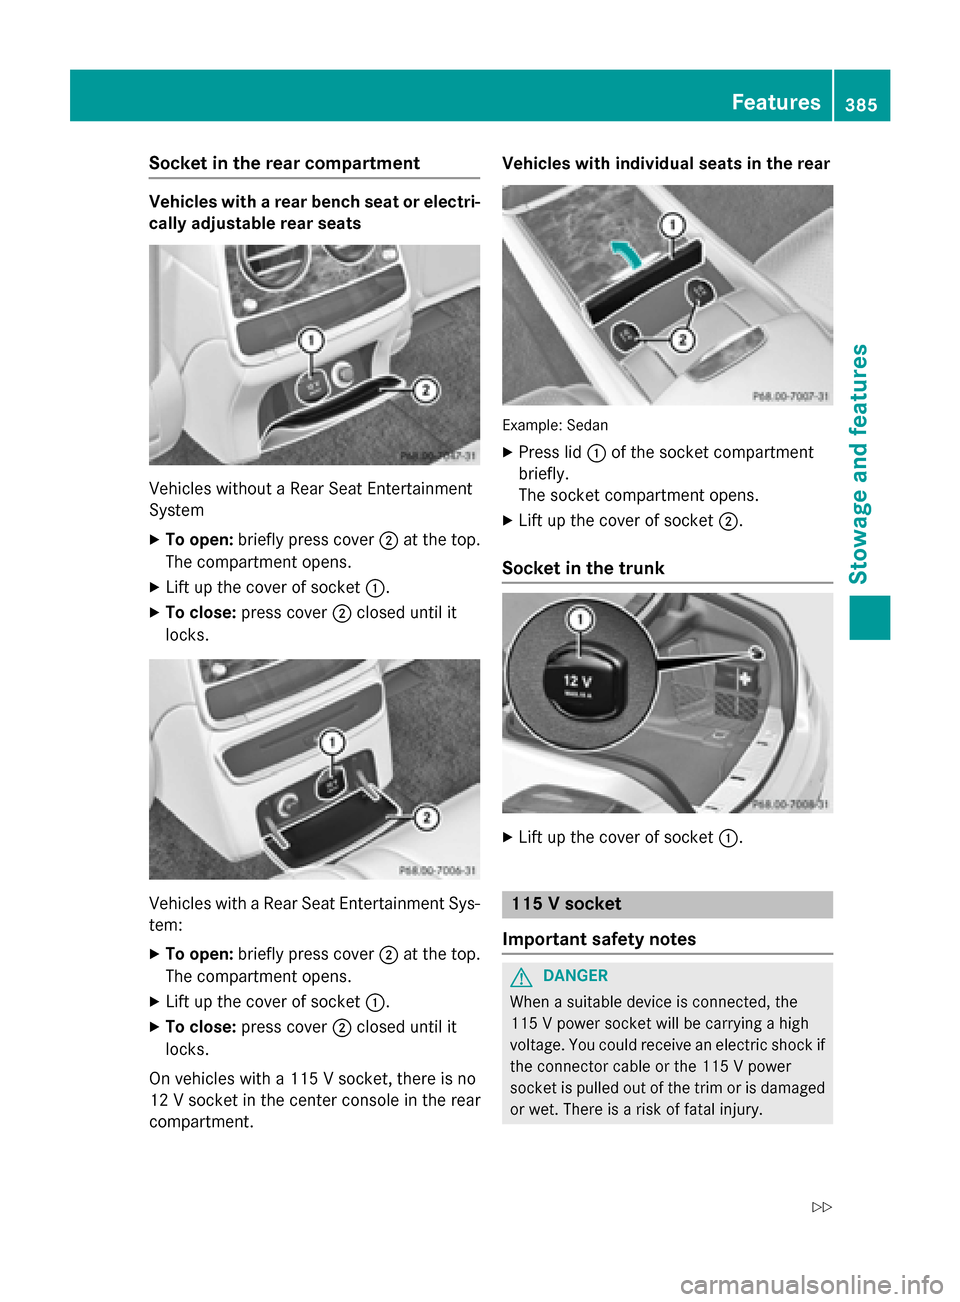
Socket in the rear compartment
Vehicles with a rear bench seat or electri-
cally adjustable rear seats Vehicles without a Rear Seat Entertainment
System
X To open: briefly press cover ;at the top.
The compartment opens.
X Lift up the cover of socket :.
X To close: press cover ;closed until it
locks. Vehicles with a Rear Seat Entertainment Sys-
tem:
X To open: briefly press cover ;at the top.
The compartment opens.
X Lift up the cover of socket :.
X To close: press cover ;closed until it
locks.
On vehicles with a 115 V socket, there is no
12 V socket in the center console in the rear
compartment. Vehicles with individual seats in the rear
Example: Sedan
X Press lid :of the socket compartment
briefly.
The socket compartment opens.
X Lift up the cover of socket ;.
Socket in the trunk X
Lift up the cover of socket :. 115 V socket
Important safety notes G
DANGER
When a suitable device is connected, the
115 V power socket will be carrying a high
voltage. You could receive an electric shock if the connector cable or the 115 V power
socket is pulled out of the trim or is damaged
or wet. There is a risk of fatal injury. Features
385Stowage and features
Z
Page 388 of 502
R
Use only connector cables that are dry and
free of damage.
R When the ignition is off, make sure that the
115 V power socket is dry.
R Have the 115 V power socket checked or
replaced immediately at a qualified speci-
alized workshop if it is damaged or has been
pulled out of the trim.
R Never plug the connector cable into a 115 V
power socket that is damaged or has been
pulled out of the trim. G
DANGER
If you reach into the power socket or plug
inappropriate devices into the power socket,
you could receive an electric shock. There is a risk of fatal injury.
Only connect appropriate devices to the
power socket.
! Note that work and repairs on the 115 V
power socket should only be carried out by
qualified specialist personnel.
General notes The 115 V power socket provides an alter-
nating voltage of 115 V so that small elec-
tronic devices can be connected. These devi- ces, such as games consoles, chargers and
laptops, must not consume more than a max-imum of 150 watts altogether.
Requirements for operation of these devices:
R the electronic device that you connect has
a suitable connector and conforms to
standards specific to the country you are in.
R the plug of the electronic device is plugged
correctly into 115 V power socket.
R the maximum wattage of the device to be
connected must not exceed 150 watts.
R the on-board power supply is within a per-
missible voltage range.
R the 12 V sockets in the center console in
the front compartment (Y page 384) and in
the trunk are functional (Y page 385).Using the 115 V power socket
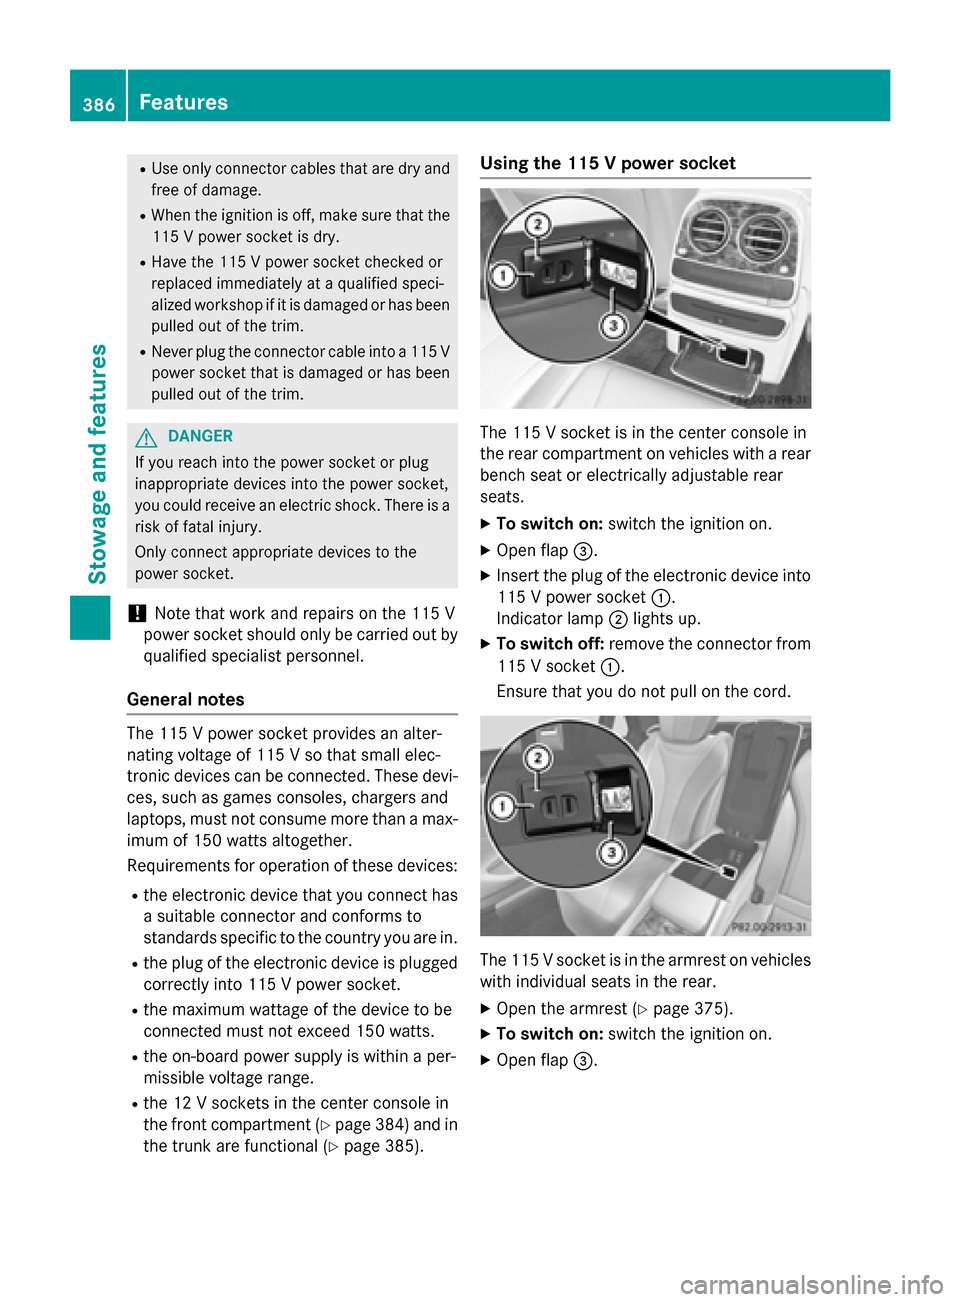
The 115 V socket is in the center console in
the rear compartment on vehicles with a rear
bench seat or electrically adjustable rear
seats.
X To switch on: switch the ignition on.
X Open flap =.
X Insert the plug of the electronic device into
115 V power socket :.
Indicator lamp ;lights up.
X To switch off: remove the connector from
115 V socket :.
Ensure that you do not pull on the cord. The 115 V socket is in the armrest on vehicles
with individual seats in the rear.
X Open the armrest (Y page 375).
X To switch on: switch the ignition on.
X Open flap =. 386
FeaturesStowage and features
Page 390 of 502

Problems with the 115 V power socket
Problem
Possible causes/consequences and
M
MSolutions The warning lamp on
the 115 V power socket
is not lit. The on-board voltage is too low because the battery is too weak.
X Start the engine.
or
X Charge the battery (Y page 430).
If the indicator lamp still does not light up:
X Visit a qualified specialist workshop. The temperature of the DC/AC converter is temporarily too high.
X Remove the electronic device connector from the 115 V socket.
X Let the DC/AC converter cool down.
If the indicator lamp still does not light up after cooling down the
converter: X Visit a qualified specialist workshop. You have connected an electronic device that has a constant
nominal power of less than 150 watts, but has a very high switch-
on current. This device will not work. If you connect such a device, the 115 V power socket will not supply it with power.
X Connect a suitable electronic device. Coolbox in the rear compartment
Important safety notes G
WARNING
If you cover the ventilation grille for the cool-
box, it may overheat. There is a risk of fire.
Always make sure that the ventilation grille is not covered.
The ventilation grille for the coolbox is in the
trunk.
The coolbox can bear a maximum load of
7.7 lb (3.5 kg).
If you want to store a bottle in the upper com-
partment of the coolbox, the capacity of the
bottle must not exceed 17 fl. oz. (0.5 l).
Store only plastic bottles in the upper com-
partment of the coolbox. Using the coolbox
X
Vehicles with rear seat armrest: fold
down the rear seat armrest.
X Pull handle :and fold down cover ;.388
FeaturesStowage and features
Page 414 of 502

After the vehicle has been washed, brake
carefully while paying attention to the traffic
conditions until full braking power is restored.
! If DISTRONIC PLUS or the HOLD function
is activated, the vehicle brakes automati-
cally in certain situations. To prevent dam-
age to the vehicle, deactivate DISTRONIC
PLUS and the HOLD function in the follow-
ing or other similar situations:
R when towing the vehicle
R in the car wash
! Never clean your vehicle in a Touchless
Automatic Car Wash as these use special
cleaning agents. These cleaning agents can
damage the paintwork or plastic parts.
! Make sure that:
R the side windows and the sliding sunroof
are fully closed.
R the ventilation/heating is switched off
(the OFF button has been pressed).
R the windshield wiper switch is at position
0.
R the 360° camera or rear view camera is
switched off.
The vehicle may otherwise be damaged.
! If the SmartKey is within the rear detec-
tion range of KEYLESS-GO, the following
situations, for example, could lead to the
unintentional opening of the trunk:
R using a car wash
R using a power washer
Make sure that the SmartKey is at least
10 ft (3 m) away from the vehicle.
! Make sure that the automatic transmis-
sion is in neutral position Nwhen washing
your vehicle in a tow-through car wash. The vehicle may otherwise be damaged.
R Operating with the SmartKey:
Do not remove the SmartKey from the
ignition lock. Do not open the driver's
door when the engine is switched off or
at very low speeds. Otherwise, when in transmission position
Dor Rthe auto-
matic transmission will automatically
switch to park position Pand block the
wheels.
R Operating with the Start/Stop button:
Do not open the driver's door when the
engine is switched off or at very low
speeds. Otherwise, when in transmission
position Dor Rthe automatic transmis-
sion will automatically switch to park
position Pand block the wheels.
Observe the following to make sure that the
automatic transmission stays in position N
neutral:
Operating with the SmartKey:
X Make sure that the ignition is switched on.
X Make sure that the vehicle is stationary.
X Depress and hold the brake pedal.
X Shift to neutral N.
X Release the brake pedal.
X Release the electric parking brake, if nec-
essary.
X Switch off the ignition and leave the Smart-
Key in the ignition lock.
Operating with the Start/Stop button:
X Make sure that the ignition is switched on.
X Make sure that the vehicle is stationary.
X Depress and hold the brake pedal.
X Engage park position P.
X Release the brake pedal.
X Remove Start/Stop button from ignition
lock (Y page 189).
X Insert the SmartKey into the ignition lock.
X Switch on the ignition.
X Depress and hold the brake pedal.
X Shift to neutral N.
X Release the brake pedal.
X Release the electric parking brake, if nec-
essary.
X Switch off the ignition and leave the Smart-
Key in the ignition lock. 412
CareMaintenance and care