2015 MERCEDES-BENZ S-Class belt
[x] Cancel search: beltPage 86 of 502

Observe information regarding indicator and
warning lamps (Y page 358) as well as dis-
play messages (Y page 320).ADAPTIVE BRAKE
ADAPTIVE BRAKE enhances braking safety
and offers increased braking comfort. In addi-
tion to the braking function, ADAPTIVE BRAKE
also has the HOLD function (Y page 242) and
hill start assist (Y page 192). PRE-SAFE
®
Brake
General information i
Pay attention to the important safety
notes in the "Driving safety systems" sec-
tion (Y page 76).
PRE‑SAFE ®
Brake is only available for vehi-
cles with the Driving Assistance package.
For PRE-SAFE ®
Brake to assist you when driv-
ing, the radar sensor system and the camera
system must be switched on and be opera-
tional.
With the help of the radar sensor system and
the camera system, PRE-SAFE ®
Brake can
detect obstacles that are in front of your vehi-
cle for an extended period of time.
In addition, pedestrians in the path of your
vehicle can be detected.
PRE-SAFE ®
Brake detects pedestrians using
typical characteristics such as the body con-
tours and posture of a person standing
upright.
Observe the restrictions described in the
"Important safety notes" sec-
tion“ (Y page 84).
PRE-SAFE ®
Brake can help you to minimize
the risk of a collision with a vehicle ahead or a pedestrian, and reduce the effects of such a
collision. If PRE-SAFE ®
Brake has detected a
risk of collision, you will be warned visually
and acoustically as well as by automatic brak- ing. Important safety notes G
WARNING
PRE-SAFE ®
Brake will initially brake your vehi-
cle by a partial application of the brakes if a
danger of collision is detected. There may be
a collision unless you brake yourself. Even
after subsequent full application of the brakes
a collision cannot always be avoided, partic-
ularly when approaching at too high a speed.
There is a risk of an accident.
Always apply the brakes yourself and try to
take evasive action, provided it is safe to do
so. G
WARNING
PRE-SAFE ®
Brake cannot always clearly iden-
tify objects and complex traffic conditions.
In these cases, PRE-SAFE ®
Brake may:
R give an unnecessary warning and then
brake the vehicle
R not give a warning or intervene
There is a risk of an accident.
Always pay particular attention to the traffic
situation and be ready to brake, especially if
PRE-SAFE ®
Brake warns you. Terminate the
intervention in a non-critical driving situation.
In order to maintain the appropriate distance
to the vehicle in front and thus prevent a col- lision, you must apply the brakes yourself.
PRE-SAFE ®
Brake can also brake the vehicle
automatically under the following conditions:
R the driver and front-passenger have their
seat belts fastened
and
R the vehicle speed is between approx-
imately 4 mph (7 km/h) and 124 mph
(200 km/h)
At a speed of up to approximately 44 mph
(70 km/h), PRE-SAFE ®
Brake can also detect:
R stationary objects in the path of your vehi-
cle, e.g. stopped or parked vehicles
R pedestrians in the path of your vehicle 84
Driving safety systemsSafety
Page 122 of 502

Useful information
i This Operator's Manual describes all
models and all standard and optional equip- ment of your vehicle available at the time of
publication of the Operator's Manual.
Country-specific differences are possible.
Please note that your vehicle may not be
equipped with all features described. This
also applies to safety-related systems and
functions.
i Read the information on qualified special-
ist workshops (Y page 29). Correct driver's seat position
G
WARNING
You could lose control of your vehicle if you do the following while driving:
R adjust the driver's seat, head restraint,
steering wheel or mirrors
R fasten the seat belt
There is a risk of an accident.
Adjust the driver's seat, head restraint, steer-
ing wheel and mirror and fasten your seat belt before starting the engine. X
Observe the safety guidelines on seat
adjustment (Y page 121).
X Check whether you have adjusted seat =
properly (Y page 122).
When adjusting the seat, make sure that:
R you are as far away from the driver's air bag
as possible
R you are sitting in a normal upright position
R you can fasten the seat belt properly
R you have moved the backrest to an almost
vertical position
R you have set the seat cushion angle so that
your thighs are gently supported
R you can depress the pedals properly
X Check whether the head restraint is adjus-
ted properly.
When doing so, make sure that you have
adjusted the head restraint so that the back of your head is supported at eye level by the center of the head restraint.
X Observe the safety guidelines on steering
wheel adjustment (Y page 137).
X Make sure that steering wheel :is adjus-
ted properly (Y page 137).
When adjusting the steering wheel, make
sure that:
R you can hold the steering wheel with your
arms slightly bent
R you can move your legs freely
R you can see all the displays in the instru-
ment cluster clearly
X Observe the safety guidelines for seat belts
(Y page 51).
X Check whether you have fastened seat
belt ;properly (Y page 54).
The seat belt should:
R fit snugly across your body
R be routed across the middle of your shoul-
der
R be routed in your pelvic area across the hip
joints 120
Correct driver's seat positionSeats, steering wheel and mirrors
Page 123 of 502

X
Before starting off, adjust the rear-view mir-
ror and the exterior mirrors in such a way
that you have a good view of road and traf-
fic conditions (Y page 141).
X Vehicles with a memory function: save
the seat, steering wheel and exterior mirror settings with the memory function
(Y page 144). Seats
Important safety notes
G
WARNING
Children could become trapped if they adjust the seats, particularly when unattended.
There is a risk of injury.
When leaving the vehicle, always take the
SmartKey with you and lock the vehicle. Never leave children unsupervised in the vehicle.
The seats can still be adjusted when there is
no SmartKey in the ignition lock. G
WARNING
You could lose control of your vehicle if you do the following while driving:
R adjust the driver's seat, head restraint,
steering wheel or mirrors
R fasten the seat belt
There is a risk of an accident.
Adjust the driver's seat, head restraint, steer-
ing wheel and mirror and fasten your seat belt before starting the engine. G
WARNING
If you adjust the seat height carelessly, you or other vehicle occupants could be trapped andthereby injured. Children in particular could
accidentally press the electrical seat adjust-
ment buttons and become trapped. There is a
risk of injury.
While moving the seats, make sure that your
hands or other body parts do not get under the
lever assembly of the seat adjustment sys-
tem. G
WARNING
When you adjust a seat, you or other vehicle
occupants could become trapped, e.g. on the seat guide rail. There is a risk of injury.
Make sure when adjusting a seat that no one
has any body parts in the sweep of the seat. G
WARNING
If head restraints are not installed and adjus-
ted correctly, they cannot provide protection
as intended. There is an increased risk of
injury in the head and neck area, e.g. in the
event of an accident or when braking.
Always drive with the head restraints instal-
led. Before driving off, make sure for every
vehicle occupant that the center of the head
restraint supports the back of the head at
about eye level. G
WARNING
The seat belt does not offer the intended level of protection if you have not moved the back-
rest to an almost vertical position. When brak-
ing or in the event of an accident, you could
slide underneath the seat belt and sustain
abdomen or neck injuries, for example. This
poses an increased risk of injury or even fatal injury.
Adjust the seat properly before beginning
your journey. Always ensure that the backrest
is in an almost vertical position and that the
shoulder section of your seat belt is routed
across the center of your shoulder.
! To avoid damage to the seats and the seat
heating, observe the following information:
R keep liquids from spilling on the seats. If
liquid is spilled on the seats, dry them as
soon as possible.
R if the seat covers are damp or wet, do not
switch on the seat heating. The seat
heating should also not be used to dry
the seats.
R clean the seat covers as recommended;
see "Interior care". Seats
121Seats, steering wheel and mirrors Z
Page 129 of 502

Adjusting the front-passenger seat
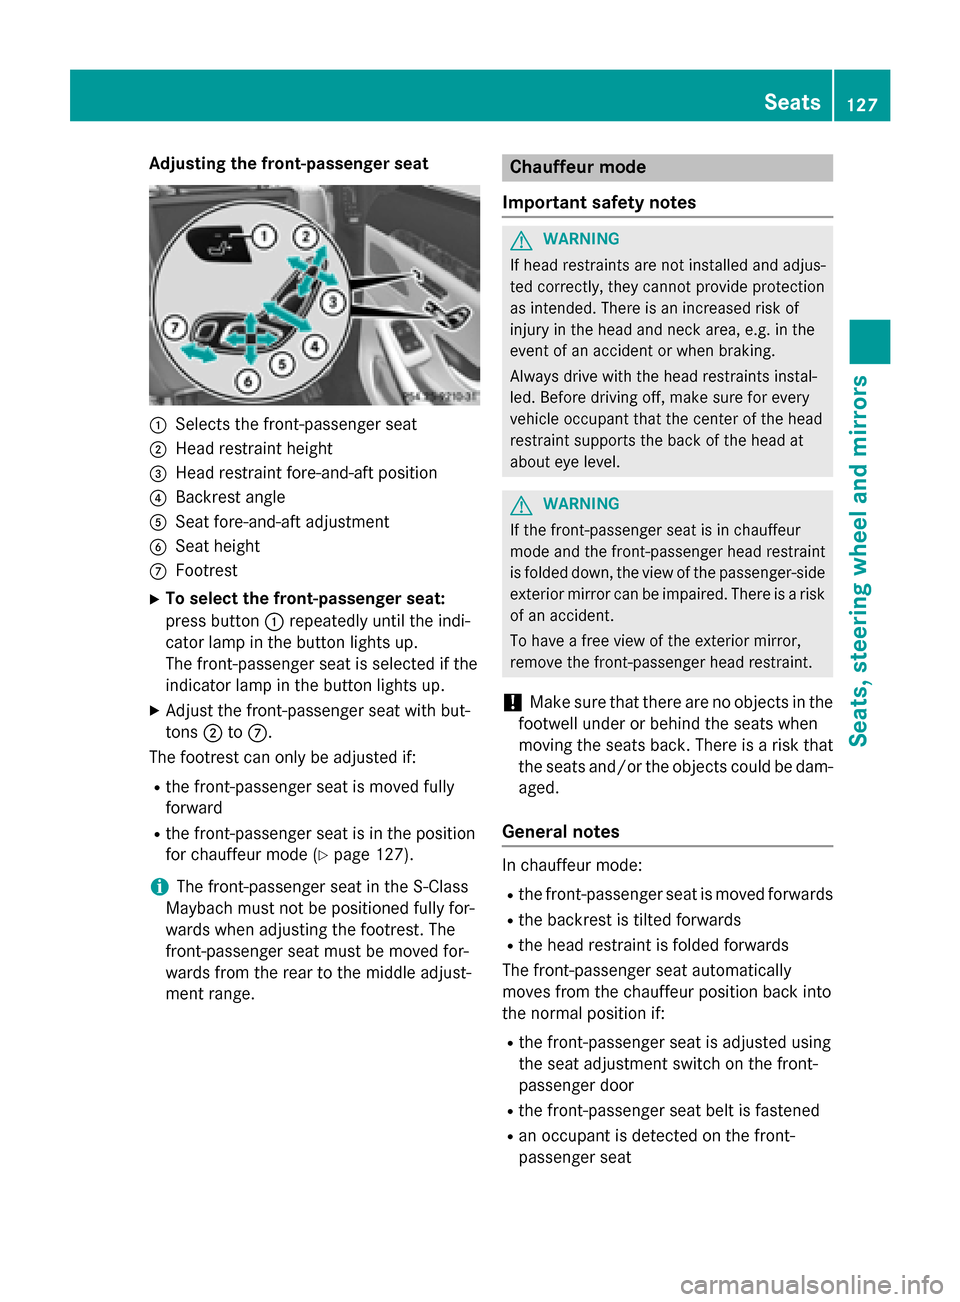
:
Selects the front-passenger seat
; Head restraint height
= Head restraint fore-and-aft position
? Backrest angle
A Seat fore-and-aft adjustment
B Seat height
C Footrest
X To select the front-passenger seat:
press button :repeatedly until the indi-
cator lamp in the button lights up.
The front-passenger seat is selected if the
indicator lamp in the button lights up.
X Adjust the front-passenger seat with but-
tons ;toC.
The footrest can only be adjusted if:
R the front-passenger seat is moved fully
forward
R the front-passenger seat is in the position
for chauffeur mode (Y page 127).
i The front-passenger seat in the S-Class
Maybach must not be positioned fully for-
wards when adjusting the footrest. The
front-passenger seat must be moved for-
wards from the rear to the middle adjust-
ment range. Chauffeur mode
Important safety notes G
WARNING
If head restraints are not installed and adjus-
ted correctly, they cannot provide protection
as intended. There is an increased risk of
injury in the head and neck area, e.g. in the
event of an accident or when braking.
Always drive with the head restraints instal-
led. Before driving off, make sure for every
vehicle occupant that the center of the head
restraint supports the back of the head at
about eye level. G
WARNING
If the front-passenger seat is in chauffeur
mode and the front-passenger head restraint
is folded down, the view of the passenger-side
exterior mirror can be impaired. There is a risk of an accident.
To have a free view of the exterior mirror,
remove the front-passenger head restraint.
! Make sure that there are no objects in the
footwell under or behind the seats when
moving the seats back. There is a risk that
the seats and/or the objects could be dam-
aged.
General notes In chauffeur mode:
R the front-passenger seat is moved forwards
R the backrest is tilted forwards
R the head restraint is folded forwards
The front-passenger seat automatically
moves from the chauffeur position back into
the normal position if:
R the front-passenger seat is adjusted using
the seat adjustment switch on the front-
passenger door
R the front-passenger seat belt is fastened
R an occupant is detected on the front-
passenger seat Seats
127Seats, steering wheel and mirrors Z
Page 130 of 502

R
the front-passenger seat head restraint is
inserted and the ignition is switched on
R the front-passenger seat backrest is moved
backwards or the seat is moved in a longi-
tudinal direction out of the chauffeur area
(Y page 130).
Positioning the front-passenger seat for
chauffeur mode General notes
Pay attention to the important safety notes
(Y
page 127). Adjust the seat for chauffeur
mode before the journey (Y page 128). Do not
remove the front-passenger seat head
restraint during the journey.
Adjusting from the rear compartment You can use the override button to disable
this function (Y page 75).
In order for the front-passenger seat to be
positioned in chauffeur mode:
R the SmartKey must be in the ignition lock
and in position 1or 2(Y page 189)
R the front-passenger seat may not be occu-
pied
R the front-passenger seat belt must not be
inserted into the buckle X
To select the front-passenger seat:
press button :repeatedly until the indi-
cator lamp in the button lights up.
The front-passenger seat is selected if the
indicator lamp in the button lights up.
X Press button ;forwards and hold it in this
position.
The seat moves forward.
The seat stops at the threshold of the area for chauffeur mode.
X Release button ;.
X Press and hold button ;again until the
front-passenger seat is in position for
chauffeur mode.
The head restraint on the front-passenger
seat folds forwards. The seat moves
forward.
The To
To view view the
theext.
ext. mirror,
mirror, adjust
adjust
front-passenger
front-passenger seat
seator
orremove
remove the
the
head
head restraint.
restraint. message appears in the
multifunction display (Y page 352).
i If the front-passenger seat is already at
the threshold to the area for the chauffeur
mode, the position for the chauffeur mode
is set immediately.
i The position for chauffeur mode can be
saved or set using the memory function of
the rear seat (Y page 145). For this the
indicator lamp on button :must be lit.
Adjusting from the driver's seat 128
SeatsSeats, steering
wheel and mirrors
Page 131 of 502

In order for the front-passenger seat to be
positioned in chauffeur mode:
R the SmartKey must be in the ignition lock
and in position 1or 2(Y page 189)
R the front-passenger seat may not be occu-
pied
R the front-passenger seat belt must not be
inserted into the buckle
X To select the front-passenger seat:
press button :repeatedly until the indi-
cator lamp in the button lights up.
The front-passenger seat is selected if the
indicator lamp in the button lights up.
X Press button ;forward and hold it.
The seat moves forward.
The seat stops at the threshold of the area for chauffeur mode.
X Release button ;.
X Press and hold button ;again until the
front-passenger seat is in position for
chauffeur mode.
The head restraint on the front-passenger
seat folds forwards. The seat moves
forward.
The To Toview
view the
theext.
ext. mirror,
mirror, adjust
adjust
front-passenger
front-passenger seat
seator
orremove
remove the
the
head
head restraint.
restraint. message appears in the
multifunction display (Y page 352).
i If the front-passenger seat is already at
the threshold to the area for the chauffeur
mode, the position for the chauffeur mode
is set immediately.
i The position for chauffeur mode cannot
be stored or set with the driver's seat mem-
ory function. Installing/removing the head restraint Removing
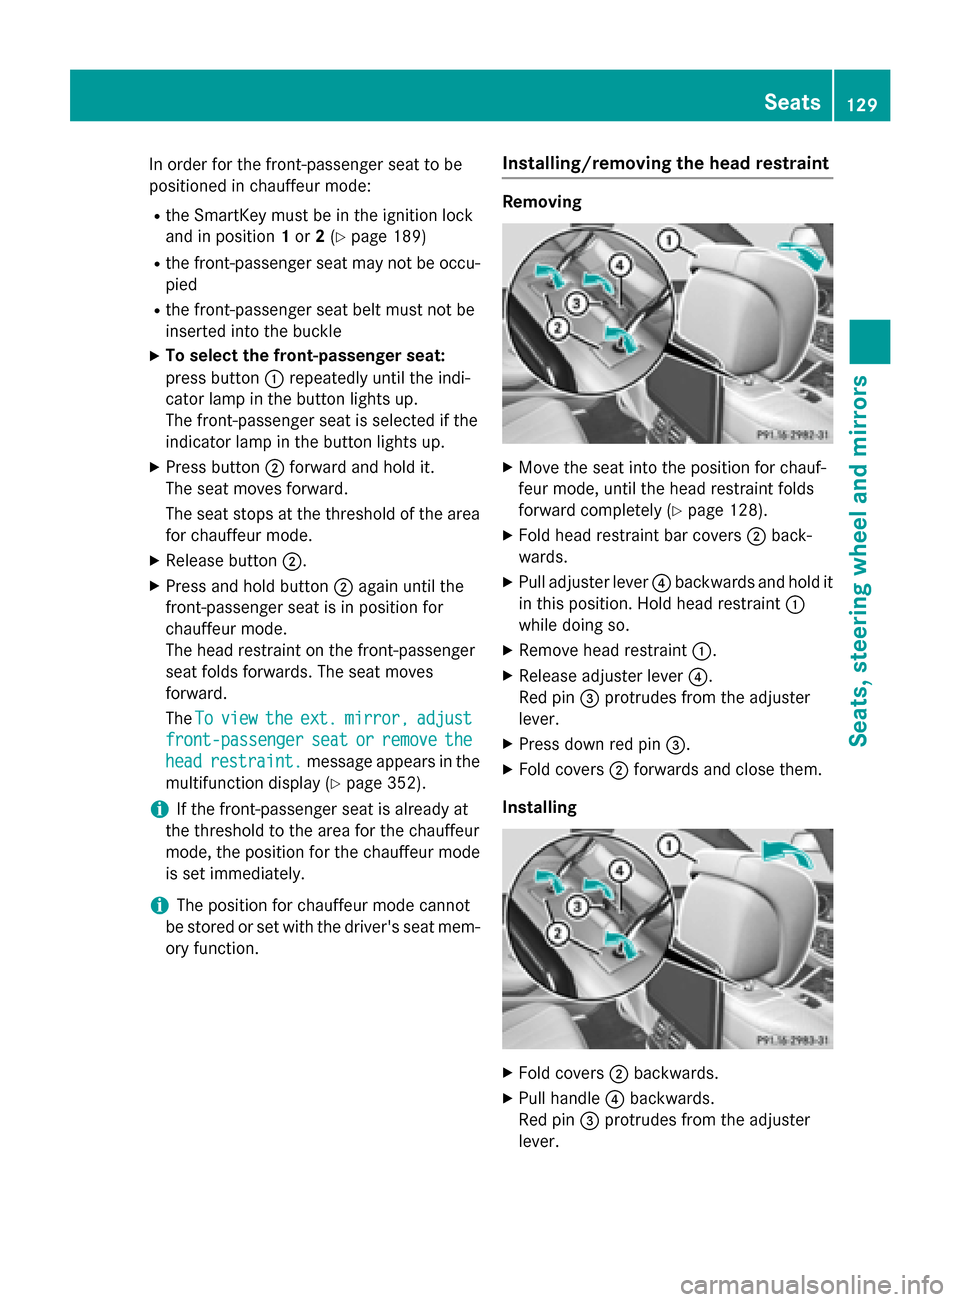
X
Move the seat into the position for chauf-
feur mode, until the head restraint folds
forward completely (Y page 128).
X Fold head restraint bar covers ;back-
wards.
X Pull adjuster lever ?backwards and hold it
in this position. Hold head restraint :
while doing so.
X Remove head restraint :.
X Release adjuster lever ?.
Red pin =protrudes from the adjuster
lever.
X Press down red pin =.
X Fold covers ;forwards and close them.
Installing X
Fold covers ;backwards.
X Pull handle ?backwards.
Red pin =protrudes from the adjuster
lever. Seats
129Seats, steering wheel and mirrors Z
Page 133 of 502

to the area for chauffeur mode. The head
restraint folds into position.
i Further settings are available via the
memory adjustment buttons if the front-
passenger seat has been selected with but- ton :.
Adjusting from the front-passenger seat X Press any seat adjustment button.
The front-passenger seat moves into the
normal adjustment range at the threshold
of the area for chauffeur mode. The head
restraint folds into position.
Fully reclined position of the front-
passenger seat Adjusting
This function is only available on vehicles with
electrically adjustable rear seats.
You can move the front-passenger seat into a fully reclined position. The rear seat and front-
passenger seat then provide a continuous
surface.
To do so:
R move the seat cushion of the rear seat as
far back as possible in a longitudinal direc-
tion (Y page 123)
R move the front-passenger seat into posi-
tion for chauffeur mode (Y page 128)
R remove the front-passenger seat head
restraint (Y page 129)
R move the front-passenger seat so that the
backrest is in a fully reclined position
(Y page 122)
Exiting
To exit the fully reclined position:
R fold the backrest upright to a suitable posi-
tion
R install the head restraint (Y page 129) Adjusting the head restraints
Adjusting the front head restraints Important safety notes
G
WARNING
You could lose control of your vehicle if you do the following while driving:
R adjust the driver's seat, head restraint,
steering wheel or mirrors
R fasten the seat belt
There is a risk of an accident.
Adjust the driver's seat, head restraint, steer-
ing wheel and mirror and fasten your seat belt before starting the engine. G
WARNING
If head restraints are not installed and adjus-
ted correctly, they cannot provide protection
as intended. There is an increased risk of
injury in the head and neck area, e.g. in the
event of an accident or when braking.
Always drive with the head restraints instal-
led. Before driving off, make sure for every
vehicle occupant that the center of the head
restraint supports the back of the head at
about eye level.
General notes
Pay attention to the important safety notes
(Y page 121).
Do not rotate the head restraints of the front
and rear seats. Otherwise, you cannot adjust
the height and angle of the head restraints to
the correct position. Seats
131Seats, steering wheel and mirrors Z
Page 136 of 502

The supplementary cushion is attached to the
head restraint by three press studs.
Installing the supplementary cushion:
X Position the head restraint as far forwards
as possible (Y page 123).
X Hold supplementary cushion ;against
the head restraint and push press studs :
into the counterpieces.
Removing the supplementary cushion: X Position the head restraint as far forwards
as possible (Y page 123).
X Release press studs :and remove sup-
plementary cushion ;.
Adjusting the rear center head
restraints Retracting and extending electrically
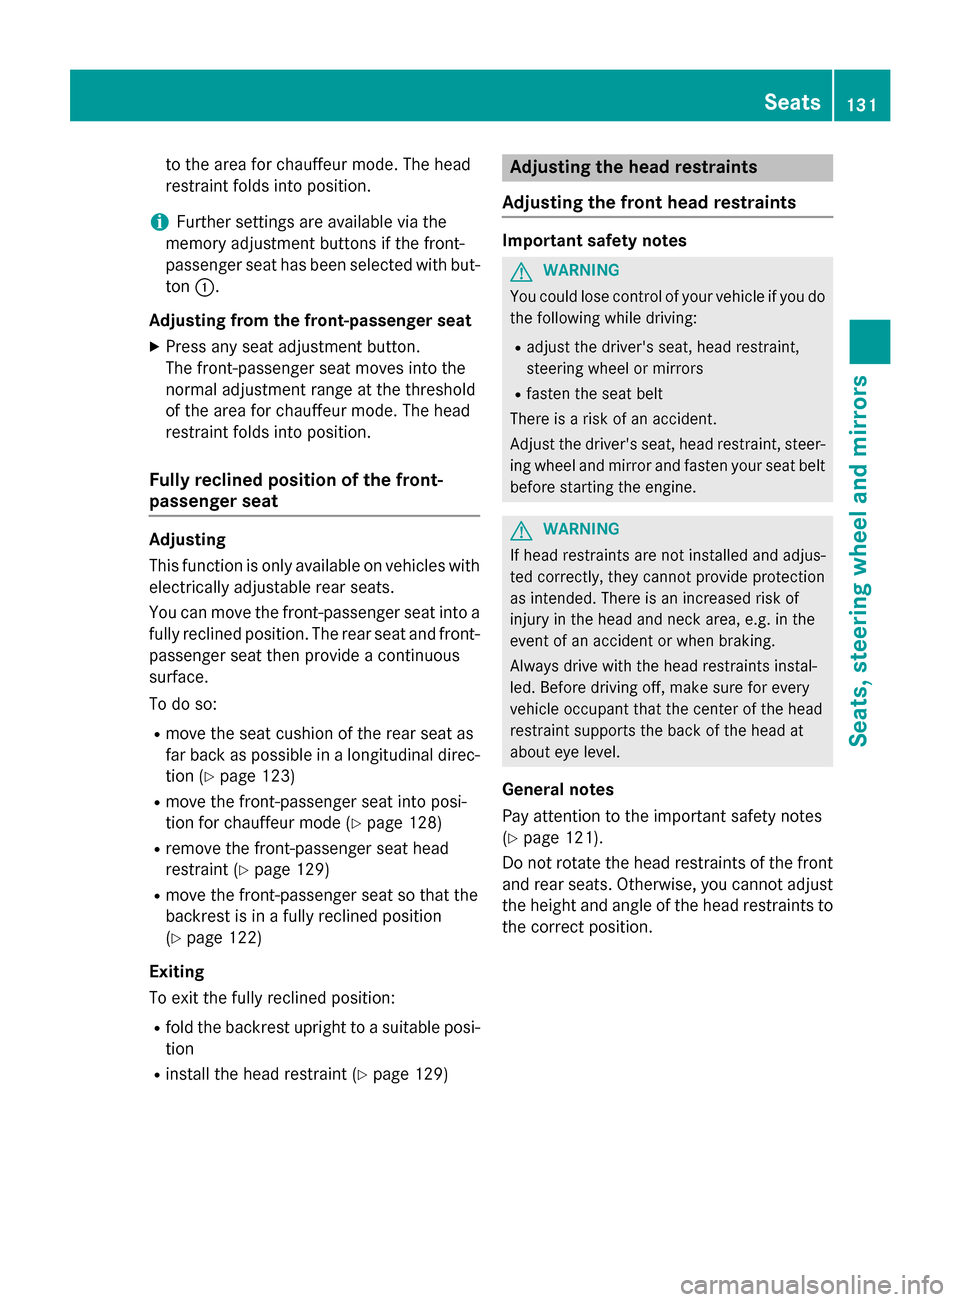
X
Press and hold button :until the head
restraint has fully extended or retracted.
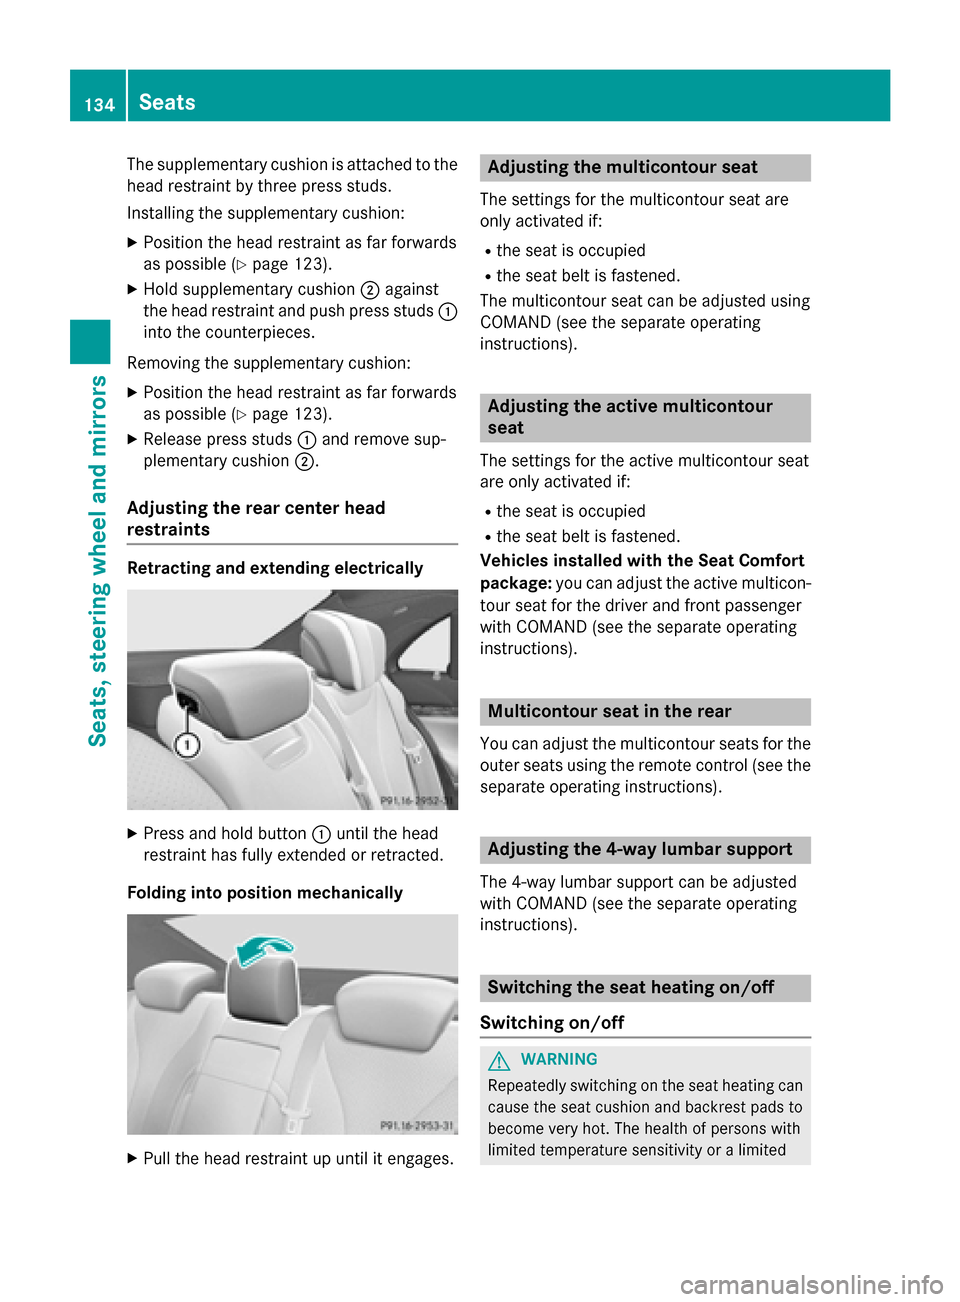
Folding into position mechanically X
Pull the head restraint up until it engages. Adjusting the multicontour seat
The settings for the multicontour seat are
only activated if:
R the seat is occupied
R the seat belt is fastened.
The multicontour seat can be adjusted using
COMAND (see the separate operating
instructions). Adjusting the active multicontour
seat
The settings for the active multicontour seat
are only activated if:
R the seat is occupied
R the seat belt is fastened.
Vehicles installed with the Seat Comfort
package: you can adjust the active multicon-
tour seat for the driver and front passenger
with COMAND (see the separate operating
instructions). Multicontour seat in the rear
You can adjust the multicontour seats for the
outer seats using the remote control (see the separate operating instructions). Adjusting the 4-way lumbar support
The 4-way lumbar support can be adjusted
with COMAND (see the separate operating
instructions). Switching the seat heating on/off
Switching on/off G
WARNING
Repeatedly switching on the seat heating can
cause the seat cushion and backrest pads to
become very hot. The health of persons with
limited temperature sensitivity or a limited 134
SeatsSeats, steering wheel and mirrors