2015 MERCEDES-BENZ S-Class reset
[x] Cancel search: resetPage 147 of 502
G
WARNING
Children could become trapped if they acti-
vate the memory function, particularly when
unattended. There is a risk of injury.
When leaving the vehicle, always take the
SmartKey with you and lock the vehicle. Never leave children unsupervised in the vehicle. General notes
The settings for the rear seat and the front-
passenger seat can be stored using the rear-
compartment memory function.
R If the indicator lamp in the vbutton is
not lit, store the rear seat settings.
R If the indicator lamp in the vbutton
lights up, store the front-passenger seat
and rear seat settings. Both the front-
passenger and rear seat are taken into
account with this setting. Depending on the equipment in the vehicle, two or three
memory positions can be stored for the
front-passenger and rear seats. Storing settings
General notes With the memory function in the rear, you can
store up to three different settings, e.g. for
three different people.
The following settings are stored as a single
memory preset:
R position of the seat, backrest and head
restraint
R multicontour seat: the seat cushions of the
backrest as well as the contour of the back- rest in the lumbar and shoulder regions
R seat heating: distribution of the heated sec-
tions of the seat cushion and backrest if the
indicator lamp in the vbutton is not lit. The following settings are stored to a memory
position, if the indicator lamp in the v
button lights up:
R position of the footrest for the front-
passenger seat, if available
R position of the screen, if available
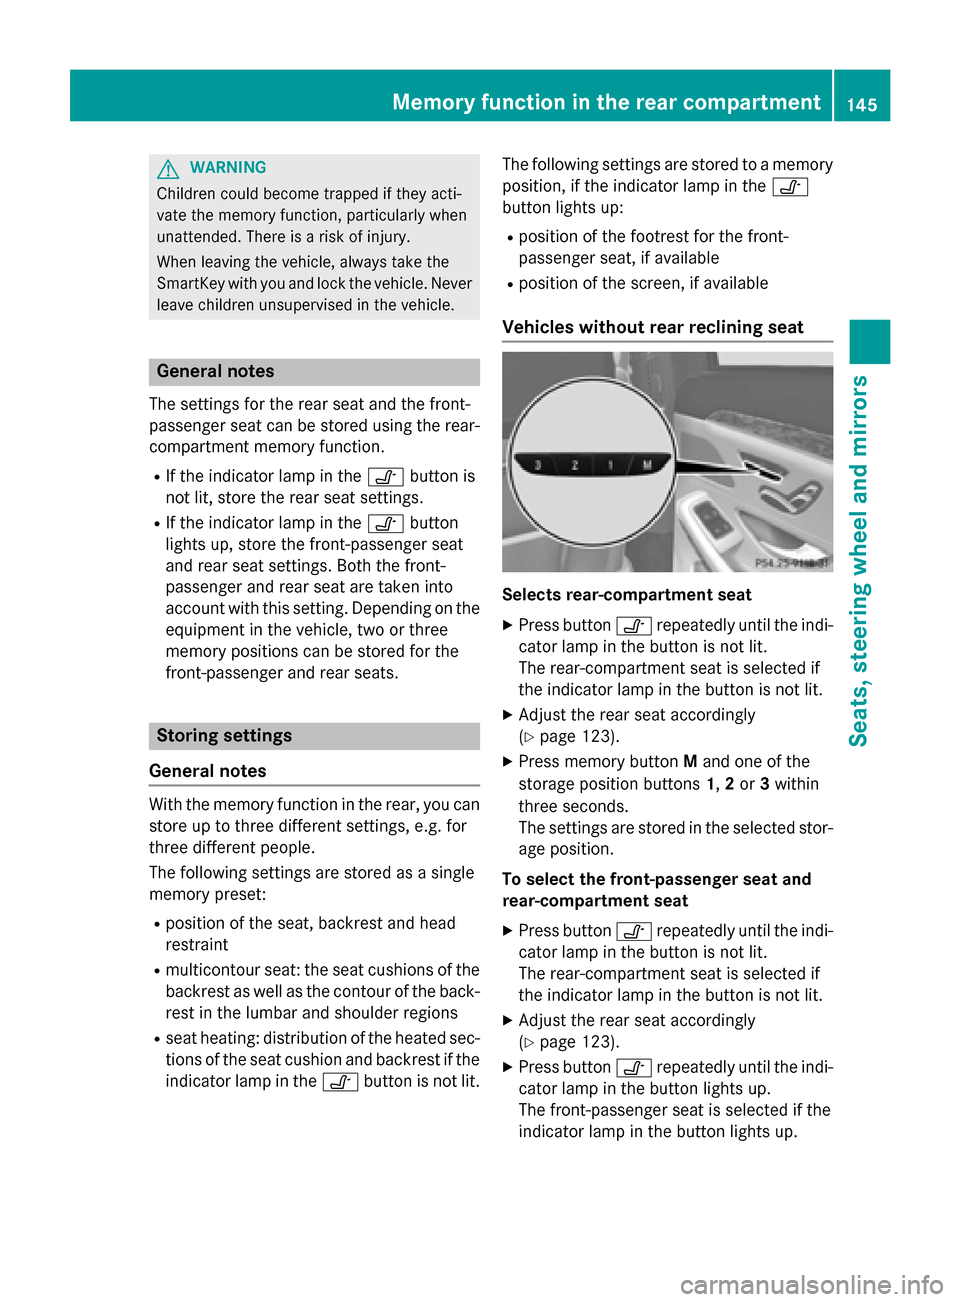
Vehicles without rear reclining seat Selects rear-compartment seat
X Press button vrepeatedly until the indi-
cator lamp in the button is not lit.
The rear-compartment seat is selected if
the indicator lamp in the button is not lit.
X Adjust the rear seat accordingly
(Y page 123).
X Press memory button Mand one of the
storage position buttons 1,2or 3within
three seconds.
The settings are stored in the selected stor- age position.
To select the front-passenger seat and
rear-compartment seat
X Press button vrepeatedly until the indi-
cator lamp in the button is not lit.
The rear-compartment seat is selected if
the indicator lamp in the button is not lit.
X Adjust the rear seat accordingly
(Y page 123).
X Press button vrepeatedly until the indi-
cator lamp in the button lights up.
The front-passenger seat is selected if the
indicator lamp in the button lights up. Memory function in the rear compartment
145Seats, steering wheel and mirrors Z
Page 216 of 502
Before charging the high-voltage battery,
check the maximum permissible charge cur-
rent for the relevant power socket.
X To adjust the setting: press button?
repeatedly until the desired setting is selec-
ted in display =.
R Two LEDs are flashing: minimum setting
R All LEDs are flashing: maximum setting
If, after the charging process, the charging
cable is:
R left connected to the power socket, the
currently selected values will be used for
the next charging process.
R removed from the power socket, the values
will be reset to the minimum setting for the next charging process. You may then need
to reset the values of the maximum charge current.
i If the vehicle requires more time than
usual when charging, check the maximum
charge current settings using the controls
on the charging cable or in the on-board
computer's menu.
Indicator lamp on the vehicle socket
When the indicator lamp on the vehicle
socket lights up, this means the following: Indicator
lamp
Ý Ý Flashes
slowly in
orange The connection between
the vehicle and the current
source is being established
before charging begins.
Flashes
slowly in
green The high-voltage battery is
being charged.
Flashes rap-
idly in red A malfunction has occurred
while charging. Indicator
lamp
Ý Ý Lights up
orange A charging break for the
high-voltage battery is tak-
ing place.
Lights up
green The high-voltage battery is
fully charged.
i
If the indicator lamp is off, lock or unlock
the vehicle with the SmartKey. The indica-
tor lamp will then display the current status
of the charging process.
i You can view the condition of charge of
the high-voltage battery in the multifunc-
tion display (see "Charging the high-voltage battery when stationary" in the "Energy
flow display" section (Y page 281)).
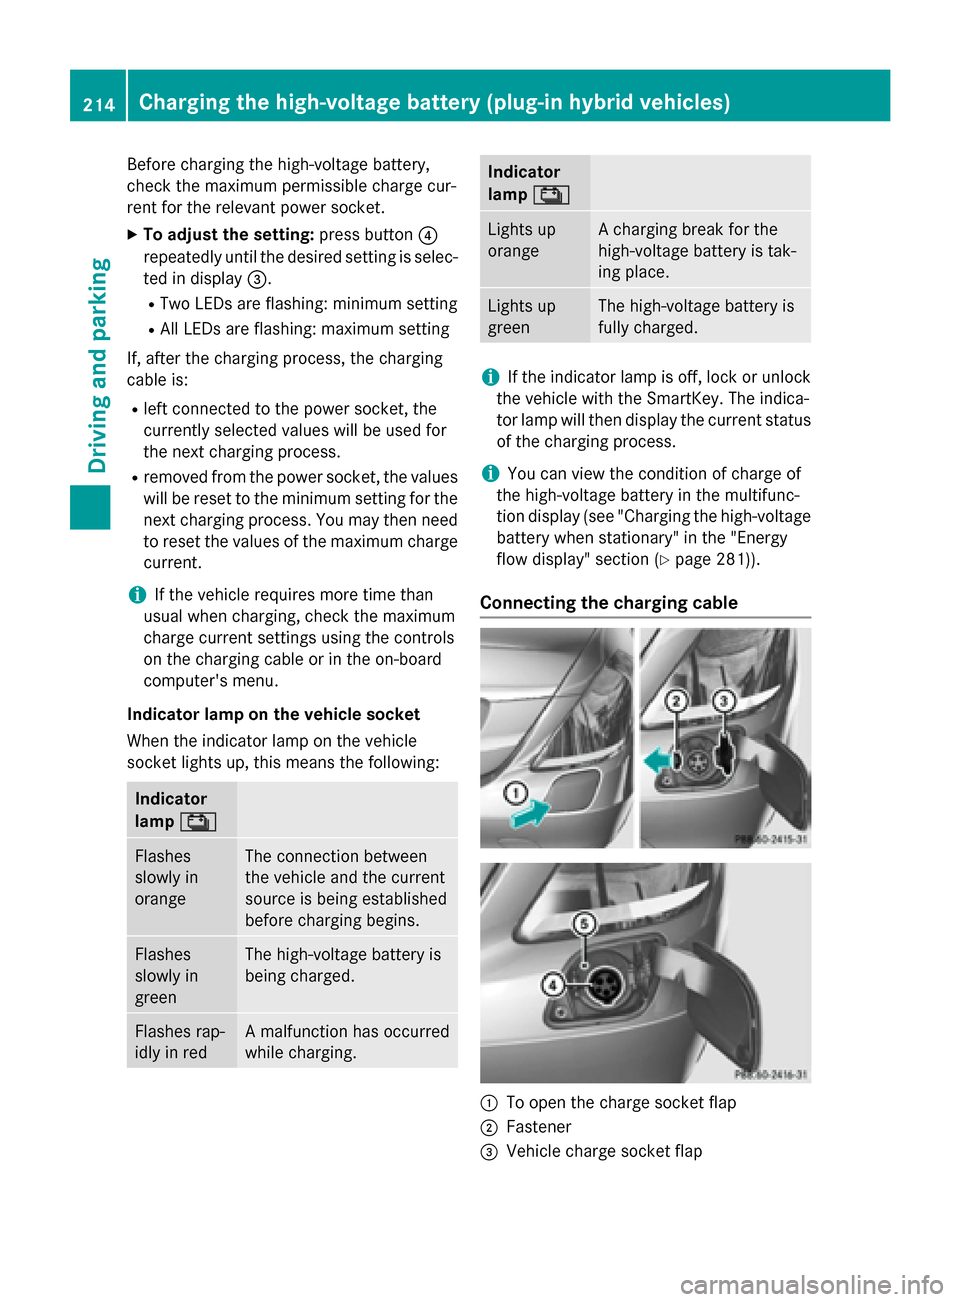
Connecting the charging cable :
To open the charge socket flap
; Fastener
= Vehicle charge socket flap 214
Charging the high-voltage battery (plug-in hybrid vehicles)Driving and parking
Page 222 of 502

code (VVC) issued by the Mercedes-Benz
Center after purchase. With this new
code you can set up the access to your
vehicle. This is described in the "Setting
up a personal area" section on the "Vehi-
cle Homepage". There, you may also
deactivate the existing access of the pre- vious owner.
Calling up functions in the "My
Mercedes Electric - Vehicle Homepage" The "Vehicle Homepage" allows you access to
vehicle information and your vehicle's func-
tions using remote query and remote config-
uration.
The following functions can be accessed via
the "Vehicle Homepage":
R request the current condition of charge of
the high-voltage battery
R program the departure time (Y page 310)
R set/activate the "Pre-entry climate control
at departure time" function (REMOTE CLI-
MATE CONTROL), (see the separate
COMAND operating instructions)
Information on additional functions and oper- ating instructions can be found on the "Vehi-
cle Homepage".
Connecting the vehicle to the Internet i
This function is not available in all coun-
tries and requires activated access to the
mbrace emergency call system.
i This function is only available if the vehi-
cle is equipped with a telephone module.
You can use the "Vehicle Homepage" if the
vehicle has a connection to the Internet via
the telephone module. The telephone module uses CDMA (Code Division Multiple Access)
and transmits the necessary data by radio.
The vehicle automatically recognizes whether a connection to the Internet via the telephone
module is possible or not. No presets are
necessary. i
Restrictions in reception are possible if
the vehicle is in an underground car park,
for example. Restrictions may also occur in areas with poor mobile network coverage.
To enable the transfer of data via the tele-
phone module, you do not need a SIM card. Parking
Important safety notes
G
WARNING
Flammable material such as leaves, grass or
twigs may ignite if they come into contact with hot parts of the exhaust system or exhaust
gas flow. There is a risk of fire.
Park the vehicle so that no flammable mate-
rials come into contact with parts of the vehi-cle which are hot. Take particular care not to
park on dry grassland or harvested grain
fields. G
WARNING
If you leave children unsupervised in the vehi- cle, they could set it in motion by, for example:
R release the parking brake.
R shift the automatic transmission out of the
parking position P.
R start the engine.
In addition, they may operate vehicle equip-
ment and become trapped. There is a risk of
an accident and injury.
When leaving the vehicle, always take the
SmartKey with you and lock the vehicle. Never
leave children unsupervised in the vehicle.
! Always secure the vehicle correctly
against rolling away. Otherwise, the vehicle
or its drivetrain could be damaged.
To ensure that the vehicle is secured against rolling away unintentionally:
R the electric parking brake must be applied.
R the transmission must be in position Pand
the SmartKey must be removed from the
ignition lock. 220
ParkingDriving and parking
Page 227 of 502
regular intervals and in accordance with the
Mercedes-Benz service requirements. Details
can be found in the Maintenance Booklet. ECO display
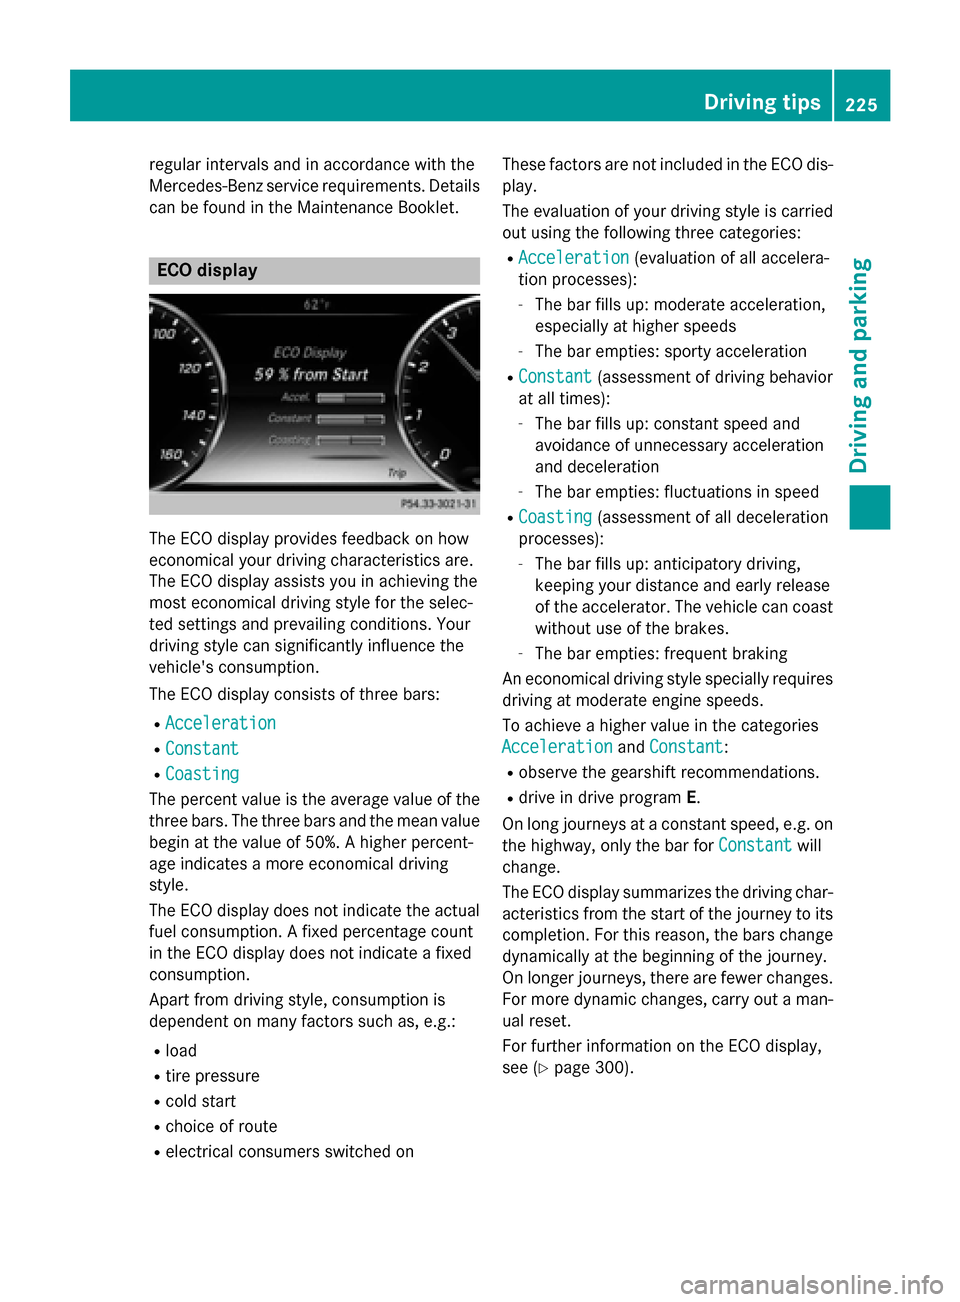
The ECO display provides feedback on how
economical your driving characteristics are.
The ECO display assists you in achieving the
most economical driving style for the selec-
ted settings and prevailing conditions. Your
driving style can significantly influence the
vehicle's consumption.
The ECO display consists of three bars:
R Acceleration
Acceleration
R Constant Constant
R Coasting
Coasting
The percent value is the average value of the three bars. The three bars and the mean value
begin at the value of 50%. A higher percent-
age indicates a more economical driving
style.
The ECO display does not indicate the actual fuel consumption. A fixed percentage count
in the ECO display does not indicate a fixed
consumption.
Apart from driving style, consumption is
dependent on many factors such as, e.g.:
R load
R tire pressure
R cold start
R choice of route
R electrical consumers switched on These factors are not included in the ECO dis-
play.
The evaluation of your driving style is carried
out using the following three categories:
R Acceleration
Acceleration (evaluation of all accelera-
tion processes):
- The bar fills up: moderate acceleration,
especially at higher speeds
- The bar empties: sporty acceleration
R Constant
Constant (assessment of driving behavior
at all times):
- The bar fills up: constant speed and
avoidance of unnecessary acceleration
and deceleration
- The bar empties: fluctuations in speed
R Coasting Coasting (assessment of all deceleration
processes):
- The bar fills up: anticipatory driving,
keeping your distance and early release
of the accelerator. The vehicle can coast
without use of the brakes.
- The bar empties: frequent braking
An economical driving style specially requires driving at moderate engine speeds.
To achieve a higher value in the categories
Acceleration
Acceleration andConstant Constant :
R observe the gearshift recommendations.
R drive in drive program E.
On long journeys at a constant speed, e.g. on
the highway, only the bar for Constant
Constantwill
change.
The ECO display summarizes the driving char- acteristics from the start of the journey to its completion. For this reason, the bars change
dynamically at the beginning of the journey.
On longer journeys, there are fewer changes. For more dynamic changes, carry out a man- ual reset.
For further information on the ECO display,
see (Y page 300). Driving tips
225Driving and parking Z
Page 267 of 502

recognize them at all. The system is not a
substitute for a well-rested and attentive
driver.
The functionality of ATTENTION ASSIST is
restricted and warnings may be delayed or
not occur at all:
R if the length of the journey is less than
approximately 30 minutes
R if the road condition is poor, e.g. if the sur-
face is uneven or if there are potholes
R if there is a strong side wind
R if you have adopted a sporty driving style
with high cornering speeds or high rates of
acceleration
R if you are predominantly driving slower
than 37 mph (60 km/h) or faster than
125 mph (200 km/h)
R if you are driving with the active Steer
Assist of DISTRONIC PLUS
R if the time has been set incorrectly
R in active driving situations, such as when
you change lanes or change your speed
ATTENTION ASSIST is reset when you con-
tinue your journey and starts assessing your
tiredness again if:
R you switch off the engine.
R you take off your seat belt and open the
driver's door, e.g. for a change of drivers or
to take a break.
Displaying the attention level You can have current status information dis-
played in the assistance menu (Y page 308)
of the on-board computer. X
Select the Assistance display for Attention
Assist using the on-board computer
(Y page 307).
The following information is displayed: R length of the journey since the last break.
R the attention level determined by ATTEN-
TION ASSIST, displayed in a bar display in
five levels from high to low.
R if ATTENTION ASSIST is unable to calculate
the attention level and cannot output a
warning, the System Passive
System Passive message
appears. The bar display then changes the
display, e.g. if you are driving at a speed
below 37 mph (60 km/h) or above 124 mph
(200 km/h).
Activating ATTENTION ASSIST X
Activate ATTENTION ASSIST using the on-
board computer (Y page 310).
The system determines the attention level
of the driver depending on the setting
selected:
Standard selected: the sensitivity with
which the system determines the attention
level is set to normal.
Sensitive selected: the sensitivity is set
higher. The attention level detected by Atten- tion Assist is adapted accordingly and the
driver is warned earlier.
When ATTENTION ASSIST is deactivated, the é symbol appears in the multifunction
display in the assistance graphic display.
When ATTENTION ASSIST has been deactiva- ted, it is automatically reactivated after the
engine has been stopped. The sensitivity
selected corresponds to the last selection
activated (standard/sensitive).
Warning in the multifunction display If fatigue or increasing lapses in concentra-
tion are detected, a warning appears in the
multifunction display:
Attention Assist: Attention Assist:
Take a break!
Take a break! Driving systems
265Driving and parking Z
Page 287 of 502
Displaying fuel consumption and generated electricity
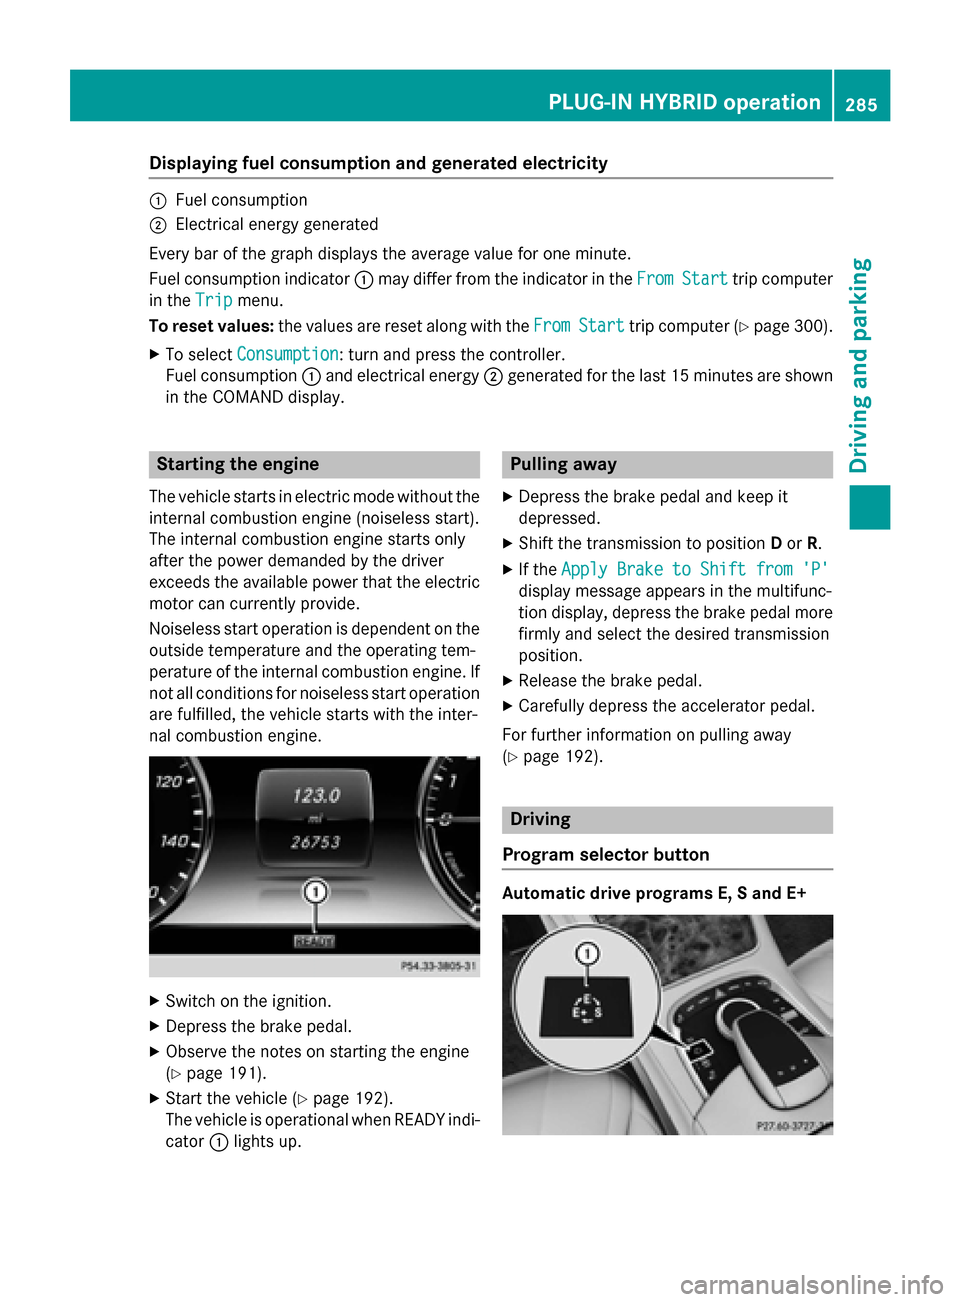
:
Fuel consumption
; Electrical energy generated
Every bar of the graph displays the average value for one minute.
Fuel consumption indicator :may differ from the indicator in the From
FromStart
Start trip computer
in the Trip
Trip menu.
To reset values: the values are reset along with the From
FromStart
Start trip computer (Y page 300).
X To select Consumption
Consumption: turn and press the controller.
Fuel consumption :and electrical energy ;generated for the last 15 minutes are shown
in the COMAND display. Starting the engine
The vehicle starts in electric mode without the
internal combustion engine (noiseless start).
The internal combustion engine starts only
after the power demanded by the driver
exceeds the available power that the electric motor can currently provide.
Noiseless start operation is dependent on the
outside temperature and the operating tem-
perature of the internal combustion engine. If
not all conditions for noiseless start operation are fulfilled, the vehicle starts with the inter-
nal combustion engine. X
Switch on the ignition.
X Depress the brake pedal.
X Observe the notes on starting the engine
(Y page 191).
X Start the vehicle (Y page 192).
The vehicle is operational when READY indi-
cator :lights up. Pulling away
X Depress the brake pedal and keep it
depressed.
X Shift the transmission to position Dor R.
X If the Apply Brake to Shift from 'P' Apply Brake to Shift from 'P'
display message appears in the multifunc-
tion display, depress the brake pedal more firmly and select the desired transmission
position.
X Release the brake pedal.
X Carefully depress the accelerator pedal.
For further information on pulling away
(Y page 192). Driving
Program selector button Automatic drive programs E, S and E+ PLUG-IN HYBRID ope
ration
285Driving an d parking Z
Page 302 of 502
depends on the engine installed and is
therefore not available in all vehicles.
PLUG-IN HYBRID vehicles: information on
total range and electric range can be found in
the "PLUG-IN HYBRID drive" section
(Y page 284).
ECO display The ECO display is not available for AMG vehi-
cles.
X Use ò on the steering wheel to call up
the list of menus.
X Press the :or9 button on the steer-
ing wheel to select the Trip
Trip menu.
X Confirm by pressing aon the steering
wheel.
X Press :or9 to select ECO ECODisplay
Display.
If the ignition remains switched off for longer than four hours, the ECO display will be auto-
matically reset.
For further information on the ECO display,
see (Y page 225). Trip computer "From Start" or "From
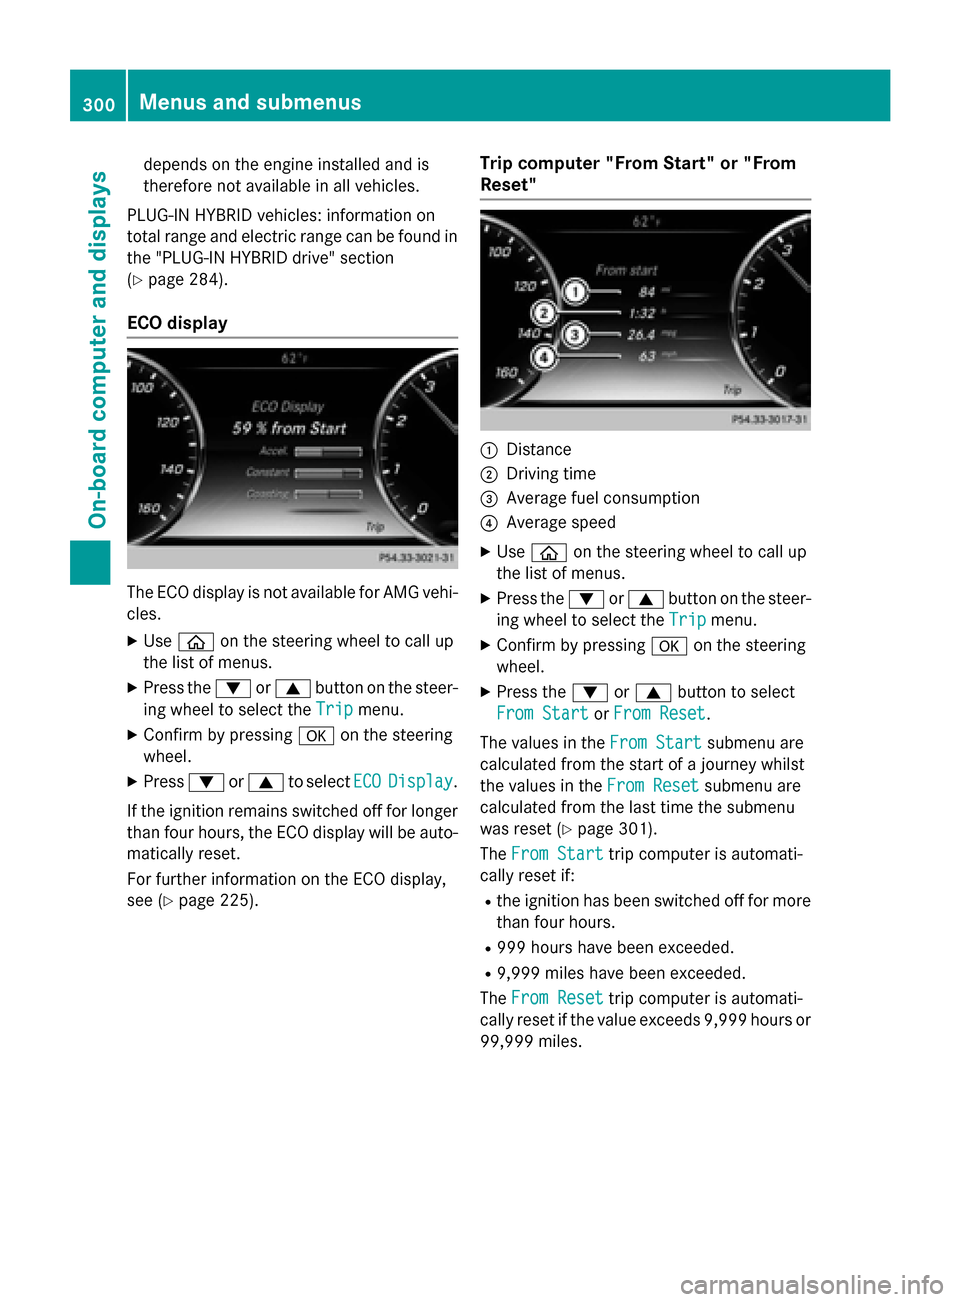
Reset" :
Distance
; Driving time
= Average fuel consumption
? Average speed
X Use ò on the steering wheel to call up
the list of menus.
X Press the :or9 button on the steer-
ing wheel to select the Trip Tripmenu.
X Confirm by pressing aon the steering
wheel.
X Press the :or9 button to select
From Start
From Start orFrom Reset
From Reset.
The values in the From Start
From Start submenu are
calculated from the start of a journey whilst
the values in the From Reset From Resetsubmenu are
calculated from the last time the submenu
was reset (Y page 301).
The From Start
From Start trip computer is automati-
cally reset if:
R the ignition has been switched off for more
than four hours.
R 999 hours have been exceeded.
R 9,999 miles have been exceeded.
The From Reset
From Reset trip computer is automati-
cally reset if the value exceeds 9,999 hours or
99,999 miles. 300
Menus and submenusOn-board computer and displays
Page 303 of 502

Digital speedometer
X
Use ò on the steering wheel to call up
the list of menus.
X Press the :or9 button on the steer-
ing wheel to select the Trip
Trip menu.
X Confirm by pressing aon the steering
wheel.
X Press the :or9 button to select the
digital speedometer.
Resetting values X
Use ò on the steering wheel to call up
the list of menus.
X Press the :or9 button on the steer-
ing wheel to select the Trip
Tripmenu.
X Confirm by pressing aon the steering
wheel.
X Press the :or9 button to select the
function that you wish to reset.
X Press the abutton.
X Press the :button to select Yes
Yes and
press the abutton to confirm. You can reset the values of the following func-
tions:
R Trip odometer
R "From Start" trip computer
R "From Reset" trip computer
R ECO display
If you reset the values in the ECO display, the
values in the "From start" trip computer are
also reset. If you reset the values in the "From start" trip computer, the values in the ECO
display are also reset. Navigation system menu
Displaying navigation instructions In the
Navi Navimenu, the multifunction display
shows navigation instructions. You can find
further information on navigation in the sep-
arate COMAND operating instructions.
X Switch on COMAND (see the separate
operating instructions).
X Use ò on the steering wheel to call up
the list of menus.
X Press the :or9 button on the steer-
ing wheel to select the Navi
Navi menu.
X Confirm by pressing aon the steering
wheel.
Route guidance not active :
Direction of travel
; Current road Menus and submenus
301On-boardcompu ter and displays Z